Key Management
Introduction
After setting up your node environment as shown in the Setup section, you'll need to configure multiple keys for your validator to operate properly. This includes setting up session keys, which are essential for participating in the consensus process, and configuring a node key that maintains a stable network identity. This guide walks you through the key management process, showing you how to generate, store, and register these keys.
Set Session Keys
Setting up your validator's session keys is essential to associate your node with your stash account on the Polkadot network. Validators use session keys to participate in the consensus process. Your validator can only perform its role in the network by properly setting session keys which consist of several key pairs for different parts of the protocol (e.g., GRANDPA, BABE). These keys must be registered on-chain and associated with your validator node to ensure it can participate in validating blocks.
Breaking change in runtime 2.2.0
Starting with runtime 2.2.0, session key generation uses the new author_rotateKeysWithOwner RPC, which requires your stash account as a parameter and returns both the session keys and a cryptographic proof of ownership. This proof must be included when submitting set_keys. The previous author_rotateKeys RPC and the Subkey approach are no longer supported for new key generation. If your validator already has session keys set on-chain and you are not rotating them, no action is required. These changes can already be tested on Westend and are expected to go live on Kusama and Polkadot in a future upgrade.
Until runtime 2.2.0 is live on your target network, use the legacy author_rotateKeys RPC and pass 0x00 as the proof when submitting setKeys. See the Pre-2.2.0 (Legacy) tab below.
Generate Session Keys
Generate session keys by running the following command on your validator node, replacing INSERT_STASH_ACCOUNT_ID with your validator's stash account ID:
curl -H "Content-Type: application/json" \
-d '{"id":1, "jsonrpc":"2.0", "method": "author_rotateKeysWithOwner", "params":["INSERT_STASH_ACCOUNT_ID"]}' \
http://localhost:9944
This command returns a JSON object with two fields in the result: keys (the hex-encoded session keys) and proof (the ownership proof). Save both values for later use.
{
  "jsonrpc": "2.0",
  "result": {
    "keys": "0xda3861a45e0197f3ca145c2c209f9126e5053fas503e459af4255cf8011d51010",
    "proof": "0x1a2b3c4d5e6f..."
  },
  "id": 1
}
Subkey is no longer supported for session key generation
Previously, validators could generate session keys externally using subkey and manually insert them into the node's keystore. This approach is no longer viable because set_keys now requires a cryptographic proof of ownership — each private session key must sign the stash account ID. The only way to obtain this proof is through author_rotateKeysWithOwner, which handles key generation, keystore insertion, and proof generation in a single step. Validators who previously relied on subkey for session key generation should migrate to using author_rotateKeysWithOwner as described above.
No RPC to generate proof for existing keys
There is currently no RPC endpoint to generate an ownership proof for session keys that are already in the node's keystore. To obtain a valid proof, you must rotate to new keys using author_rotateKeysWithOwner. Support for generating proofs from existing keys may be added in a future release.
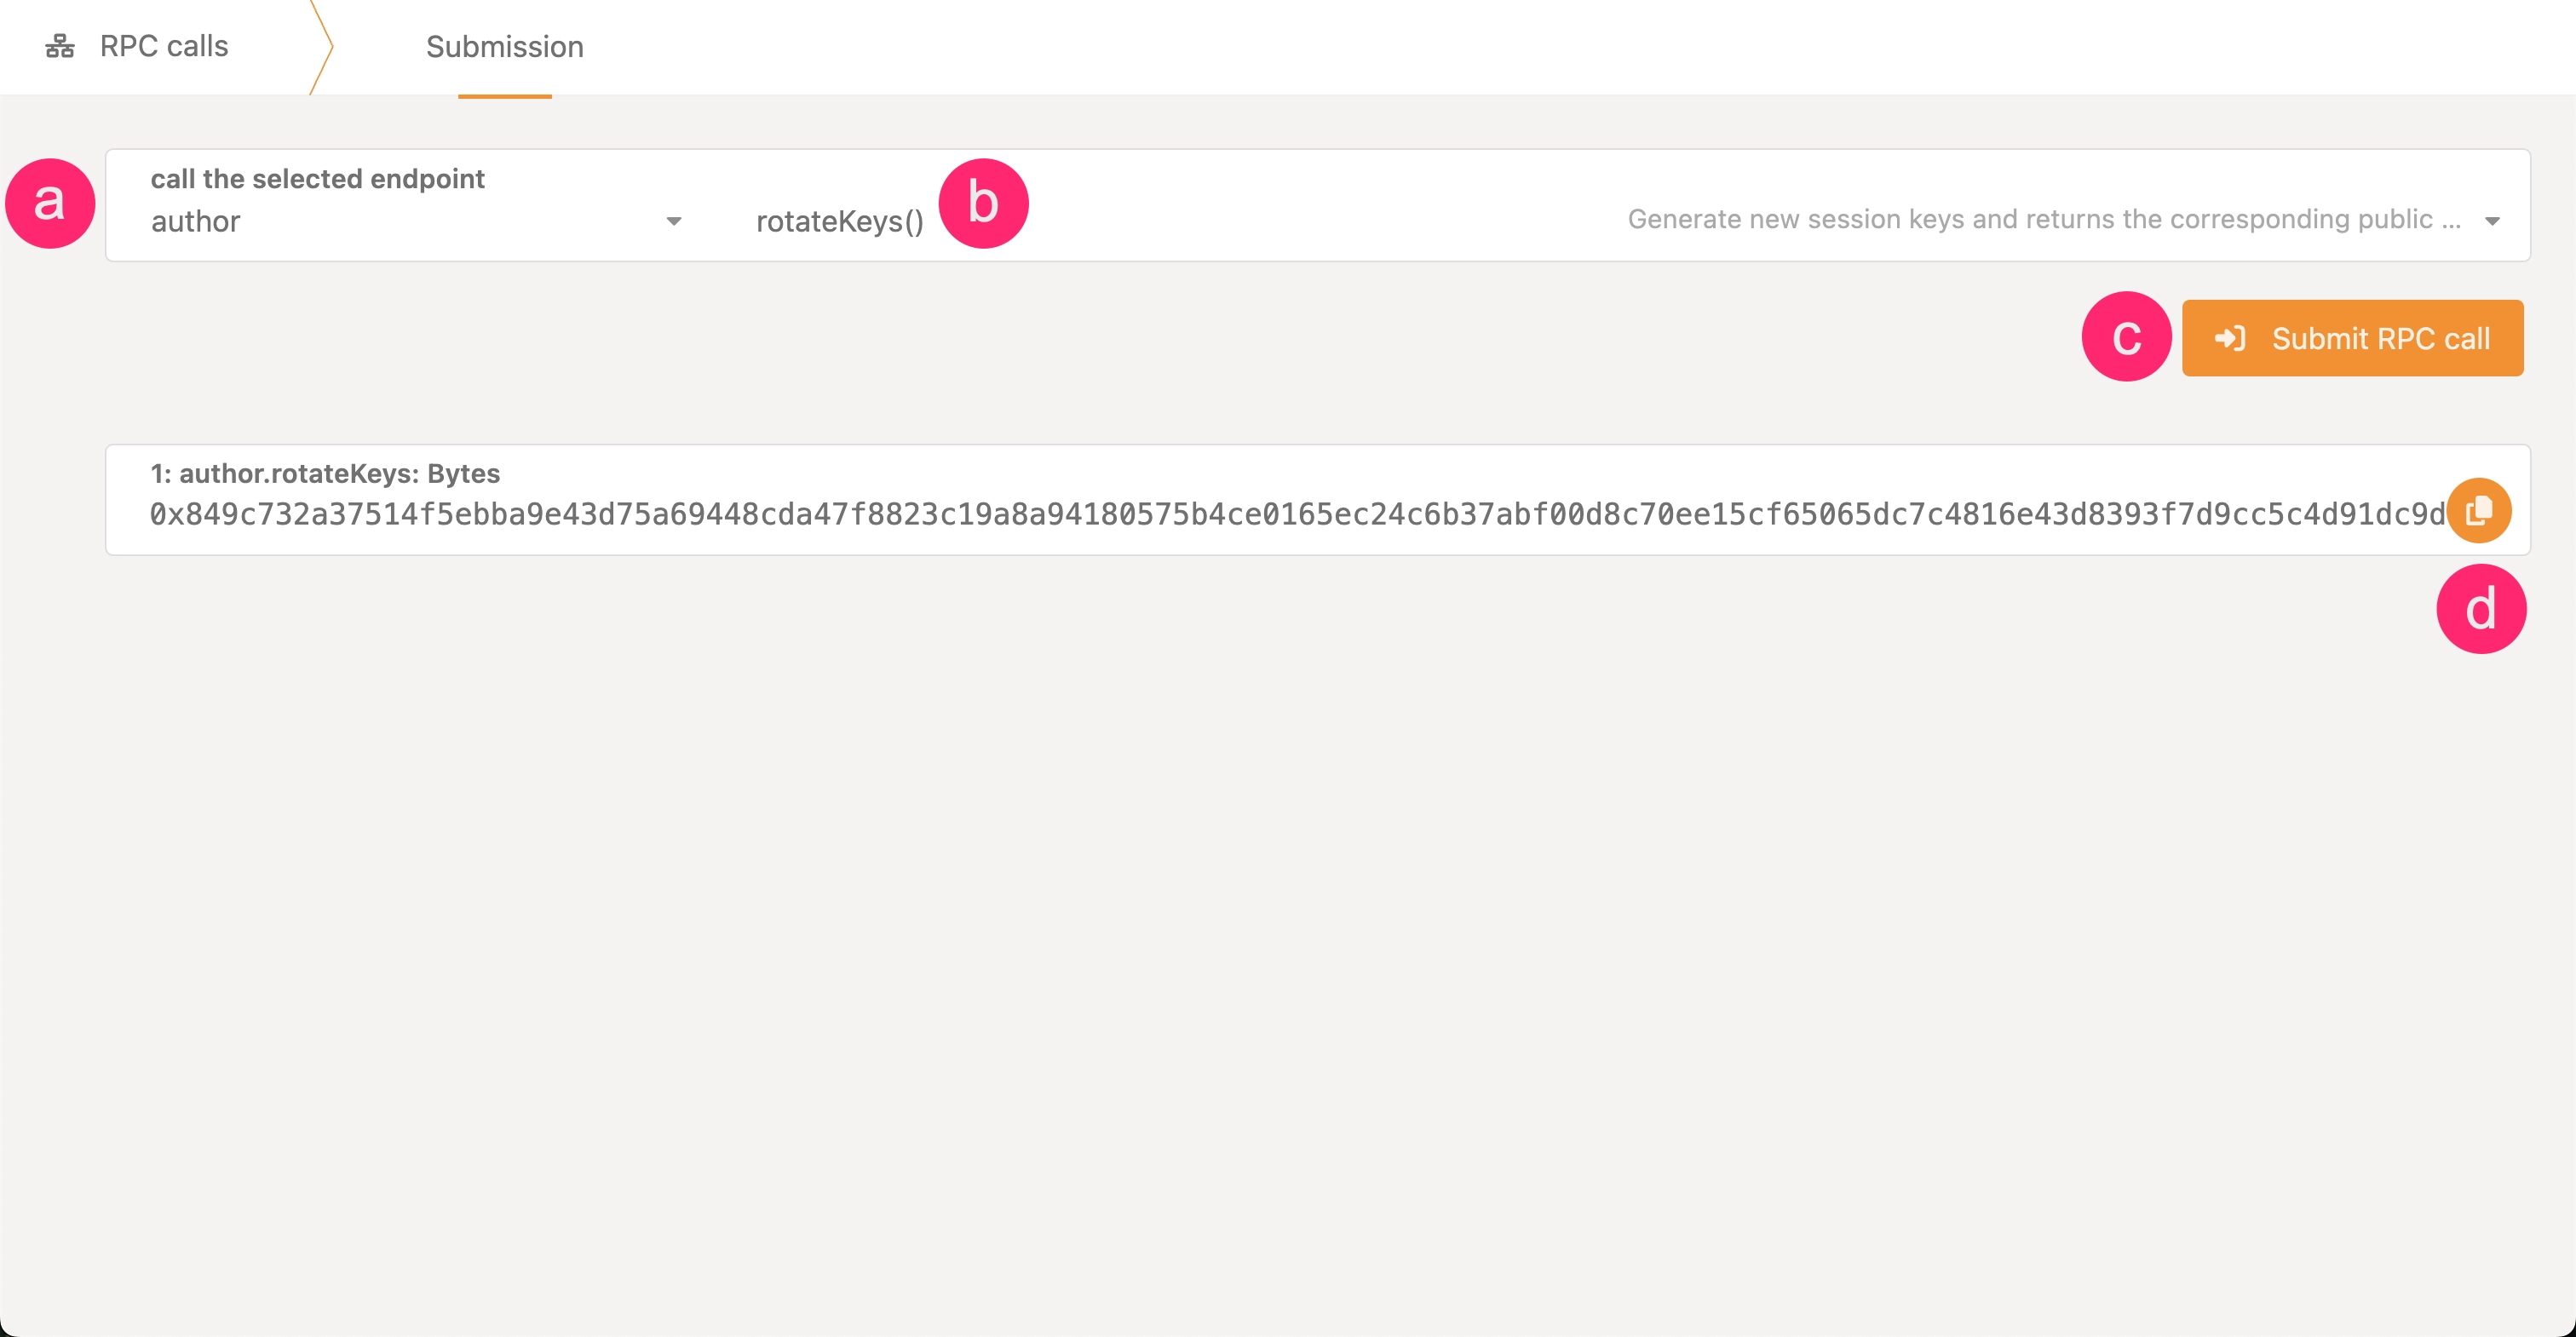
If runtime 2.2.0 is not yet live on your target network (Kusama or Polkadot), there are multiple ways to create the session keys. It can be done by interacting with the Polkadot.js Apps UI, using the curl command, or by using Subkey.
-
In Polkadot.js Apps, connect to your local node, navigate to the Developer dropdown, and select the RPC Calls option.
-
Construct an
author_rotateKeysRPC call and execute it:- Select the author endpoint.
- Choose the rotateKeys() call.
- Click the Submit RPC Call button.
- Copy the hex-encoded public key from the response.
Generate session keys by running the following command on your validator node:
curl -H "Content-Type: application/json" \
-d '{"id":1, "jsonrpc":"2.0", "method": "author_rotateKeys", "params":[]}' \
http://localhost:9944
This command will return a JSON object. The result key is the hex-encoded public part of the newly created session key. Save this for later use.
To create a keypair for your node's session keys, use the subkey generate command. This generates a set of cryptographic keys that must be stored in your node's keystore directory.
When you run the command, it produces output similar to this example:
Secret phrase:       twist buffalo mixture excess device drastic vague mammal fitness punch match hammer
  Network ID:        substrate
  Secret seed:       0x5faa9e5defe42b201388d5c2b8202d6625a344abc9aa52943a71f12cb90b88a9
  Public key (hex):  0x28cc2fdb6e28835e2bbac9a16feb65c23d448c9314ef12fe083b61bab8fc2755
  Account ID:        0x28cc2fdb6e28835e2bbac9a16feb65c23d448c9314ef12fe083b61bab8fc2755
  Public key (SS58): 5CzCRpXzHYhuo6G3gYFR3cgV6X3qCNwVt51m8q14ZcChsSXQ
  SS58 Address:      5CzCRpXzHYhuo6G3gYFR3cgV6X3qCNwVt51m8q14ZcChsSXQ
To properly store these keys, create a file in your keystore directory with a specific naming convention. The filename must consist of the hex string 61757261 (which represents "aura" in hex) followed by the public key without its 0x prefix.
Using the example above, you would create a file named:
And store only the secret phrase in the file:
When submitting setKeys, use 0x00 as the proof parameter.
Save your session key output immediately
Calling author_rotateKeys or author_rotateKeysWithOwner generates new keys every time — it does not return previously generated keys. If you lose the output, there is no way to retrieve it. You will need to call the RPC again, which generates a fresh set of keys, and then re-submit setKeys with the new result.
Submit Transaction to Set Keys
After generating your session keys (and proof, if using runtime 2.2.0+), you must submit them on-chain. There are two paths for submitting session keys:
The recommended approach is to use the stakingRcClient.set_keys extrinsic on Polkadot Hub. This path is required for validators using pure proxy stash accounts or Staking Operator proxies.
- In Polkadot.js Apps, connect to Polkadot Hub (Asset Hub).
- Navigate to Developer > Extrinsics.
- Select your stash account (or submit via proxy).
- Choose the stakingRcClient pallet and the setKeys extrinsic.
- Enter the following parameters:
keys: The session keys hex string returned byauthor_rotateKeysWithOwner.proof: The proof hex string returned byauthor_rotateKeysWithOwner.maxDeliveryAndRemoteExecutionFee: Optional maximum fee for the XCM message to the relay chain. Can be left asNone.
- Submit and sign the transaction.
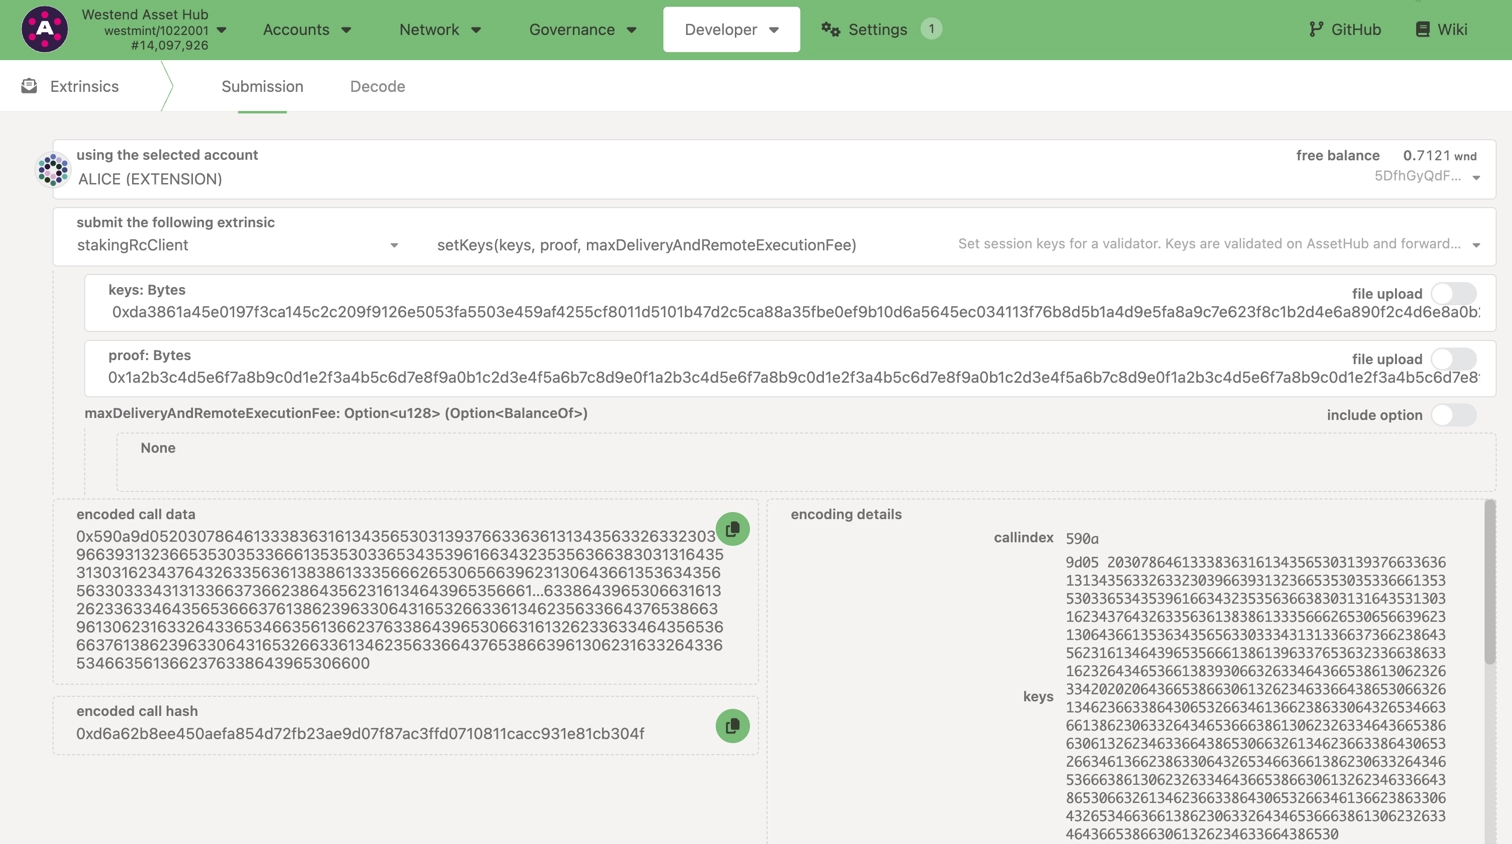
Polkadot Hub validates the proof locally and forwards the keys to the relay chain via XCM.
- Go to Polkadot.js Apps and connect to Polkadot Hub.
- Navigate to Developer > Extrinsics.
- Select the account that controls your validator (your stash or proxy account).
- Choose the stakingRcClient pallet and the setKeys extrinsic.
- Paste the hex-encoded session key string returned by
author_rotateKeysinto the keys field. - Set the proof field to
0x(empty proof). - Submit the transaction.
Note
Setting session keys on Polkadot Hub requires a deposit of approximately 60 DOT (or ~2 KSM on Kusama). This deposit is only released when you call stakingRcClient.purgeKeys on Polkadot Hub — purging keys via the relay chain (session.purgeKeys) does not release this deposit.
You can also submit session keys directly on the relay chain using session.setKeys. This path will be removed in a future runtime upgrade (see polkadot-fellows/runtimes#1212). Migrate to the Polkadot Hub path above.
- In Polkadot.js Apps, connect to the relay chain.
- Navigate to Developer > Extrinsics.
- Select your stash account.
- Choose the session pallet and the setKeys extrinsic.
- Enter the following parameters:
keys: The session keys hex string returned byauthor_rotateKeysWithOwner.proof: The proof hex string returned byauthor_rotateKeysWithOwner.
- Submit and sign the transaction.
- Go to the Network > Staking > Accounts section on Polkadot.js Apps connected to the relay chain.
- Select Set Session Key on the bonding account you generated earlier.
- Paste the hex-encoded session key string returned by
author_rotateKeys(from the Polkadot.js Apps UI, curl, or Subkey) into the input field and submit the transaction.
Removal planned
Both session.setKeys and session.purgeKeys on the relay chain will be removed in a future runtime upgrade (polkadot-fellows/runtimes#1212). Migrate to the Polkadot Hub path: use stakingRcClient.setKeys to set keys and stakingRcClient.purgeKeys to purge them.
Once the transaction is signed and submitted, your session keys will be registered on-chain.
Verify Session Key Setup
To verify that your session keys are properly set, you can use one of two RPC calls:
hasKey: Checks if the node has a specific key by public key and key type.hasSessionKeys: Verifies if your node has the full session key string associated with the validator.
For example, you can check session keys on the Polkadot.js Apps interface or by running an RPC query against your node. Once this is done, your validator node is ready for its role.
Set the Node Key
Validators on Polkadot need a static network key (also known as the node key) to maintain a stable node identity. This key ensures that your validator can maintain a consistent peer ID, even across restarts, which is crucial for maintaining reliable network connections.
Starting with Polkadot version 1.11, validators without a stable network key may encounter the following error on startup:
Generate the Node Key
Use one of the following methods to generate your node key:
The recommended solution is to generate a node key and save it to a file using the following command:
Save the file path for reference. You will need it in the next step to configure your node with a static identity.
Set Node Key
After generating the node key, configure your node to use it by specifying the path to the key file when launching your node. Add the following flag to your validator node's startup command:
Following these steps ensures that your node retains its identity, making it discoverable by peers without the risk of conflicting identities across sessions. For further technical background, see Polkadot SDK Pull Request #3852 for the rationale behind requiring static keys.
| Created: February 25, 2025