---
title: Install Polkadot SDK
description: Install all required Polkadot SDK dependencies, set up the SDK itself, and verify that it runs correctly on your machine.
categories:
- Basics
- Tooling
url: https://docs.polkadot.com/parachains/install-polkadot-sdk/
word_count: 3234
token_estimate: 5120
version_hash: sha256:71bd962e39b3eb74d9a69e19ba5ac881bf43703eba51286cffc8ad29940ebb19
last_updated: '2026-05-19T14:51:06+00:00'
---
# Install Polkadot SDK
This guide provides step-by-step instructions for installing the Polkadot SDK on macOS, Linux, and Windows. The installation process consists of two main parts:
- **Installing dependencies**: Setting up Rust, required system packages, and development tools.
- **Building the Polkadot SDK**: Cloning and compiling the Polkadot SDK repository.
Follow the appropriate section for your operating system to ensure all necessary tools are installed and configured properly.
## Install Dependencies: macOS
You can install Rust and set up a Substrate development environment on Apple macOS computers with Intel or Apple M1 processors.
### Before You Begin {: #before-you-begin-mac-os }
Before you install Rust and set up your development environment on macOS, verify that your computer meets the following basic requirements:
- Operating system version is 10.7 Lion or later.
- Processor speed of at least 2 GHz. Note that 3 GHz is recommended.
- Memory of at least 8 GB RAM. Note that 16 GB is recommended.
- Storage of at least 10 GB of available space.
- Broadband Internet connection.
### Install Command Line Tools
Xcode Command Line Tools provide essential build dependencies including `clang`, `make`, and other tools required to compile native crates like `librocksdb-sys`. To install them, run:
```bash
xcode-select --install
```
### Install Homebrew
In most cases, you should use Homebrew to install and manage packages on macOS computers. If you don't already have Homebrew installed on your local computer, you should download and install it before continuing.
To install Homebrew:
1. Open the Terminal application.
2. Download and install Homebrew by running the following command:
```bash
/bin/bash -c "$(curl -fsSL https://raw.githubusercontent.com/Homebrew/install/master/install.sh)"
```
3. Verify Homebrew has been successfully installed by running the following command:
```bash
brew --version
```
The command displays output similar to the following:
brew --version
Homebrew 4.3.15
### Support for Apple Silicon
Protobuf must be installed before the build process can begin. To install it, run the following command:
```bash
brew install protobuf
```
### Install Required Packages and Rust {: #install-required-packages-and-rust-mac-os }
Because the blockchain requires standard cryptography to support the generation of public/private key pairs and the validation of transaction signatures, you must also have a package that provides cryptography, such as `openssl`.
To install `openssl` and the Rust toolchain on macOS:
1. Open the Terminal application.
2. Ensure you have an updated version of Homebrew by running the following command:
```bash
brew update
```
3. Install the `openssl` package by running the following command:
```bash
brew install openssl
```
4. Download the `rustup` installation program and use it to install Rust by running the following command:
```bash
curl --proto '=https' --tlsv1.2 -sSf https://sh.rustup.rs | sh
```
5. Follow the prompts displayed to proceed with a default installation.
6. Update your current shell to include Cargo by running the following command:
```bash
source ~/.cargo/env
```
7. Configure the Rust toolchain to default to the latest stable version by running the following commands:
```bash
rustup default stable
rustup update
rustup target add wasm32-unknown-unknown
rustup component add rust-src
```
8. Proceed to [Build the Polkadot SDK](#build-the-polkadot-sdk).
## Install Dependencies: Linux
Rust supports most Linux distributions. Depending on the specific distribution and version of the operating system you use, you might need to add some software dependencies to your environment. In general, your development environment should include a linker or a C-compatible compiler, such as `clang`, and an appropriate integrated development environment (IDE).
### Before You Begin {: #before-you-begin-linux }
Check the documentation for your operating system for information about the installed packages and how to download and install any additional packages you might need. For example, if you use Ubuntu, you can use the Ubuntu Advanced Packaging Tool (`apt`) to install the `build-essential` package:
```bash
sudo apt install build-essential
```
At a minimum, you need the following packages before you install Rust:
```text
clang curl git make
```
Because the blockchain requires standard cryptography to support the generation of public/private key pairs and the validation of transaction signatures, you must also have a package that provides cryptography, such as `libssl-dev` or `openssl-devel`.
### Install Required Packages and Rust {: #install-required-packages-and-rust-linux }
To install the Rust toolchain on Linux:
1. Open a terminal shell.
2. Check the packages installed on the local computer by running the appropriate package management command for your Linux distribution.
3. Add any package dependencies you are missing to your local development environment by running the appropriate package management command for your Linux distribution:
=== "Ubuntu"
```bash
sudo apt install --assume-yes git clang curl libssl-dev llvm libclang-dev libudev-dev make protobuf-compiler
```
=== "Debian"
```sh
sudo apt install --assume-yes git clang curl libssl-dev llvm libclang-dev libudev-dev make protobuf-compiler
```
=== "Arch"
```sh
pacman -Syu --needed --noconfirm curl git clang make protobuf
```
=== "Fedora"
```sh
sudo dnf update
sudo dnf install clang curl git openssl-devel make protobuf-compiler
```
=== "OpenSUSE"
```sh
sudo zypper install clang curl git openssl-devel llvm-devel libudev-devel make protobuf
```
Remember that different distributions might use different package managers and bundle packages in different ways. For example, depending on your installation selections, Ubuntu Desktop and Ubuntu Server might have different packages and different requirements. However, the packages listed in the command-line examples are applicable to many common Linux distributions, including Debian, Linux Mint, MX Linux, and Elementary OS.
4. Download the `rustup` installation program and use it to install Rust by running the following command:
```bash
curl --proto '=https' --tlsv1.2 -sSf https://sh.rustup.rs | sh
```
5. Follow the prompts displayed to proceed with a default installation.
6. Update your current shell to include Cargo by running the following command:
```bash
source $HOME/.cargo/env
```
7. Verify your installation by running the following command:
```bash
rustc --version
```
8. Configure the Rust toolchain to default to the latest stable version by running the following commands:
```bash
rustup default stable
rustup update
rustup target add wasm32-unknown-unknown
rustup component add rust-src
```
9. Proceed to [Build the Polkadot SDK](#build-the-polkadot-sdk).
## Install Dependencies: Windows (WSL)
In general, UNIX-based operating systems—like macOS or Linux—provide a better development environment for building Substrate-based blockchains.
However, suppose your local computer uses Microsoft Windows instead of a UNIX-based operating system. In that case, you can configure it with additional software to make it a suitable development environment for building Substrate-based blockchains. To prepare a development environment on a Microsoft Windows computer, you can use Windows Subsystem for Linux (WSL) to emulate a UNIX operating environment.
### Before You Begin {: #before-you-begin-windows-wls }
Before installing on Microsoft Windows, verify the following basic requirements:
- You have a computer running a supported Microsoft Windows operating system:
- **For Windows desktop**: You must be running Microsoft Windows 10, version 2004 or later, or Microsoft Windows 11 to install WSL.
- **For Windows server**: You must be running Microsoft Windows Server 2019, or later, to install WSL on a server operating system.
- You have a good internet connection and access to a shell terminal on your local computer.
### Set Up Windows Subsystem for Linux
WSL enables you to emulate a Linux environment on a computer that uses the Windows operating system. The primary advantage of this approach for Substrate development is that you can use all of the code and command-line examples as described in the Substrate documentation. For example, you can run common commands—such as `ls` and `ps`—unmodified. By using WSL, you can avoid configuring a virtual machine image or a dual-boot operating system.
To prepare a development environment using WSL:
1. Check your Windows version and build number to see if WSL is enabled by default.
If you have Microsoft Windows 10, version 2004 (Build 19041 and higher), or Microsoft Windows 11, WSL is available by default and you can continue to the next step.
If you have an older version of Microsoft Windows installed, see the [WSL manual installation steps for older versions](https://learn.microsoft.com/en-us/windows/wsl/install-manual). If you are installing on an older version of Microsoft Windows, you can download and install WLS 2 if your computer has Windows 10, version 1903 or higher.
2. Select **Windows PowerShell** or **Command Prompt** from the **Start** menu, right-click, then **Run as administrator**.
3. In the PowerShell or Command Prompt terminal, run the following command:
```bash
wsl --install
```
This command enables the required WSL 2 components that are part of the Windows operating system, downloads the latest Linux kernel, and installs the Ubuntu Linux distribution by default.
If you want to review the other Linux distributions available, run the following command:
```bash
wsl --list --online
```
4. After the distribution is downloaded, close the terminal.
5. Click the **Start** menu, select **Shut down or sign out**, then click **Restart** to restart the computer.
Restarting the computer is required to start the installation of the Linux distribution. It can take a few minutes for the installation to complete after you restart.
For more information about setting up WSL as a development environment, see the [Set up a WSL development environment](https://learn.microsoft.com/en-us/windows/wsl/setup/environment) docs.
### Install Required Packages and Rust {: #install-required-packages-and-rust-windows-wls }
To install the Rust toolchain on WSL:
1. Click the **Start** menu, then select **Ubuntu**.
2. Type a UNIX user name to create a user account.
3. Type a password for your UNIX user, then retype the password to confirm it.
4. Download the latest updates for the Ubuntu distribution using the Ubuntu Advanced Packaging Tool (`apt`) by running the following command:
```bash
sudo apt update
```
5. Add the required packages for the Ubuntu distribution by running the following command:
```bash
sudo apt install --assume-yes git clang curl libssl-dev llvm libclang-dev libudev-dev make protobuf-compiler
```
6. Download the `rustup` installation program and use it to install Rust for the Ubuntu distribution by running the following command:
```bash
curl --proto '=https' --tlsv1.2 -sSf https://sh.rustup.rs | sh
```
7. Follow the prompts displayed to proceed with a default installation.
8. Update your current shell to include Cargo by running the following command:
```bash
source ~/.cargo/env
```
9. Verify your installation by running the following command:
```bash
rustc --version
```
10. Configure the Rust toolchain to use the latest stable version as the default toolchain by running the following commands:
```bash
rustup default stable
rustup update
rustup target add wasm32-unknown-unknown
rustup component add rust-src
```
11. Proceed to [Build the Polkadot SDK](#build-the-polkadot-sdk).
## Build the Polkadot SDK
After installing all dependencies, you can now clone and compile the Polkadot SDK repository to verify your setup.
### Clone the Polkadot SDK
1. Clone the Polkadot SDK repository:
```bash
git clone https://github.com/paritytech/polkadot-sdk.git
```
2. Navigate into the project directory:
```bash
cd polkadot-sdk
```
### Compile the Polkadot SDK
Compile the entire Polkadot SDK repository to ensure your environment is properly configured:
```bash
cargo build --release --locked
```
!!!note
This initial compilation will take significant time, depending on your machine specifications. It compiles all components of the Polkadot SDK to verify your toolchain is correctly configured.
### Verify the Build
Once the build completes successfully, verify the installation by checking the compiled binaries:
```bash
ls target/release
```
You should see several binaries, including:
- `polkadot`: The Polkadot relay chain node.
- `polkadot-parachain`: The parachain collator node.
- `polkadot-omni-node`:The omni node for running parachains.
- `substrate-node`: The kitchensink node with many pre-configured pallets.
Verify the Polkadot binary works by checking its version:
```bash
./target/release/polkadot --version
```
This should display version information similar to:
```bash
polkadot 1.16.0-1234abcd567
```
If you see the version output without errors, your development environment is correctly configured and ready for Polkadot SDK development!
## Optional: Run the Kitchensink Node
The Polkadot SDK includes a feature-rich node called "kitchensink" located at `substrate/bin/node`. This node comes pre-configured with many pallets and features from the Polkadot SDK, making it an excellent reference for exploring capabilities and understanding how different components work together.
!!!note
If you've already compiled the Polkadot SDK in the previous step, the `substrate-node` binary is already built and ready to use. You can skip directly to running the node.
### Run the Kitchensink Node in Development Mode
From the `polkadot-sdk` root directory, start the kitchensink node in development mode:
```bash
./target/release/substrate-node --dev
```
The `--dev` flag enables development mode, which:
- Runs a single-node development chain.
- Produces and finalizes blocks automatically.
- Uses pre-configured development accounts (Alice, Bob, etc.).
- Deletes all data when stopped, ensuring a clean state on restart.
./target/release/substrate-node --dev
2025-10-25 09:08:53 Substrate Node
2025-10-25 09:08:53 ✌️ version 3.0.0-dev-7304295748b
2025-10-25 09:08:53 ❤️ by Parity Technologies <admin@parity.io>, 2017-2025
2025-10-25 09:08:53 📋 Chain specification: Development
2025-10-25 09:08:53 🏷 Node name: squalid-shelf-0944
2025-10-25 09:08:53 👤 Role: AUTHORITY
2025-10-25 09:08:53 💾 Database: RocksDb at /var/folders/6t/fw37yfvx14qgwv5sl5p0lcph0000gn/T/substrate0XFsh7/chains/dev/db/full
2025-10-25 09:08:57 🔨 Initializing Genesis block/state (state: 0x9831…a36f, header-hash: 0x6eaf…0764)
2025-10-25 09:08:57 Creating transaction pool txpool_type=ForkAware ready=Limit { count: 8192, total_bytes: 20971520 } future=Limit { count: 819, total_bytes: 2097152 }
2025-10-25 09:08:57 👴 Loading GRANDPA authority set from genesis on what appears to be first startup.
2025-10-25 09:08:57 👶 Creating empty BABE epoch changes on what appears to be first startup.
2025-10-25 09:08:57 Using default protocol ID "sup" because none is configured in the chain specs
2025-10-25 09:08:57 Local node identity is: 12D3KooWFug81ps95nGBDXidDv8K9zth3JBwVw3nm8KanZ3Rdi4J
2025-10-25 09:08:57 Running litep2p network backend
2025-10-25 09:08:57 💻 Operating system: macos
2025-10-25 09:08:57 💻 CPU architecture: aarch64
2025-10-25 09:08:57 📦 Highest known block at #0
2025-10-25 09:08:57 〽️ Prometheus exporter started at 127.0.0.1:9615
2025-10-25 09:08:57 Running JSON-RPC server: addr=127.0.0.1:9944,[::1]:9944
2025-10-25 09:08:57 🏁 CPU single core score: 1.55 GiBs, parallelism score: 1.43 GiBs with expected cores: 8
2025-10-25 09:08:57 🏁 Memory score: 65.81 GiBs
2025-10-25 09:08:57 🏁 Disk score (seq. writes): 3.20 GiBs
2025-10-25 09:08:57 🏁 Disk score (rand. writes): 760.04 MiBs
2025-10-25 09:08:57 👶 Starting BABE Authorship worker
2025-10-25 09:08:57 Failed to load AddrCache from file, using empty instead: Failed to encode or decode AddrCache.
2025-10-25 09:08:57 Loaded persisted AddrCache with 0 authority ids.
2025-10-25 09:08:57 🥩 BEEFY gadget waiting for BEEFY pallet to become available...
2025-10-25 09:08:57 Successfully persisted AddrCache on disk
2025-10-25 09:09:00 🙌 Starting consensus session on top of parent 0x6eaf6f7689b01e21821690ce221c6f5a4eeab997242f60d232234b6c1da20764 (#0)
2025-10-25 09:09:00 🎁 Prepared block for proposing at 1 (5 ms) hash: 0xf1937d6bec79950210463b701e187abe7d0d5e3eb6e089f1c15e5857966471ca; parent_hash: 0x6eaf…0764; end: NoMoreTransactions; extrinsics_count: 2
2025-10-25 09:09:00 🔖 Pre-sealed block for proposal at 1. Hash now 0xcf78ec71ff34797161bfeaa325d21f14745b74cbaa59122ed879af024c7a1400, previously 0xf1937d6bec79950210463b701e187abe7d0d5e3eb6e089f1c15e5857966471ca.
2025-10-25 09:09:00 👶 New epoch 0 launching at block 0xcf78…1400 (block slot 587119380 >= start slot 587119380).
2025-10-25 09:09:00 👶 Next epoch starts at slot 587119580
2025-10-25 09:09:00 🏆 Imported #1 (0x6eaf…0764 → 0xcf78…1400)
2025-10-25 09:09:00 maintain txs=(0, 0) a=1 i=1 views=[(1, 0, 0)] event=NewBestBlock { hash: 0xcf78ec71ff34797161bfeaa325d21f14745b74cbaa59122ed879af024c7a1400, tree_route: None } duration=2.034958ms
2025-10-25 09:09:02 💤 Idle (0 peers), best: #1 (0xcf78…1400), finalized #0 (0x6eaf…0764), ⬇ 0 ⬆ 0
2025-10-25 09:09:03 🙌 Starting consensus session on top of parent 0xcf78ec71ff34797161bfeaa325d21f14745b74cbaa59122ed879af024c7a1400 (#1)
2025-10-25 09:09:03 🎁 Prepared block for proposing at 2 (4 ms) hash: 0xc5cc68c6f3dcda8bae3028f2e17a8dcd348c65750332f31af7972f25bf7a7d60; parent_hash: 0xcf78…1400; end: NoMoreTransactions; extrinsics_count: 2
2025-10-25 09:09:03 🔖 Pre-sealed block for proposal at 2. Hash now 0x67d0adc440feeb28c239da9650744d3dbda899b3ca3b8dc00050ce7269ea6aee, previously 0xc5cc68c6f3dcda8bae3028f2e17a8dcd348c65750332f31af7972f25bf7a7d60.
2025-10-25 09:09:03 🏆 Imported #2 (0xcf78…1400 → 0x67d0…6aee)
2025-10-25 09:09:03 maintain txs=(0, 0) a=1 i=2 views=[(2, 0, 0)] event=NewBestBlock { hash: 0x67d0adc440feeb28c239da9650744d3dbda899b3ca3b8dc00050ce7269ea6aee, tree_route: None } duration=301µs
2025-10-25 09:09:06 🙌 Starting consensus session on top of parent 0x67d0adc440feeb28c239da9650744d3dbda899b3ca3b8dc00050ce7269ea6aee (#2)
2025-10-25 09:09:06 🎁 Prepared block for proposing at 3 (5 ms) hash: 0x29eaa5f82783284b25e9c81e851ae5be63c54de28c94f438cbd733f680172ea2; parent_hash: 0x67d0…6aee; end: NoMoreTransactions; extrinsics_count: 2
2025-10-25 09:09:06 🔖 Pre-sealed block for proposal at 3. Hash now 0x8fb26c9192f8738b8971107072f9d106d364ee7f1ece94d8ae5acc9f69cc522f, previously 0x29eaa5f82783284b25e9c81e851ae5be63c54de28c94f438cbd733f680172ea2.
You should see log output indicating the node is running and producing blocks, with increasing block numbers after `finalized`.
### Interact with the Kitchensink Node
The kitchensink node is accessible at `ws://localhost:9944`. Open [Polkadot.js Apps](https://polkadot.js.org/apps/#/explorer) in your browser to explore its features and connect to the local node.
1. Click the network icon in the top left corner.
2. Scroll to **Development** and select **Local Node**.
3. Click **Switch** to connect to your local node.
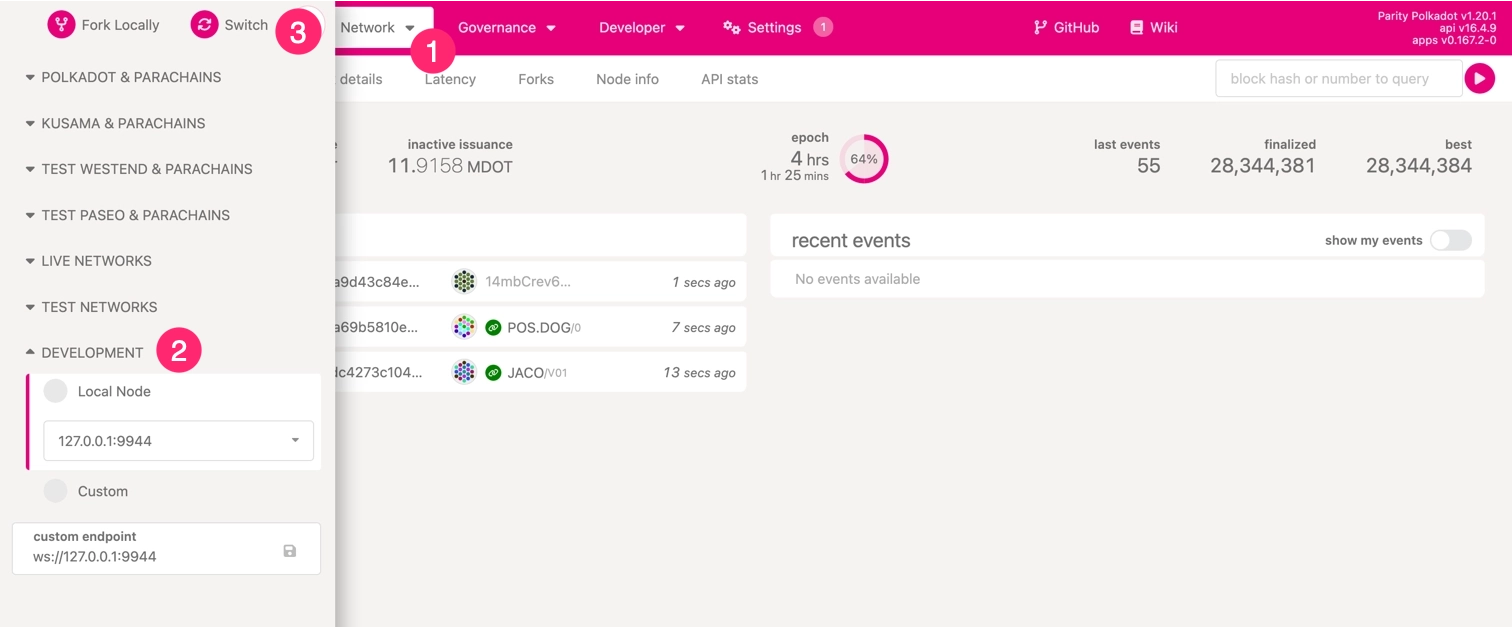
Once connected, the interface updates its color scheme to indicate a successful connection to the local node.
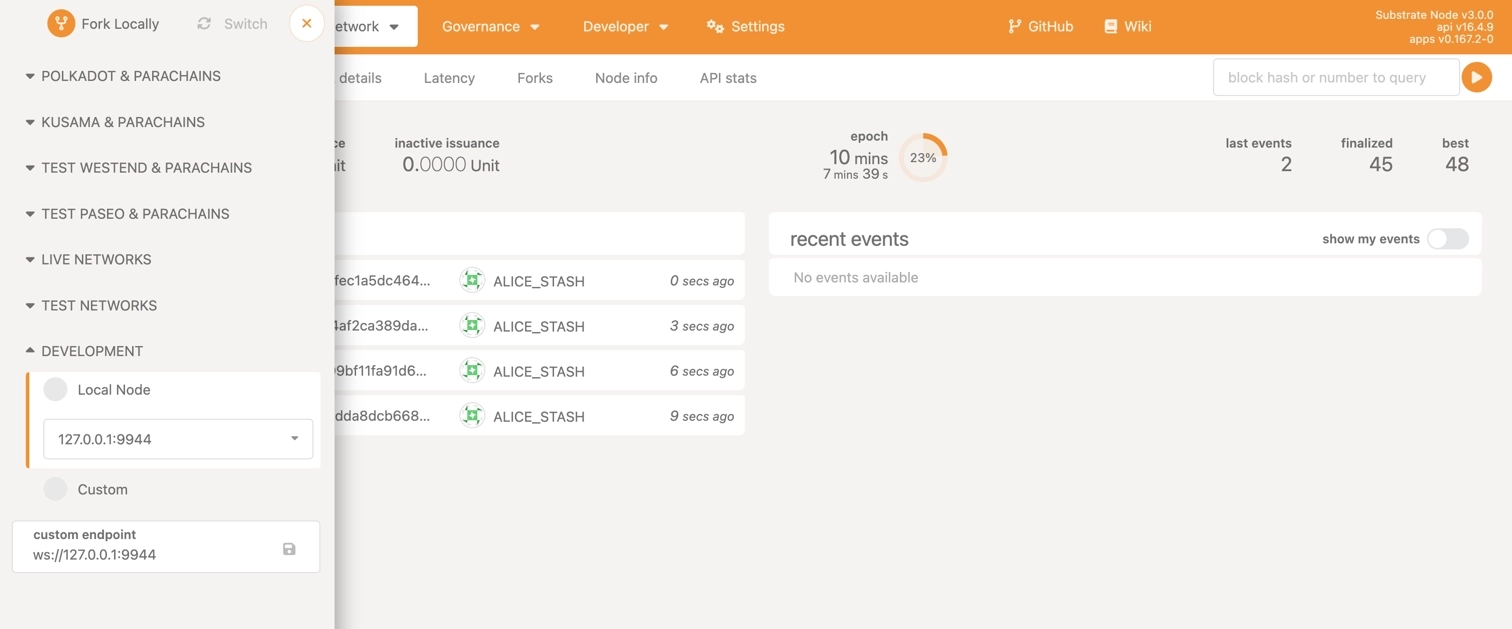
You can now explore the various pallets and features included in the kitchensink node, making it a valuable reference as you develop your own blockchain applications.
To stop the node, press `Control-C` in the terminal.
## Where to Go Next
- __Get Started with Parachain Development__
---
Practical examples and tutorials for building and deploying Polkadot parachains, covering everything from launch to customization and cross-chain messaging.
[:octicons-arrow-right-24: Get Started](/parachains/get-started/)