---
title: Start Validating
description: Learn how to start validating on Polkadot by choosing a network, syncing your node, bonding DOT tokens, and activating your validator.
categories:
- Infrastructure
url: https://docs.polkadot.com/node-infrastructure/run-a-validator/onboarding-and-offboarding/start-validating/
word_count: 2533
token_estimate: 3923
version_hash: sha256:99648e96771d37abbccd5648cf13c5b3438013278226b8379b46fd96162f45ce
last_updated: '2026-06-04T16:06:19+00:00'
---
# Start Validating
## Introduction
After configuring your node keys as shown in the [Key Management](/node-infrastructure/run-a-validator/onboarding-and-offboarding/key-management/) section and ensuring your system is set up, you're ready to begin the validator setup process. This guide will walk you through choosing a network, synchronizing your node with the blockchain, bonding your DOT tokens, and starting your validator.
## Choose a Network
Running your validator on a test network like Westend or Kusama is a smart way to familiarize yourself with the process and identify any setup issues in a lower-stakes environment before joining the Polkadot MainNet.
- **Westend**: Polkadot's primary TestNet is open to anyone for testing purposes. Validator slots are intentionally limited to keep the network stable for the Polkadot release process, so it may not support as many validators at any given time.
- **Kusama**: Often called Polkadot's "canary network," Kusama has real economic value but operates with a faster and more experimental approach. Running a validator here provides an experience closer to MainNet with the benefit of more frequent validation opportunities with an era time of 6 hours vs 24 hours for Polkadot.
- **Polkadot**: The main network, where validators secure the Polkadot relay chain. It has a slower era time of 24 hours and requires a higher minimum bond amount to participate.
## Synchronize Chain Data
The next step is to sync your node with the chosen blockchain network. Synchronization is necessary to download and validate the blockchain data, ensuring your node is ready to participate as a validator. Follow these steps to sync your node:
1. **Start syncing**: You can run a full or warp sync.
=== "Full sync"
Polkadot defaults to using a full sync, which downloads and validates the entire blockchain history from the genesis block. Start the syncing process by running the following command:
```sh
polkadot
```
This command starts your Polkadot node in non-validator mode, allowing you to synchronize the chain data.
=== "Warp sync"
You can opt to use warp sync which initially downloads only GRANDPA finality proofs and the latest finalized block's state. Use the following command to start a warp sync:
``` bash
polkadot --sync warp
```
Warp sync ensures that your node quickly updates to the latest finalized state. The historical blocks are downloaded in the background as the node continues to operate.
If you're planning to run a validator on a TestNet, you can specify the chain using the `--chain` flag. For example, the following will run a validator on Kusama:
```sh
polkadot --chain=kusama
```
2. **Monitor sync progress**: Once the sync starts, you will see a stream of logs providing information about the node's status and progress. Here's an example of what the output might look like:
polkadot
2021-06-17 03:07:07 Parity Polkadot
2021-06-17 03:07:07 ✌️ version 0.9.5-95f6aa201-x86_64-linux-gnu
2021-06-17 03:07:07 ❤️ by Parity Technologies <admin@parity.io>, 2017-2021
2021-06-17 03:07:07 📋 Chain specification: Polkadot
2021-06-17 03:07:07 🏷 Node name: boiling-pet-7554
2021-06-17 03:07:07 👤 Role: FULL
2021-06-17 03:07:07 💾 Database: RocksDb at /root/.local/share/polkadot/chains/polkadot/db
2021-06-17 03:07:07 ⛓ Native runtime: polkadot-9050 (parity-polkadot-0.tx7.au0)
2021-06-17 03:07:10 🏷 Local node identity is: 12D3KooWLtXFWf1oGrnxMGmPKPW54xWCHAXHbFh4Eap6KXmxoi9u
2021-06-17 03:07:10 📦 Highest known block at #17914
2021-06-17 03:07:10 〽️ Prometheus server started at 127.0.0.1:9615
2021-06-17 03:07:10 Listening for new connections on 127.0.0.1:9944
...
The output logs provide information such as the current block number, node name, and network connections. Monitor the sync progress and any errors that might occur during the process. Look for information about the latest processed block and compare it with the current highest block using tools like [Telemetry](https://telemetry.polkadot.io/#list/Polkadot%20CC1) or [Polkadot.js Apps Explorer](https://polkadot.js.org/apps/#/explorer).
### Database Snapshot Services
If you'd like to speed up the process further, you can use a database snapshot. Snapshots are compressed backups of the blockchain's database directory and can significantly reduce the time required to sync a new node. Parity provides official database snapshots for Polkadot, Kusama, Westend, and other chains at [snapshots.polkadot.io](https://snapshots.polkadot.io/).
!!!warning
Although snapshots are convenient, syncing from scratch is recommended for security purposes. If snapshots become corrupted and most nodes rely on them, the network could inadvertently run on a non-canonical chain.
polkadot
2021-06-17 03:07:07 Idle (0 peers), best: #0 (0x3fd7...5baf), finalized #0 (0x3fd7...5baf), ⬇ 2.9kiB/s ⬆ 3.7kiB/s
2021-06-17 03:07:12 Idle (0 peers), best: #0 (0x3fd7...5baf), finalized #0 (0x3fd7...5baf), ⬇ 1.7kiB/s ⬆ 2.0kiB/s
2021-06-17 03:07:17 Idle (0 peers), best: #0 (0x3fd7...5baf), finalized #0 (0x3fd7...5baf), ⬇ 0.9kiB/s ⬆ 1.2kiB/s
2021-06-17 03:07:19 Libp2p => Random Kademlia query has yielded empty results
2021-06-17 03:08:00 Idle (0 peers), best: #0 (0x3fd7...5baf), finalized #0 (0x3fd7...5baf), ⬇ 1.6kiB/s ⬆ 1.9kiB/s
2021-06-17 03:08:05 Idle (0 peers), best: #0 (0x3fd7...5baf), finalized #0 (0x3fd7...5baf), ⬇ 0.6kiB/s ⬆ 0.9kiB/s
...
If you see terminal output similar to the preceding, and you are unable to synchronize the chain due to having zero peers, make sure you have libp2p port `30333` activated. It will take some time to discover other peers over the network.
## Bond DOT
Once your validator node is synced, the next step is bonding DOT. A bonded account, or stash, holds your staked tokens (DOT) that back your validator node. Bonding your DOT means locking it for a period, during which it cannot be transferred or spent but is used to secure your validator's role in the network. Visit the [Minimum Bond Requirement](/node-infrastructure/run-a-validator/requirements/#minimum-bond-requirement) section for details on how much DOT is required.
The following sections will guide you through bonding DOT for your validator.
### Bonding DOT on Polkadot.js Apps
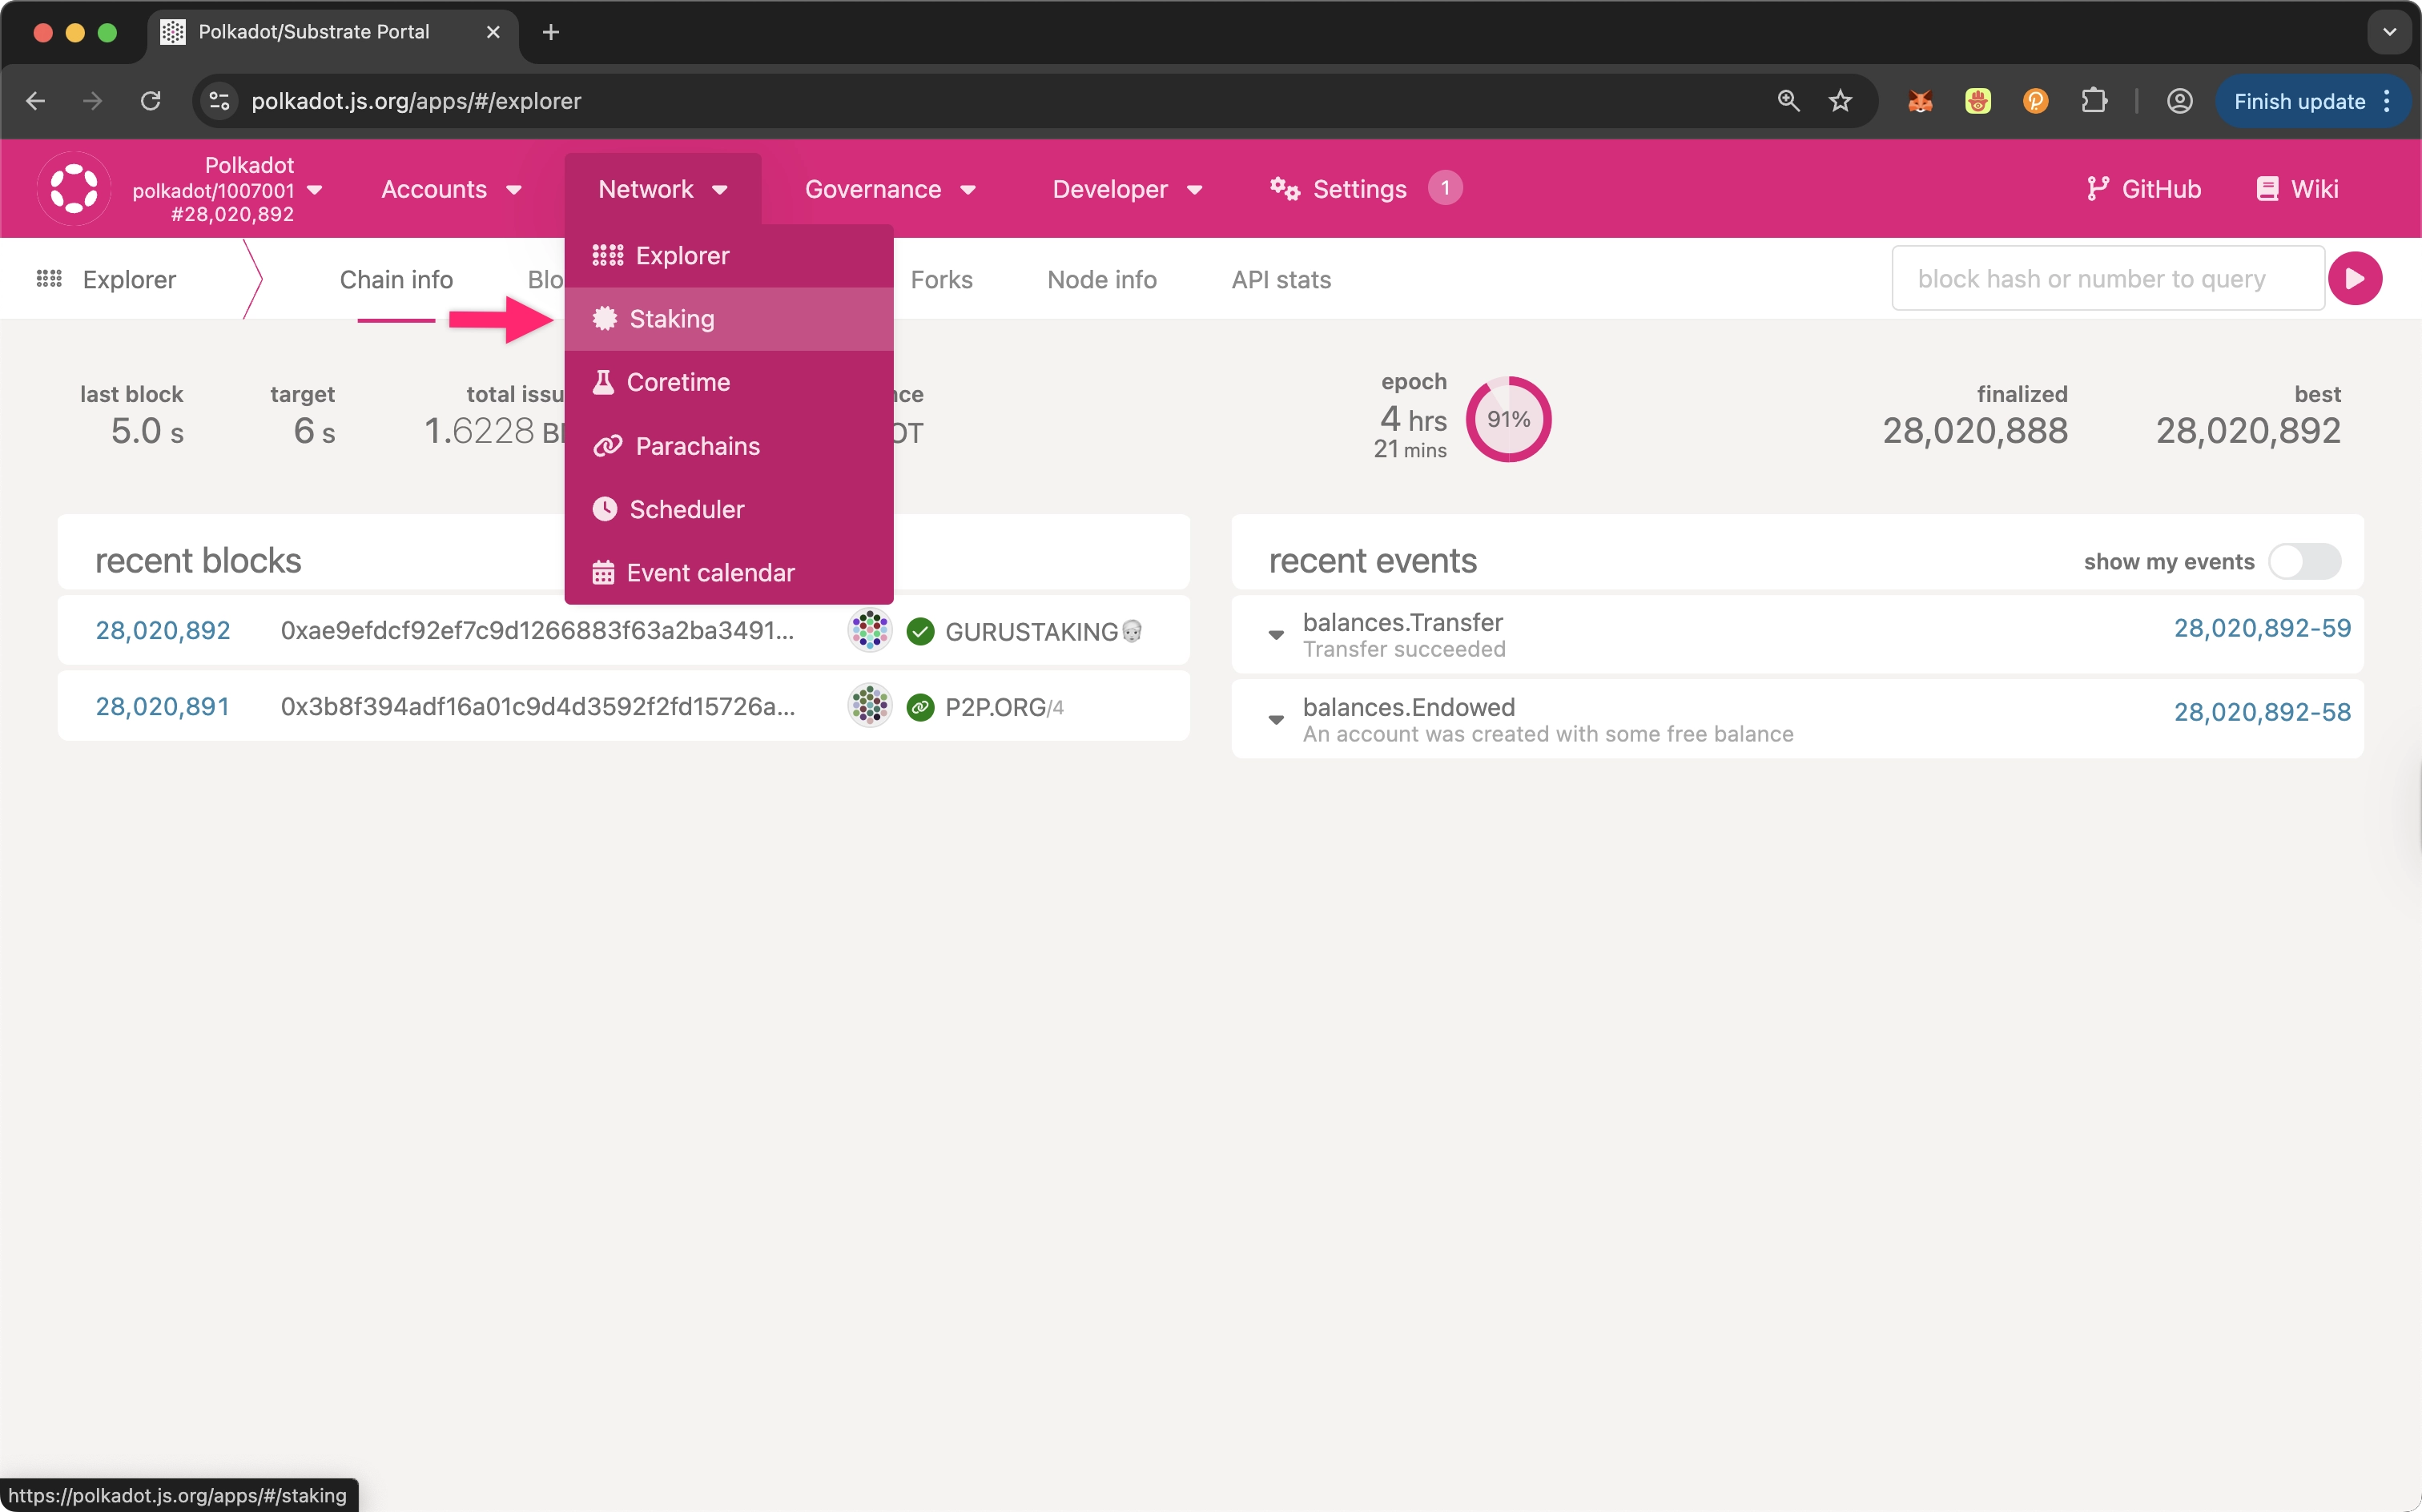
Once you're ready to bond your DOT, head over to the [Polkadot.js Apps](https://polkadot.js.org/apps/) staking page by clicking the **Network** dropdown at the top of the page and selecting [**Staking**](https://polkadot.js.org/apps/#/staking/actions).
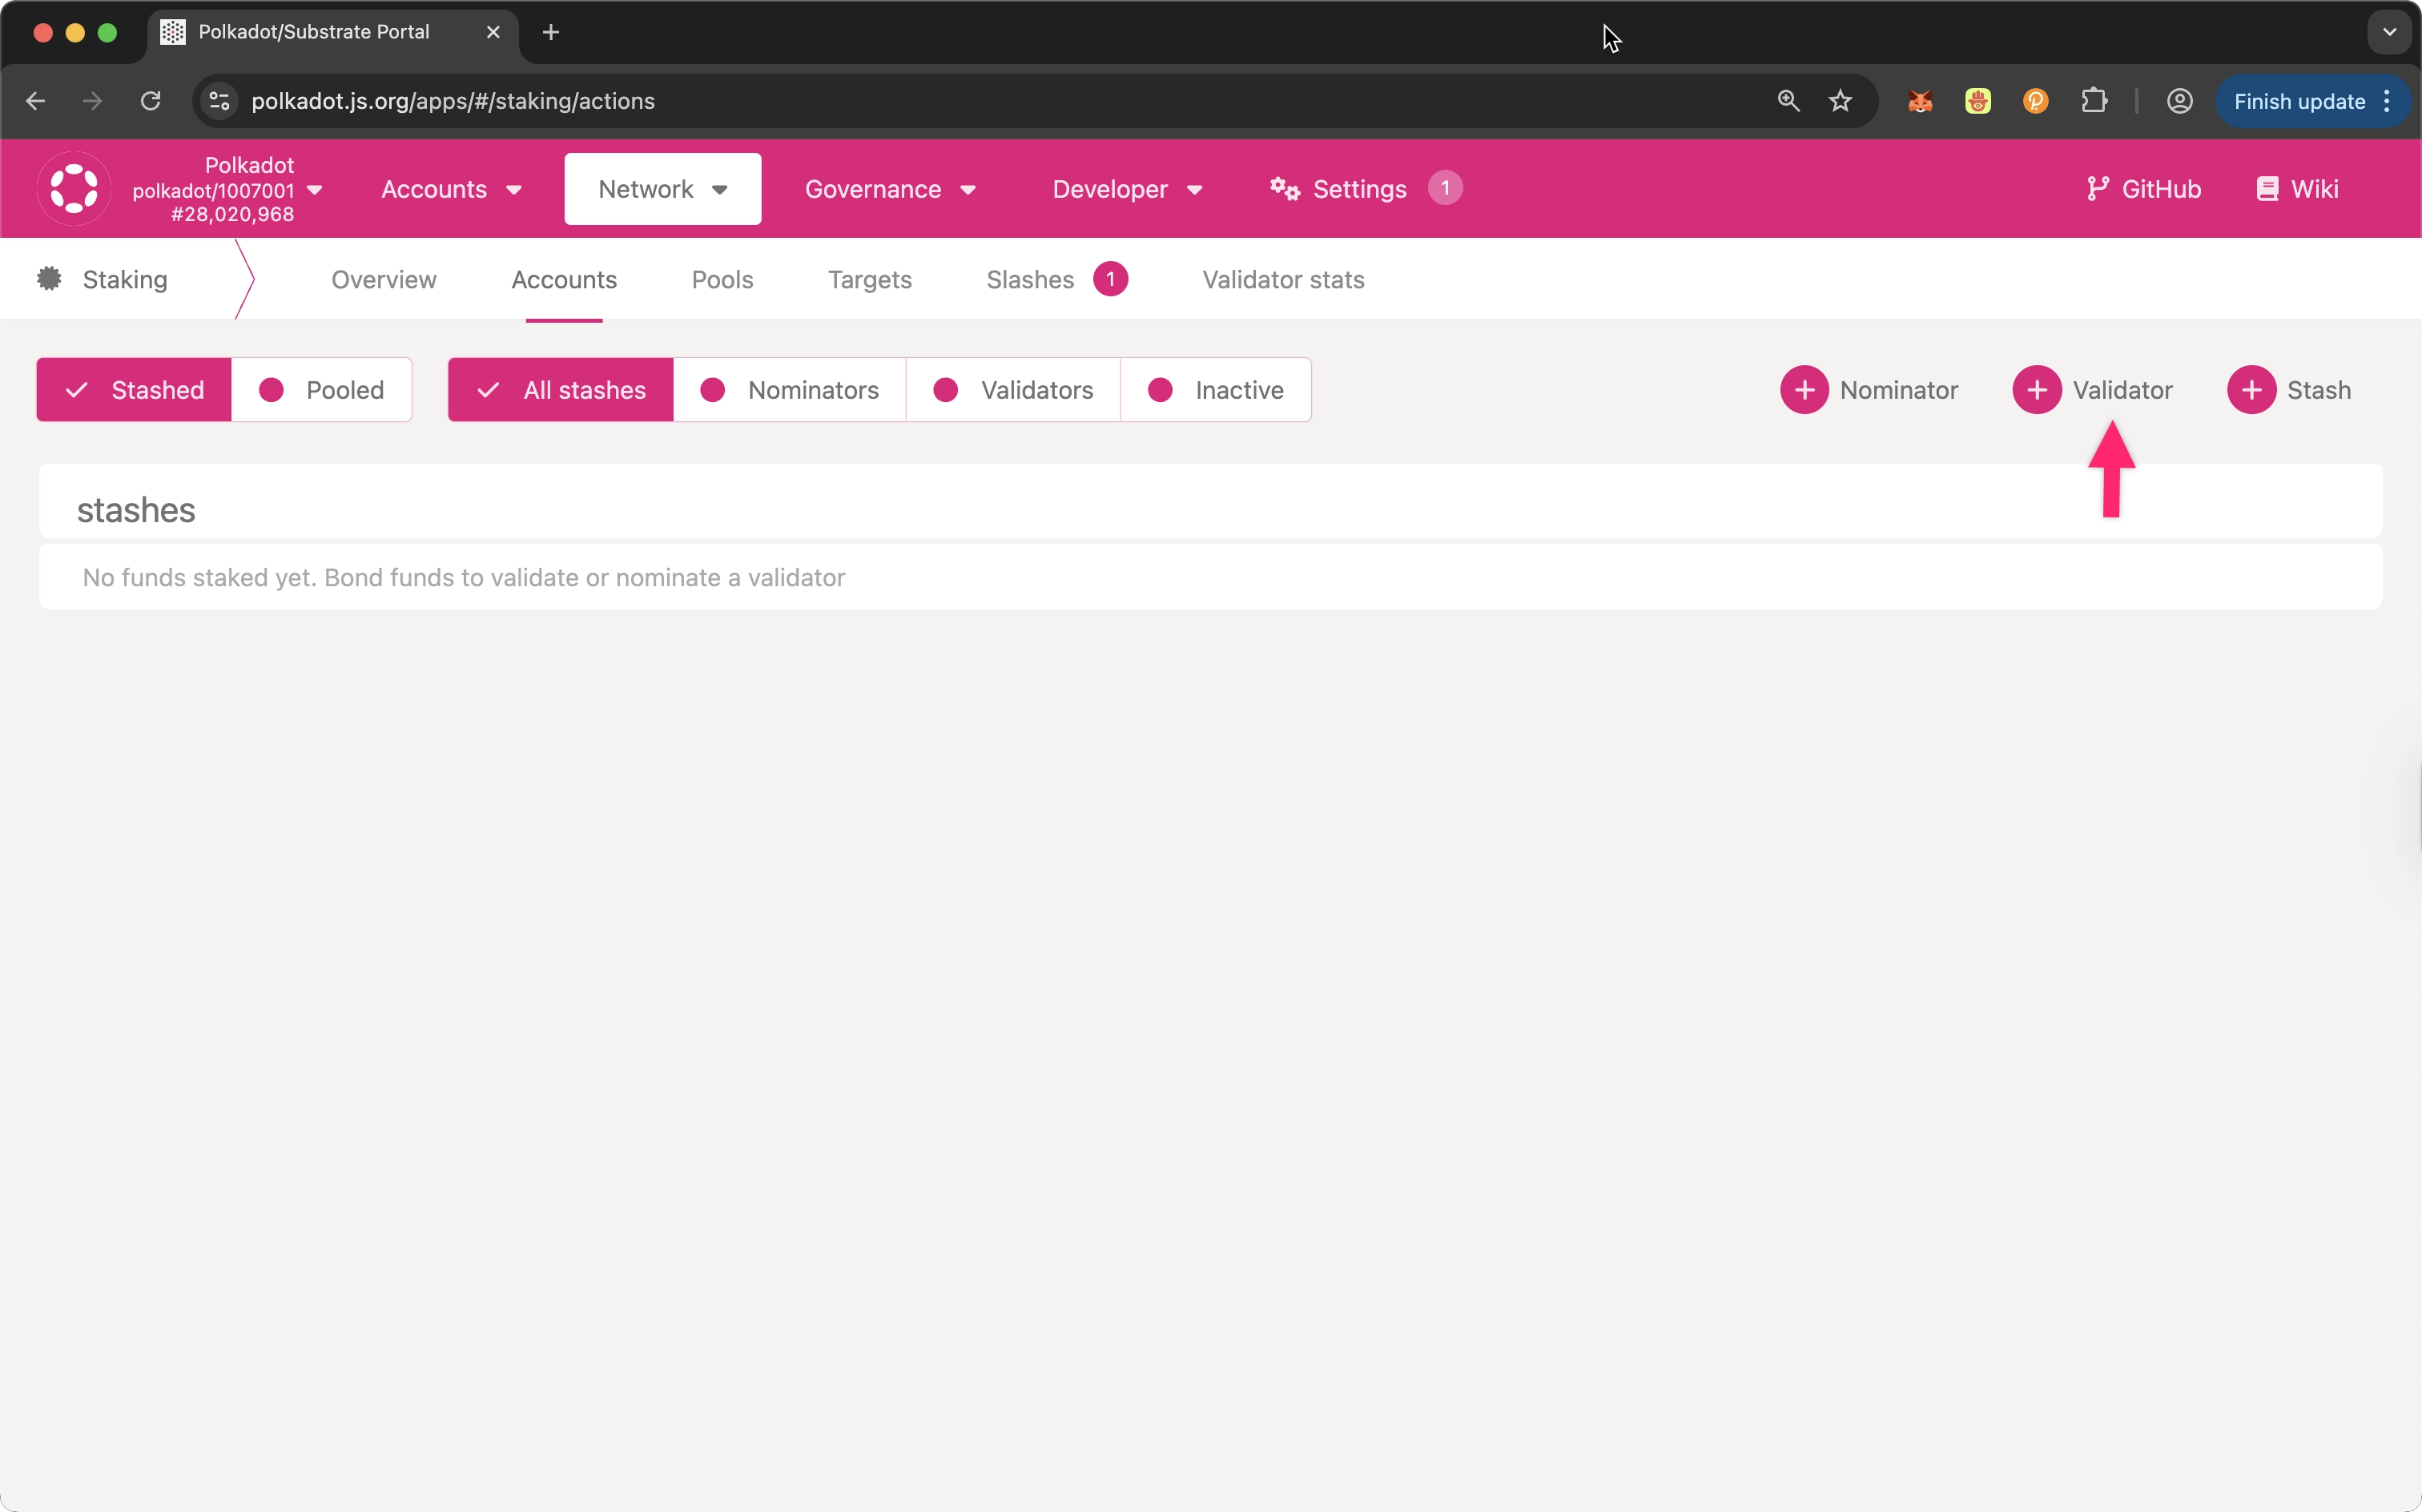
To get started with the bond submission, click on the **Accounts** tab, then the **+ Stash** button, and then enter the following information:
1. **Stash account**: Select your stash account (which is the account with the DOT/KSM balance).
2. **Value bonded**: Enter how much DOT from the stash account you want to bond/stake. You are not required to bond all of the DOT in that account and you may bond more DOT at a later time. Be aware, withdrawing any bonded amount requires waiting for the unbonding period. The unbonding period is seven days for Kusama and 28 days for Polkadot.
!!! note
Starting in April 2026, the unbonding period for Polkadot nominators is expected to be reduced from 28 days to approximately 2 days, with dynamic scaling based on unbonding queue size. Validator unbonding periods may differ. See [RFC-0097](https://polkadot-fellows.github.io/RFCs/approved/0097-unbonding_queue.html) for technical details.
3. **Payment destination**: Add the recipient account for validator rewards. If you'd like to redirect payments to an account that is not the stash account, you can do it by entering the address here. Note that it is extremely unsafe to set an exchange address as the recipient of the staking rewards.
Once everything is filled in properly, select **Bond** and sign the transaction with your stash account. If successful, you should see an `ExtrinsicSuccess` message.
Your bonded account will be available under **Stashes**. After refreshing the screen, you should now see a card with all your accounts. The bonded amount on the right corresponds to the funds bonded by the stash account.
## Validate
Once your validator node is fully synced and ready, the next step is to ensure it's visible on the network and performing as expected. Below are steps for monitoring and managing your node on the Polkadot network.
### Verify Sync via Telemetry
To confirm that your validator is live and synchronized with the Polkadot network, visit the [Telemetry](https://telemetry.polkadot.io/#list/Polkadot%20CC1) page. Telemetry provides real-time information on node performance and can help you check if your validator is connected properly. Search for your node by name. You can search all nodes currently active on the network, which is why you should use a unique name for easy recognition. Now, confirm that your node is fully synced by comparing the block height of your node with the network's latest block. Nodes that are fully synced will appear white in the list, while nodes that are not yet fully synced will appear gray.
### Activate using Polkadot.js Apps
Follow these steps to use Polkadot.js Apps to activate your validator:
1. In Polkadot.js Apps, navigate to **Network** and select **Staking**:
2. Open the **Accounts** tab and click on **+ Validator**:
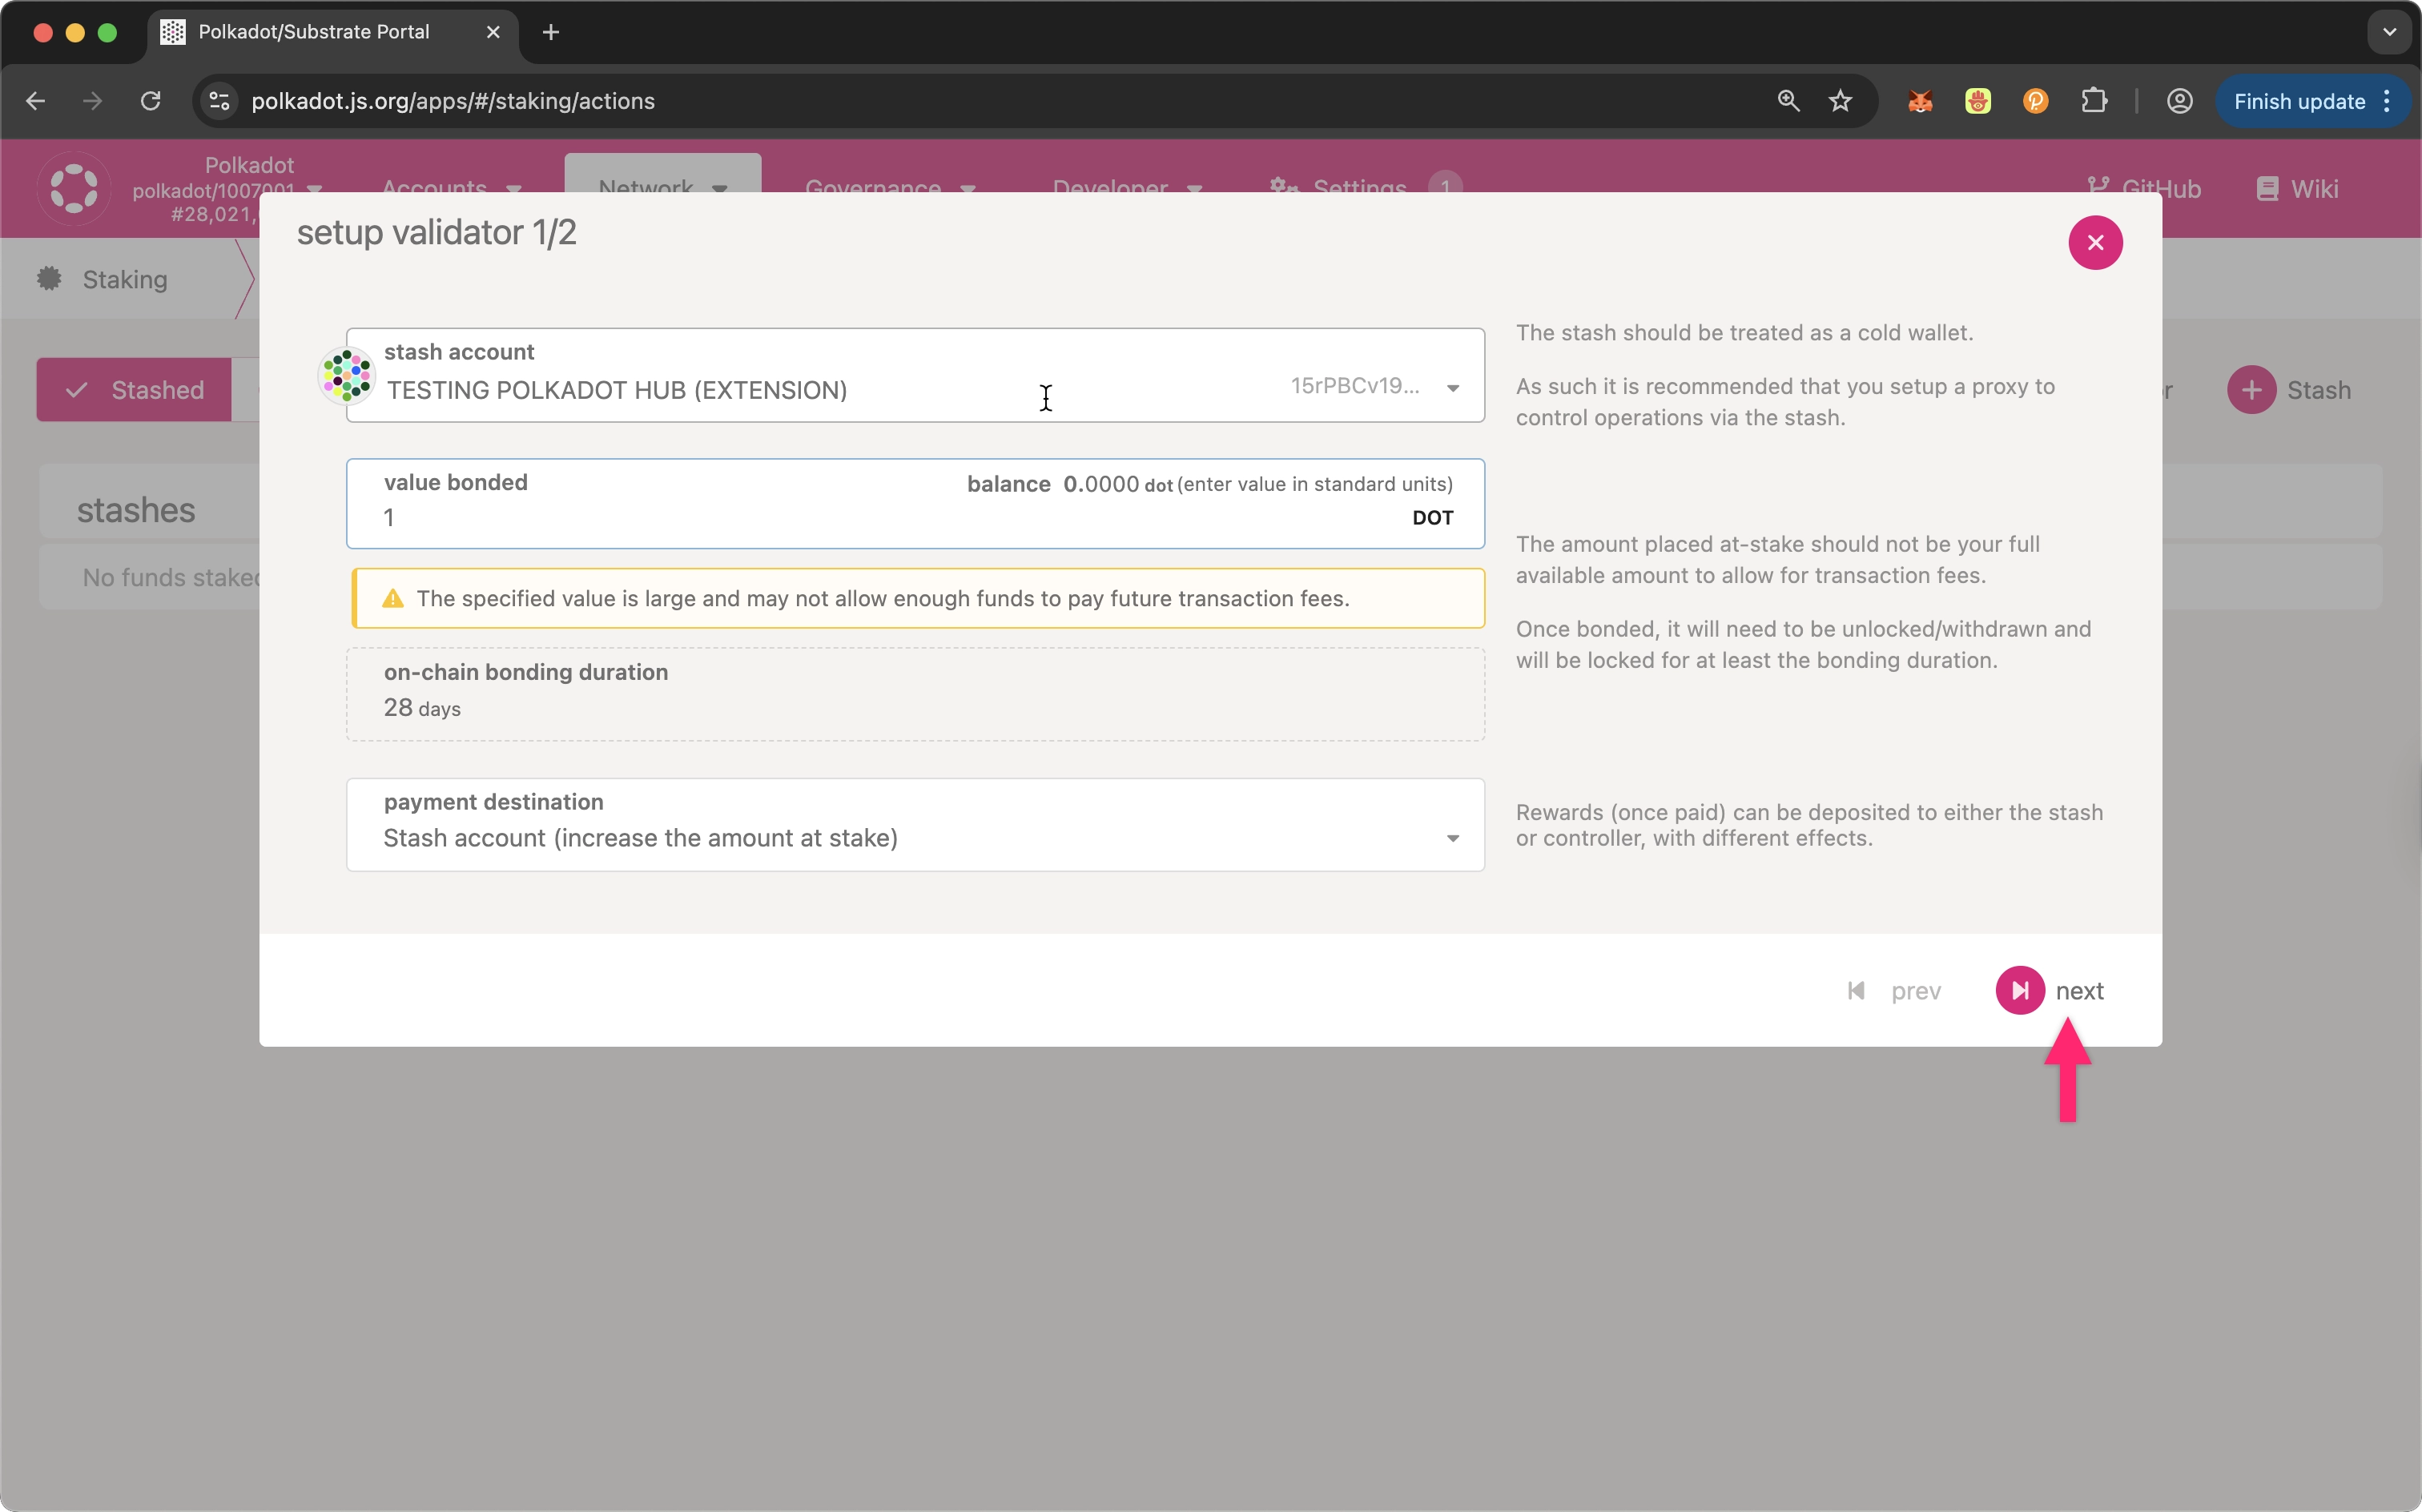
3. Set a bond amount in the **value bonded** field and then click **next**:
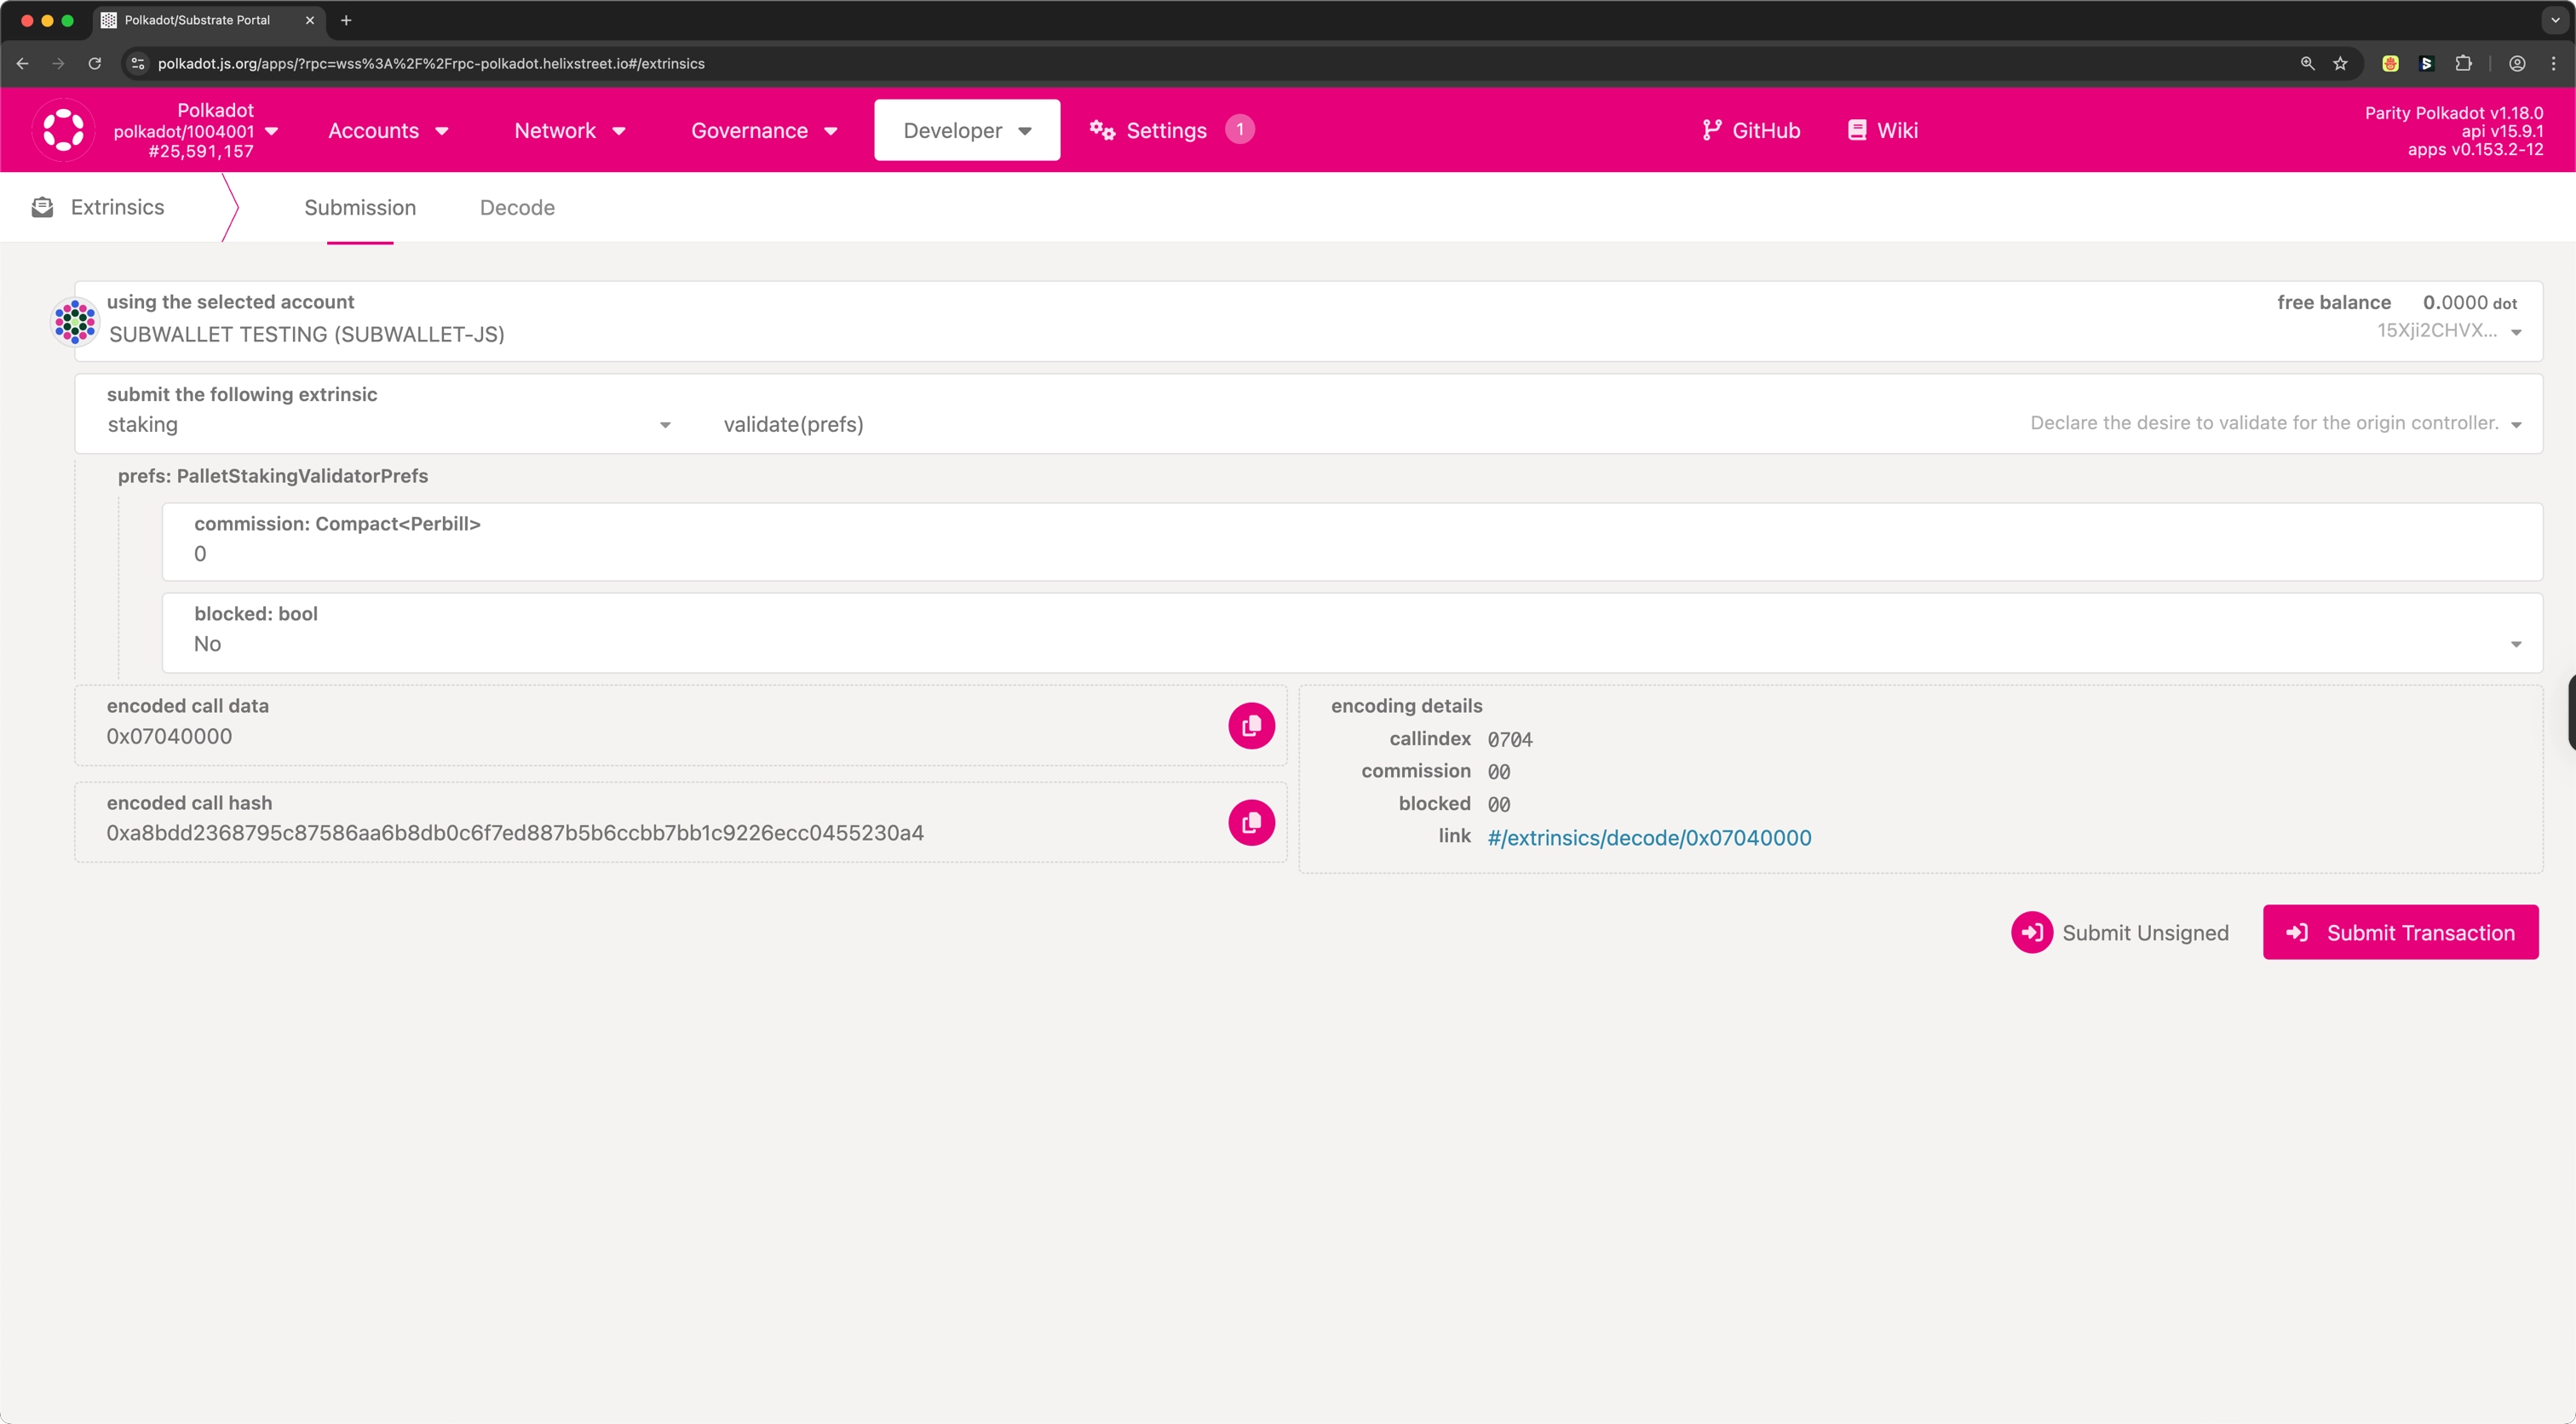
4. Paste the session keys and proof from `author_rotateKeysWithOwner` (or use the keys from `author_rotateKeys` with `0x00` as the proof if runtime 2.2.0 is not yet live on your network), set the commission, allow or block new nominations, then click **Bond & Validate** to link your validator with its session keys.
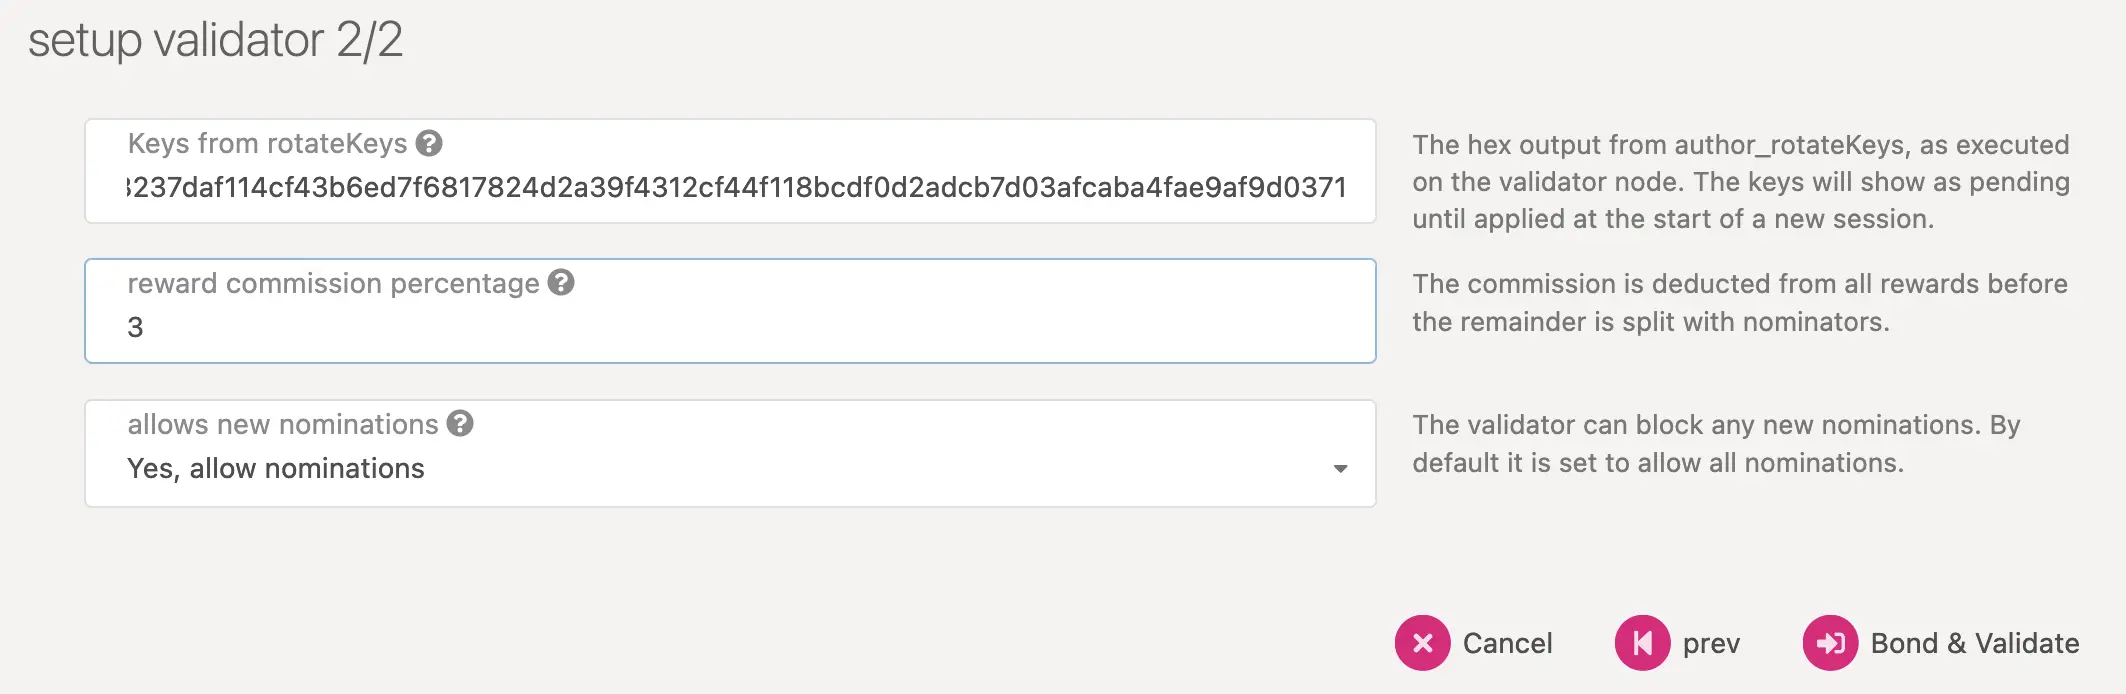
You can also set the **commission** and **blocked** nominations option via `staking.validate` extrinsic. By default, the blocked option is set to FALSE (i.e., the validator accepts nominations).
!!! warning
As of the March 2026 runtime upgrade, a **minimum commission of 10%** is required for all validators. Setting a commission rate below 10% will make your validator permissionlessly chill-able through the `staking.chillOther` extrinsic. See [Minimum Commission](/node-infrastructure/run-a-validator/requirements/#minimum-commission) for details.
### Monitor Validation Status and Slots
On the [**Staking**](https://polkadot.js.org/apps/#/staking) tab in Polkadot.js Apps, you can see your validator's status, the number of available validator slots, and the nodes that have signaled their intent to validate. Your node may initially appear in the waiting queue, especially if the validator slots are full. The following is an example view of the **Staking** tab:
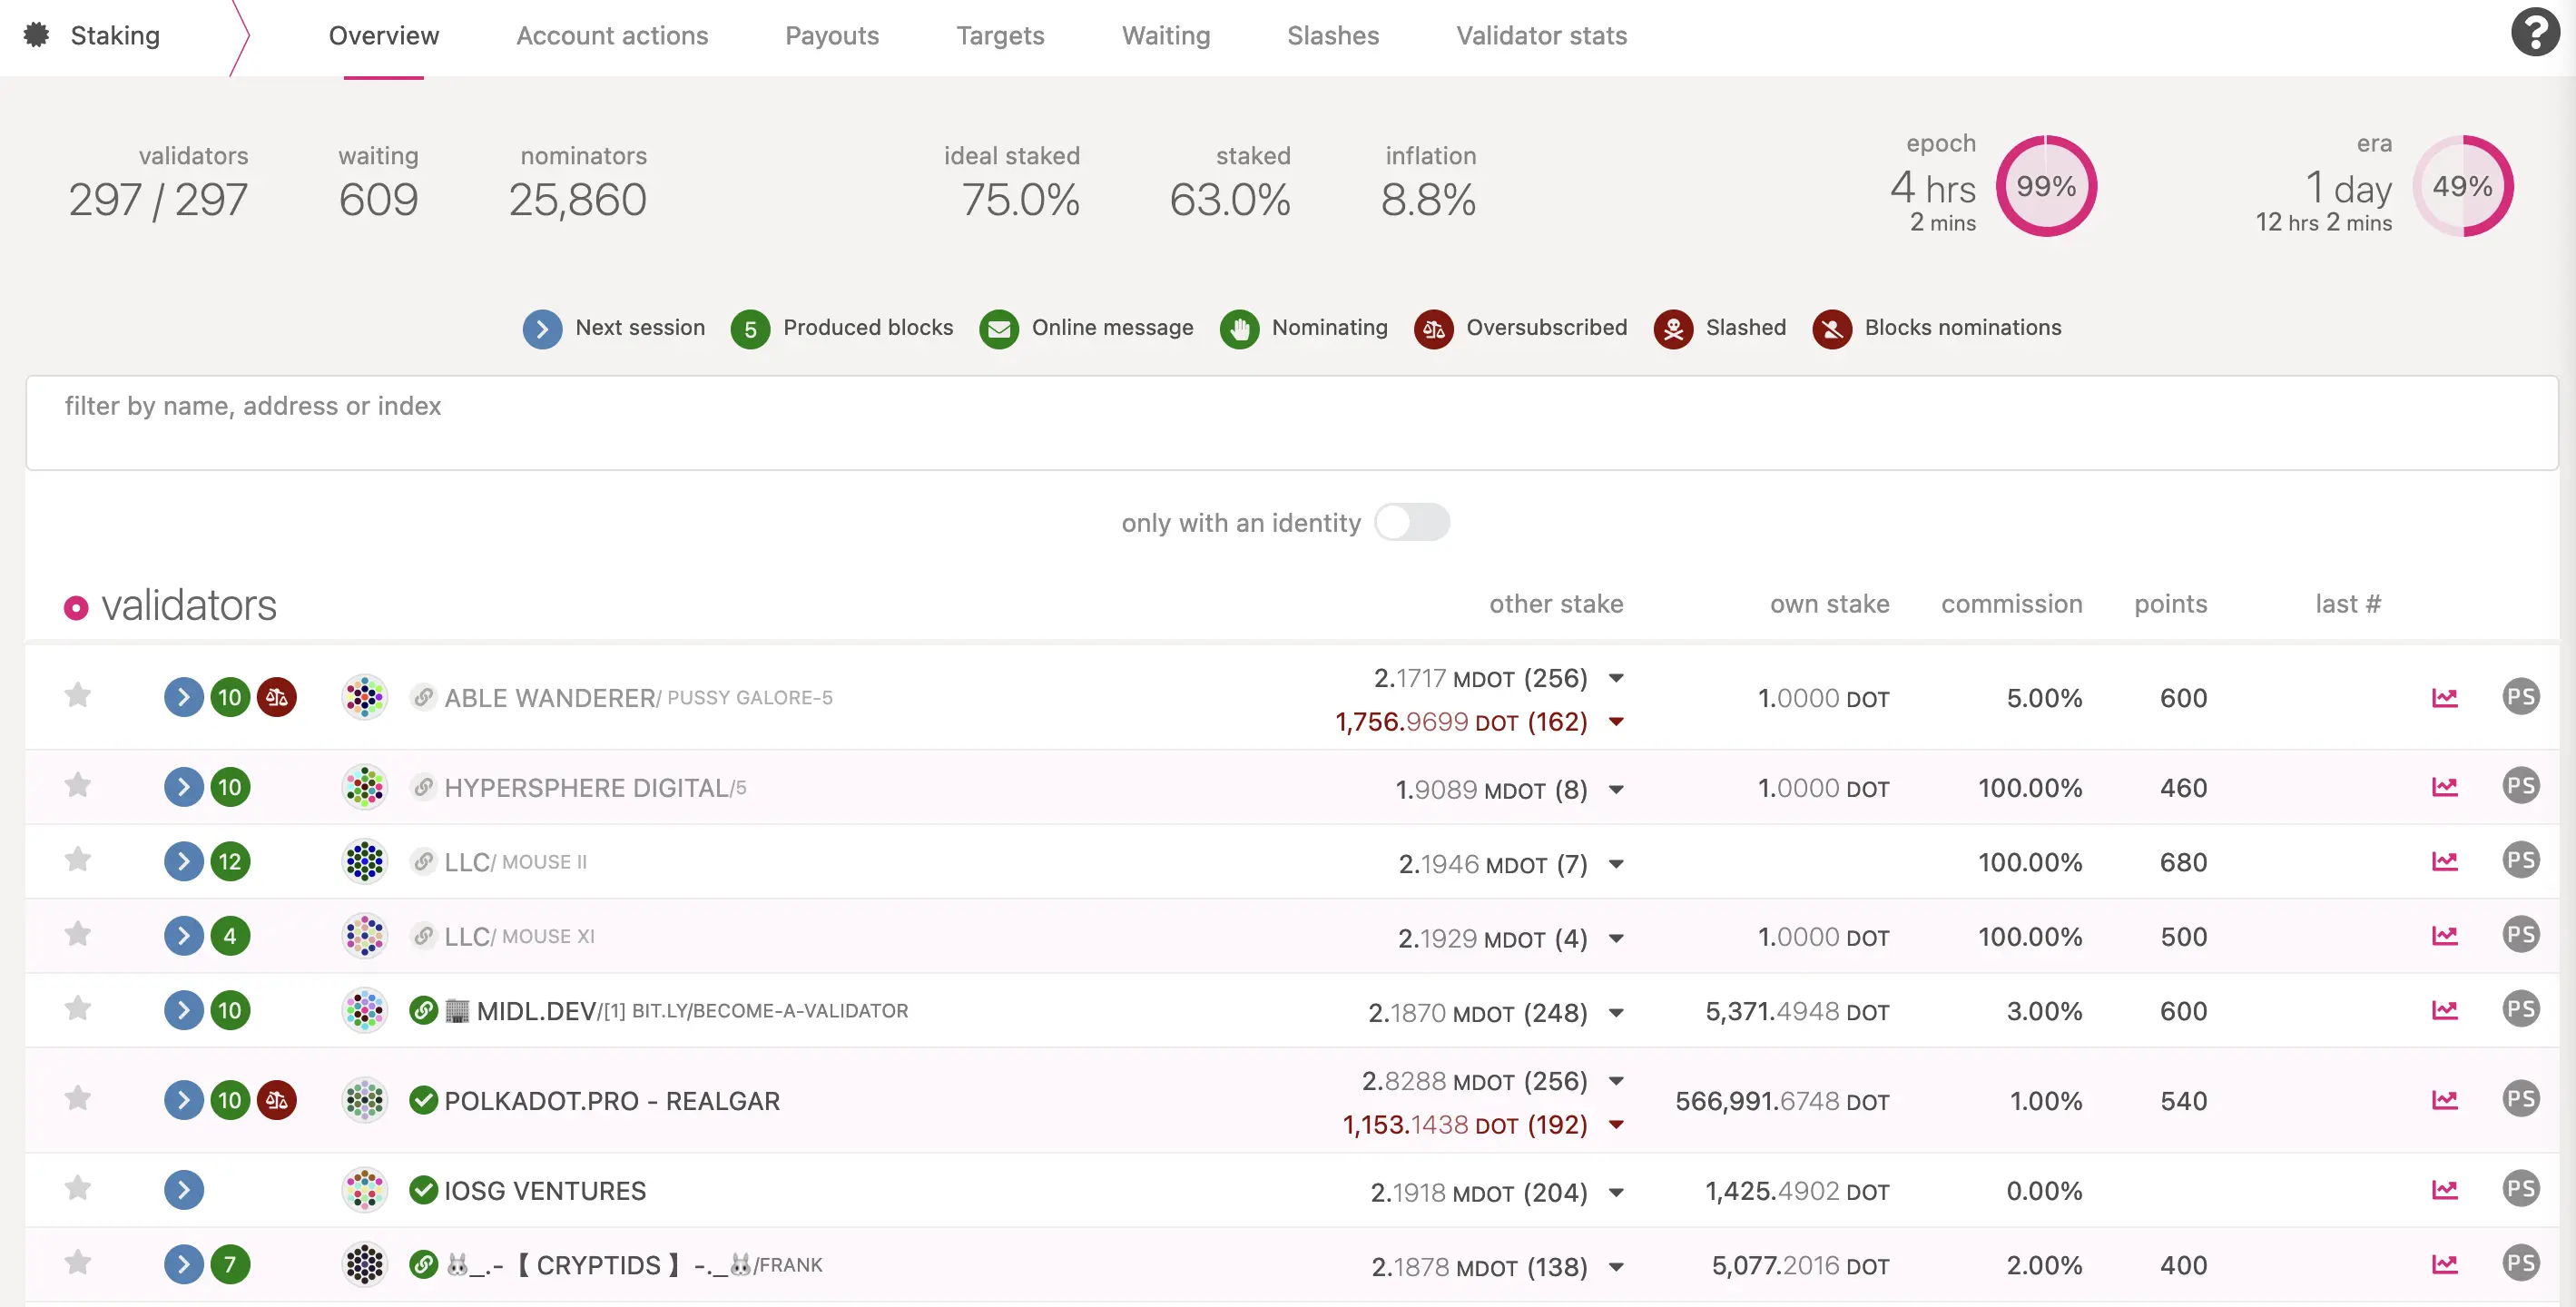
The validator set refreshes each era. If there's an available slot in the next era, your node may be selected to move from the waiting queue to the active validator set, allowing it to start validating blocks. If your validator is not selected, it remains in the waiting queue. Increasing your stake or gaining more nominators may improve your chance of being selected in future eras.
## Run a Validator Using Systemd
Running your Polkadot validator as a [systemd](https://en.wikipedia.org/wiki/Systemd) service is an effective way to ensure its high uptime and reliability. Using systemd allows your validator to automatically restart after server reboots or unexpected crashes, significantly reducing the risk of slashing due to downtime.
This following sections will walk you through creating and managing a systemd service for your validator, allowing you to seamlessly monitor and control it as part of your Linux system.
Ensure the following requirements are met before proceeding with the systemd setup:
- Confirm your system meets the [requirements](/node-infrastructure/run-a-validator/requirements/) for running a validator.
- Ensure you meet the [minimum bond requirements](https://wiki.polkadot.com/general/chain-state-values/#minimum-validator-bond) for validating.
- Verify the Polkadot binary is [installed](/node-infrastructure/run-a-validator/onboarding-and-offboarding/set-up-validator/#install-the-polkadot-binaries).
### Create the Systemd Service File
First create a new unit file called `polkadot-validator.service` in `/etc/systemd/system/`:
```bash
touch /etc/systemd/system/polkadot-validator.service
```
In this unit file, you will write the commands that you want to run on server boot/restart:
```systemd title="/etc/systemd/system/polkadot-validator.service"
[Unit]
Description=Polkadot Node
After=network.target
Documentation=https://github.com/paritytech/polkadot-sdk
[Service]
EnvironmentFile=-/etc/default/polkadot
ExecStart=/usr/bin/polkadot $POLKADOT_CLI_ARGS
User=polkadot
Group=polkadot
Restart=always
RestartSec=120
CapabilityBoundingSet=
LockPersonality=true
NoNewPrivileges=true
PrivateDevices=true
PrivateMounts=true
PrivateTmp=true
PrivateUsers=true
ProtectClock=true
ProtectControlGroups=true
ProtectHostname=true
ProtectKernelModules=true
ProtectKernelTunables=true
ProtectSystem=strict
RemoveIPC=true
RestrictAddressFamilies=AF_INET AF_INET6 AF_NETLINK AF_UNIX
RestrictNamespaces=false
RestrictSUIDSGID=true
SystemCallArchitectures=native
SystemCallFilter=@system-service
SystemCallFilter=landlock_add_rule landlock_create_ruleset landlock_restrict_self seccomp mount umount2
SystemCallFilter=~@clock @module @reboot @swap @privileged
SystemCallFilter=pivot_root
UMask=0027
[Install]
WantedBy=multi-user.target
```
!!! warning "Restart delay and equivocation risk"
It is recommended that a node's restart be delayed with `RestartSec` in the case of a crash. It's possible that when a node crashes, consensus votes in GRANDPA aren't persisted to disk. In this case, there is potential to equivocate when immediately restarting. Delaying the restart will allow the network to progress past potentially conflicting votes.
### Run the Service
Activate the systemd service to start on system boot by running:
```bash
systemctl enable polkadot-validator.service
```
To start the service manually, use:
```bash
systemctl start polkadot-validator.service
```
Check the service's status to confirm it is running:
```bash
systemctl status polkadot-validator.service
```
To view the logs in real-time, use [journalctl](https://www.freedesktop.org/software/systemd/man/latest/journalctl.html) like so:
```bash
journalctl -f -u polkadot-validator
```
With these steps, you can effectively manage and monitor your validator as a systemd service.
Once your validator is active, it's officially part of Polkadot's security infrastructure. For questions or further support, you can reach out to the [Polkadot Validator chat](https://matrix.to/#/!NZrbtteFeqYKCUGQtr:matrix.parity.io?via=matrix.parity.io&via=matrix.org&via=web3.foundation) for tips and troubleshooting.