` for Polkadot TestNet. Can also be used programmatically via `fetch()` |
| Smoldot Light Client | Coming Soon | Fully decentralized retrieval via the `bitswap_block` RPC, enabling trustless data access without connecting to a full node |
!!! warning
Generic public IPFS gateways like `ipfs.io` or `cloudflare-ipfs.com` are **deprecated** for Bulletin Chain retrieval. They do not reliably serve Bulletin Chain data and introduce external single points of failure.
!!! tip
For fully decentralized retrieval, use Direct P2P (Helia) or the upcoming Smoldot light client support.
## Data Lifecycle
The typical lifecycle of data on the Bulletin Chain follows these steps:
1. **Authorization**: Obtain authorization to store data through the faucet (Polkadot TestNet) or from a privileged account (MainNet).
2. **Storage**: Submit a `store` or `store_with_cid_config` transaction with your data payload.
3. **Retrieval**: Fetch data from collator nodes using the CID via the Console UI, Direct P2P (Helia), the Bulletin Chain IPFS gateway, or (coming soon) the Smoldot light client.
4. **Renewal**: Before the retention period expires, submit a `renew` transaction to extend the data's lifetime.
## Size Limits
| Parameter | Value |
|:---:|:--:|
| Max transaction size | ~8 MiB |
| Max file size (chunked) | ~64 MiB |
| Retention period (Polkadot TestNet) | ~2 weeks |
For files larger than the max transaction size, data must be split into chunks using the [DAG-PB (UnixFS)](https://ipld.io/specs/codecs/dag-pb/) standard. Each chunk is stored as a separate transaction. A final manifest transaction is uploaded last, containing the CIDs of all chunks. The manifest's CID becomes the root CID for the complete file. IPFS clients can then retrieve and reassemble the file automatically using the manifest.
## Network Endpoints
| Network | Endpoint |
|:--:|:--:|
| Bulletin Chain RPC (Polkadot TestNet) | `wss://paseo-bulletin-rpc.polkadot.io` |
| IPFS Gateway (Polkadot TestNet) | `https://paseo-ipfs.polkadot.io` |
## Where to Go Next
- Guide __Store Data on the Bulletin Chain__
---
Learn how to authorize your account, store an image, retrieve it, and manage renewals using the Console UI or PAPI.
[:octicons-arrow-right-24: Get Started](/chain-interactions/store-data/bulletin-chain/)
---
Page Title: Deploy an ERC-20 Using Hardhat
- Resolved Markdown: https://docs.polkadot.com/smart-contracts/cookbook/smart-contracts/deploy-erc20/erc20-hardhat.md
- Canonical (HTML): https://docs.polkadot.com/smart-contracts/cookbook/smart-contracts/deploy-erc20/erc20-hardhat/
- Summary: Deploy an ERC-20 token on Polkadot Hub using PVM. This guide covers contract creation, compilation, deployment, and interaction via Hardhat.
- Word Count: 1087; Token Estimate: 2046
- Last Updated: 2026-06-04T16:08:37+00:00
- Version Hash: sha256:adc4baa9da9436508faeab0d2274720a8e26135dae3fb5b3e8cf28fd6b798a2a
# Deploy an ERC-20 Using Hardhat
## Introduction
[ERC-20](https://eips.ethereum.org/EIPS/eip-20) tokens are fungible tokens commonly used for creating cryptocurrencies, governance tokens, and staking mechanisms. Polkadot Hub enables easy deployment of ERC-20 tokens via Ethereum-compatible smart contracts and tools.
This guide demonstrates how to deploy an ERC-20 contract on Polkadot Hub TestNet using [Hardhat](https://hardhat.org/), an Ethereum development environment. The ERC-20 contract can be retrieved from OpenZeppelin's [GitHub repository](https://github.com/OpenZeppelin/openzeppelin-contracts/tree/v5.6.1/contracts/token/ERC20) or generated with the [OpenZeppelin Contracts Wizard for Polkadot](https://wizard.openzeppelin.com/polkadot).
## Prerequisites
Before you begin, ensure you have the following:
- A basic understanding of [Solidity](https://www.soliditylang.org/) programming and [ERC-20](https://ethereum.org/developers/docs/standards/tokens/erc-20/) fungible tokens.
- [Node.js](https://nodejs.org/en/download) v22.13.1 or later installed.
- Test tokens for gas fees, available from the [Polkadot faucet](https://faucet.polkadot.io/). See [Get Test Tokens](/smart-contracts/faucet/#get-test-tokens) for a guide to using the faucet.
- A wallet with a private key for signing transactions.
## Set Up Your Project
This tutorial uses a [Hardhat ERC-20 template](https://github.com/polkadot-developers/revm-hardhat-examples/tree/master/erc20-hardhat) that contains all the necessary files.
To get started, take the following steps:
1. Clone the GitHub repository locally:
```bash
git clone https://github.com/polkadot-developers/revm-hardhat-examples/
cd revm-hardhat-examples/erc20-hardhat
```
2. Install the dependencies using the following command:
```bash
npm i
```
This command will fetch all the necessary packages to help you use Hardhat to deploy an ERC-20 to Polkadot.
## Configure Hardhat
If you started with the cloned Hardhat ERC-20 template, `hardhat.config.ts` is already configured to deploy to the Polkadot TestNet as shown in the example below:
```ts title="hardhat.config.ts" hl_lines="14-19"
import { HardhatUserConfig, vars } from "hardhat/config";
import "@nomicfoundation/hardhat-toolbox";
const config: HardhatUserConfig = {
solidity: {
version: "0.8.28",
settings: {
optimizer: {
enabled: true,
runs: 200,
},
},
},
networks: {
polkadotTestnet: {
url: "https://services.polkadothub-rpc.com/testnet",
accounts: vars.has("TESTNET_PRIVATE_KEY") ? [vars.get("TESTNET_PRIVATE_KEY")] : [],
},
},
mocha: {
timeout: 40000,
},
};
export default config;
```
!!! tip
Visit the Hardhat [Configuration variables](https://v2.hardhat.org/hardhat-runner/docs/guides/configuration-variables) documentation to learn how to use Hardhat to handle your private keys securely.
## Compile the Contract
Next, compile the contract included with the template by running the following command:
```bash
npx hardhat compile
```
If everything compiles successfully, you will see output similar to the following:
npx hardhat compile
Generating typings for: 23 artifacts in dir: typechain-types for target: ethers-v6
Successfully generated 62 typings!
Compiled 21 Solidity files successfully (evm target: paris).
## Test the Contract
You can view the predefined test file at [`test/MyToken.test.ts`](https://github.com/polkadot-developers/revm-hardhat-examples/blob/master/erc20-hardhat/test/MyToken.test.ts). This example test includes verification of the following:
- The token name and symbol exist (confirms deployment) and are correct.
- The token owner is correctly configured.
- The initial token supply is zero.
- The owner can mint tokens.
- The total supply increases after a mint.
- Successful mints to different test addresses with expected account balance and total supply changes.
Run the tests using the following command:
```bash
npx hardhat test --network polkadotTestnet
```
If tests are successful, you will see outputs similar to the following:
npx hardhat test --network polkadotTestnet
MyToken
Deployment
✔ Should have correct name and symbol
✔ Should set the right owner
✔ Should have zero initial supply
Minting
✔ Should allow owner to mint tokens
✔ Should increase total supply on mint
Multiple mints
✔ Should correctly track balance after multiple mints
6 passing (369ms)
## Deploy the Contract
You are now ready to deploy the contract to your chosen network. This example demonstrates deployment to the Polkadot TestNet. Deploy the contract as follows:
1. Run the following command in your terminal:
```bash
npx hardhat ignition deploy ./ignition/modules/MyToken.ts --network polkadotTestnet
```
2. Confirm the target deployment network name and chain ID when prompted:
npx hardhat ignition deploy ./ignition/modules/MyToken.ts --network polkadotTestnet
✔ Confirm deploy to network polkadotTestnet (420420417)? … yes
Hardhat Ignition 🚀
Deploying [ TokenModule ]
Batch #1
Executed TokenModule#MyToken
Batch #2
Executed TokenModule#MyToken.mint
[ TokenModule ] successfully deployed 🚀
Deployed Addresses
TokenModule#MyToken - 0xc01Ee7f10EA4aF4673cFff62710E1D7792aBa8f3
Congratulations! You've successfully deployed an ERC-20 token contract to Polkadot Hub TestNet using Hardhat. Consider the following resources to build upon your progress.
## Where to Go Next
- Guide __Deploy an NFT__
---
Walk through deploying an NFT to the Polkadot Hub using Hardhat.
[:octicons-arrow-right-24: Get Started](/smart-contracts/cookbook/smart-contracts/deploy-nft/nft-hardhat/)
- Guide __Create a DApp__
---
Learn step-by-step how to build a fully functional dApp that interacts with a smart contract deployed via Hardhat.
[:octicons-arrow-right-24: Get Started](/smart-contracts/cookbook/dapps/zero-to-hero/)
---
Page Title: Deploy an ERC-20 Using Remix IDE
- Resolved Markdown: https://docs.polkadot.com/smart-contracts/cookbook/smart-contracts/deploy-erc20/erc20-remix.md
- Canonical (HTML): https://docs.polkadot.com/smart-contracts/cookbook/smart-contracts/deploy-erc20/erc20-remix/
- Summary: Deploy an ERC-20 token contract on Polkadot Hub. This guide covers contract creation, compilation, deployment, and interaction via the Remix IDE.
- Word Count: 865; Token Estimate: 1402
- Last Updated: 2026-06-04T16:08:37+00:00
- Version Hash: sha256:b34b29c8409aafae22df8131de569fc8b4c264c13c1b11dd6aa1620e23e07f8c
# Deploy an ERC-20 Using Remix IDE
## Introduction
[ERC-20](https://eips.ethereum.org/EIPS/eip-20) tokens are fungible tokens commonly used for creating cryptocurrencies, governance tokens, and staking mechanisms. Polkadot Hub enables easy token deployment with Ethereum-compatible smart contracts and tools via the EVM backend.
This tutorial covers deploying an ERC-20 contract on Polkadot Hub TestNet using [Remix IDE](https://remix.ethereum.org/), a web-based development tool. The ERC-20 contract can be retrieved from OpenZeppelin's [GitHub repository](https://github.com/OpenZeppelin/openzeppelin-contracts/tree/v5.6.1/contracts/token/ERC20) or generated with the [OpenZeppelin Contracts Wizard for Polkadot](https://wizard.openzeppelin.com/polkadot).
## Prerequisites
Before you begin, ensure you have:
- A basic understanding of [Solidity](https://www.soliditylang.org/) programming and [ERC-20](https://ethereum.org/developers/docs/standards/tokens/erc-20/) fungible tokens.
- An EVM-compatible [wallet](/smart-contracts/connect/) connected to Polkadot Hub. This example utilizes [MetaMask](https://metamask.io/).
- Test tokens for gas fees, available from the [Polkadot faucet](https://faucet.polkadot.io/). See [Get Test Tokens](/smart-contracts/faucet/#get-test-tokens) for a guide to using the faucet.
## Create Your Contract
Follow the steps below to create the ERC-20 contract:
1. Navigate to [Remix IDE](https://remix.ethereum.org/) in your web browser.
2. Select the **Create new file** button under the **contracts** folder, and name your contract `MyToken.sol`.

3. Now, paste the following ERC-20 contract code into `MyToken.sol`:
```solidity title="MyToken.sol"
// SPDX-License-Identifier: MIT
// Compatible with OpenZeppelin Contracts ^5.4.0
pragma solidity ^0.8.27;
import {ERC20} from "@openzeppelin/contracts/token/ERC20/ERC20.sol";
import {ERC20Permit} from "@openzeppelin/contracts/token/ERC20/extensions/ERC20Permit.sol";
import {Ownable} from "@openzeppelin/contracts/access/Ownable.sol";
contract MyToken is ERC20, Ownable, ERC20Permit {
constructor(address initialOwner)
ERC20("MyToken", "MTK")
Ownable(initialOwner)
ERC20Permit("MyToken")
{}
function mint(address to, uint256 amount) public onlyOwner {
_mint(to, amount);
}
}
```
!!! tip
The [OpenZeppelin Contracts Wizard for Polkadot](https://wizard.openzeppelin.com/polkadot) was used to generate this example ERC-20 contract. Use it to customize and generate your own ERC-20, ERC-721, or other OpenZeppelin-standard contracts for Polkadot Hub.
## Compile the Contract
Solidity source code compiles into bytecode that can be deployed on the blockchain. During this process, the compiler checks the contract for syntax errors, ensures type safety, and generates the machine-readable instructions needed for blockchain execution.
Ensure your `MyToken.sol` contract is open in the Remix IDE Editor, and use the following steps to compile:
1. Select the **Solidity Compiler** plugin from the left panel.
2. Select the **Compile MyToken.sol** button.
The **Solidity Compiler** icon will display a green checkmark once the contract compiles successfully. If any issues arise during contract compilation, errors and warnings will appear in the terminal panel at the bottom of the screen.

## Deploy the Contract
Follow these steps to deploy the contract using Remix:
1. Select **Deploy & Run Transactions** from the left panel.
2. Ensure your MetaMask wallet is connected to Polkadot Hub TestNet, then select the **Environment** dropdown and select **Injected Provider - MetaMask**.
3. Configure the contract parameters by entering the address that will own the deployed token contract.
4. Select the **Deploy** button to initiate the deployment.
4. Approve the transaction in your MetaMask wallet when prompted.
6. You will see the transaction details in the terminal when the deployment succeeds, including the contract address and deployment transaction hash.

Once successfully deployed, your contract will appear in the **Deployed Contracts** section, ready for interaction.
## Interact with the Contract
Once deployed, you can interact with your contract through Remix. Find your contract under **Deployed/Unpinned Contracts**, and select it to expand the available methods. In this example, you'll mint some tokens to a given address using the following steps:
1. Expand the **mint** function, then enter the recipient address and the amount (remember to add 18 zeros for one whole token).
2. Select **transact**.
3. Approve the transaction in your MetaMask wallet when prompted.
4. You will see a green check mark in the terminal when the transaction is successful.
5. You can also call the **balanceOf** function by passing the address of the **mint** call to confirm the new balance.

Feel free to explore and interact with the contract's other functions by selecting the method, providing any required parameters, and confirming the transaction in MetaMask when prompted.
Congratulations! You've successfully deployed an ERC-20 token contract to Polkadot Hub TestNet using Remix IDE. Consider the following resources to build upon your progress.
## Where to Go Next
- Guide __Deploy an NFT with Remix__
---
Walk through deploying an ERC-721 Non-Fungible Token (NFT) using OpenZeppelin's battle-tested NFT implementation and Remix.
[:octicons-arrow-right-24: Get Started](/smart-contracts/cookbook/smart-contracts/deploy-nft/nft-remix/)
---
Page Title: Deploy an ERC-721 NFT Using Remix
- Resolved Markdown: https://docs.polkadot.com/smart-contracts/cookbook/smart-contracts/deploy-nft/nft-remix.md
- Canonical (HTML): https://docs.polkadot.com/smart-contracts/cookbook/smart-contracts/deploy-nft/nft-remix/
- Summary: Learn how to deploy an ERC-721 NFT contract to Polkadot Hub using Remix, a browser-based IDE for quick prototyping and learning.
- Word Count: 673; Token Estimate: 1135
- Last Updated: 2026-06-04T16:08:37+00:00
- Version Hash: sha256:4f5abda2e8dd2b4cfdedf802e3f18e8424a76a74437ea25cbd105d56b379c1be
# Deploy an NFT with Remix
## Introduction
Non-Fungible Tokens (NFTs) represent unique digital assets commonly used for digital art, collectibles, gaming, and identity verification.
This guide demonstrates how to deploy an [ERC-721](https://eips.ethereum.org/EIPS/eip-721) NFT contract to [Polkadot Hub](/smart-contracts/overview/#smart-contract-development). You'll use [OpenZeppelin's battle-tested NFT implementation](https://github.com/OpenZeppelin/openzeppelin-contracts) and [Remix](https://remix.ethereum.org/), a visual, browser-based environment perfect for rapid prototyping and learning. It requires no local installation and provides an intuitive interface for contract development.
## Prerequisites
- A basic understanding of [Solidity](https://www.soliditylang.org/) programming and [ERC-721 NFT](https://ethereum.org/developers/docs/standards/tokens/erc-721/) standards.
- An EVM-compatible [wallet](/smart-contracts/connect/) connected to Polkadot Hub. This example utilizes [MetaMask](https://metamask.io/).
- Test tokens for gas fees (available from the [Polkadot faucet](https://faucet.polkadot.io/)). See [Get Test Tokens](/smart-contracts/faucet/#get-test-tokens) for a guide to using the faucet.
## Create Your Contract
Follow the steps below to create the ERC-721 contract:
1. Navigate to [Remix IDE](https://remix.ethereum.org/) in your web browser.
2. Select the **Create new file** button under the **contracts** folder, and name your contract `MyNFT.sol`.

3. Now, paste the following ERC-721 contract code into `MyNFT.sol`:
```solidity title="contracts/MyNFT.sol"
// SPDX-License-Identifier: MIT
pragma solidity ^0.8.20;
import "@openzeppelin/contracts/token/ERC721/ERC721.sol";
import "@openzeppelin/contracts/access/Ownable.sol";
contract MyNFT is ERC721, Ownable {
uint256 private _nextTokenId;
constructor(
address initialOwner
) ERC721("MyToken", "MTK") Ownable(initialOwner) {}
function safeMint(address to) public onlyOwner {
uint256 tokenId = _nextTokenId++;
_safeMint(to, tokenId);
}
}
```
!!! tip
The [OpenZeppelin Contracts Wizard for Polkadot](https://wizard.openzeppelin.com/polkadot) was used to generate this example ERC-721 contract. Use it to customize and generate your own ERC-20, ERC-721, or other OpenZeppelin-standard contracts for Polkadot Hub.
## Compile the Contract
Solidity source code compiles into bytecode that can be deployed on the blockchain. During this process, the compiler checks the contract for syntax errors, ensures type safety, and generates the machine-readable instructions needed for blockchain execution.
Ensure your `MyNFT.sol` contract is open in the Remix IDE Editor, and use the following steps to compile:
1. Select the **Solidity Compiler** plugin from the left panel.
2. Select the **Compile MyToken.sol** button.
The **Solidity Compiler** icon will display a green checkmark once the contract compiles successfully. If any issues arise during contract compilation, errors and warnings will appear in the terminal panel at the bottom of the screen.

## Deploy the Contract
Follow these steps to deploy the contract using Remix:
1. Select **Deploy & Run Transactions** from the left panel.
2. Ensure your MetaMask wallet is connected to Polkadot Hub TestNet, then select the **Environment** dropdown and select **Injected Provider - MetaMask**.

3. Configure the contract parameters by entering the address that will own the deployed NFT contract.
4. Select the **Deploy** button to initiate the deployment.
5. Approve the transaction in your MetaMask wallet when prompted.
6. You will see the transaction details in the terminal when the deployment succeeds, including the contract address and deployment transaction hash.

Once successfully deployed, your contract will appear in the **Deployed Contracts** section, ready for interaction.
Congratulations! You've successfully deployed an ERC-721 NFT contract to Polkadot Hub TestNet using Remix IDE. Consider the following resources to build upon your progress.
## Where to Go Next
- Guide __Deploy an ERC-20__
---
Walk through deploying a fully-functional ERC-20 to Polkadot Hub using Remix.
[:octicons-arrow-right-24: Get Started](/smart-contracts/cookbook/smart-contracts/deploy-erc20/erc20-remix/)
---
Page Title: Deploy an ERC-721 Using Hardhat
- Resolved Markdown: https://docs.polkadot.com/smart-contracts/cookbook/smart-contracts/deploy-nft/nft-hardhat.md
- Canonical (HTML): https://docs.polkadot.com/smart-contracts/cookbook/smart-contracts/deploy-nft/nft-hardhat/
- Summary: Learn how to deploy an ERC-721 NFT contract to Polkadot Hub using Hardhat, a comprehensive development environment with built-in deployment capabilities.
- Word Count: 976; Token Estimate: 1826
- Last Updated: 2026-06-04T16:08:37+00:00
- Version Hash: sha256:cf85263483252c058f46af69eb0ca948509aa03334e933e7786decb689acf4d4
# Deploy an ERC-721 Using Hardhat
## Introduction
Non-Fungible Tokens (NFTs) represent unique digital assets commonly used for digital art, collectibles, gaming, and identity verification.
This guide demonstrates how to deploy an [ERC-721](https://eips.ethereum.org/EIPS/eip-721) NFT contract to [Polkadot Hub](/smart-contracts/overview/#smart-contract-development) TestNet. You'll use OpenZeppelin's battle-tested [NFT implementation](https://github.com/OpenZeppelin/openzeppelin-contracts) and [Hardhat](https://hardhat.org/docs/getting-started), a comprehensive development environment with built-in testing, debugging, and deployment capabilities. You can generate a custom NFT contract with the [OpenZeppelin Contracts Wizard for Polkadot](https://wizard.openzeppelin.com/polkadot), then use it in this Hardhat workflow. Hardhat uses standard Solidity compilation to generate EVM bytecode, making it fully compatible with Polkadot Hub's EVM environment.
## Prerequisites
Before you begin, ensure you have the following:
- A basic understanding of [Solidity](https://www.soliditylang.org/) programming and [ERC-721](https://ethereum.org/developers/docs/standards/tokens/erc-721/) non-fungible tokens.
- [Node.js](https://nodejs.org/en/download) v22.13.1 or later installed.
- Test tokens for gas fees, available from the [Polkadot faucet](https://faucet.polkadot.io/). See [Get Test Tokens](/smart-contracts/faucet/#get-test-tokens) for a guide to using the faucet.
- A wallet with a private key for signing transactions.
## Set Up Your Project
1. Use the following terminal commands to create a directory and initialize your Hardhat project inside of it:
```bash
mkdir hardhat-nft-deployment
cd hardhat-nft-deployment
npx hardhat@^2.27.0 init
```
2. Install the OpenZeppelin contract dependencies using the command:
```bash
npm install @openzeppelin/contracts
```
## Configure Hardhat
Open `hardhat.config.ts` and update to add `polkadotTestnet` to the `networks` configuration as highlighted in the following example code:
```typescript title="hardhat.config.ts" hl_lines='18-23'
import type { HardhatUserConfig } from 'hardhat/config';
import hardhatToolboxViemPlugin from '@nomicfoundation/hardhat-toolbox-viem';
import { vars } from 'hardhat/config';
const config: HardhatUserConfig = {
plugins: [hardhatToolboxViemPlugin],
solidity: {
version: '0.8.28',
settings: {
optimizer: {
enabled: true,
runs: 200,
},
},
},
networks: {
polkadotTestnet: {
url: 'https://services.polkadothub-rpc.com/testnet',
chainId: 420420417,
accounts: [vars.get('PRIVATE_KEY')],
},
},
};
export default config;
```
!!! tip
Visit the Hardhat [Configuration variables](https://v2.hardhat.org/hardhat-runner/docs/guides/configuration-variables) documentation to learn how to use Hardhat to handle your private keys securely.
## Create the Contract
Follow these steps to create your smart contract:
1. Delete the default contract file(s) in the `contracts` directory.
2. Create a new file named `MyNFT.sol` inside the `contracts` directory.
3. Add the following code to create the `MyNFT.sol` smart contract:
```solidity title="contracts/MyNFT.sol"
// SPDX-License-Identifier: MIT
pragma solidity ^0.8.20;
import "@openzeppelin/contracts/token/ERC721/ERC721.sol";
import "@openzeppelin/contracts/access/Ownable.sol";
contract MyNFT is ERC721, Ownable {
uint256 private _nextTokenId;
constructor(
address initialOwner
) ERC721("MyToken", "MTK") Ownable(initialOwner) {}
function safeMint(address to) public onlyOwner {
uint256 tokenId = _nextTokenId++;
_safeMint(to, tokenId);
}
}
```
## Compile the Contract
Compile your `MyNFT.sol` contract using the following command:
```bash
npx hardhat compile
```
You will see a message in the terminal confirming the contract was successfully compiled, similar to the following:
npx hardhat compile
Downloading solc 0.8.28
Downloading solc 0.8.28 (WASM build)
Compiled 1 Solidity file with solc 0.8.28 (evm target: cancun)
## Deploy the Contract
You are now ready to deploy the contract to your chosen network. This example demonstrates deployment to the Polkadot TestNet. Deploy the contract as follows:
1. Delete the default file(s) inside the `ignition/modules` directory.
2. Create a new file named `MyNFT.ts` inside the `ignition/modules` directory.
3. Open `ignition/modules/MyNFT.ts` and add the following code to create your deployment module:
```typescript title="ignition/modules/MyNFT.ts"
import { buildModule } from '@nomicfoundation/hardhat-ignition/modules';
export default buildModule('MyNFTModule', (m) => {
const initialOwner = m.getParameter('initialOwner', 'INSERT_OWNER_ADDRESS');
const myNFT = m.contract('MyNFT', [initialOwner]);
return { myNFT };
});
```
Replace `INSERT_OWNER_ADDRESS` with your desired owner address.
4. Deploy your contract to Polkadot Hub TestNet using the following command:
```bash
npx hardhat ignition deploy ignition/modules/MyNFT.ts --network polkadotTestnet
```
5. Confirm the target deployment network name and chain ID when prompted:
npx hardhat ignition deploy ignition/modules/MyNFT.ts --network polkadotHubTestnet
✔ Confirm deploy to network polkadotTestnet (420420417)? … yes
Hardhat Ignition 🚀
Deploying [ MyNFTModule ]
Batch #1
Executed MyNFTModule#MyNFT
Batch #2
Executed MyNFTModule#MyNFT.safeMint
[ TokenModule ] successfully deployed 🚀
Deployed Addresses
MyNFTModule#MyNFT - 0x1234.......
Congratulations! You've successfully deployed an ERC-721 NFT contract to Polkadot Hub TestNet using Hardhat. Consider the following resources to build upon your progress.
## Where to Go Next
- Guide __Deploy an ERC-20__
---
Walk through deploying a fully-functional ERC-20 to Polkadot Hub using Hardhat.
[:octicons-arrow-right-24: Get Started](/smart-contracts/cookbook/smart-contracts/deploy-erc20/erc20-hardhat/)
- Guide __Create a DApp__
---
Learn step-by-step how to build a fully functional dApp that interacts with a smart contract deployed via Hardhat.
[:octicons-arrow-right-24: Get Started](/smart-contracts/cookbook/dapps/zero-to-hero/)
---
Page Title: dotNS Architecture
- Resolved Markdown: https://docs.polkadot.com/reference/apps/infrastructure/dotns/architecture.md
- Canonical (HTML): https://docs.polkadot.com/reference/apps/infrastructure/dotns/architecture/
- Summary: The cooperating contracts on Asset Hub that back the dotNS registry — name records, ownership, content references, and PopRules enforcement.
- Word Count: 468; Token Estimate: 705
- Last Updated: 2026-06-16T14:17:44+00:00
- Version Hash: sha256:291779c6de17299721fb06577d6877aad7c831e39a2e8e8092e33b522d2f29f2
# Architecture
## Introduction
dotNS is implemented as a set of cooperating contracts on Asset Hub, not as a single monolithic registrar. The split exists because the responsibilities are genuinely different — managing name records, enforcing PopRules pricing, and handling transfers are separate jobs — and contract boundaries map cleanly onto those slices.
This page documents what each contract is responsible for at a conceptual level, so a Product developer building against the dotNS surface knows which contract handles which interaction.
!!! warning "Provisional"
The complete contract map (every contract's name, address, ABI, and the precise responsibilities split between them) is still being finalized. This page documents the conceptual responsibilities; the per-contract reference will be added once the deployment is confirmed. The [TestNet Contracts](/reference/apps/infrastructure/dotns/testnet-contracts/) page tracks the current addresses as they stabilize.
## Conceptual Responsibilities
The contract set covers nine slices of the registry's job, grouped into three families:
- **Registry core**: The contracts that hold the name records themselves:
- A registry contract holding the `(namehash → record)` mapping and gating who can write to each record.
- A resolver contract responding to queries — read-side surface for "what record does this `namehash` currently have?"
- A records contract or substructure storing the `contenthash`, owner, and other per-name fields a resolver returns.
- **Registration and pricing**: The contracts that gate who can register what:
- A PopRules contract that evaluates a proposed registration against the pricing ladder (name length × PoP tier × suffix → free or deposit).
- A registrar contract that orchestrates the full registration flow: PopRules check, fee collection if applicable, write to the registry.
- A deposit/treasury contract managing the deposits paid by open-tier registrations.
- **Lifecycle**: The contracts that handle changes after registration:
- A transfer contract handling owner-changes for an existing name. See [Name Transfers](/reference/apps/infrastructure/dotns/transfer/).
- A renewal contract (or sub-mechanism) handling annual or per-period renewals where applicable.
- An admin/governance contract for operations that need to be governance-routed (reserved-name allocations, dispute resolution, contract upgrades).
A Product developer rarely interacts with the contracts directly — the [CLI](/reference/apps/infrastructure/dotns/cli/) and the higher-level [Register and Publish](/apps/deploy-your-app/) flow wrap the registration interactions. A Product reading name resolution data does so through the standard chain-client surface, calling into the resolver contract via the typed PAPI descriptor for Asset Hub.
## Where to Go Next
- Learn **PopRules and Pricing**
---
The ladder the registrar contract evaluates against — name length, PoP tier, deposit amounts.
[:octicons-arrow-right-24: Reference](/reference/apps/infrastructure/dotns/poprules-pricing/)
- Learn **TestNet Contracts**
---
The current TestNet addresses for the dotNS contract set, tracked as the surface stabilizes.
[:octicons-arrow-right-24: Reference](/reference/apps/infrastructure/dotns/testnet-contracts/)
---
Page Title: dotNS CLI Reference
- Resolved Markdown: https://docs.polkadot.com/reference/apps/infrastructure/dotns/cli.md
- Canonical (HTML): https://docs.polkadot.com/reference/apps/infrastructure/dotns/cli/
- Summary: Reference for @parity/dotns-cli — the command-line tool for managing .dot name registrations, contenthash updates, transfers, and renewals.
- Word Count: 575; Token Estimate: 1015
- Last Updated: 2026-06-16T14:17:44+00:00
- Version Hash: sha256:d5fc04d96cd87d148712e5d3ab1ec171f4093da2fe98d9815d4805d8e70d6b37
# CLI
## Introduction
[`@parity/dotns-cli`](https://www.npmjs.com/package/@parity/dotns-cli) is the command-line tool for interacting with the dotNS registry — registering a `.dot` name, updating its `contenthash`, transferring ownership, and renewing where applicable. It is the canonical way to perform these operations outside of the higher-level [Register and Publish](/apps/deploy-your-app/) flow that the Polkadot Product setup track wraps.
A Product developer building a typical publishing pipeline rarely calls the CLI directly — the setup track handles the common path. The CLI is the right tool when you need a fine-grained, scriptable interaction (CI publishing, batch operations across multiple names, debugging a registration failure).
!!! info "CLI version"
This page targets `@parity/dotns-cli` `0.6.2`. The CLI is in active development and breaking changes between versions are expected. To follow this reference, install this version (or check the page's last update against the latest release on npm).
## Command Families
The CLI exposes commands across three families that map onto the dotNS contract responsibilities:
- **Registration**: Commands that create a name record:
- Register a new name with a starting `contenthash`.
- Check PopRules eligibility for a proposed name and account (preview the deposit / free-tier outcome before submitting).
- **Records management**: Commands that mutate an existing name's fields:
- Update the `contenthash` to a new CID — this is what a Product owner runs when they publish a new bundle and want the `.dot` name to point at the new version.
- Set or unset administrative fields on the record.
- **Lifecycle**: Commands that change ownership or extend the registration:
- Transfer the name to another account.
- Renew the registration where renewals apply.
## Installing and Authenticating
The CLI is distributed as an npm package. Install it globally or run via `npx`. Operations that mutate state (registration, update, transfer) require an account that can sign the resulting Asset Hub transaction — the CLI accepts a key file, a connected hardware signer, or a Polkadot App session via a pairing flow, depending on the operation and the security posture the operator chooses.
For day-to-day Product publishing, the recommended account is the same paired account a developer uses with Polkadot Desktop, so PopRules tier and any reserved-name claims continue to apply consistently across the CLI and Desktop paths.
## Command Surface
Each command — subcommand path, required flags, optional flags, and exit codes — is enumerated here.
!!! warning "Provisional"
Per-flag details for each command are still being audited against the published surface. The table below lists the known top-level commands at `0.6.2`; the per-flag reference will be filled in once it is confirmed against the live package.
| Command | Family | Required flags | Optional flags | Notes |
|:-----------------------------------------|:------------------|:---------------|:---------------|:-----------|
| `register domain` | Registration | _Pending_ | _Pending_ | _Pending_ |
| `register subname` | Registration | _Pending_ | _Pending_ | _Pending_ |
| `lookup` | Records | _Pending_ | _Pending_ | _Pending_ |
| `content view` / `content set` | Records | _Pending_ | _Pending_ | _Pending_ |
| `text view` / `text set` | Records | _Pending_ | _Pending_ | _Pending_ |
| `pop set` / `pop info` | Records | _Pending_ | _Pending_ | _Pending_ |
| `store` | Records | _Pending_ | _Pending_ | _Pending_ |
| `account` | Lifecycle | _Pending_ | _Pending_ | _Pending_ |
| `bulletin` | Lifecycle | _Pending_ | _Pending_ | _Pending_ |
## Where to Go Next
- Guide **Register and Publish**
---
The higher-level publishing flow that wraps the most common CLI operations.
[:octicons-arrow-right-24: Get Started](/apps/deploy-your-app/)
- Learn **TestNet Contracts**
---
The current TestNet contract addresses the CLI targets when operating in TestNet mode.
[:octicons-arrow-right-24: Reference](/reference/apps/infrastructure/dotns/testnet-contracts/)
---
Page Title: dotNS Reference
- Resolved Markdown: https://docs.polkadot.com/reference/apps/infrastructure/dotns.md
- Canonical (HTML): https://docs.polkadot.com/reference/apps/infrastructure/dotns/
- Summary: Reference for dotNS — the .dot name system on Asset Hub that resolves Product names to published bundles, with PopRules pricing and contract architecture.
- Word Count: 528; Token Estimate: 879
- Last Updated: 2026-06-16T14:17:44+00:00
- Version Hash: sha256:e704c571bc642d5f733595adb9cf6b8c0471ef7116ce802b53936a7b706dd5a3
# dotNS
## Introduction
dotNS is Polkadot's decentralized name service for Products — the registry that turns a human-readable `.dot` name like `awesome.dot` into the published Polkadot Product it points at. It's the lookup every Host runs whenever a user navigates to a `.dot` address.
If you have used a DNS provider, the role is similar: human-readable names map to content. The differences: dotNS is on-chain (no DNS provider in the middle), name resolution returns a [Content Identifier (CID)](/reference/glossary/#content-identifier-cid) for a Product bundle (not an IP address), and pricing is tied to [Proof of Personhood](/reference/apps/infrastructure/pop/) so spam farming short names is bounded.
Four properties shape how a Product developer interacts with dotNS:
- **The registry lives on Asset Hub**: Names, owners, and the content references they point at are stored as contract state on Asset Hub, not on the People Chain or Bulletin Chain.
- **Name resolution is content-addressed at the end**: A `.dot` name resolves to a CID, and the CID points at bytes on the [Bulletin Chain](/reference/apps/infrastructure/bulletin-chain/) (or via an IPFS gateway). See [Name Mechanism](/reference/apps/infrastructure/dotns/name-mechanism/).
- **Pricing is personhood-gated by PopRules**: Short names are free for personhood holders; longer or numerically-suffixed names are open to anyone but require a deposit. See [PopRules and Pricing](/reference/apps/infrastructure/dotns/poprules-pricing/).
- **The architecture is a small set of cooperating contracts**: Not a single registrar — a set of contracts each handling a slice of the model. See [Architecture](/reference/apps/infrastructure/dotns/architecture/).
For the Product-side how-to (registering a name, publishing your bundle), see [Register and Publish](/apps/deploy-your-app/).
!!! warning "Known gaps"
Two operational caveats apply to the current dotNS surface:
- **Self-declared PoP tier**: dotNS reads PoP tier from a status the user sets themselves. On-chain verification of PoP tier against the People Chain is a forthcoming integration; until then, treat the tier check as cooperative, not adversarial.
- **Operational runbook gaps**: Some operator-side procedures (migration, batch updates, contract upgrade paths) are not yet documented for this build. The reference here covers the developer-facing surface.
## Where to Go Next
- Learn **Name Mechanism**
---
How a `.dot` name resolves to a Product bundle — `namehash` derivation, the `contenthash` → CID mapping, and the IPFS/Bulletin delivery path.
[:octicons-arrow-right-24: Reference](/reference/apps/infrastructure/dotns/name-mechanism/)
- Learn **Architecture**
---
The contract architecture on Asset Hub that backs the registry — what each contract is responsible for and how they cooperate.
[:octicons-arrow-right-24: Reference](/reference/apps/infrastructure/dotns/architecture/)
- Learn **PopRules and Pricing**
---
The pricing ladder for name registration: who can register what at what cost, organized by name length and PoP tier.
[:octicons-arrow-right-24: Reference](/reference/apps/infrastructure/dotns/poprules-pricing/)
- Guide **Register and Publish**
---
The Product-side how-to: registering a `.dot` name, attaching your published Product bundle, and going live.
[:octicons-arrow-right-24: Get Started](/apps/deploy-your-app/)
---
Page Title: dotNS TestNet Contracts
- Resolved Markdown: https://docs.polkadot.com/reference/apps/infrastructure/dotns/testnet-contracts.md
- Canonical (HTML): https://docs.polkadot.com/reference/apps/infrastructure/dotns/testnet-contracts/
- Summary: Current Paseo TestNet contract addresses for the dotNS registry — registry core, registration and pricing, and lifecycle contract families.
- Word Count: 431; Token Estimate: 779
- Last Updated: 2026-06-16T14:17:44+00:00
- Version Hash: sha256:c85182ff6e12ef0c2b45f481ca9ffe4b7804cc5c136099f89896b4f13128accd
# TestNet Contracts
## Introduction
This page tracks the current TestNet contract addresses for the dotNS deployment on Paseo. A Product or tool that wants to interact with the registry directly on TestNet needs these addresses; the higher-level CLI and Polkadot Product SDK surfaces resolve them internally, but anyone integrating below those layers can look up what to call here.
!!! warning "Provisional"
The current TestNet contract addresses are still being finalized as the dotNS deployment stabilizes. Addresses can change across redeployments during this window. The table below will be populated and kept in sync as the deployment is confirmed; until then, the [CLI](/reference/apps/infrastructure/dotns/cli/) and the [Register and Publish](/apps/deploy-your-app/) flow target the current deployment automatically, and most developers should rely on those rather than calling contracts directly.
## Contract Address Table
| Contract | Responsibility | Paseo TestNet Address |
|:------------|:------------------------------------------------------------------|:----------------------|
| `Registry` | Holds `(namehash → record)` mappings; gates writes per-record. | _TBD_ |
| `Resolver` | Read-side query surface for name records. | _TBD_ |
| `Records` | Stores `contenthash`, owner, and per-name administrative fields. | _TBD_ |
| `Registrar` | Orchestrates registration: PopRules check, fee collection, write. | _TBD_ |
| `PopRules` | Evaluates a proposed registration against the pricing ladder. | _TBD_ |
| `Deposit` | Manages deposits paid by open-tier registrations. | _TBD_ |
| `Transfer` | Handles owner-changes for an existing name. | _TBD_ |
| `Renewal` | Handles renewals where they apply. | _TBD_ |
| `Admin` | Governance-routed operations (reserved names, contract upgrades). | _TBD_ |
Addresses will appear in this table as the deployment is confirmed. In the meantime, the SDK and CLI resolve the right targets automatically.
## How to Use These Addresses
For Products that need to read name resolution data directly (most don't — the chain client surface and the resolution code in each Host handle this), point your typed chain client at the resolver contract address using the standard PAPI descriptor for Asset Hub. The query is a standard contract call; the resolver returns the record fields you read against.
For tools or batch jobs that need to mutate state (a CI pipeline registering a name on every release, for example), use the [`@parity/dotns-cli`](/reference/apps/infrastructure/dotns/cli/) instead of building contract calls by hand. The CLI handles the encoding, the PopRules pre-check, and the signing path consistently.
## Where to Go Next
- Learn **CLI**
---
The command-line surface that targets these contracts automatically.
[:octicons-arrow-right-24: Reference](/reference/apps/infrastructure/dotns/cli/)
- Learn **Architecture**
---
What each contract in the table above is responsible for and how they cooperate.
[:octicons-arrow-right-24: Reference](/reference/apps/infrastructure/dotns/architecture/)
---
Page Title: Dual Virtual Machine Stack
- Resolved Markdown: https://docs.polkadot.com/smart-contracts/for-eth-devs/dual-vm-stack.md
- Canonical (HTML): https://docs.polkadot.com/smart-contracts/for-eth-devs/dual-vm-stack/
- Summary: Compare Polkadot’s dual smart contract VMs—REVM for EVM compatibility and PolkaVM for RISC-V performance, flexibility, and efficiency.
- Word Count: 476; Token Estimate: 704
- Last Updated: 2026-06-04T16:08:37+00:00
- Version Hash: sha256:f56e092a184fc62ce5338959b483aee22b36c1f4dc8ed07882d43164a6820413
# Dual Virtual Machine Stack
## Introduction
Polkadot's smart contract platform supports two distinct virtual machine (VM) architectures, providing developers with flexibility in selecting the optimal execution backend for their specific needs. This approach strikes a balance between immediate Ethereum compatibility and long-term innovation, enabling developers to deploy either unmodified (Ethereum Virtual Machine) EVM contracts using Rust Ethereum Virtual Machine (REVM) or optimize for higher performance using PolkaVM (PVM).
Both VM options share common infrastructure, including RPC interfaces, tooling support, and precompiles. The following sections compare architectures and guide you in selecting the best VM for your project's needs.
## REVM Backend
The [REVM backend](https://github.com/bluealloy/revm) is a complete Rust implementation of the Ethereum Virtual Machine, enabling Solidity contracts to run unchanged on Polkadot Hub.
### Key Benefits
- **Zero modifications required**: Deploy existing Ethereum contracts exactly as they are.
- **Full EVM compatibility**: Exact EVM behavior for audit tools and bytecode inspection.
- **Familiar tooling**: Use Hardhat, Foundry, Remix, and all standard Ethereum development tools.
- **Rapid deployment**: Get your contracts running on Polkadot immediately.
- **Established infrastructure**: Work with the Ethereum tooling ecosystem you already know.
### How It Works
REVM enables Ethereum developers to seamlessly migrate to Polkadot, achieving improved performance and lower fees without modifying their existing contracts or development workflows.
## Architecture
### Revive Pallet
[**`pallet_revive`**](https://paritytech.github.io/polkadot-sdk/master/pallet_revive/index.html) is the runtime module that executes smart contracts. It processes Ethereum-style transactions through the following workflow:
```mermaid
sequenceDiagram
participant User as User/dApp
participant Proxy as Ethereum JSON RPC Proxy
participant Chain as Blockchain Node
participant Pallet as pallet_revive
User->>Proxy: Submit Ethereum Transaction
Proxy->>Chain: Repackage as Polkadot Compatible Transaction
Chain->>Pallet: Process Transaction
Pallet->>Pallet: Decode Ethereum Transaction
Pallet->>Pallet: Execute Contract
Pallet->>Chain: Return Results
Chain->>Proxy: Forward Results
Proxy->>User: Return Ethereum-compatible Response
```
This proxy-based approach eliminates the need for node binary modifications, maintaining compatibility across different client implementations. Preserving the original Ethereum transaction payload simplifies the adaptation of existing tools, which can continue processing familiar transaction formats.
## Alternative: PVM Backend
For advanced use cases requiring maximum performance, Polkadot Hub also supports the [PVM (Polkadot Virtual Machine)](https://github.com/paritytech/polkavm) backend. PVM uses a RISC-V-based architecture that can provide performance optimizations for computationally intensive workloads. Solidity contracts can be compiled to PVM bytecode using the `resolc` compiler.
Rust is also well-suited for PVM. Tooling is still limited, so consider using LLMs and coding agents to supplement development.
Most developers should start with REVM for its simplicity and full Ethereum compatibility. PVM is available for projects with specific performance requirements.
## Where To Go Next
- Learn __Contract Deployment__
---
Understand deployment mechanics, gas estimation behavior, and storage considerations.
[:octicons-arrow-right-24: Reference](/smart-contracts/for-eth-devs/contract-deployment/)
---
Page Title: Elastic Scaling
- Resolved Markdown: https://docs.polkadot.com/reference/parachains/consensus/elastic-scaling.md
- Canonical (HTML): https://docs.polkadot.com/reference/parachains/consensus/elastic-scaling/
- Summary: Learn how elastic scaling in Polkadot boosts parachain throughput, reduces latency, and supports dynamic, cost-efficient resource allocation.
- Word Count: 1046; Token Estimate: 1440
- Last Updated: 2026-01-14T11:42:16+00:00
- Version Hash: sha256:a8a20c71c851e6ee4440b65e4b5b96187327345a757a450ee3a021afc7e5af52
# Elastic Scaling
## Introduction
Polkadot's architecture delivers scalability and security through its shared security model, where the relay chain coordinates and validates multiple parallel chains.
Elastic scaling enhances this architecture by allowing parachains to utilize multiple computational cores simultaneously, breaking the previous 1:1 relationship between parachain and relay chain blocks.
This technical advancement enables parachains to process multiple blocks within a single relay chain block, significantly increasing throughput capabilities. By leveraging [Agile Coretime](/reference/polkadot-hub/consensus-and-security/agile-coretime/), parachains can dynamically adjust their processing capacity based on demand, creating an efficient and responsive infrastructure for high-throughput applications.
## How Elastic Scaling Works
Elastic scaling enables parachains to process multiple blocks in parallel by utilizing additional cores on the relay chain. This section provides a technical analysis of the performance advantages and details of the implementation.
Consider a parachain that needs to process four consecutive parablocks. With traditional single-core allocation, the validation process follows a strictly sequential pattern. Each parablock undergoes a two-phase process on the relay chain:
1. **Backing phase**: Validators create and distribute validity statements.
2. **Inclusion phase**: The parablock is included in the relay chain after availability verification.
Throughout the following diagrams, specific notation is used to represent different components of the system:
- **R1, R2, ...**: Relay chain blocks (produced at ~6-second intervals).
- **P1, P2, ...**: Parachain blocks that need validation and inclusion.
- **C1, C2, ...**: Cores on the relay chain.
In the single-core scenario (assuming a 6-second relay chain block time), processing four parablocks requires approximately 30 seconds:
```mermaid
sequenceDiagram
participant R1 as R1
participant R2 as R2
participant R3 as R3
participant R4 as R4
participant R5 as R5
Note over R1,R5: Single Core Scenario
rect rgb(200, 220, 240)
Note right of R1: Core C1
R1->>R1: Back P1
R2->>R2: Include P1
R2->>R2: Back P2
R3->>R3: Include P2
R3->>R3: Back P3
R4->>R4: Include P3
R4->>R4: Back P4
R5->>R5: Include P4
end
```
With elastic scaling utilizing two cores simultaneously, the same four parablocks can be processed in approximately 18 seconds:
```mermaid
sequenceDiagram
participant R1 as R1
participant R2 as R2
participant R3 as R3
participant R4 as R4
participant R5 as R5
Note over R1,R3: Multi-Core Scenario
rect rgb(200, 220, 240)
Note right of R1: Core C1
R1->>R1: Back P1
R2->>R2: Include P1
R2->>R2: Back P2
R3->>R3: Include P2
end
rect rgb(220, 200, 240)
Note right of R1: Core C2
R1->>R1: Back P3
R2->>R2: Include P3
R2->>R2: Back P4
R3->>R3: Include P4
end
```
To help interpret the sequence diagrams above, note the following key elements:
- The horizontal axis represents time progression through relay chain blocks (R1-R5).
- Each colored rectangle shows processing on a specific core (C1 or C2).
- In the single-core scenario, all blocks must be processed sequentially on one core.
- In the multi-core scenario, blocks are processed in parallel across multiple cores, reducing total time.
The relay chain processes these multiple parablocks as independent validation units during the backing, availability, and approval phases. However, during inclusion, it verifies that their state roots align properly to maintain chain consistency.
From an implementation perspective:
- **Parachain side**: Collators must increase their block production rate to utilize multiple cores fully.
- **Validation process**: Each core operates independently, but with coordinated state verification.
- **Resource management**: Cores are dynamically allocated based on parachain requirements.
- **State consistency**: While backed and processed in parallel, the parablocks maintain sequential state transitions.
## Benefits of Elastic Scaling
- **Increased throughput**: Multiple concurrent cores enable parachains to process transactions at multiples of their previous capacity. By allowing multiple parachain blocks to be validated within each relay chain block cycle, applications can achieve significantly higher transaction volumes.
- **Lower latency**: Transaction finality improves substantially with multi-core processing. Parachains currently achieve 2-second latency with three cores, with projected improvements to 500ms using 12 cores, enabling near-real-time application responsiveness.
- **Resource efficiency**: Applications acquire computational resources precisely matched to their needs, eliminating wasteful over-provisioning. Coretime can be purchased at granular intervals (blocks, hours, days), creating cost-effective operations, particularly for applications with variable transaction patterns.
- **Scalable growth**: New applications can launch with minimal initial resource commitment and scale dynamically as adoption increases. This eliminates the traditional paradox of either over-allocating resources (increasing costs) or under-allocating (degrading performance) during growth phases.
- **Workload distribution**: Parachains intelligently distribute workloads across cores during peak demand periods and release resources when traffic subsides. Paired with secondary coretime markets, this ensures maximum resource utilization across the entire network ecosystem.
- **Reliable performance**: End-users experience reliable application performance regardless of network congestion levels. Applications maintain responsiveness even during traffic spikes, eliminating performance degradation that commonly impacts blockchain applications during high-demand periods.
## Use Cases
Elastic scaling enables applications to dynamically adjust their resource consumption based on real-time demand. This is especially valuable for decentralized applications where usage patterns can be highly variable. The following examples illustrate common scenarios where elastic scaling delivers significant performance and cost-efficiency benefits.
### Handling Sudden Traffic Spikes
Many decentralized applications experience unpredictable, high-volume traffic bursts, especially in gaming, DeFi protocols, NFT auctions, messaging platforms, and social media. Elastic scaling allows these systems to acquire additional coretime during peak usage and release it during quieter periods, ensuring responsiveness without incurring constant high infrastructure costs.
### Supporting Early-Stage Growth
Startups and new projects often begin with uncertain or volatile demand. With elastic scaling, teams can launch with minimal compute resources (e.g., a single core) and gradually scale as adoption increases. This prevents overprovisioning and enables cost-efficient growth until the application is ready for more permanent or horizontal scaling.
### Scaling Massive IoT Networks
Internet of Things (IoT) applications often involve processing data from millions of devices in real time. Elastic scaling supports this need by enabling high-throughput transaction processing as demand fluctuates. Combined with Polkadot’s shared security model, it provides a reliable and privacy-preserving foundation for large-scale IoT deployments.
### Powering Real-Time, Low-Latency Systems
Applications like payment processors, trading platforms, gaming engines, or real-time data feeds require fast, consistent performance. Elastic scaling can reduce execution latency during demand spikes, helping ensure low-latency, reliable service even under heavy load.
---
Page Title: Entropy Method Group
- Resolved Markdown: https://docs.polkadot.com/reference/apps/protocol/truapi/entropy.md
- Canonical (HTML): https://docs.polkadot.com/reference/apps/protocol/truapi/entropy/
- Summary: TrUAPI method group for deriving deterministic per-Product entropy from the user's root key, suitable for seeding Product-local key material.
- Word Count: 462; Token Estimate: 626
- Last Updated: 2026-06-16T14:17:44+00:00
- Version Hash: sha256:96e55623b9965cb74ad6b1ed9d59944c7ebb3db5356fd55c2a0b1529175bfda2
# Entropy
## Introduction
The Entropy method group lets a Product obtain a stable secret derived from the user's root key, scoped to that Product. A Product uses it to seed key material it needs to hold itself — an encryption key for local data, a deterministic identifier, a seed for a Product-side keypair — without ever touching the user's root entropy or asking the user to manage a separate secret.
The value is deterministic: it is derived from the user's root [BIP-39](https://github.com/bitcoin/bips/blob/master/bip-0039.mediawiki) entropy through a three-layer BLAKE2b-256 keyed-hashing scheme, so the same input always produces the same output. A Product that asks for the same derivation context tomorrow, or on another device the user has restored, gets the same 32 bytes back. This is what makes it useful for seeding: the Product can re-derive its key material instead of storing it.
!!! danger "Not a randomness source"
Host-derived entropy is deterministic and pre-computable — it is key-derivation, not randomness. Do **not** use it for lottery draws, fair-shuffle games, randomized selection, or any flow where a value must be unpredictable to the parties involved. Anyone who can reproduce the derivation can predict the output. For unpredictable values, use the browser's `crypto.getRandomValues`; for randomness that an external party must be able to verify against the chain, use an on-chain VRF or beacon directly, not this group.
This is the same `entropy = randomness` confusion behind the RFC-7 bug, where a Host minted a random `rootAccountSecret` instead of deriving it. The point of this group is the opposite of randomness: reproducible derivation.
## Conceptual Contract
The group exposes a single derivation primitive:
- **Deriving entropy for a context**: The Product requests 32 bytes of entropy derived from the user's root entropy and bound to a derivation context. The same context always yields the same bytes; two different contexts yield independent values, so a Product cannot accidentally reuse one secret where it meant to use another.
There is no subscription, no per-block or per-epoch update, and no randomness beacon. The group is one `host_derive_entropy` request and its deterministic response.
!!! warning "Provisional"
The exact derivation-context surface (how a Product names and scopes a derivation) and the SDK wrapper around `host_derive_entropy` are still being finalized. The deterministic-derivation contract described here matches the TrUAPI v0.2 spec and is stable.
## Where to Go Next
- Learn **Sandbox and Sub-Accounts**
---
Why a Product is scoped to derived material rather than the user's root identity — the same derivation principle this group exposes for arbitrary secrets.
[:octicons-arrow-right-24: Reference](/reference/apps/protocol/truapi/sandbox/)
---
Page Title: EVM vs PVM
- Resolved Markdown: https://docs.polkadot.com/smart-contracts/for-eth-devs/evm-vs-pvm.md
- Canonical (HTML): https://docs.polkadot.com/smart-contracts/for-eth-devs/evm-vs-pvm/
- Summary: Compares EVM and PVM, highlighting key architectural differences, gas models, memory management, and account handling while ensuring Solidity compatibility.
- Word Count: 3342; Token Estimate: 5216
- Last Updated: 2026-06-16T14:17:44+00:00
- Version Hash: sha256:a19100383ff5c9ce207dc98797cca4d59b0825b8fd83b33847ba1e77deecd1d7
# EVM vs PVM
## Introduction
While Polkadot Virtual Machine (PVM) strives for maximum Ethereum compatibility, several fundamental design decisions create necessary divergences from the [EVM](https://ethereum.org/developers/docs/evm/). These differences represent trade-offs that enhance performance and resource management while maintaining accessibility for Solidity developers.
## Core Virtual Machine Architecture
The most significant departure from Ethereum comes from PVM's foundation itself. Rather than implementing the EVM, PVM utilizes a RISC-V instruction set. For most Solidity developers, this architectural change remains transparent thanks to the [Revive compiler's](https://github.com/paritytech/revive) complete Solidity support, including inline assembler functionality.
```mermaid
graph TD
Solidity["Solidity Source Code"]
subgraph "Ethereum Path"
EthCompile["Standard Solidity Compiler (solc)"]
EVM_Bytecode["EVM Bytecode"]
EVM["Stack-based EVM"]
end
subgraph "PVM Path"
ReviveCompile["Revive Compiler"]
RISCV_Bytecode["RISC-V Bytecode"]
PVMNode["RISC-V-based PVM"]
end
Execution["Contract Execution"]
Solidity --> EthCompile
Solidity --> ReviveCompile
EthCompile --> EVM_Bytecode
EVM_Bytecode --> EVM
EVM --> Execution
ReviveCompile --> RISCV_Bytecode
RISCV_Bytecode --> PVMNode
PVMNode --> Execution
```
However, this architectural difference becomes relevant in specific scenarios. Tools that attempt to download and inspect contract bytecode will fail, as they expect EVM bytecode rather than PVM's RISC-V format. Most applications typically pass bytecode as an opaque blob, making this a non-issue for standard use cases.
This primarily affects contracts using [`EXTCODECOPY`](https://www.evm.codes/?fork=cancun#3c) to manipulate code at runtime. A contract encounters problems specifically when it uses `EXTCODECOPY` to copy contract code into memory and then attempts to mutate it. This pattern is not possible in standard Solidity and requires dropping down to YUL assembly. An example would be a factory contract written in assembly that constructs and instantiates new contracts by generating code at runtime. Such contracts are rare in practice.
PVM offers an elegant alternative through its [on-chain constructors](https://paritytech.github.io/polkadot-sdk/master/pallet_revive/pallet/struct.Pallet.html#method.bare_instantiate), enabling contract instantiation without runtime code modification, making this pattern unnecessary. This architectural difference also impacts how contract deployment works more broadly, as discussed in the [Contract Deployment](#contract-deployment) section.
### High-Level Architecture Comparison
| Feature | Ethereum Virtual Machine (EVM) | PVM |
|:-----------------------------:|:------------------------------------------------------------------------------------:|:------------------------------------------------------:|
| **Instruction Set** | Stack-based architecture | RISC-V instruction set |
| **Bytecode Format** | EVM bytecode | RISC-V format |
| **Contract Size Limit** | 24KB code size limit | Contract-specific memory limits |
| **Compiler** | Solidity Compiler | Revive Compiler |
| **Inline Assembly** | Supported | Supported with the compatibility layer |
| **Code Introspection** | Supported via [`EXTCODECOPY`](https://www.evm.codes/?fork=cancun#3c) | Limited support, alternative via on-chain constructors |
| **Resource Metering** | Single gas metric | Multi-dimensional |
| **Runtime Code Modification** | Supported | Limited, with alternatives |
| **Contract Instantiation** | Standard deployment | On-chain constructors for flexible instantiation |
## Gas Model
Ethereum's resource model relies on a single metric: [gas](https://ethereum.org/developers/docs/gas/#what-is-gas), which serves as the universal unit for measuring computational costs. Each operation on the network consumes a specific amount of gas. Most platforms aiming for Ethereum compatibility typically adopt identical gas values to ensure seamless integration.
The significant changes to Ethereum's gas model will be outlined in the following sections.
### Dynamic Gas Value Scaling
Instead of adhering to Ethereum's fixed gas values, PVM implements benchmark-based pricing that better reflects its improved execution performance. This makes instructions cheaper relative to I/O-bound operations but requires developers to avoid hardcoding gas values, particularly in cross-contract calls.
### Multi-Dimensional Resource Metering
Moving beyond Ethereum's single gas metric, PVM meters three distinct resources:
- **`ref_time`**: Equivalent to traditional gas, measuring computation time.
- **`proof_size`**: Tracks state proof size for validator verification.
- **`storage_deposit`**: Manages state bloat through a deposit system.
All three resources can be limited at the transaction level, just like gas on Ethereum. The [Ethereum RPC proxy](https://github.com/paritytech/polkadot-sdk/tree/master/substrate/frame/revive/rpc) maps all three dimensions into the single gas dimension, ensuring everything behaves as expected for users.
These resources can also be limited when making cross-contract calls, which is essential for security when interacting with untrusted contracts. However, Solidity only allows specifying `gas_limit` for cross-contract calls. The `gas_limit` is most similar to Polkadots `ref_time_limit`, but the Revive compiler doesn't supply any imposed `gas_limit` for cross-contract calls for two key reasons:
- **Semantic differences**: `gas_limit` and `ref_time_limit` are not semantically identical; blindly passing EVM gas as `ref_time_limit` can lead to unexpected behavior.
- **Incomplete protection**: The other two resources (`proof_size` and `storage_deposit`) would remain uncapped anyway, making it insufficient to prevent malicious callees from performing DOS attacks.
When resources are "uncapped" in cross-contract calls, they remain constrained by transaction-specified limits, preventing abuse of the transaction signer.
!!! note
The runtime will provide a special precompile, allowing cross-contract calls with limits specified for all weight dimensions in the future.
All gas-related opcodes like [`GAS`](https://www.evm.codes/?fork=cancun#5a) or [`GAS_LIMIT`](https://www.evm.codes/?fork=cancun#45) return only the `ref_time` value as it's the closest match to traditional gas. Extended APIs will be provided through precompiles to make full use of all resources, including cross-contract calls with all three resources specified.
## Memory Management
The EVM and the PVM take fundamentally different approaches to memory constraints:
| Feature | Ethereum Virtual Machine (EVM) | PVM |
|:------------------------:|:-----------------------------------------:|:----------------------------------------------:|
| **Memory Constraints** | Indirect control via gas costs | Hard memory limits per contract |
| **Cost Model** | Increasing gas curve with allocation size | Fixed costs separated from execution gas |
| **Memory Limits** | Soft limits through prohibitive gas costs | Hard fixed limits per contract |
| **Pricing Efficiency** | Potential overcharging for memory | More efficient through separation of concerns |
| **Contract Nesting** | Limited by available gas | Limited by constant memory per contract |
| **Memory Metering** | Dynamic based on total allocation | Static limits per contract instance |
| **Future Improvements** | Incremental gas cost updates | Potential dynamic metering for deeper nesting |
| **Cross-Contract Calls** | Handled through gas forwarding | Requires careful boundary limit implementation |
The architecture establishes a constant memory limit per contract, which is the basis for calculating maximum contract nesting depth. This calculation assumes worst-case memory usage for each nested contract, resulting in a straightforward but conservative limit that operates independently of actual memory consumption. Future iterations may introduce dynamic memory metering, allowing deeper nesting depths for contracts with smaller memory footprints. However, such an enhancement would require careful implementation of cross-contract boundary limits before API stabilization, as it would introduce an additional resource metric to the system.
### Current Memory Limits
The following table depicts memory-related limits at the time of writing:
| Limit | Maximum |
|:------------------------------------------:|:---------------:|
| Call stack depth | 5 |
| Event topics | 4 |
| Event data payload size (including topics) | 416 bytes |
| Storage value size | 416 bytes |
| Transient storage variables | 128 uint values |
| Immutable variables | 16 uint values |
| Contract code blob size | ~100 kilobytes |
!!! note
Limits might be increased in the future. To guarantee existing contracts work as expected, limits will never be decreased.
## Account Management - Existential Deposit
Ethereum and Polkadot handle account persistence differently, affecting state management and contract interactions:
### Account Management Comparison
| Feature | Ethereum Approach | PVM/Polkadot Approach |
|:-------------------------:|:-----------------------------------------------------:|:------------------------------------------------------:|
| **Account Persistence** | Accounts persist indefinitely, even with zero balance | Requires existential deposit (ED) to maintain account |
| **Minimum Balance** | None | ED required |
| **Account Deletion** | Accounts remain in state | Accounts below ED are automatically deleted |
| **Contract Accounts** | Exist indefinitely | Must maintain ED |
| **Balance Reporting** | Reports full balance | Reports ED-adjusted balance via Ethereum RPC |
| **New Account Transfers** | Standard transfer | Includes ED automatically with extra fee cost |
| **Contract-to-Contract** | Direct transfers | ED drawn from transaction signer, not sending contract |
| **State Management** | Potential bloat from zero-balance accounts | Optimized with auto-deletion of dust accounts |
This difference introduces potential compatibility challenges for Ethereum-based contracts and tools, particularly wallets. To mitigate this, PVM implements several transparent adjustments:
- Balance queries via Ethereum RPC automatically deduct the ED, ensuring reported balances match spendable amounts.
- Account balance checks through EVM opcodes reflect the ED-adjusted balance.
- Transfers to new accounts automatically include the ED (`x + ED`), with the extra cost incorporated into transaction fees.
- Contract-to-contract transfers handle ED requirements by:
- Drawing ED from the transaction signer instead of the sending contract.
- Keeping transfer amounts transparent for contract logic.
- Treating ED like other storage deposit costs.
This approach ensures that Ethereum contracts work without modifications while maintaining Polkadot's optimized state management.
## Contract Deployment
For most users deploying contracts (like ERC-20 tokens), contract deployment works seamlessly without requiring special steps. However, when using advanced patterns like factory contracts that dynamically create other contracts at runtime, you'll need to understand PVM's unique deployment model.
In the PVM, contract deployment follows a fundamentally different model from EVM. The EVM allows contracts to be deployed with a single transaction, where the contract code is bundled with the deployment transaction. In contrast, PVM has a different process for contract instantiation.
- **Code must be pre-uploaded**: Unlike EVM, where contract code is bundled within the deploying contract, PVM requires all contract bytecode to be uploaded to the chain before instantiation.
- **Factory pattern limitations**: The common EVM pattern, where contracts dynamically create other contracts, will fail with a `CodeNotFound` error unless the dependent contract code was previously uploaded.
- **Separate upload and instantiation**: This creates a two-step process where developers must first upload all contract code, then instantiate relationships between contracts.
This architecture impacts several common EVM patterns and requires developers to adapt their deployment strategies accordingly. _Factory contracts must be modified to work with pre-uploaded code rather than embedding bytecode_, and runtime code generation is not supported due to PVM's RISC-V bytecode format. The specific behavior of contract creation opcodes is detailed in the [YUL IR Translation](#yul-function-translation-differences) section.
When migrating EVM projects to PVM, developers should identify all contracts that will be instantiated at runtime and ensure they are pre-uploaded to the chain before any instantiation attempts.
## Solidity and YUL IR Translation Incompatibilities
While PVM maintains high-level compatibility with Solidity, several low-level differences exist in the translation of YUL IR and specific Solidity constructs. These differences are particularly relevant for developers working with assembly code or utilizing advanced contract patterns.
### Contract Code Structure
PVM's contract runtime does not differentiate between runtime code and deploy (constructor) code. Instead, both are emitted into a single PVM contract code blob and live on-chain. Therefore, in EVM terminology, the deploy code equals the runtime code. For most standard Solidity contracts, this is transparent. However, if you are analyzing raw bytecode or building tools that expect separate deploy and runtime sections, you'll need to adjust for this unified structure.
In the constructor code, the `codesize` instruction returns the call data size instead of the actual code blob size, which differs from standard EVM behavior. Developers might consider that the constructor logic uses `codesize` to inspect the deployed contract's size (e.g., for self-validation or specific deployment patterns); this will return an incorrect value on PVM. Re-evaluate such logic or use alternative methods to achieve your goal.
### Solidity-Specific Differences
Solidity constructs behave differently under PVM:
- **`address.creationCode`**: Returns the bytecode keccak256 hash instead of the actual creation code, reflecting PVM's hash-based code referencing system.
- If your contract relies on `address.creationCode` to verify or interact with the full raw bytecode of a newly deployed contract, this will not work as expected. You will receive a hash, not the code itself. This typically affects highly specialized factory contracts or introspection tools.
### YUL Function Translation Differences
The following YUL functions exhibit notable behavioral differences in PVM:
- Memory operations:
- **`mload`, `mstore`, `msize`, `mcopy`**: PVM preserves memory layout but implements several constraints.
- EVM linear heap memory is emulated using a fixed 64KB byte buffer, limiting maximum contract memory usage.
- Accessing memory offsets larger than the buffer size traps the contract with an `OutOfBound` error.
- Compiler optimizations may eliminate unused memory operations, potentially causing `msize` to differ from EVM behavior.
For Solidity developers, the compiler generally handles memory efficiently within this 64KB limit. However, if you are writing low-level YUL assembly and perform direct memory manipulations, you must respect the 64KB buffer limit. Attempting to access memory outside this range will cause your transaction to revert. Be aware that `msize` might not always reflect the exact EVM behavior if compiler optimizations occur.
- Call data operations:
- **`calldataload`, `calldatacopy`**: In constructor code, the offset parameter is ignored and these functions always return `0`, diverging from EVM behavior where call data represents constructor arguments.
- If your constructor logic in YUL assembly attempts to read constructor arguments using `calldataload` or `calldatacopy` with specific offsets, this will not yield the expected constructor arguments. Instead, these functions will return `zeroed` values. Standard Solidity constructors are handled correctly by the compiler, but manual YUL assembly for constructor argument parsing will need adjustment.
- Code operations:
- **`codecopy`**: Only supported within constructor code, reflecting PVM's different approach to code handling and the unified code blob structure.
- If your contracts use `codecopy` (e.g., for self-modifying code or inspecting other contract's runtime bytecode) outside of the constructor, this will not be supported and will likely result in a compile-time error or runtime trap. This implies that patterns like dynamically generating or modifying contract code at runtime are not directly feasible with `codecopy` on PVM.
- Control flow:
- **`invalid`**: Traps the contract execution but does not consume remaining gas, unlike EVM where it consumes all available gas.
- While `invalid` still reverts the transaction, the difference in gas consumption could subtly affect very specific error handling or gas accounting patterns that rely on `invalid` to consume all remaining gas. For most error scenarios, `revert()` is the standard and recommended practice.
- Cross-contract calls:
- **`call`, `delegatecall`, `staticall`**: These functions ignore supplied gas limits and forward all remaining resources due to PVM's multi-dimensional resource model. This creates important security implications:
- Contract authors must implement reentrancy protection since gas stipends don't provide protection.
- The compiler detects `address payable.{send,transfer}` patterns and disables call reentrancy as a protective heuristic.
- Using `address payable.{send,transfer}` is already deprecated; PVM will provide dedicated precompiles for safe balance transfers.
The traditional EVM pattern of limiting gas in cross-contract calls (especially with the 2300 gas stipend for send/transfer) does not provide reentrancy protection on PVM. Developers must explicitly implement reentrancy guards (e.g., using a reentrancy lock mutex) in their Solidity code when making external calls to untrusted contracts. Relying on gas limits alone for reentrancy prevention is unsafe and will lead to vulnerabilities on PVM.
!!! warning
The 2300 gas stipend that is provided by solc for address payable.{send, transfer} calls offers no reentrancy protection in PVM. While the compiler attempts to detect and mitigate this pattern, developers should avoid these deprecated functions.
- Contract creation:
- **`create`, `create2`**: Contract instantiation works fundamentally differently in PVM. Instead of supplying deploy code concatenated with constructor arguments, the runtime expects:
1. A buffer containing the code hash to deploy.
2. The constructor arguments buffer.
PVM translates `dataoffset` and `datasize` instructions to handle contract hashes instead of contract code, enabling seamless use of the `new` keyword in Solidity. However, this translation may fail for contracts creating other contracts within `assembly` blocks.
If you use the Solidity `new` keyword to deploy contracts, the Revive compiler handles this transparently. However, if you are creating contracts manually in YUL assembly using `create` or `create2` opcodes, you must provide the code hash of the contract to be deployed, not its raw bytecode. Attempting to pass raw bytecode will fail. This fundamentally changes how manual contract creation is performed in assembly.
!!! warning
Avoid using `create` family opcodes for manual deployment crafting in `assembly` blocks. This pattern is discouraged due to translation complexity and offers no gas savings benefits in PVM.
- Data operations:
- **`dataoffset`**: Returns the contract hash instead of code offset, aligning with PVM's hash-based code referencing.
- **`datasize`**: Returns the constant contract hash size (32 bytes) rather than variable code size.
These changes are primarily relevant for low-level YUL assembly developers who are trying to inspect or manipulate contract code directly. `dataoffset` will provide a hash, not a memory offset to the code, and `datasize` will always be 32 bytes (the size of a hash). This reinforces that direct manipulation of contract bytecode at runtime, as might be done in some EVM patterns, is not supported.
- Resource queries:
- **`gas`, `gaslimit`**: Return only the `ref_time` component of PVM's multi-dimensional weight system, providing the closest analog to traditional gas measurements.
- While `gas` and `gaslimit` still provide a useful metric, consider that they represent `ref_time` (computation time) only. If your contract logic depends on precise knowledge of other resource costs (like `proof_size` or `storage_deposit`), you won't get that information from these opcodes. You'll need to use future precompiles for full multi-dimensional resource queries.
- Blockchain state:
- **`prevrandao`, `difficulty`**: Both translate to a constant value of `2500000000000000`, as PVM doesn't implement Ethereum's difficulty adjustment or randomness mechanisms.
- If your Solidity contract relies on `block.difficulty` (or its equivalent YUL opcode `difficulty`) for randomness generation or any logic tied to Ethereum's proof-of-work difficulty, this will not provide true randomness on PVM. The value will always be constant. Developers needing on-chain randomness should utilize Polkadot's native randomness sources or dedicated VRF (Verifiable Random Function) solutions if available.
### Unsupported Operations
Several EVM operations are not supported in PVM and produce compile-time errors:
- **`pc`, `extcodecopy`**: These operations are EVM-specific and have no equivalent functionality in PVM's RISC-V architecture.
- Any Solidity contracts that utilize inline assembly to interact with `pc` (program counter) or `extcodecopy` will fail to compile or behave unexpectedly. This means patterns involving introspection of the current execution location or copying external contract bytecode at runtime are not supported.
- **`blobhash`, `blobbasefee`**: Related to Ethereum's rollup model and blob data handling, these operations are unnecessary given Polkadot's superior rollup architecture.
- If you are porting contracts designed for Ethereum's EIP-4844 (proto-danksharding) and rely on these blob-related opcodes, they will not be available on PVM.
- **`extcodecopy`, `selfdestruct`**: These deprecated operations are not supported and generate compile-time errors.
- The `selfdestruct` opcode, which allowed contracts to remove themselves from the blockchain, is not supported. Contracts cannot be self-destroyed on PVM. This affects contract upgradeability patterns that rely on self-destruction and redeployment. Similarly, `extcodecopy` is unsupported, impacting contracts that intend to inspect or copy the bytecode of other deployed contracts.
### Compilation Pipeline Considerations
PVM processes YUL IR exclusively, meaning all contracts exhibit behavior consistent with Solidity's `via-ir` compilation mode. Developers familiar with the legacy compilation pipeline should expect [IR-based codegen behavior](https://docs.soliditylang.org/en/latest/ir-breaking-changes.html) when working with PVM contracts.
If you've previously worked with older Solidity compilers that did not use the `via-ir` pipeline by default, you might observe subtle differences in compiled bytecode size or gas usage. It's recommended to familiarize yourself with Solidity's IR-based codegen behavior, as this is the standard for PVM.
### Memory Pointer Limitations
YUL functions accepting memory buffer offset pointers or size arguments are limited by PVM's 32-bit pointer size. Supplying values above `2^32-1` will trap the contract immediately. The Solidity compiler typically generates valid memory references, making this primarily a concern for low-level assembly code.
For standard Solidity development, this limitation is unlikely to be hit as the compiler handles memory addresses correctly within typical contract sizes. However, if you are writing extremely large contracts using YUL assembly that manually and extensively manipulate memory addresses, ensure that your memory offsets and sizes do not exceed PVM's **fixed 64KB memory limit per contract**. While the YUL functions might accept 32-bit pointers (up to 2^32-1), attempting to access memory beyond the allocated 64KB buffer will trap the contract immediately.
These incompatibilities reflect the fundamental architectural differences between EVM and PVM while maintaining high-level Solidity compatibility. Most developers using standard Solidity patterns will encounter no issues, but those working with assembly code or advanced contract patterns should carefully review these differences during migration.
---
Page Title: Gas Model on the Polkadot Hub
- Resolved Markdown: https://docs.polkadot.com/smart-contracts/for-eth-devs/gas-model.md
- Canonical (HTML): https://docs.polkadot.com/smart-contracts/for-eth-devs/gas-model/
- Summary: Learn how gas estimation, pricing, and weight mapping work in the Polkadot Hub.
- Word Count: 749; Token Estimate: 1043
- Last Updated: 2026-06-04T16:08:37+00:00
- Version Hash: sha256:6262b9e98da257cc01770e9318f9f2669495bc232e8c89535e818f9beaed9cdb
# Gas Model
## Introduction
The Polkadot Hub implements a gas model that bridges Ethereum's familiar gas concept with Polkadot's more sophisticated resource metering system. This page explains how gas works in the Polkadot Hub and what developers need to know when building smart contracts.
## Understanding Resources in the Polkadot Hub
Unlike Ethereum, which uses a single gas value to measure everything, the Polkadot Hub tracks three separate resources:
- **`ref_time`**: Measures computational time. It is the closest equivalent to traditional gas and represents the amount of CPU time your contract execution consumes.
- **`proof_size`**: Measures the amount of state data that validators need to verify. When your contract reads from storage or makes state queries, this metric tracks the size of the proofs needed to validate those operations.
- **`storage_deposit`**: Is a native balance that gets temporarily locked when your contract creates new storage entries. This prevents state bloat by requiring contracts to pay for the storage they use. The deposit is returned when the storage is freed.
For Ethereum wallet compatibility, the Polkadot Hub's RPC layer automatically maps these three dimensions into a single gas value that wallets can understand and display to users.
## Gas vs Weight
When you interact with the Polkadot Hub through an Ethereum wallet, you see familiar gas values. Under the hood, the runtime works with `weight` - a two-dimensional metric that combines `ref_time` and `proof_size`.
The system continuously translates between these representations: converting `weight` to gas when estimating costs, and converting gas back to `weight` when executing transactions.
## How Gas Estimation Works
When your wallet requests a gas estimate (`eth_estimateGas`), the Polkadot Hub performs a dry-run of your transaction. This test execution discovers:
- How much computational time the contract will consume (`ref_time`).
- How much state data needs to be verified (`proof_size`).
- Whether any storage deposits are required (`storage_deposit`).
The system then calculates a gas estimate that covers all these costs, including:
- Base transaction overhead (intrinsic costs like signature verification, nonce/account checks, and dispatch setup).
- Transaction length fees (charges for the transaction size in bytes).
- The actual contract execution costs.
- Any storage deposits.
The gas estimate also includes a small safety buffer to account for slight differences between the test run and actual execution.
## Dynamic Gas Pricing
Pallet revive uses dynamic pricing through a "fee multiplier" that adjusts based on network congestion:
- When blocks are full, the multiplier increases, making transactions more expensive.
- When blocks are empty, the multiplier decreases, making transactions cheaper.
- The multiplier updates after every block based on utilization.
This creates a market-based pricing mechanism similar to Ethereum's base fee, helping to manage network resources efficiently.
The gas price returned during estimation is simply the current fee multiplier value.
!!! warning "Important for Users"
Because the fee multiplier can change between when you estimate gas and when your transaction executes, you can add a safety buffer (10-20%) to both your gas limit and gas price. This ensures your transaction will execute successfully even if network conditions change slightly.
## Transaction Execution Flow
The following diagram illustrates the complete lifecycle of a transaction from submission to settlement:
```mermaid
graph TD
U[User/Wallet] --> M[Transaction pool]
M --> P[Pre-dispatch convert gas to weight and create hold]
P --> C{Sufficient funds}
C -->|No| R[Rejected]
C -->|Yes| X[Execute contract within limits]
X --> S[Settle fee from actual weight and length; refund]
S --> B[Included in block]
```
The transaction execution flow is as follows:
- **Pool and pre-dispatch**: The transaction enters the pool, `gas` is mapped to `weight`, and a temporary hold is created for the maximum fee exposure. Weight is a two-dimensional tuple (`ref_time`, `proof_size`). Each dimension is tracked independently. The [`WeightToFee`](https://docs.rs/pallet-transaction-payment/latest/pallet_transaction_payment/pallet/trait.Config.html#associatedtype.WeightToFee) conversion takes the maximum of the two dimensions (after applying their respective coefficients) to determine the fee.
- **Funds check**: If the hold is insufficient, the transaction is rejected before any execution.
- **Execution**: If sufficient, the contract runs within the derived weight limits; a `storage_deposit` may be reserved when new storage is created.
- **Settlement**: Fees are charged from the actual `weight` used plus the length fee; any unused hold is refunded.
- **Inclusion**: After settlement, the transaction is included in the block.
## Conclusion
The Polkadot Hub's gas model is designed to be Ethereum-compatible while providing the flexibility and efficiency of Polkadot's resource metering system. Developers can build on Ethereum tooling while leveraging Polkadot's advanced features like multi-dimensional resource tracking.
---
Page Title: Get Started with Parachain Development
- Resolved Markdown: https://docs.polkadot.com/parachains/get-started.md
- Canonical (HTML): https://docs.polkadot.com/parachains/get-started/
- Summary: Practical examples and tutorials for building and deploying Polkadot parachains, covering everything from launch to customization and cross-chain messaging.
- Word Count: 238; Token Estimate: 557
- Last Updated: 2026-06-04T16:08:37+00:00
- Version Hash: sha256:33ba15486ecca4f2953ffecd2080f2fed3e8b3f42fa015ae2cef4a227bb84606
# Get Started
The following sections provide practical recipes for building parachains on Polkadot—each focused on specific development scenarios with step-by-step, hands-on examples.
## Quick Start Guides
Quick start guides help developers set up and interact with the Polkadot parachain ecosystem using various tools and frameworks.
| Tutorial | Tools | Description |
|:----------------------------------------------------------------------------------------------:|:---------------------:|:-----------------------------------------------------------------------:|
| [Set Up the Parachain Template](/parachains/launch-a-parachain/set-up-the-parachain-template/) | Polkadot SDK | Learn how to set up and run the Polkadot SDK Parachain Template locally |
| [Launch a Local Parachain](/parachains/testing/run-a-parachain-network/) | Zombienet, Chopsticks | Set up a local development environment for testing |
| [Fork an Existing Parachain](/parachains/testing/fork-a-parachain/) | Chopsticks | Create a local fork of a live parachain for testing |
## Launch a Simple Parachain
Learn the fundamentals of launching and deploying a parachain to the Polkadot network.
## Customize Your Runtime
Build custom functionality for your parachain by composing and creating pallets.
### Pallet Development
Deep dive into creating and managing custom pallets for your parachain.
## Testing
Test your parachain in various environments before production deployment.
## Runtime Upgrades and Maintenance
Manage your parachain's lifecycle with forkless upgrades and maintenance operations.
## Interoperability
Configure your parachain for cross-chain communication using XCM (Cross-Consensus Messaging).
## Integrations
Integrate your parachain with essential ecosystem tools and services.
## Additional Resources
- [Polkadot SDK Documentation](https://paritytech.github.io/polkadot-sdk/master/polkadot_sdk_docs/polkadot_sdk/index.html)
- [Polkadot Wiki - Parachains](https://wiki.polkadot.com/learn/learn-parachains/)
---
Page Title: Get Started with Smart Contracts
- Resolved Markdown: https://docs.polkadot.com/smart-contracts/get-started.md
- Canonical (HTML): https://docs.polkadot.com/smart-contracts/get-started/
- Summary: Practical examples for building and deploying smart contracts on Polkadot Hub, from connecting and tooling to deployment, integrations, and precompiles.
- Word Count: 515; Token Estimate: 1168
- Last Updated: 2026-06-04T16:08:37+00:00
- Version Hash: sha256:6073c66c449fe1d6b8271e429308b0ed5ad5412e8de3dfc0a91818a1b5258eb9
# Get Started with Smart Contracts
This resource provides quick-starts for building smart contracts on Polkadot Hub. Use the tables below to jump directly to the tools and workflows you need.
## Quick Starts
Use these curated links to get connected, get funded, and deploy your first contract.
| Quick Start | Tools | Description |
|-----------------------------------------------------|-----------------------|-----------------------------------------------------------------|
| [Connect to Polkadot](/smart-contracts/connect/) | Polkadot.js, MetaMask | Add the network, configure RPC, verify activity in the explorer |
| [Get Test Tokens](/smart-contracts/faucet/) | - | Request test funds to deploy and interact with contracts |
| [Explore Transactions](/smart-contracts/explorers/) | BlockScout, Routescan, Subscan | Inspect transactions, logs, token transfers, and contract state |
## Build and Test Locally
Set up local environments and CI-friendly workflows to iterate quickly and validate changes before deploying.
## Ethereum Tool Differences on Polkadot EVM
Tools like **Foundry** and **Hardhat** are built for standard Ethereum nodes. Polkadot EVM networks (such as Polkadot Hub) use the same [Ethereum JSON-RPC](https://ethereum.org/developers/docs/apis/json-rpc/) interface, but run on a different execution environment (Substrate with REVM or PVM). As a result:
- **Local tests** (e.g., `forge test`, Hardhat's default network) run in the tool's own EVM, not Polkadot's—so behavior can differ from the real chain.
- **Time and snapshot helpers** (e.g., `evm_increaseTime`, `loadFixture`) are often not supported on Polkadot nodes.
- **Gas reports** from these tools may not match what you see on-chain.
**Recommendation:** To check chain-specific behavior, run your contracts against a [local dev node](/smart-contracts/dev-environments/local-dev-node/) or a TestNet. For more details, see [EVM vs PVM](/smart-contracts/for-eth-devs/evm-vs-pvm/) and [Contract Deployment](/smart-contracts/for-eth-devs/contract-deployment/).
## Ethereum Developer Resources
Bridge your Ethereum knowledge with Polkadot Hub specifics: account mapping, fees, JSON-RPC, and deployment.
## Cookbook: Hands-on Tutorials
Follow step-by-step guides that walk through common tasks and complete dApp examples.
| Tutorial | Tools | Description |
|------------------------------------------------------------------------------------------------|---------------------|-------------------------------------------|
| [Deploy a Basic Contract](/smart-contracts/cookbook/smart-contracts/deploy-basic/basic-remix/) | Remix | Minimal deployment walkthrough |
| [Deploy an ERC-20](/smart-contracts/cookbook/smart-contracts/deploy-erc20/erc20-remix/) | Remix, OpenZeppelin | Create, deploy, and mint a fungible token |
| [Deploy an NFT (ERC-721)](/smart-contracts/cookbook/smart-contracts/deploy-nft/nft-remix/) | Remix, OpenZeppelin | Build and deploy an NFT collection |
| [Uniswap V2](/smart-contracts/cookbook/eth-dapps/uniswap-v2/) | Hardhat | Full dApp project: compile, test, deploy |
| [Zero‑to‑Hero dApp](/smart-contracts/cookbook/dapps/zero-to-hero/) | Multiple | End‑to‑end dApp patterns and practices |
## Libraries
Choose the client libraries that fit your stack for connecting wallets and calling contracts.
## Integrations
Integrate essential services like wallets, indexers, and oracles to round out your dApp.
## Precompiles
Discover precompiled system contracts available on the Hub and how to use them.
From here, follow the quick starts to get connected, iterate locally with your preferred tools, and use the guides, libraries, integrations, and precompiles as you grow into production‑ready dApps. If you get stuck, [open an issue](https://github.com/polkadot-developers/polkadot-docs/issues/new?template=docs-issue.yml) or reach out in the community channels.
---
Page Title: Get Started with XCM
- Resolved Markdown: https://docs.polkadot.com/parachains/interoperability/get-started.md
- Canonical (HTML): https://docs.polkadot.com/parachains/interoperability/get-started/
- Summary: Unlock blockchain interoperability with XCM — Polkadot's Cross-Consensus Messaging format for cross-chain interactions.
- Word Count: 958; Token Estimate: 1453
- Last Updated: 2026-05-27T20:25:14+00:00
- Version Hash: sha256:5d1dcb77cc1d250220feb2c783695093359b47f4446ca1d25bd6f377df391559
# Get Started with XCM
## Introduction
Polkadot’s unique value lies in its ability to enable interoperability between parachains and other blockchain systems. At the core of this capability is XCM (Cross-Consensus Messaging)—a flexible messaging format that facilitates communication and collaboration between independent consensus systems.
With XCM, one chain can send intents to another one, fostering a more interconnected ecosystem. Although it was developed specifically for Polkadot, XCM is a universal format, usable in any blockchain environment. This guide provides an overview of XCM’s core principles, design, and functionality, alongside practical examples of its implementation.
## Messaging Format
XCM is not a protocol but a standardized [messaging format](https://github.com/polkadot-fellows/xcm-format). It defines the structure and behavior of messages but does not handle their delivery. This separation allows developers to focus on crafting instructions for target systems without worrying about transmission mechanics.
XCM messages are intent-driven, outlining desired actions for the receiving blockchain to consider and potentially alter its state. These messages do not directly execute changes; instead, they rely on the host chain's environment to interpret and implement them. By utilizing asynchronous composability, XCM facilitates efficient execution where messages can be processed independently of their original order, similar to how RESTful services handle HTTP requests without requiring sequential processing.
## The Four Principles of XCM
XCM adheres to four guiding principles that ensure robust and reliable communication across consensus systems:
- **Asynchronous**: XCM messages operate independently of sender acknowledgment, avoiding delays due to blocked processes.
- **Absolute**: XCM messages are guaranteed to be delivered and interpreted accurately, in order, and timely. Once a message is sent, one can be sure it will be processed as intended.
- **Asymmetric**: XCM messages follow the 'fire and forget' paradigm meaning no automatic feedback is provided to the sender. Any results must be communicated separately to the sender with an additional message back to the origin.
- **Agnostic**: XCM operates independently of the specific consensus mechanisms, making it compatible across diverse systems.
These principles guarantee that XCM provides a reliable framework for cross-chain communication, even in complex environments.
## The XCM Tech Stack
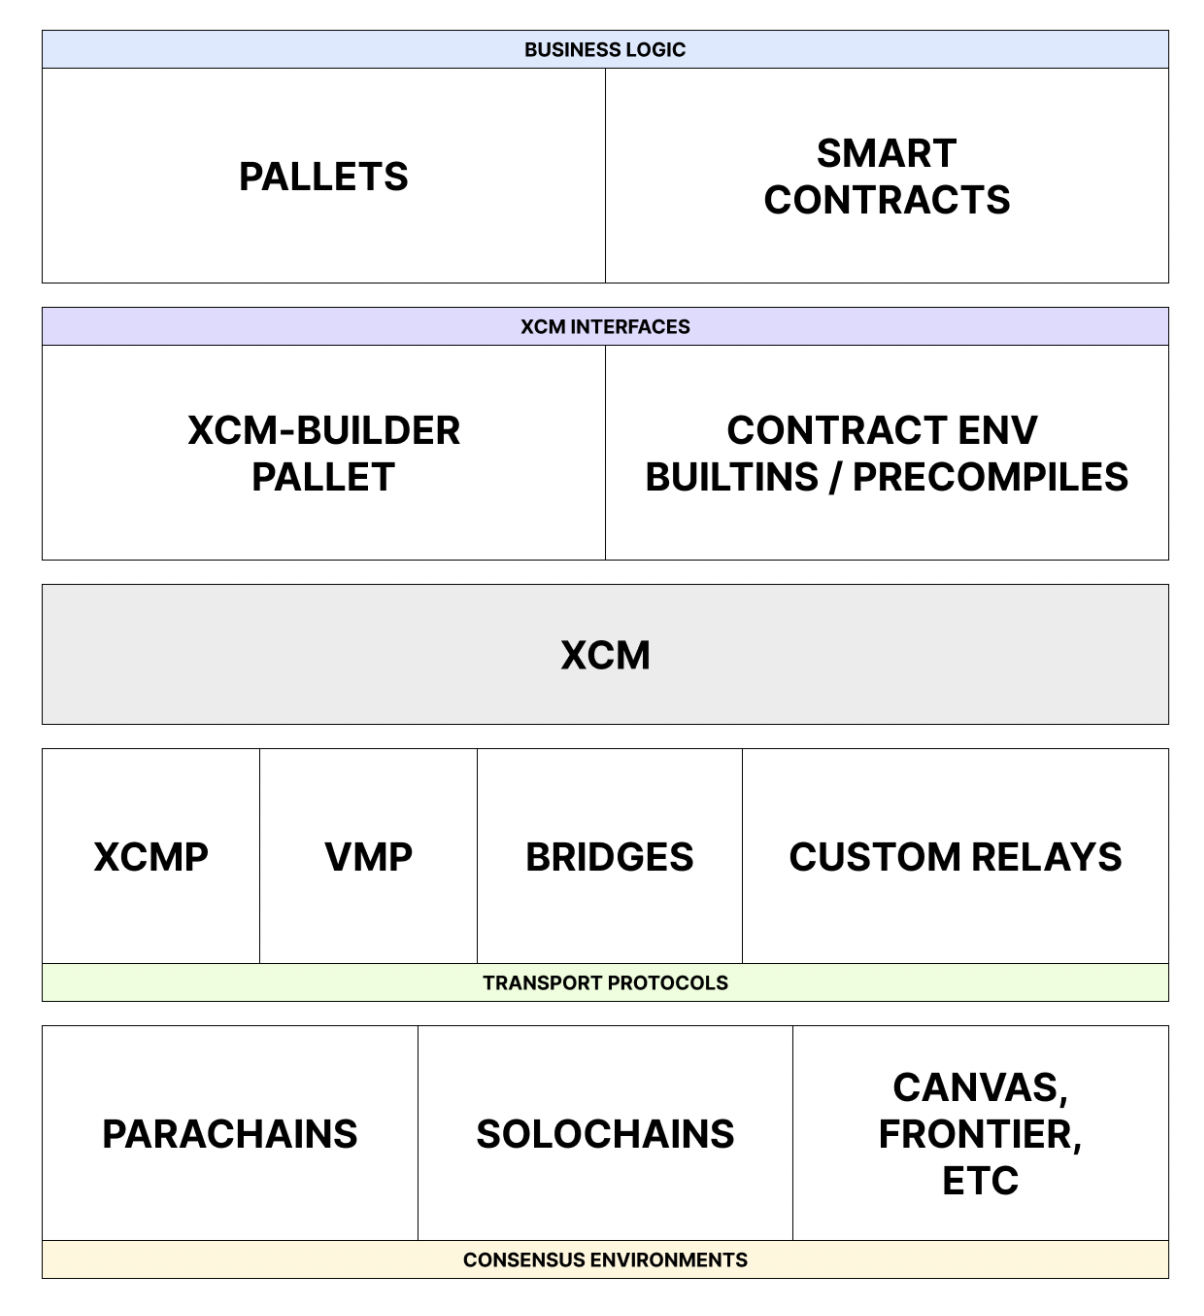
The XCM tech stack is designed to facilitate seamless interoperable communication between chains that reside within the Polkadot ecosystem. XCM can be used to express the meaning of the messages over each of the communication channels.
## Core Functionalities of XCM
XCM enhances cross-consensus communication by introducing several powerful features:
- **Programmability**: Supports dynamic message handling, allowing for more comprehensive use cases. Includes branching logic, safe dispatches for version checks, and asset operations like NFT management.
- **Functional Multichain Decomposition**: Enables mechanisms such as remote asset locking, asset namespacing, and inter-chain state referencing, with contextual message identification.
- **Bridging**: Establishes a universal reference framework for multi-hop setups, connecting disparate systems like Ethereum and Bitcoin with the Polkadot relay chain acting as a universal location.
The standardized format for messages allows parachains to handle tasks like user balances, governance, and staking, freeing the Polkadot relay chain to focus on shared security. These features make XCM indispensable for implementing scalable and interoperable blockchain applications.
## XCM Example
The following is a simplified XCM message demonstrating a token transfer from Alice to Bob on the same chain (ParaA).
```rust
let message = Xcm(vec![
WithdrawAsset((Here, amount).into()),
BuyExecution {
fees: (Here, amount).into(),
weight_limit: WeightLimit::Unlimited
},
DepositAsset {
assets: All.into(),
beneficiary: MultiLocation {
parents: 0,
interior: Junction::AccountId32 {
network: None,
id: BOB.clone().into()
}.into(),
}.into()
}
]);
```
The message consists of three instructions described as follows:
- **[WithdrawAsset](https://github.com/polkadot-fellows/xcm-format?tab=readme-ov-file#withdrawasset)**: Transfers a specified number of tokens from Alice's account to a holding register.
```rust
WithdrawAsset((Here, amount).into()),
```
- **`Here`**: The native parachain token.
- **`amount`**: The number of tokens that are transferred.
The first instruction takes as an input the MultiAsset that should be withdrawn. The MultiAsset describes the native parachain token with the `Here` keyword. The `amount` parameter is the number of tokens that are transferred. The withdrawal account depends on the origin of the message. In this example the origin of the message is Alice. The `WithdrawAsset` instruction moves `amount` number of native tokens from Alice's account into the holding register.
- **[BuyExecution](https://github.com/polkadot-fellows/xcm-format?tab=readme-ov-file#buyexecution)**: Allocates fees to cover the execution Weight of the XCM instructions.
```rust
BuyExecution {
fees: (Here, amount).into(),
weight_limit: WeightLimit::Unlimited
},
```
- **`fees`**: Describes the asset in the holding register that should be used to pay for the weight.
- **`weight_limit`**: Defines the maximum fees that can be used to buy weight.
- **[DepositAsset](https://github.com/polkadot-fellows/xcm-format?tab=readme-ov-file#depositasset)**: Moves the remaining tokens from the holding register to Bob’s account.
```rust
DepositAsset {
assets: All.into(),
beneficiary: MultiLocation {
parents: 0,
interior: Junction::AccountId32 {
network: None,
id: BOB.clone().into()
}.into(),
}.into()
}
```
- **`All`**: The wildcard for the asset(s) to be deposited. In this case, all assets in the holding register should be deposited.
This step-by-step process showcases how XCM enables precise state changes within a blockchain system. You can find a complete XCM message example in the [XCM repository](https://github.com/paritytech/xcm-docs/blob/main/examples/src/0_first_look/mod.rs).
## Overview
XCM revolutionizes cross-chain communication by enabling use cases such as:
- Token transfers between blockchains.
- Asset locking for cross-chain smart contract interactions.
- Remote execution of functions on other blockchains.
These functionalities empower developers to build innovative, multi-chain applications, leveraging the strengths of various blockchain networks. To stay updated on XCM’s evolving format or contribute, visit the [XCM repository](https://github.com/paritytech/xcm-docs/blob/main/examples/src/0_first_look/mod.rs).
---
Page Title: Glossary
- Resolved Markdown: https://docs.polkadot.com/reference/glossary.md
- Canonical (HTML): https://docs.polkadot.com/reference/glossary/
- Summary: Glossary of terms used within the Polkadot ecosystem, Polkadot SDK, its subsequent libraries, and other relevant Web3 terminology.
- Word Count: 6223; Token Estimate: 9568
- Last Updated: 2026-06-16T14:17:44+00:00
- Version Hash: sha256:8b6299f142f29ff35acbb912c706d0e6c915510255af4a55c5ca63ec175fb63f
# Glossary
Key definitions, concepts, and terminology specific to the Polkadot ecosystem are included here.
Additional glossaries from around the ecosystem you might find helpful:
- [Polkadot Wiki Glossary](https://wiki.polkadot.com/general/glossary)
- [Polkadot SDK Glossary](https://paritytech.github.io/polkadot-sdk/master/polkadot_sdk_docs/reference_docs/glossary/index.html)
## Alias
A context-specific pseudonym derived from a user's [PoP](#proof-of-personhood-pop) identity via [Ring-VRF](#ring-vrf). Unlinkable across `.dot` domains by default. The same user produces a consistent alias every time they return to the same [Product](#product), but a different alias for any other Product.
## Allowance
An on-chain access-control grant. The chain-level permission that gates publishing or storing data. `pallet-statement-store` records per-account `StatementAllowance` entries (a `max_count` cap on live statements and a `max_size` cap on total bytes). [Bulletin Chain](#bulletin-chain) consumes per-account quotas of transactions and bytes for storage. [Coinage](#coinage) issues periodic free-token allowances to persons. Spam resistance comes from the allowance ceiling rather than from per-transaction fees.
## Asset Hub
[Polkadot](#polkadot)'s system chain for assets, swaps, smart contracts, and EVM-compatible contracts. Hosts the [dotNS](#dotns) contracts, where [`.dot`](#dot-address) names actually live.
## Authority
The role in a blockchain that can participate in consensus mechanisms.
- **[GRANDPA](#ghost-based-recursive-ancestor-deriving-prefix-agreement-grandpa)**: The authorities vote on chains they consider final.
- **[Blind Assignment of Blockchain Extension](#blind-assignment-of-blockchain-extension-babe) (BABE)**: The authorities are also [block authors](#block-author).
Authority sets can be used as a basis for consensus mechanisms such as the [Nominated Proof of Stake (NPoS)](#nominated-proof-of-stake-npos) protocol.
## Authority Round (Aura)
A deterministic [consensus](#consensus) protocol where block production is limited to a rotating list of [authorities](#authority) that take turns creating blocks. In authority round (Aura) consensus, most online authorities are assumed to be honest. It is often used in combination with [GRANDPA](#ghost-based-recursive-ancestor-deriving-prefix-agreement-grandpa) as a [hybrid consensus](#hybrid-consensus) protocol.
Learn more by reading the official [Aura consensus algorithm](https://openethereum.github.io/Aura) wiki article.
## Blake2b-256
The cryptographic hash function used pervasively in [Polkadot](#polkadot), for [CIDs](#content-identifier-cid), [statement](#statement)-topic derivation, and content addressing.
## Blind Assignment of Blockchain Extension (BABE)
A [block authoring](#block-author) protocol similar to [Aura](#authority-round-aura), except [authorities](#authority) win [slots](#slot) based on a Verifiable Random Function (VRF) instead of the round-robin selection method. The winning authority can select a chain and submit a new block.
Learn more by reading the Polkadot Wiki page on [BABE](https://wiki.polkadot.com/learn/learn-consensus/#block-production-babe).
## Block Author
The node responsible for the creation of a block, also called _block producers_. In a Proof of Work (PoW) blockchain, these nodes are called _miners_.
## Browse
The Polkadot-native channel through which users find published [Products](#product). A curated catalogue surfaced inside the [Hosts](#host) (App and Desktop dashboards), and the destination a developer publishes a Product to once it's ready for end users.
## Bulletin Chain
[Polkadot](#polkadot)'s content-addressed storage [parachain](#parachain). Writes are gated by an explicit on-chain authorization (no token balance for storage). Content is retained ~2 weeks by default and renewable. Powers [Product](#product) bundles, encrypted [chat](#chat) content, profile media, and app assets.
## Byzantine Fault Tolerance (BFT)
The ability of a distributed computer network to remain operational if a certain proportion of its nodes or [authorities](#authority) are defective or behaving maliciously. A distributed network is typically considered Byzantine fault tolerant if it can remain functional, with up to one-third of nodes assumed to be defective, offline, actively malicious, and part of a coordinated attack.
### Byzantine Failure
The loss of a network service due to node failures that exceed the proportion of nodes required to reach consensus.
### Practical Byzantine Fault Tolerance (pBFT)
An early approach to Byzantine fault tolerance (BFT), practical Byzantine fault tolerance (pBFT) systems tolerate Byzantine behavior from up to one-third of participants.
The communication overhead for such systems is `O(n²)`, where `n` is the number of nodes (participants) in the system.
## Call
In the context of pallets containing functions to be dispatched to the runtime, `Call` is an enumeration data type that describes the functions that can be dispatched with one variant per pallet. A `Call` represents a [dispatch](#dispatchable) data structure object.
## Chain Specification
A chain specification file defines the properties required to run a node in an active or new Polkadot SDK-built network. It often contains the initial genesis runtime code, network properties (such as the network's name), the initial state for some pallets, and the boot node list. The chain specification file makes it easy to use a single Polkadot SDK codebase as the foundation for multiple independently configured chains.
## Chain State
Chain state (also referred to as on-chain state) is the complete set of data stored in a Polkadot SDK-based blockchain's key-value database at any given point in time. It represents everything the runtime currently knows and manages about the network.
## Chat
The [Polkadot App](#polkadot-app)'s in-App messaging surface. Composes the [Statement Store](#statement-store) (signaling, who's online, message arrival) with the [Bulletin Chain](#bulletin-chain) (encrypted message content). Supports DMs, group chats, file attachments, voice calls, and video calls.
## Coin (in Coinage)
A discrete bearer token object with a power-of-two USD value (denominations from $0.01 to $163.84) and an age counter that increments on every transfer or split. Not a balance. One public key holds at most one coin. Backed 1:1 by an underlying stablecoin.
## Coinage
[Polkadot](#polkadot)'s privacy-preserving payment layer (`pallet-coinage`). Replaces public balances with an anonymous coin system denominated in USD. When Alice sends funds to Bob, the only information revealed is that Alice had enough to cover the transfer. [Products](#product) interact with Coinage only through the abstract Payment API.
## Collator
An [author](#block-author) of a [parachain](#parachain) network.
They aren't [authorities](#authority) in themselves, as they require a [relay chain](#relay-chain) to coordinate [consensus](#consensus).
More details are found on the [Polkadot Collator Wiki](https://wiki.polkadot.com/learn/learn-collator/).
## Collective
Most often used to refer to an instance of the Collective pallet on Polkadot SDK-based networks such as [Kusama](#kusama) or [Polkadot](#polkadot) if the Collective pallet is part of the FRAME-based runtime for the network.
## Consensus
Consensus is the process blockchain nodes use to agree on a chain's canonical fork. It is composed of [authorship](#block-author), finality, and [fork-choice rule](#fork-choice-rulestrategy). In the Polkadot ecosystem, these three components are usually separate and the term consensus often refers specifically to authorship.
See also [hybrid consensus](#hybrid-consensus).
## Consensus Algorithm
Ensures a set of [actors](#authority), who don't necessarily trust each other, can reach an agreement about the state as the result of some computation. Most consensus algorithms assume that up to one-third of the actors or nodes can be [Byzantine fault tolerant](#byzantine-fault-tolerance-bft).
Consensus algorithms are generally concerned with ensuring two properties:
- **Safety**: Indicating that all honest nodes eventually agreed on the state of the chain.
- **Liveness**: Indicating the ability of the chain to keep progressing.
## Consensus Engine
The node subsystem responsible for consensus tasks.
For detailed information about the consensus strategies of the [Polkadot](#polkadot) network, see the [Polkadot Consensus](/reference/polkadot-hub/consensus-and-security/pos-consensus/) blog series.
See also [hybrid consensus](#hybrid-consensus).
## Content Identifier (CID)
An IPFS-compatible identifier derived from the content (multihash + codec). [Bulletin Chain](#bulletin-chain) defaults to Blake2b-256 with the Raw codec. Two identical payloads produce the same CID.
## Coretime
The time allocated for utilizing a core, measured in relay chain blocks. There are two types of coretime: *on-demand* and *bulk*.
On-demand coretime refers to coretime acquired through bidding in near real-time for the validation of a single parachain block on one of the cores reserved specifically for on-demand orders. They are available as an on-demand coretime pool. Set of cores that are available on-demand. Cores reserved through bulk coretime could also be made available in the on-demand coretime pool, in parts or in entirety.
Bulk coretime is a fixed duration of continuous coretime represented by an NFT that can be split, shared, or resold. It is managed by the [Broker pallet](https://paritytech.github.io/polkadot-sdk/master/pallet_broker/index.html).
## Cross-Consensus Messaging (XCM)
[Polkadot](#polkadot)'s standard for moving messages and assets between chains. Used for cross-chain [Bulletin Chain](#bulletin-chain) writes initiated from [People Chain](#people-chain), and by the members ring system to distribute ring roots to subscribing [parachains](#parachain).
## DAG-PB
A manifest format used to stitch together the chunks of a large file uploaded to the [Bulletin Chain](#bulletin-chain). When a file is bigger than Bulletin's single-transaction size limit, the SDK splits it into chunks and uploads each one separately, then publishes a DAG-PB manifest that records the order and [CIDs](#content-identifier-cid) of every chunk. Readers fetch the manifest first, then pull the chunks in parallel and reassemble the file locally.
## Derived Sub-Account
A per-[Product](#product) account deterministically derived from the user's identity and the Product's [`.dot`](#dot-address) domain. Each Product sees its own sub-account for the same user, so activity in `app-a.dot` is unlinkable to activity in `app-b.dot` without an explicit cross-domain permission grant. Derivation is computed locally by the [Host](#host), so no round trip to the paired [App](#polkadot-app) is needed to obtain the account.
## Development Phrase
A [mnemonic phrase](https://en.wikipedia.org/wiki/Mnemonic#For_numerical_sequences_and_mathematical_operations) that is intentionally made public.
Well-known development accounts, such as Alice, Bob, Charlie, Dave, Eve, and Ferdie, are generated from the same secret phrase:
```
bottom drive obey lake curtain smoke basket hold race lonely fit walk
```
Many tools in the Polkadot SDK ecosystem, such as [`subkey`](https://github.com/paritytech/polkadot-sdk/tree/polkadot-stable2603/substrate/bin/utils/subkey), allow you to implicitly specify an account using a derivation path such as `//Alice`.
## Digest
An extensible field of the [block header](#header) that encodes information needed by several actors in a blockchain network, including:
- [Light clients](#light-client) for chain synchronization.
- Consensus engines for block verification.
- The runtime itself, in the case of pre-runtime digests.
## Dimension of Individuality Measurement (DIM)
A way of demonstrating that you're a real, unique person. Each DIM is a separate mechanism a user can complete to build up their personhood score. The PoP Game is the primary DIM in use today. Tattoo verification and in-person meetups have been discussed as future additions.
## Dispatchable
Function objects that act as the entry points in FRAME [pallets](#pallet). Internal or external entities can call them to interact with the blockchain’s state. They are a core aspect of the runtime logic, handling [transactions](#transaction) and other state-changing operations.
## DOT
[Polkadot](#polkadot)'s native mainnet token. Used for [transaction](#transaction) fees, staking, and governance deposits.
## dot Address
A human-readable name in the [dotNS](#dotns) registry on [Asset Hub](#asset-hub), of the form `something.dot`. Resolves to a content reference ([CID](#content-identifier-cid)) pointing at a published [Product](#product) bundle on [Bulletin Chain](#bulletin-chain) (or via an [IPFS](#interplanetary-file-system-ipfs) gateway), plus a wallet address for users.
## DotNS
[Polkadot](#polkadot)'s name service. A suite of smart contracts on [Asset Hub](#asset-hub) that map `.dot` names to on-chain resources, including wallet addresses for users and [CIDs](#content-identifier-cid) for [Products](#product). Architecturally derived from ENS (Ethereum Name Service) and uses the same name-hashing scheme.
## Entropy
Verifiable randomness sourced from chain state, such as block hashes, VRF outputs, or randomness beacons. Useful when fairness has to be checkable by an external party after the fact (lotteries, fair-shuffle games, randomized airdrops), and stronger than a [Product](#product)'s local CSPRNG for that purpose.
## Ephemeral
Short-lived data that exists outside chain blocks and decays after a defined window. [Statements](#statement) ([Statement Store](#statement-store)), [HOP](#handoff-protocol-hop) entries, and [chat](#chat) messages are all ephemeral. They propagate peer-to-peer, expire after a TTL, and never durably commit to the chain itself.
## Events
A means of recording that some particular [chain state](#chain-state) transition happened.
In the context of [FRAME](#framework-for-runtime-aggregation-of-modularized-entities-frame), events are composable data types that each [pallet](#pallet) can individually define. Events in FRAME are implemented as a set of transient storage items inspected immediately after a block has been executed and reset during block initialization.
## Executor
A means of executing a function call in a given [runtime](#runtime) with a set of dependencies.
There are two orchestration engines in Polkadot SDK, _WebAssembly_ and _native_.
- The _native executor_ uses a natively compiled runtime embedded in the node to execute calls. This is a performance optimization available to up-to-date nodes.
- The _WebAssembly executor_ uses a [Wasm](#webassembly-wasm) binary and a Wasm interpreter to execute calls. The binary is guaranteed to be up-to-date regardless of the version of the blockchain node because it is persisted in the [chain state](#chain-state) of the Polkadot SDK-based chain.
## Existential Deposit
The minimum balance an account is allowed to have in the [Balances pallet](https://paritytech.github.io/polkadot-sdk/master/pallet_balances/index.html). Accounts cannot be created with a balance less than the existential deposit amount.
If an account balance drops below this amount, the Balances pallet uses [a FRAME System API](https://paritytech.github.io/substrate/master/frame_system/pallet/struct.Pallet.html#method.dec_ref) to drop its references to that account.
If the Balances pallet reference to an account is dropped, the account can be [reaped](https://paritytech.github.io/substrate/master/frame_system/pallet/struct.Pallet.html#method.allow_death).
## Extrinsic
A general term for data that originates outside the runtime, is included in a block, and leads to some action. This includes user-initiated transactions and inherent transactions placed into the block by the block builder.
It is a SCALE-encoded array typically consisting of a version number, signature, and varying data types indicating the resulting runtime function to be called. Extrinsics can take two forms: [inherents](#inherent-transactions) and [transactions](#transaction).
## Fork Choice Rule/Strategy
A fork choice rule or strategy helps determine which chain is valid when reconciling several network forks. A common fork choice rule is the [longest chain](https://paritytech.github.io/polkadot-sdk/master/sc_consensus/struct.LongestChain.html), in which the chain with the most blocks is selected.
## Framework for Runtime Aggregation of Modularized Entities (FRAME)
Enables developers to create blockchain [runtime](#runtime) environments from a modular set of components called [pallets](#pallet). It utilizes a set of procedural macros to construct runtimes.
[Visit the Polkadot SDK docs for more details on FRAME.](https://paritytech.github.io/polkadot-sdk/master/polkadot_sdk_docs/polkadot_sdk/frame_runtime/index.html)
## Full Node
A node that prunes historical states, keeping only recently finalized block states to reduce storage needs. Full nodes provide current chain state access and allow direct submission and validation of [extrinsics](#extrinsic), maintaining network decentralization.
## Genesis Configuration
A mechanism for specifying the initial state of a blockchain. By convention, this initial state or first block is commonly referred to as the genesis state or genesis block. The genesis configuration for Polkadot SDK-based chains is accomplished by way of a [chain specification](#chain-specification) file.
## GHOST-based Recursive Ancestor Deriving Prefix Agreement (GRANDPA)
A deterministic finality mechanism for blockchains that is implemented in the [Rust](https://rust-lang.org/) programming language.
The [formal specification](https://github.com/w3f/consensus/blob/master/pdf/grandpa-old.pdf) is maintained by the [Web3 Foundation](https://web3.foundation/).
## Handoff Protocol (HOP)
A [Substrate](#substrate) node service for [ephemeral](#ephemeral), addressed, peer-to-peer data delivery between users. Like a dead-drop with an expiry timer. A sender deposits data for named recipients, recipients collect, and the data self-destructs after collection or ~24 hours.
## Header
A structure that aggregates the information used to summarize a block. Primarily, it consists of cryptographic information used by [light clients](#light-client) to get minimally secure but very efficient chain synchronization.
## HOLLAR
The placeholder stablecoin currently backing [Coinage](#coinage). Will be replaced by [pUSD](#pusd) once pUSD is available.
## Host
One of the three Polkadot applications ([App](#polkadot-app), [Desktop](#polkadot-desktop), [Web](#polkadot-web)) that load Polkadot [Products](#product) in a [sandboxed](#sandbox) container and mediate every capability the Product uses, including chain calls, storage, signing, and outbound requests.
## Host API
The set of methods a [Host](#host) exposes to the [Products](#product) running inside it. Often used interchangeably with [TrUAPI](#triangle-user-agent-programming-interface-truapi). "Host API" emphasizes the consumer side, "TrUAPI" emphasizes the protocol specification.
## Hybrid Consensus
A blockchain consensus protocol that consists of independent or loosely coupled mechanisms for [block production](#block-author) and finality.
Hybrid consensus allows the chain to grow as fast as probabilistic consensus protocols, such as [Aura](#authority-round-aura), while maintaining the same level of security as deterministic finality consensus protocols, such as [GRANDPA](#ghost-based-recursive-ancestor-deriving-prefix-agreement-grandpa).
## Inherent Transactions
A special type of unsigned transaction, referred to as _inherents_, that enables a block authoring node to insert information that doesn't require validation directly into a block.
Only the block-authoring node that calls the inherent transaction function can insert data into its block. In general, validators assume the data inserted using an inherent transaction is valid and reasonable even if it can't be deterministically verified.
## InterPlanetary File System (IPFS)
The content-addressed delivery layer [Polkadot Web](#polkadot-web)'s host shell can use to fetch a [Product](#product) bundle by [CID](#content-identifier-cid), as an alternative to direct [Bulletin Chain](#bulletin-chain) peer-to-peer fetch.
## JSON-RPC
A stateless, lightweight remote procedure call protocol encoded in JavaScript Object Notation (JSON). JSON-RPC provides a standard way to call functions on a remote system by using JSON.
For Polkadot SDK, this protocol is implemented through the [Parity JSON-RPC](https://github.com/paritytech/jsonrpc) crate.
## Keystore
A subsystem for managing keys for the purpose of producing new blocks.
## Kusama
[Kusama](https://kusama.network/) is a Polkadot SDK-based blockchain that implements a design similar to the [Polkadot](#polkadot) network.
Kusama is a [canary](https://en.wiktionary.org/wiki/canary_in_a_coal_mine) network and is referred to as [Polkadot's "wild cousin."](https://wiki.polkadot.com/learn/learn-comparisons-kusama/).
As a canary network, Kusama is expected to be more stable than a test network like [Westend](#westend) but less stable than a production network like [Polkadot](#polkadot). Kusama is controlled by its network participants and is intended to be stable enough to encourage meaningful experimentation.
## libp2p
A peer-to-peer networking stack that allows the use of many transport mechanisms, including WebSockets (usable in a web browser).
Polkadot SDK uses the [Rust implementation](https://github.com/libp2p/rust-libp2p) of the `libp2p` networking stack.
## Light Client
A type of blockchain node that doesn't store the [chain state](#chain-state) or produce blocks.
A light client can verify cryptographic primitives and provides a [remote procedure call (RPC)](https://en.wikipedia.org/wiki/Remote_procedure_call) server, enabling blockchain users to interact with the network.
## Manifest
A JSON file packaged with a [Product](#product)'s bundle that declares the permissions it needs and (for [Polkadot Web](#polkadot-web) Products) the routes and [CIDs](#content-identifier-cid) the [Host](#host) loads. Permissions are declared in the manifest, not requested ad-hoc at runtime.
## Metadata
Data that provides information about one or more aspects of a system.
The metadata that exposes information about a Polkadot SDK blockchain enables you to interact with that system.
## Nominated Proof of Stake (NPoS)
A method for determining [validators](#validator) or _[authorities](#authority)_ based on a willingness to commit their stake to the proper functioning of one or more block-producing nodes.
## Oracle
An entity that connects a blockchain to a non-blockchain data source. Oracles enable the blockchain to access and act upon information from existing data sources and incorporate data from non-blockchain systems and services.
## Origin
A [FRAME](#framework-for-runtime-aggregation-of-modularized-entities-frame) primitive that identifies the source of a [dispatched](#dispatchable) function call into the [runtime](#runtime). The FRAME System pallet defines three built-in [origins](#origin). As a [pallet](#pallet) developer, you can also define custom origins, such as those defined by the [Collective pallet](https://paritytech.github.io/substrate/master/pallet_collective/enum.RawOrigin.html).
## Pairing
The one-time cryptographic handshake between [Polkadot Desktop](#polkadot-desktop) and the user's mobile [App](#polkadot-app). Desktop displays a QR code, the App scans it and returns a derived [session public key](#session-public-key) that Desktop stores. The private key never leaves the phone.
## Pallet
A module that can be used to extend the capabilities of a [FRAME](#framework-for-runtime-aggregation-of-modularized-entities-frame)-based [runtime](#runtime).
Pallets bundle domain-specific logic with runtime primitives like [events](#events) and [storage items](#storage-item).
## PAPI
`polkadot-api`. The standard typed TypeScript library for interacting with [Polkadot](#polkadot) chains. The [Product](#product) SDK's chain-client wraps PAPI, so Products use familiar PAPI patterns under the hood.
## Parachain
A parachain is a blockchain that derives shared infrastructure and security from a _[relay chain](#relay-chain)_.
You can learn more about parachains on the [Polkadot Wiki](https://wiki.polkadot.com/learn/learn-parachains/).
## PAS
The native token of the [Paseo TestNet](#paseo-testnet). The test-network counterpart to [DOT](#dot). Distributed via the Polkadot Faucet for development.
## Paseo TestNet
The [Polkadot](#polkadot) ecosystem test network. Provisions testing on Polkadot's "production" runtime, which means less chance of feature or code mismatch when developing [parachain](#parachain) apps. After the [Polkadot Technical fellowship](https://wiki.polkadot.com/learn/learn-polkadot-technical-fellowship/) proposes a runtime upgrade for Polkadot, this TestNet is updated, giving a period where the TestNet is ahead of Polkadot to allow for testing. The network that lives behind the [Polkadot Desktop](#polkadot-desktop) environment called `paseo-next`. Accounts, balances, and identities on Paseo TestNet are isolated from mainnet.
## People Chain
[Polkadot](#polkadot)'s system [parachain](#parachain) for identity, usernames, and [Proof of Personhood](#proof-of-personhood-pop). Hosts the PoP pallet set (`pallet-people`, `pallet-game`, `pallet-score`, `pallet-identity`, `pallet-ubc`, `pallet-airdrop`, `pallet-members`), the [Statement Store](#statement-store) [allowance](#allowance) records, and [Coinage](#coinage).
## Pocket
[Polkadot Desktop](#polkadot-desktop)'s peer-to-peer send flow. Two distinguishing properties. First, [personhood](#proof-of-personhood-pop)-aware addressing (the sender can address a recipient by their personhood, not just an account address). Second, two-sided confirmation (the recipient explicitly accepts or declines on their [App](#polkadot-app)).
## Polkadot
The [Polkadot network](https://polkadot.com/) is a blockchain that serves as the central hub of a heterogeneous blockchain network. It serves the role of the [relay chain](#relay-chain) and provides shared infrastructure and security to support [parachains](#parachain).
## Polkadot App
The mobile [Host](#host) in the [Triangle](#triangle). Runs on the user's phone, holds the user's private key, performs [Proof of Personhood](#proof-of-personhood-pop) verification, and signs every [transaction](#transaction) a [Product](#product) submits anywhere in the Triangle.
## Polkadot Cloud
Polkadot Cloud is a platform for deploying resilient, customizable and scalable Web3 applications through Polkadot's functionality. It encompasses the wider Polkadot network infrastructure and security layer where parachains operate. The platform enables users to launch Ethereum-compatible chains, build specialized blockchains, and flexibly manage computing resources through on-demand or bulk coretime purchases. Initially launched with basic parachain functionality, Polkadot Cloud has evolved to offer enhanced flexibility with features like coretime, elastic scaling, and async backing for improved performance.
## Polkadot Desktop
The desktop [Host](#host) in the [Triangle](#triangle). A specialized browser that loads Polkadot [Products](#product) by their `.dot` names inside a [sandbox](#sandbox). Never holds private keys. Routes every signing request to the paired mobile [App](#polkadot-app).
## Polkadot Hub
Polkadot Hub is a Layer 1 platform that serves as the primary entry point to the Polkadot ecosystem, providing essential functionality without requiring parachain deployment. It offers core services including smart contracts, identity management, staking, governance, and interoperability with other ecosystems, making it simple and fast for both builders and users to get started in Web3.
## Polkadot SDK
The umbrella project that contains [Substrate](#substrate) (the blockchain framework), Cumulus (the [parachain](#parachain) integration layer that lets a Substrate chain plug into [Polkadot](#polkadot)'s [relay chain](#relay-chain) as a parachain), and the Polkadot node implementation itself, all in one monorepo. Most teams building on Polkadot depend on the Polkadot SDK rather than on Substrate alone, because Cumulus is what makes a Substrate chain a parachain of Polkadot.
## Polkadot Virtual Machine (PVM)
A custom virtual machine optimized for performance, leveraging a RISC-V-based architecture to support Solidity and any language that compiles to RISC-V. Specifically designed for the Polkadot ecosystem, enabling smart contract deployment and execution.
## Polkadot Web
The browser-based [Host](#host) in the [Triangle](#triangle), served at `dot.li`. Loads Polkadot [Products](#product) by their `.dot` names inside a [sandboxed](#sandbox) iframe. Pairs with the user's mobile [App](#polkadot-app) for signing. No installation required.
## PoP Full
The destination [personhood](#proof-of-personhood-pop) tier. Cryptographically proven via the biometric verification flow in the official [Polkadot App](#polkadot-app). PoP Full holders join the active membership ring on the [People Chain](#people-chain) and can generate full [Ring-VRF](#ring-vrf) proofs.
## PoP Lite
The on-ramp [personhood](#proof-of-personhood-pop) tier. Third-party attestation registered in a separate lite-people ring. Supply is governance-bounded for spam resistance. Lite holders can produce lite-ring [Ring-VRF](#ring-vrf) proofs but do not yet hold membership in the full personhood ring.
## PoP Tier
A user's level of [Proof of Personhood](#proof-of-personhood-pop). Currently one of three options: Full (cryptographically proven via biometric verification), Lite (third-party attested, governance-bounded supply), or none. The tier determines which features unlock, including short `.dot` names, UBI eligibility, and free unload tokens. Checked through [Ring-VRF](#ring-vrf) proofs against the corresponding members ring.
## Preimage
A preimage is the data that is input into a hash function to calculate a hash. Since a hash function is a [one-way function](https://en.wikipedia.org/wiki/One-way_function), the output (the hash) cannot be used to reveal the input (the preimage). Another way to define it is as off-chain content addressed by hash that an on-chain operation will dereference, for example the bytes of a governance proposal that a referendum points at. This differs from a [Statement](#statement). A preimage is durable (it lives until the referencing operation completes), where a Statement is short-lived gossip.
## Product
A third-party single-page application that runs inside a [Host](#host), addressed by a `.dot` domain, reachable from the outside world only through the [Host API](#host-api). Products cannot hold keys, make arbitrary network requests, or talk to chains directly.
## Proof of Personhood (PoP)
[Polkadot](#polkadot)'s privacy-preserving "real human" check on the [People Chain](#people-chain). Verified once via an in-App video interaction (the PoP Game). The result is registered in `pallet-people`'s membership ring and unlocks personhood-gated features such as TestNet funds, short `.dot` names, and [alias](#alias)-gated checks.
## pUSD
[Polkadot](#polkadot)'s planned native stablecoin on [Asset Hub](#asset-hub). Will eventually back [Coinage](#coinage). Until pUSD is live on TestNet, [HOLLAR](#hollar) is the placeholder backing.
## Recycler
A mixing pool built on [Ring-VRF](#ring-vrf) that breaks the on-chain link between a [coin](#coin-in-coinage)'s deposit and withdrawal. Users load a coin into the recycler, wait for other users to load too (a larger set makes deposits harder to link to withdrawals), then unload anonymously into a fresh coin.
## Relay Chain
Relay chains are blockchains that provide shared infrastructure and security to the [parachains](#parachain) in the network. In addition to providing [consensus](#consensus) capabilities, relay chains allow parachains to communicate and exchange digital assets without needing to trust one another.
## Ring-VRF
The cryptographic primitive at the heart of [PoP](#proof-of-personhood-pop). Lets a verified person prove "I'm one of the recognized persons in this set" without revealing which one. The privacy foundation under [aliases](#alias), [Coinage](#coinage), and airdrops.
## Rococo
A [parachain](#parachain) test network for the Polkadot network. The [Rococo](#rococo) network is a Polkadot SDK-based blockchain with an October 14, 2024 deprecation date. Development teams are encouraged to use the Paseo TestNet instead.
## Runtime
The runtime represents the [state transition function](#state-transition-function-stf) for a blockchain. In Polkadot SDK, the runtime is stored as a [Wasm](#webassembly-wasm) binary in the chain state. The Runtime is stored under a unique state key and can be modified during the execution of the state transition function.
## Sandbox
The [Host](#host)-governed environment a [Product](#product) runs in. Products see [derived sub-accounts](#derived-sub-account) (not the user's root identity), reach the outside world only through the [Host API](#host-api), and are isolated from one another by default. Declared permissions selectively relax this isolation.
## Session Public Key
The derived public key [Desktop](#polkadot-desktop) receives from the mobile [App](#polkadot-app) during [pairing](#pairing). Lets Desktop identify the user and construct per-[Product](#product) sub-accounts, but is never enough to sign on its own. A dev-pairing artifact, unrelated to [validator](#validator) session keys used for block production.
## Shield States
The security-indicator UI in [Polkadot Web](#polkadot-web). Yellow while verifying. Green when confirmed. Orange when content was served via a gateway fallback rather than peer-to-peer. Red when the on-chain record has changed since the cached version was loaded.
## Sign In with Polkadot
The [Host](#host)-level authentication handshake between [Polkadot Desktop](#polkadot-desktop) (or [Web](#polkadot-web)) and the paired [Polkadot App](#polkadot-app). Establishes session identity so the Host can construct per-[Product](#product) sub-accounts. Distinct from per-[transaction](#transaction) signing. Sign In runs once at the start of a session, and signing runs per-transaction.
## Signing Model
Mobile is the signer. [Desktop](#polkadot-desktop) is the mediator. Every [transaction](#transaction) routes from the [Product](#product) through Desktop's signing modal to the paired [App](#polkadot-app), where the user explicitly approves on their phone. The Chain Submit permission gates the ability to request a signing prompt. It never authorizes auto-signing.
## Simple Concatenated Aggregate Little-Endian (SCALE)
The compact binary codec used by [Polkadot SDK](#polkadot-sdk) for on-chain data, RPC messages, and inter-chain payloads. [TrUAPI](#triangle-user-agent-programming-interface-truapi) messages are SCALE-encoded.
## Slot
A fixed, equal interval of time used by consensus engines such as [Aura](#authority-round-aura) and [BABE](#blind-assignment-of-blockchain-extension-babe). In each slot, a subset of [authorities](#authority) is permitted, or obliged, to [author](#block-author) a block.
## Smoldot
The [Polkadot](#polkadot) [light client](#light-client). Used by [Polkadot Web](#polkadot-web)'s host shell to verify chain state in-browser without running a [full node](#full-node). Planned for direct [Statement Store](#statement-store) participation by end-user apps.
## Sovereign Account
The unique account identifier for each chain in the relay chain ecosystem. It is often used in cross-consensus (XCM) interactions to sign XCM messages sent to the relay chain or other chains in the ecosystem.
The sovereign account for each chain is a root-level account that can only be accessed using the Sudo pallet or through governance. The account identifier is calculated by concatenating the Blake2 hash of a specific text string and the registered parachain identifier.
## Sr25519
The default cryptographic signature scheme used across [Polkadot](#polkadot). Schnorr signatures over Ristretto. Used for [transactions](#transaction), [statements](#statement), and [PoP](#proof-of-personhood-pop) proofs.
## SS58 Address Format
A public key address based on the Bitcoin [`Base-58-check`](https://en.bitcoin.it/wiki/Base58Check_encoding) encoding. Each Polkadot SDK SS58 address uses a `base-58` encoded value to identify a specific account on a specific Polkadot SDK-based chain
The [canonical `ss58-registry`](https://github.com/paritytech/ss58-registry) provides additional details about the address format used by different Polkadot SDK-based chains, including the network prefix and website used for different networks
## State Transition Function (STF)
The logic of a blockchain that determines how the state changes when a block is processed. In Polkadot SDK, the state transition function is effectively equivalent to the [runtime](#runtime).
## Statement
An [ephemeral](#ephemeral), signed data blob in the [Statement Store](#statement-store). Lives in the node's local pool, not in chain blocks. Carries a payload (up to ~1 MB), one or more topics, an optional channel for last-write-wins replacement, and an authentication proof.
## Statement Store
A network-layer pub/sub primitive on the [People Chain](#people-chain), not a chain in its own right. [Statements](#statement) are signed, [allowance](#allowance)-gated, propagated peer-to-peer through gossip, and decay after a short TTL.
## Storage Item
[FRAME](#framework-for-runtime-aggregation-of-modularized-entities-frame) primitives that provide type-safe data persistence capabilities to the [runtime](#runtime).
Learn more in the [storage items](https://paritytech.github.io/polkadot-sdk/master/frame_support/storage/types/index.html) reference document in the Polkadot SDK.
## Substrate
The modular [Rust](https://rust-lang.org/) blockchain framework Polkadot is built on, and now one component of the Polkadot SDK. A Substrate runtime is composed of pallets (reusable modules implementing chain logic — balances, staking, governance, etc.) and uses the SCALE codec for encoding. Substrate is the framework; Polkadot is one chain built with it. Substrate is maintained by [Parity Technologies](https://www.parity.io/).
## Transaction
An [extrinsic](#extrinsic) that includes a signature that can be used to verify the account authorizing it inherently or via [signed extensions](https://paritytech.github.io/polkadot-sdk/master/polkadot_sdk_docs/reference_docs/signed_extensions/index.html).
## Transaction Era
A definable period expressed as a range of block numbers during which a transaction can be included in a block.
Transaction eras are used to protect against transaction replay attacks if an account is reaped and its replay-protecting nonce is reset to zero.
## Triangle
Three Polkadot [Hosts](#host) (the [Polkadot App](#polkadot-app) on mobile, [Polkadot Desktop](#polkadot-desktop), and [Polkadot Web](#polkadot-web)) together with the [Products](#product) that run inside them and the [TrUAPI](#triangle-user-agent-programming-interface-truapi) protocol that connects them. The mobile App is always the key custodian. Desktop and Web never hold private keys.
## Triangle User-Agent Programming Interface (TrUAPI)
The protocol that mediates all communication between [Hosts](#host) and [Products](#product). Always capitalized this way. Eleven method groups cover signing, chain interaction, storage, [chat](#chat), payments, and more.
## Trie (Patricia Merkle Tree)
A data structure used to represent sets of key-value pairs and enables the items in the data set to be stored and retrieved using a cryptographic hash. Because incremental changes to the data set result in a new hash, retrieving data is efficient even if the data set is very large. With this data structure, you can also prove whether the data set includes any particular key-value pair without access to the entire data set.
In Polkadot SDK-based blockchains, state is stored in a trie data structure that supports the efficient creation of incremental digests. This trie is exposed to the [runtime](#runtime) as [a simple key/value map](#storage-item) where both keys and values can be arbitrary byte arrays.
## Validator
A validator is a node that participates in the consensus mechanism of the network. Its roles include block production, transaction validation, network integrity, and security maintenance.
## WebAssembly (Wasm)
An execution architecture that allows for the efficient, platform-neutral expression of
deterministic, machine-executable logic.
[Wasm](https://webassembly.org/) can be compiled from many languages, including
the [Rust](https://rust-lang.org/) programming language. Polkadot SDK-based chains use a Wasm binary to provide portable [runtimes](#runtime) that can be included as part of the chain's state.
## Weight
A convention used in Polkadot SDK-based blockchains to measure and manage the time it takes to validate a block.
Polkadot SDK defines one unit of weight as one picosecond of execution time on reference hardware.
The maximum block weight should be equivalent to one-third of the target block time with an allocation of one-third each for:
- Block construction
- Network propagation
- Import and verification
By defining weights, you can trade-off the number of transactions per second and the hardware required to maintain the target block time appropriate for your use case. Weights are defined in the runtime, meaning you can tune them using runtime updates to keep up with hardware and software improvements.
## Westend
Westend is a Parity-maintained, Polkadot SDK-based blockchain that serves as a test network for the [Polkadot](#polkadot) network.
---
Page Title: HOP Recipient Journey
- Resolved Markdown: https://docs.polkadot.com/reference/apps/infrastructure/hop/recipient.md
- Canonical (HTML): https://docs.polkadot.com/reference/apps/infrastructure/hop/recipient/
- Summary: The receiving side of a HOP transfer — observing the incoming hop on the destination chain, validating the proof, and settling the resulting state.
- Word Count: 466; Token Estimate: 689
- Last Updated: 2026-06-16T14:17:44+00:00
- Version Hash: sha256:b1a36fb6043574910d50d196b76a31d4a8d6a19513bf963f2537ad6607592a7a
# Recipient Journey
## Introduction
This page documents the recipient side of a HOP transfer: what a participant or chain receiving the final hop sees, how the destination chain validates the incoming proof, and what settles when the validation passes.
For the protocol mechanics underneath, see [How It Works](/reference/apps/infrastructure/hop/how-it-works/). For the sender's view, see [Sender Journey](/reference/apps/infrastructure/hop/sender/).
!!! warning "Provisional"
The exact recipient-side event surface (what events the destination emits when a HOP transfer lands, the subscription primitive for those events, the state-change semantics), and any accept-or-decline mechanics on the recipient's side are still being finalized. This page documents the conceptual flow; the per-event reference will be added once the surface stabilizes.
## The Flow at a Glance
From the recipient's perspective:
1. **An incoming hop lands**: The destination chain receives the final hop with its payload and proof.
2. **The verifier validates**: The chain's HOP integration calls the configured verifier; only an accepted proof proceeds to settlement.
3. **State settles**: The destination chain applies the payload's effect — crediting the recipient's account for an asset transfer, recording the message for a message-passing flow, or whatever the payload prescribed.
4. **The destination emits a finalization event**: The event is what tells the sender (and the recipient's UI, if any) that the transfer completed.
Importantly, the recipient does _not_ typically have to explicitly accept the transfer — settlement happens automatically when the verifier accepts. Where two-sided acceptance is needed (a Coinage-style flow where the recipient can decline), that semantics is layered on top of HOP by the higher-level pallet, not built into HOP itself.
## What the Recipient's Product Sees
If the recipient is a user of a Polkadot Product, the Product subscribes to the relevant chain state on the destination chain. When the HOP transfer settles:
- The user's balance (or other state) updates as the destination chain's storage changes.
- The Product UI surfaces the change to the user — typically as an arrived transfer or an updated state value.
For asynchronous receive flows, the Product builds against the destination chain's chain-client surface — see [Read Chain State](/apps/build/read-chain-state/) for the pattern.
## Where to Go Next
- Learn **How It Works**
---
The protocol mechanics — single hops, multi-hop routing, the verifier model that gates settlement.
[:octicons-arrow-right-24: Reference](/reference/apps/infrastructure/hop/how-it-works/)
- Guide **Read Chain State**
---
The Product-side how-to for subscribing to chain state — the surface a recipient's Product uses to observe HOP-driven state changes.
[:octicons-arrow-right-24: Get Started](/apps/build/read-chain-state/)
---
Page Title: HOP Reference
- Resolved Markdown: https://docs.polkadot.com/reference/apps/infrastructure/hop.md
- Canonical (HTML): https://docs.polkadot.com/reference/apps/infrastructure/hop/
- Summary: Reference for HOP — Polkadot's cross-chain hop protocol that moves assets and messages between chains, with current maturity-state caveats clearly flagged.
- Word Count: 464; Token Estimate: 709
- Last Updated: 2026-06-16T14:17:44+00:00
- Version Hash: sha256:1f29cafb6c5d0bcff91a979d20e95d018fcc563fc78cd4d4b05516bdc4f39c62
# HOP
## Introduction
HOP is Polkadot's cross-chain hop protocol — a mechanism for moving assets and messages between chains in the Polkadot ecosystem with more flexibility than a plain XCM transfer. The use case is *"hop a transfer through one or more intermediate chains to reach its destination,"* with HOP handling the per-hop routing, proofs, and cleanup of intermediate state.
For most Product developers, HOP is not something you will reach for in day-one flows. The standard payment patterns — `Balances.transfer_keep_alive` for merchant flows, [Coinage](/reference/apps/infrastructure/pop/pallet-coinage/) for personhood-aware payments — cover the common cases without needing HOP. HOP becomes relevant when a Product crosses chain boundaries in a way standard XCM does not cleanly handle.
!!! warning "Current state caveats"
HOP is being actively built and three caveats apply to integrations against the current code:
- **`NoopVerifier` is not production-ready**: The current verifier implementation is a development stand-in. Production-grade verification is forthcoming.
- **The repository README is out of date**: Where the README and this reference disagree, this reference reflects the intended direction; the README will be updated separately.
- **`pallet-hop-promotion` status is evolving**: The promotion pallet that pairs with HOP for certain flows is in flux; integrations should not depend on its current shape.
These notes will be removed from this page as each item resolves.
## Where HOP Fits
Three places HOP shows up in a Product context:
- **As a building block under cross-chain payments**: Coinage and other payment flows can route through HOP underneath when the sender and recipient are on different chains. The Product surface (Coinage, `Balances.transfer_keep_alive`) is what a Product calls; HOP is the layer beneath that makes the cross-chain part work.
- **As a primitive for cross-chain messaging beyond payments**: Moving non-asset payloads (state references, capability handles) across chain boundaries in flows that need more flexibility than plain XCM.
- **As a target for node-operator and runtime-developer work**: Running a HOP-enabled node, integrating HOP into a new Substrate chain. These node-operator and SDK-integration paths are forthcoming separately.
## Where to Go Next
- Learn **How It Works**
---
The conceptual protocol — what a "hop" is, how multi-hop routing is constructed, and the verifier model.
[:octicons-arrow-right-24: Reference](/reference/apps/infrastructure/hop/how-it-works/)
- Learn **Sender Journey**
---
The sender side of a HOP transfer: building, dispatching, and tracking a multi-hop send.
[:octicons-arrow-right-24: Reference](/reference/apps/infrastructure/hop/sender/)
- Learn **Recipient Journey**
---
The recipient side: receiving a HOP transfer that landed on a chain via one or more hops.
[:octicons-arrow-right-24: Reference](/reference/apps/infrastructure/hop/recipient/)
---
Page Title: HOP Sender Journey
- Resolved Markdown: https://docs.polkadot.com/reference/apps/infrastructure/hop/sender.md
- Canonical (HTML): https://docs.polkadot.com/reference/apps/infrastructure/hop/sender/
- Summary: The sender side of a HOP transfer — dispatching a multi-hop send, tracking it as it routes through intermediate chains, and observing the final outcome.
- Word Count: 448; Token Estimate: 662
- Last Updated: 2026-06-16T14:17:44+00:00
- Version Hash: sha256:55b40eeea4a2d23ffb7feb58d4e0e0d5083c089b6b851040ce1f12c6d30e4ea8
# Sender Journey
## Introduction
This page documents the sender side of a HOP transfer: what a participant who initiates the send does, what they see as it routes, and how they observe whether it landed.
For the protocol mechanics underneath, see [How It Works](/reference/apps/infrastructure/hop/how-it-works/). For the recipient's view, see [Recipient Journey](/reference/apps/infrastructure/hop/recipient/).
!!! warning "Provisional"
The exact sender-side dispatch extrinsics, the tracking surface (events emitted at each hop, subscribable status), and the finalization signal a sender observes are still being finalized. This page documents the conceptual flow; the per-call reference will be added once the surface stabilizes.
## The Flow at a Glance
From the sender's perspective:
1. **Build the hop sequence**: Either specify the full route (sender-specified routing) or specify only the destination and let routing chains determine the intermediate hops dynamically.
2. **Sign and dispatch**: A single signed transaction on the sender's chain initiates the send. The signing uses the standard mediated-signing flow — the user approves on the paired App per the usual model.
3. **Watch the hops progress**: Each hop emits an event on the chain it landed on; the sender's UI (or backend, if the sender is a service) can subscribe to those events to track progress.
4. **Observe finalization**: When the transfer lands on the destination chain, the destination emits a finalization event. The sender's flow can resolve at that point — typically by updating UI, posting a confirmation, or triggering the next step in a larger workflow.
## What Can Go Wrong
The two common failure modes a sender's UI should handle:
- **Mid-route rejection**: A hop fails verification on an intermediate or destination chain (the verifier rejects the proof, the receiving chain refuses for policy reasons, fees are insufficient). The funds typically remain reclaimable on the chain where the failure occurred; the sender's UI should make recovery visible.
- **Timeout / loss of tracking**: A hop succeeds but the sender's monitoring loses visibility (the sender's node was offline during the relevant events). The funds are still where the chain says they are; the sender's UI should recover by reading the destination's state directly rather than assuming the worst from missing events.
## Where to Go Next
- Learn **How It Works**
---
The protocol mechanics underneath the sender flow — single hops, multi-hop routing, the verifier model.
[:octicons-arrow-right-24: Reference](/reference/apps/infrastructure/hop/how-it-works/)
- Learn **Recipient Journey**
---
The receiving side of a HOP transfer.
[:octicons-arrow-right-24: Reference](/reference/apps/infrastructure/hop/recipient/)
---
Page Title: Host API on Polkadot Web
- Resolved Markdown: https://docs.polkadot.com/reference/apps/hosts/polkadot-web/host-api.md
- Canonical (HTML): https://docs.polkadot.com/reference/apps/hosts/polkadot-web/host-api/
- Summary: Reference for the TrUAPI Host API surface exposed by Polkadot Web, including shared Desktop behavior and where browser-context behavior differs.
- Word Count: 486; Token Estimate: 671
- Last Updated: 2026-06-16T14:17:44+00:00
- Version Hash: sha256:c19a0a16b340e4dc3091e64cac695d0e09e366694f5d91bf753883f65f7648f0
# Host API on Polkadot Web
## Introduction
The Host API surface a Product calls on Polkadot Web is the same TrUAPI surface as on Polkadot Desktop. The same method groups, the same signatures, and the same SDK packages apply. Code written for Desktop runs on Web. This page documents the _exceptions_ to that statement, focusing on the small number of capabilities whose underlying behavior is materially different because the runtime is a browser, not an installed application.
For the full TrUAPI reference (method groups, versioning, package table), see [Protocol: TrUAPI](/reference/apps/protocol/truapi/).
!!! warning "Provisional"
The per-method-group behavioral matrix between Polkadot Web and Polkadot Desktop is still being finalized. This page documents the categories where behavior is known to differ and the conceptual reason for each; the per-method specifics will be added once the surface is confirmed.
## What Is the Same
By default, assume the following behavior is the same on Web as on Desktop:
- Chain interaction, storage reads, transaction building, and `signAndSubmit` work identically.
- Per-Product sub-accounts derive the same way and resolve to the same addresses.
- Permissions are declared the same way in the manifest and gate the same capabilities at the Host API boundary.
- Signing routes to the paired Polkadot App with the same per-transaction approval model.
A Product that targets Web can use the same `@parity/product-sdk` packages and the same TrUAPI method group calls; the SDK abstracts away the Host difference at every point where it matters.
## Where Browser-Context Differs
Three categories are where browser-context behavior diverges and a Product developer may need Web-specific handling:
- **Local storage backing**: The Product SDK's [`KvStore`](/apps/build/persist-data-locally/) routes through the Host on Web exactly as on Desktop, but the underlying backend the Host uses is different: browser-managed storage rather than the installed app's on-device storage. Capacity, eviction behavior, and clear-history semantics follow the browser's rules.
- **Outbound requests under the `ExternalRequest` permission**: Pattern-scoped outbound requests still work, but the request itself is dispatched from a browser context. CORS, cookies, and the browser's network policies all apply on top of the Host's pattern enforcement. A request the Host would allow may still be blocked by the browser if the target server's CORS policy rejects it.
- **Media capabilities**: Media-access permissions such as `Microphone` are gated by both the Host's permission system and the browser's media-permission prompt. The user has to grant both. Build UI that handles the two-prompt path gracefully.
A Product that uses none of those three categories needs no Web-specific code.
## Where to Go Next
- Guide **Persist Data Locally**
---
The Product-side how-to for `KvStore`, including the cross-environment behavior the Web Host inherits.
[:octicons-arrow-right-24: Get Started](/apps/build/persist-data-locally/)
---
Page Title: How HOP Works
- Resolved Markdown: https://docs.polkadot.com/reference/apps/infrastructure/hop/how-it-works.md
- Canonical (HTML): https://docs.polkadot.com/reference/apps/infrastructure/hop/how-it-works/
- Summary: The HOP protocol's conceptual model — what a hop is, how multi-hop routing is constructed, and how the verifier model proves cross-chain correctness.
- Word Count: 629; Token Estimate: 852
- Last Updated: 2026-06-16T14:17:44+00:00
- Version Hash: sha256:af4e8730ec41f19f841ebbf49f40661eda1b3b9abaa03537b2fdabad07f61b90
# How It Works
## Introduction
A HOP transfer is built from a sequence of single-chain hops, each one taking the transfer one step closer to its destination. The protocol's job is to make a sequence of single-chain hops behave like a single coherent operation — atomic enough for the sender to reason about, with proofs that the intermediate state was correctly cleared as the transfer moved through.
This page documents the conceptual model: what a hop is, how multi-hop routing is constructed, and how the verifier model works at a high level.
!!! warning "Provisional"
The exact wire format of a HOP message, the runtime extrinsics that initiate and consume hops, the verifier interface, and the per-chain integration surface are still being finalized. This page covers the conceptual model only; the protocol-level reference will be added once the surface stabilizes.
## What a Single Hop Is
A single hop moves a transfer from one chain to one adjacent chain. The hop carries:
- **The payload**: The asset and amount, or the message being moved.
- **A proof**: Evidence that the source chain has authorized the hop (typically a signed XCM-style message from the source chain's account holding the funds).
- **Routing information**: Where the hop should land next, plus any constraints or fees the next hop should respect.
The receiving chain on the other side of a hop validates the proof, accepts the payload, and either holds the funds locally (if it is the destination) or constructs the next hop forward.
## How Multi-Hop Routing Is Constructed
A multi-hop transfer is a chain of single hops — chain A → chain B → chain C, for example, where A is the sender's chain, C is the destination, and B is an intermediate routing chain.
The routing can be:
- **Sender-specified**: The sender constructs the full hop sequence at dispatch time and signs the whole thing.
- **Router-determined**: The sender specifies only the destination, and intermediate chains determine the next-hop routing dynamically.
In both modes, each hop carries enough proof for the receiving chain to validate the previous hop independently, so the chain doesn't need to trust the routing chain's word about what happened upstream.
## The Verifier Model
The verifier is the component that checks the cryptographic correctness of each incoming hop. It receives the payload, the proof, and the routing context, and produces either an "accept" or "reject" outcome. The chain's HOP integration calls into the verifier for every incoming hop; only accepted hops modify chain state.
The verifier abstracts the cryptography from the chain's HOP integration, so different verifier implementations can plug in without rewriting the per-chain integration code. The current `NoopVerifier` is a development stand-in that always accepts — useful for testing the protocol flow without the cryptographic overhead, but not suitable for production. A production verifier is forthcoming.
## What a Product Sees
A Product dispatching a HOP transfer through a higher-level surface (Coinage, or a future payment-routing primitive that uses HOP underneath) sees a single `signAndSubmit`-style call that resolves when the transfer completes — or fails — at the destination. The multi-hop machinery underneath is not directly exposed to the Product code; it is the chain's HOP integration that orchestrates the hops, and the Product's UI shows the result the destination reports back.
## Where to Go Next
- Learn **Sender Journey**
---
What a participant sending a HOP transfer sees — dispatch, tracking, and finalization on the destination.
[:octicons-arrow-right-24: Reference](/reference/apps/infrastructure/hop/sender/)
- Learn **Recipient Journey**
---
What a participant receiving a HOP transfer sees on the destination chain.
[:octicons-arrow-right-24: Reference](/reference/apps/infrastructure/hop/recipient/)
---
Page Title: Inclusion Pipeline
- Resolved Markdown: https://docs.polkadot.com/reference/parachains/consensus/inclusion-pipeline.md
- Canonical (HTML): https://docs.polkadot.com/reference/parachains/consensus/inclusion-pipeline/
- Summary: Learn how Polkadot validates parachain blocks through the Inclusion Pipeline, detailing context, generation, backing, and inclusion stages.
- Word Count: 567; Token Estimate: 818
- Last Updated: 2026-01-14T11:42:16+00:00
- Version Hash: sha256:c51eb3c6cfc5a5c6c6cd19366bec72a77b9f89aa6a72b5df23c549abc36fa04f
# Inclusion Pipeline
## Introduction
The inclusion pipeline is the multi-stage process through which every parachain block (parablock) is validated and secured before being finalized in the Polkadot relay chain. This pipeline ensures that all parachain blocks meet validity requirements through progressive verification by multiple sets of validators.
The pipeline exists to provide Polkadot's security guarantees, rather than relying on a single validator group. Each parablock passes through multiple validation stages with different validator sets, ensuring that invalid blocks cannot be finalized even if some validators are malicious or compromised.
Whether a parachain uses synchronous or [asynchronous backing](/reference/parachains/consensus/async-backing), all parablocks follow the same inclusion pipeline. The difference is in the timing: asynchronous backing allows multiple blocks to be at different stages of the pipeline simultaneously (pipelining), while synchronous backing processes one block through the entire pipeline before starting the next.
## Pipeline Stages
The inclusion pipeline consists of three main stages:
```mermaid
%%{init: {"flowchart": {"nodeSpacing": 40, "rankSpacing": 60}}}%%
flowchart LR
%% Keep the pipeline on one row (container is hidden)
subgraph Row[" "]
direction LR
G["Generation"] --> B["Backing"] --> I["Inclusion"]
end
style Row fill:none,stroke:none
%% Context: plain text (no box) pointing to both G and B
C["Context"]:::nobox
C -.-> G
C -.-> B
classDef nobox fill:none,stroke:none,color:inherit;
```
### Context
To build a parablock during the generation and backing stages, collators and validators require access to the state context of the parachain. This context is derived from two sources:
- **Relay Parent**: The relay chain block to which the parablock is anchored. Note that the relay parent of a parablock is always different from the relay chain block that eventually includes it. This context source resides on the relay chain.
- **Unincluded Segments**: Chains of candidate parablocks that have not yet been included in the relay chain. These segments represent sequences of block ancestors and may contain candidates at any stage pre-inclusion. A key feature enabled by [async backing](/reference/parachains/consensus/async-backing) is that collators can build new parablocks on top of these unincluded ancestors rather than being limited to ancestors already included in the relay chain state. This context source resides on the collators.
### Generation
Collators execute their blockchain core functionality to generate a new block, producing a [proof-of-validity](https://wiki.polkadot.com/general/glossary/#proof-of-validity) (PoV), which is passed to validators selected for backing. The PoV is composed of:
- A list of state transitions called the **block candidate**
- The values in the parachain's database that the block modifies
- The hashes of the unaffected points in the Merkle tree
### Backing
A subset of active validators verify that the parablock follows the state transition rules of the parachain and sign a [validity statement](https://paritytech.github.io/polkadot-sdk/book/types/backing.html?#validity-attestation) about the PoV which can have a positive or negative outcome. With enough positive statements (at least 2/3 of assigned validators), the candidate is considered backable. It is then noted in a fork on the relay chain, at which point it is considered backed, ready for the next stage of the pipeline.
### Inclusion
Validators gossip [erasure code chunks](https://paritytech.github.io/polkadot-sdk/book/types/availability.html#erasure-chunk) and put the parablock through the final [approval process](https://paritytech.github.io/polkadot-sdk/book/protocol-approval.html) before it is considered *included* in the relay chain.
---
Page Title: Install Polkadot SDK
- Resolved Markdown: https://docs.polkadot.com/parachains/install-polkadot-sdk.md
- Canonical (HTML): https://docs.polkadot.com/parachains/install-polkadot-sdk/
- Summary: Install all required Polkadot SDK dependencies, set up the SDK itself, and verify that it runs correctly on your machine.
- Word Count: 3234; Token Estimate: 5120
- Last Updated: 2026-05-19T14:51:06+00:00
- Version Hash: sha256:71bd962e39b3eb74d9a69e19ba5ac881bf43703eba51286cffc8ad29940ebb19
# Install Polkadot SDK
This guide provides step-by-step instructions for installing the Polkadot SDK on macOS, Linux, and Windows. The installation process consists of two main parts:
- **Installing dependencies**: Setting up Rust, required system packages, and development tools.
- **Building the Polkadot SDK**: Cloning and compiling the Polkadot SDK repository.
Follow the appropriate section for your operating system to ensure all necessary tools are installed and configured properly.
## Install Dependencies: macOS
You can install Rust and set up a Substrate development environment on Apple macOS computers with Intel or Apple M1 processors.
### Before You Begin {: #before-you-begin-mac-os }
Before you install Rust and set up your development environment on macOS, verify that your computer meets the following basic requirements:
- Operating system version is 10.7 Lion or later.
- Processor speed of at least 2 GHz. Note that 3 GHz is recommended.
- Memory of at least 8 GB RAM. Note that 16 GB is recommended.
- Storage of at least 10 GB of available space.
- Broadband Internet connection.
### Install Command Line Tools
Xcode Command Line Tools provide essential build dependencies including `clang`, `make`, and other tools required to compile native crates like `librocksdb-sys`. To install them, run:
```bash
xcode-select --install
```
### Install Homebrew
In most cases, you should use Homebrew to install and manage packages on macOS computers. If you don't already have Homebrew installed on your local computer, you should download and install it before continuing.
To install Homebrew:
1. Open the Terminal application.
2. Download and install Homebrew by running the following command:
```bash
/bin/bash -c "$(curl -fsSL https://raw.githubusercontent.com/Homebrew/install/master/install.sh)"
```
3. Verify Homebrew has been successfully installed by running the following command:
```bash
brew --version
```
The command displays output similar to the following:
brew --version
Homebrew 4.3.15
### Support for Apple Silicon
Protobuf must be installed before the build process can begin. To install it, run the following command:
```bash
brew install protobuf
```
### Install Required Packages and Rust {: #install-required-packages-and-rust-mac-os }
Because the blockchain requires standard cryptography to support the generation of public/private key pairs and the validation of transaction signatures, you must also have a package that provides cryptography, such as `openssl`.
To install `openssl` and the Rust toolchain on macOS:
1. Open the Terminal application.
2. Ensure you have an updated version of Homebrew by running the following command:
```bash
brew update
```
3. Install the `openssl` package by running the following command:
```bash
brew install openssl
```
4. Download the `rustup` installation program and use it to install Rust by running the following command:
```bash
curl --proto '=https' --tlsv1.2 -sSf https://sh.rustup.rs | sh
```
5. Follow the prompts displayed to proceed with a default installation.
6. Update your current shell to include Cargo by running the following command:
```bash
source ~/.cargo/env
```
7. Configure the Rust toolchain to default to the latest stable version by running the following commands:
```bash
rustup default stable
rustup update
rustup target add wasm32-unknown-unknown
rustup component add rust-src
```
8. Proceed to [Build the Polkadot SDK](#build-the-polkadot-sdk).
## Install Dependencies: Linux
Rust supports most Linux distributions. Depending on the specific distribution and version of the operating system you use, you might need to add some software dependencies to your environment. In general, your development environment should include a linker or a C-compatible compiler, such as `clang`, and an appropriate integrated development environment (IDE).
### Before You Begin {: #before-you-begin-linux }
Check the documentation for your operating system for information about the installed packages and how to download and install any additional packages you might need. For example, if you use Ubuntu, you can use the Ubuntu Advanced Packaging Tool (`apt`) to install the `build-essential` package:
```bash
sudo apt install build-essential
```
At a minimum, you need the following packages before you install Rust:
```text
clang curl git make
```
Because the blockchain requires standard cryptography to support the generation of public/private key pairs and the validation of transaction signatures, you must also have a package that provides cryptography, such as `libssl-dev` or `openssl-devel`.
### Install Required Packages and Rust {: #install-required-packages-and-rust-linux }
To install the Rust toolchain on Linux:
1. Open a terminal shell.
2. Check the packages installed on the local computer by running the appropriate package management command for your Linux distribution.
3. Add any package dependencies you are missing to your local development environment by running the appropriate package management command for your Linux distribution:
=== "Ubuntu"
```bash
sudo apt install --assume-yes git clang curl libssl-dev llvm libclang-dev libudev-dev make protobuf-compiler
```
=== "Debian"
```sh
sudo apt install --assume-yes git clang curl libssl-dev llvm libclang-dev libudev-dev make protobuf-compiler
```
=== "Arch"
```sh
pacman -Syu --needed --noconfirm curl git clang make protobuf
```
=== "Fedora"
```sh
sudo dnf update
sudo dnf install clang curl git openssl-devel make protobuf-compiler
```
=== "OpenSUSE"
```sh
sudo zypper install clang curl git openssl-devel llvm-devel libudev-devel make protobuf
```
Remember that different distributions might use different package managers and bundle packages in different ways. For example, depending on your installation selections, Ubuntu Desktop and Ubuntu Server might have different packages and different requirements. However, the packages listed in the command-line examples are applicable to many common Linux distributions, including Debian, Linux Mint, MX Linux, and Elementary OS.
4. Download the `rustup` installation program and use it to install Rust by running the following command:
```bash
curl --proto '=https' --tlsv1.2 -sSf https://sh.rustup.rs | sh
```
5. Follow the prompts displayed to proceed with a default installation.
6. Update your current shell to include Cargo by running the following command:
```bash
source $HOME/.cargo/env
```
7. Verify your installation by running the following command:
```bash
rustc --version
```
8. Configure the Rust toolchain to default to the latest stable version by running the following commands:
```bash
rustup default stable
rustup update
rustup target add wasm32-unknown-unknown
rustup component add rust-src
```
9. Proceed to [Build the Polkadot SDK](#build-the-polkadot-sdk).
## Install Dependencies: Windows (WSL)
In general, UNIX-based operating systems—like macOS or Linux—provide a better development environment for building Substrate-based blockchains.
However, suppose your local computer uses Microsoft Windows instead of a UNIX-based operating system. In that case, you can configure it with additional software to make it a suitable development environment for building Substrate-based blockchains. To prepare a development environment on a Microsoft Windows computer, you can use Windows Subsystem for Linux (WSL) to emulate a UNIX operating environment.
### Before You Begin {: #before-you-begin-windows-wls }
Before installing on Microsoft Windows, verify the following basic requirements:
- You have a computer running a supported Microsoft Windows operating system:
- **For Windows desktop**: You must be running Microsoft Windows 10, version 2004 or later, or Microsoft Windows 11 to install WSL.
- **For Windows server**: You must be running Microsoft Windows Server 2019, or later, to install WSL on a server operating system.
- You have a good internet connection and access to a shell terminal on your local computer.
### Set Up Windows Subsystem for Linux
WSL enables you to emulate a Linux environment on a computer that uses the Windows operating system. The primary advantage of this approach for Substrate development is that you can use all of the code and command-line examples as described in the Substrate documentation. For example, you can run common commands—such as `ls` and `ps`—unmodified. By using WSL, you can avoid configuring a virtual machine image or a dual-boot operating system.
To prepare a development environment using WSL:
1. Check your Windows version and build number to see if WSL is enabled by default.
If you have Microsoft Windows 10, version 2004 (Build 19041 and higher), or Microsoft Windows 11, WSL is available by default and you can continue to the next step.
If you have an older version of Microsoft Windows installed, see the [WSL manual installation steps for older versions](https://learn.microsoft.com/en-us/windows/wsl/install-manual). If you are installing on an older version of Microsoft Windows, you can download and install WLS 2 if your computer has Windows 10, version 1903 or higher.
2. Select **Windows PowerShell** or **Command Prompt** from the **Start** menu, right-click, then **Run as administrator**.
3. In the PowerShell or Command Prompt terminal, run the following command:
```bash
wsl --install
```
This command enables the required WSL 2 components that are part of the Windows operating system, downloads the latest Linux kernel, and installs the Ubuntu Linux distribution by default.
If you want to review the other Linux distributions available, run the following command:
```bash
wsl --list --online
```
4. After the distribution is downloaded, close the terminal.
5. Click the **Start** menu, select **Shut down or sign out**, then click **Restart** to restart the computer.
Restarting the computer is required to start the installation of the Linux distribution. It can take a few minutes for the installation to complete after you restart.
For more information about setting up WSL as a development environment, see the [Set up a WSL development environment](https://learn.microsoft.com/en-us/windows/wsl/setup/environment) docs.
### Install Required Packages and Rust {: #install-required-packages-and-rust-windows-wls }
To install the Rust toolchain on WSL:
1. Click the **Start** menu, then select **Ubuntu**.
2. Type a UNIX user name to create a user account.
3. Type a password for your UNIX user, then retype the password to confirm it.
4. Download the latest updates for the Ubuntu distribution using the Ubuntu Advanced Packaging Tool (`apt`) by running the following command:
```bash
sudo apt update
```
5. Add the required packages for the Ubuntu distribution by running the following command:
```bash
sudo apt install --assume-yes git clang curl libssl-dev llvm libclang-dev libudev-dev make protobuf-compiler
```
6. Download the `rustup` installation program and use it to install Rust for the Ubuntu distribution by running the following command:
```bash
curl --proto '=https' --tlsv1.2 -sSf https://sh.rustup.rs | sh
```
7. Follow the prompts displayed to proceed with a default installation.
8. Update your current shell to include Cargo by running the following command:
```bash
source ~/.cargo/env
```
9. Verify your installation by running the following command:
```bash
rustc --version
```
10. Configure the Rust toolchain to use the latest stable version as the default toolchain by running the following commands:
```bash
rustup default stable
rustup update
rustup target add wasm32-unknown-unknown
rustup component add rust-src
```
11. Proceed to [Build the Polkadot SDK](#build-the-polkadot-sdk).
## Build the Polkadot SDK
After installing all dependencies, you can now clone and compile the Polkadot SDK repository to verify your setup.
### Clone the Polkadot SDK
1. Clone the Polkadot SDK repository:
```bash
git clone https://github.com/paritytech/polkadot-sdk.git
```
2. Navigate into the project directory:
```bash
cd polkadot-sdk
```
### Compile the Polkadot SDK
Compile the entire Polkadot SDK repository to ensure your environment is properly configured:
```bash
cargo build --release --locked
```
!!!note
This initial compilation will take significant time, depending on your machine specifications. It compiles all components of the Polkadot SDK to verify your toolchain is correctly configured.
### Verify the Build
Once the build completes successfully, verify the installation by checking the compiled binaries:
```bash
ls target/release
```
You should see several binaries, including:
- `polkadot`: The Polkadot relay chain node.
- `polkadot-parachain`: The parachain collator node.
- `polkadot-omni-node`:The omni node for running parachains.
- `substrate-node`: The kitchensink node with many pre-configured pallets.
Verify the Polkadot binary works by checking its version:
```bash
./target/release/polkadot --version
```
This should display version information similar to:
```bash
polkadot 1.16.0-1234abcd567
```
If you see the version output without errors, your development environment is correctly configured and ready for Polkadot SDK development!
## Optional: Run the Kitchensink Node
The Polkadot SDK includes a feature-rich node called "kitchensink" located at `substrate/bin/node`. This node comes pre-configured with many pallets and features from the Polkadot SDK, making it an excellent reference for exploring capabilities and understanding how different components work together.
!!!note
If you've already compiled the Polkadot SDK in the previous step, the `substrate-node` binary is already built and ready to use. You can skip directly to running the node.
### Run the Kitchensink Node in Development Mode
From the `polkadot-sdk` root directory, start the kitchensink node in development mode:
```bash
./target/release/substrate-node --dev
```
The `--dev` flag enables development mode, which:
- Runs a single-node development chain.
- Produces and finalizes blocks automatically.
- Uses pre-configured development accounts (Alice, Bob, etc.).
- Deletes all data when stopped, ensuring a clean state on restart.
./target/release/substrate-node --dev
2025-10-25 09:08:53 Substrate Node
2025-10-25 09:08:53 ✌️ version 3.0.0-dev-7304295748b
2025-10-25 09:08:53 ❤️ by Parity Technologies <admin@parity.io>, 2017-2025
2025-10-25 09:08:53 📋 Chain specification: Development
2025-10-25 09:08:53 🏷 Node name: squalid-shelf-0944
2025-10-25 09:08:53 👤 Role: AUTHORITY
2025-10-25 09:08:53 💾 Database: RocksDb at /var/folders/6t/fw37yfvx14qgwv5sl5p0lcph0000gn/T/substrate0XFsh7/chains/dev/db/full
2025-10-25 09:08:57 🔨 Initializing Genesis block/state (state: 0x9831…a36f, header-hash: 0x6eaf…0764)
2025-10-25 09:08:57 Creating transaction pool txpool_type=ForkAware ready=Limit { count: 8192, total_bytes: 20971520 } future=Limit { count: 819, total_bytes: 2097152 }
2025-10-25 09:08:57 👴 Loading GRANDPA authority set from genesis on what appears to be first startup.
2025-10-25 09:08:57 👶 Creating empty BABE epoch changes on what appears to be first startup.
2025-10-25 09:08:57 Using default protocol ID "sup" because none is configured in the chain specs
2025-10-25 09:08:57 Local node identity is: 12D3KooWFug81ps95nGBDXidDv8K9zth3JBwVw3nm8KanZ3Rdi4J
2025-10-25 09:08:57 Running litep2p network backend
2025-10-25 09:08:57 💻 Operating system: macos
2025-10-25 09:08:57 💻 CPU architecture: aarch64
2025-10-25 09:08:57 📦 Highest known block at #0
2025-10-25 09:08:57 〽️ Prometheus exporter started at 127.0.0.1:9615
2025-10-25 09:08:57 Running JSON-RPC server: addr=127.0.0.1:9944,[::1]:9944
2025-10-25 09:08:57 🏁 CPU single core score: 1.55 GiBs, parallelism score: 1.43 GiBs with expected cores: 8
2025-10-25 09:08:57 🏁 Memory score: 65.81 GiBs
2025-10-25 09:08:57 🏁 Disk score (seq. writes): 3.20 GiBs
2025-10-25 09:08:57 🏁 Disk score (rand. writes): 760.04 MiBs
2025-10-25 09:08:57 👶 Starting BABE Authorship worker
2025-10-25 09:08:57 Failed to load AddrCache from file, using empty instead: Failed to encode or decode AddrCache.
2025-10-25 09:08:57 Loaded persisted AddrCache with 0 authority ids.
2025-10-25 09:08:57 🥩 BEEFY gadget waiting for BEEFY pallet to become available...
2025-10-25 09:08:57 Successfully persisted AddrCache on disk
2025-10-25 09:09:00 🙌 Starting consensus session on top of parent 0x6eaf6f7689b01e21821690ce221c6f5a4eeab997242f60d232234b6c1da20764 (#0)
2025-10-25 09:09:00 🎁 Prepared block for proposing at 1 (5 ms) hash: 0xf1937d6bec79950210463b701e187abe7d0d5e3eb6e089f1c15e5857966471ca; parent_hash: 0x6eaf…0764; end: NoMoreTransactions; extrinsics_count: 2
2025-10-25 09:09:00 🔖 Pre-sealed block for proposal at 1. Hash now 0xcf78ec71ff34797161bfeaa325d21f14745b74cbaa59122ed879af024c7a1400, previously 0xf1937d6bec79950210463b701e187abe7d0d5e3eb6e089f1c15e5857966471ca.
2025-10-25 09:09:00 👶 New epoch 0 launching at block 0xcf78…1400 (block slot 587119380 >= start slot 587119380).
2025-10-25 09:09:00 👶 Next epoch starts at slot 587119580
2025-10-25 09:09:00 🏆 Imported #1 (0x6eaf…0764 → 0xcf78…1400)
2025-10-25 09:09:00 maintain txs=(0, 0) a=1 i=1 views=[(1, 0, 0)] event=NewBestBlock { hash: 0xcf78ec71ff34797161bfeaa325d21f14745b74cbaa59122ed879af024c7a1400, tree_route: None } duration=2.034958ms
2025-10-25 09:09:02 💤 Idle (0 peers), best: #1 (0xcf78…1400), finalized #0 (0x6eaf…0764), ⬇ 0 ⬆ 0
2025-10-25 09:09:03 🙌 Starting consensus session on top of parent 0xcf78ec71ff34797161bfeaa325d21f14745b74cbaa59122ed879af024c7a1400 (#1)
2025-10-25 09:09:03 🎁 Prepared block for proposing at 2 (4 ms) hash: 0xc5cc68c6f3dcda8bae3028f2e17a8dcd348c65750332f31af7972f25bf7a7d60; parent_hash: 0xcf78…1400; end: NoMoreTransactions; extrinsics_count: 2
2025-10-25 09:09:03 🔖 Pre-sealed block for proposal at 2. Hash now 0x67d0adc440feeb28c239da9650744d3dbda899b3ca3b8dc00050ce7269ea6aee, previously 0xc5cc68c6f3dcda8bae3028f2e17a8dcd348c65750332f31af7972f25bf7a7d60.
2025-10-25 09:09:03 🏆 Imported #2 (0xcf78…1400 → 0x67d0…6aee)
2025-10-25 09:09:03 maintain txs=(0, 0) a=1 i=2 views=[(2, 0, 0)] event=NewBestBlock { hash: 0x67d0adc440feeb28c239da9650744d3dbda899b3ca3b8dc00050ce7269ea6aee, tree_route: None } duration=301µs
2025-10-25 09:09:06 🙌 Starting consensus session on top of parent 0x67d0adc440feeb28c239da9650744d3dbda899b3ca3b8dc00050ce7269ea6aee (#2)
2025-10-25 09:09:06 🎁 Prepared block for proposing at 3 (5 ms) hash: 0x29eaa5f82783284b25e9c81e851ae5be63c54de28c94f438cbd733f680172ea2; parent_hash: 0x67d0…6aee; end: NoMoreTransactions; extrinsics_count: 2
2025-10-25 09:09:06 🔖 Pre-sealed block for proposal at 3. Hash now 0x8fb26c9192f8738b8971107072f9d106d364ee7f1ece94d8ae5acc9f69cc522f, previously 0x29eaa5f82783284b25e9c81e851ae5be63c54de28c94f438cbd733f680172ea2.
You should see log output indicating the node is running and producing blocks, with increasing block numbers after `finalized`.
### Interact with the Kitchensink Node
The kitchensink node is accessible at `ws://localhost:9944`. Open [Polkadot.js Apps](https://polkadot.js.org/apps/#/explorer) in your browser to explore its features and connect to the local node.
1. Click the network icon in the top left corner.
2. Scroll to **Development** and select **Local Node**.
3. Click **Switch** to connect to your local node.
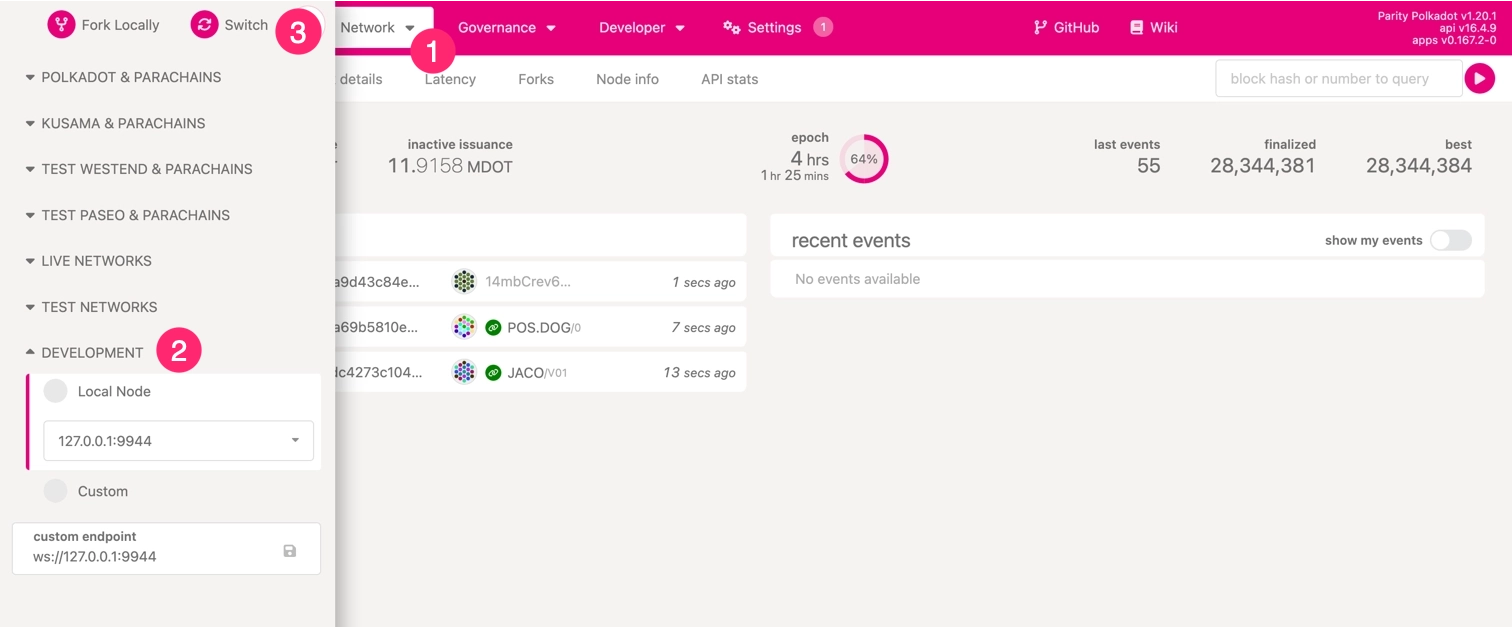
Once connected, the interface updates its color scheme to indicate a successful connection to the local node.
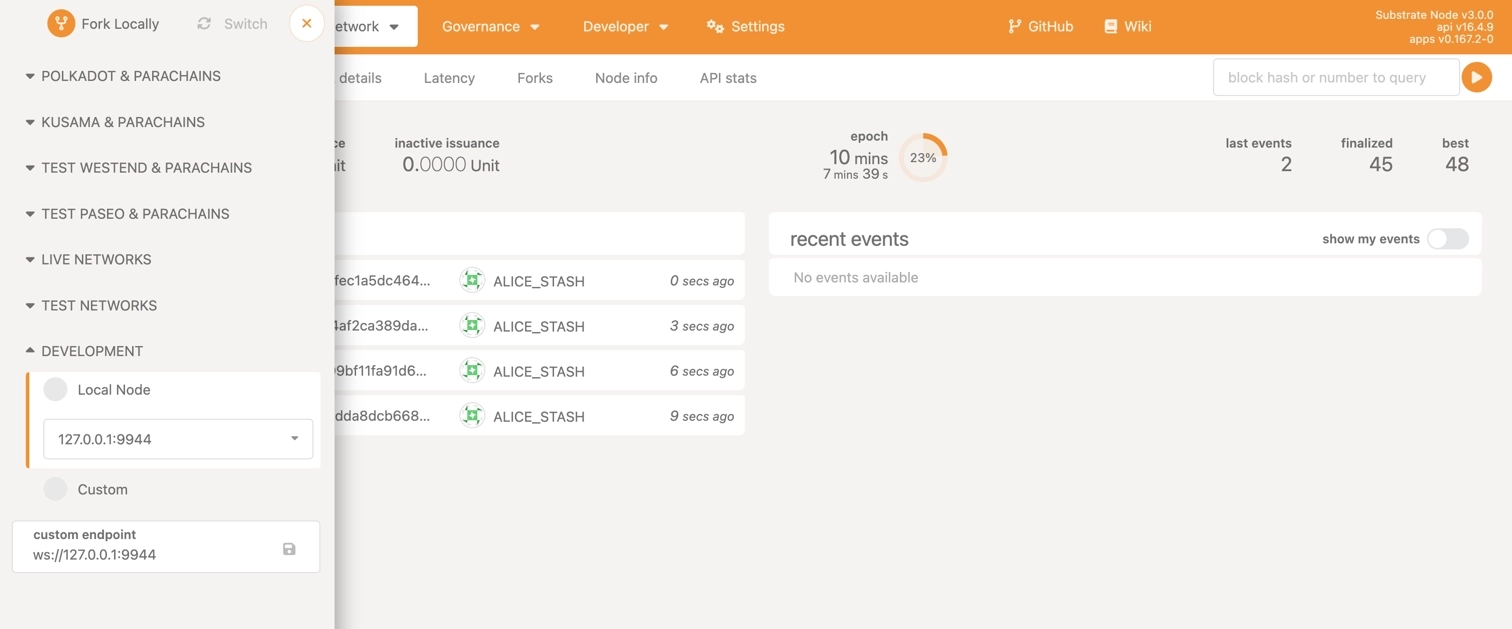
You can now explore the various pallets and features included in the kitchensink node, making it a valuable reference as you develop your own blockchain applications.
To stop the node, press `Control-C` in the terminal.
## Where to Go Next
- __Get Started with Parachain Development__
---
Practical examples and tutorials for building and deploying Polkadot parachains, covering everything from launch to customization and cross-chain messaging.
[:octicons-arrow-right-24: Get Started](/parachains/get-started/)
---
Page Title: Interoperability
- Resolved Markdown: https://docs.polkadot.com/reference/parachains/interoperability.md
- Canonical (HTML): https://docs.polkadot.com/reference/parachains/interoperability/
- Summary: Explore the importance of interoperability in the Polkadot ecosystem, covering XCM, bridges, and cross-chain communication.
- Word Count: 581; Token Estimate: 763
- Last Updated: 2026-03-16T21:10:48+00:00
- Version Hash: sha256:72e1be74aca2fb4ee7bbba4de426997b42024a95b15886ec6a6ece0feea58aef
# Interoperability
## Introduction
Interoperability lies at the heart of the Polkadot ecosystem, enabling communication and collaboration across a diverse range of blockchains. By bridging the gaps between parachains, relay chains, and even external networks, Polkadot unlocks the potential for truly decentralized applications, efficient resource sharing, and scalable solutions.
Polkadot’s design ensures that blockchains can transcend their individual limitations by working together as part of a unified system. This cooperative architecture is what sets Polkadot apart in the blockchain landscape.
## Why Interoperability Matters
The blockchain ecosystem is inherently fragmented. Different blockchains excel in specialized domains such as finance, gaming, or supply chain management, but these chains function in isolation without interoperability. This lack of connectivity stifles the broader utility of blockchain technology.
Interoperability solves this problem by enabling blockchains to:
- **Collaborate across networks**: Chains can interact to share assets, functionality, and data, creating synergies that amplify their individual strengths.
- **Achieve greater scalability**: Specialized chains can offload tasks to others, optimizing performance and resource utilization.
- **Expand use-case potential**: Cross-chain applications can leverage features from multiple blockchains, unlocking novel user experiences and solutions.
In the Polkadot ecosystem, interoperability transforms a collection of isolated chains into a cohesive, efficient network, pushing the boundaries of what blockchains can achieve together.
## Key Mechanisms for Interoperability
At the core of Polkadot's cross-chain collaboration are foundational technologies designed to break down barriers between networks. These mechanisms empower blockchains to communicate, share resources, and operate as a cohesive ecosystem.
### Cross-Consensus Messaging (XCM): The Backbone of Communication
Polkadot's Cross-Consensus Messaging (XCM) is the standard framework for interaction between parachains, relay chains, and, eventually, external blockchains. XCM provides a trustless, secure messaging format for exchanging assets, sharing data, and executing cross-chain operations.
Through XCM, decentralized applications can:
- Transfer tokens and other assets across chains.
- Coordinate complex workflows that span multiple blockchains.
- Enable seamless user experiences where underlying blockchain differences are invisible.
- XCM exemplifies Polkadot’s commitment to creating a robust and interoperable ecosystem.
For further information about XCM, check the [Get Started with XCM](/parachains/interoperability/get-started/) article.
### Bridges: Connecting External Networks
While XCM enables interoperability within the Polkadot ecosystem, bridges extend this functionality to external blockchains such as Ethereum and Bitcoin. By connecting these networks, bridges allow Polkadot-based chains to access external liquidity, additional functionalities, and broader user bases.
With bridges, developers and users gain the ability to:
- Integrate external assets into Polkadot-based applications.
- Combine the strengths of Polkadot’s scalability with the liquidity of other networks.
- Facilitate accurate multi-chain applications that transcend ecosystem boundaries.
For more information about bridges in the Polkadot ecosystem, see the [Bridge Hub](/reference/polkadot-hub/bridging/) guide.
## The Polkadot Advantage
Polkadot was purpose-built for interoperability. Unlike networks that add interoperability as an afterthought, Polkadot integrates it as a fundamental design principle. This approach offers several distinct advantages:
- **Developer empowerment**: Polkadot’s interoperability tools allow developers to build applications that leverage multiple chains’ capabilities without added complexity.
- **Enhanced ecosystem collaboration**: Chains in Polkadot can focus on their unique strengths while contributing to the ecosystem’s overall growth.
- **Future-proofing blockchain**: By enabling seamless communication, Polkadot ensures its ecosystem can adapt to evolving demands and technologies.
## Looking Ahead
Polkadot’s vision of interoperability extends beyond technical functionality, representing a shift towards a more collaborative blockchain landscape. By enabling chains to work together, Polkadot fosters innovation, efficiency, and accessibility, paving the way for a decentralized future where blockchains are not isolated competitors but interconnected collaborators.
---
Page Title: JSON-RPC APIs
- Resolved Markdown: https://docs.polkadot.com/smart-contracts/for-eth-devs/json-rpc-apis.md
- Canonical (HTML): https://docs.polkadot.com/smart-contracts/for-eth-devs/json-rpc-apis/
- Summary: JSON-RPC APIs guide for Polkadot Hub, covering supported methods, parameters, and examples for interacting with the chain.
- Word Count: 4012; Token Estimate: 9712
- Last Updated: 2026-06-04T16:08:37+00:00
- Version Hash: sha256:f07175cbe34280c5145ffeabf00bff70df102d7435c9d0c07700f8eb19cd69bc
# JSON-RPC APIs
## Introduction
Polkadot Hub provides Ethereum compatibility through its JSON-RPC interface, allowing developers to interact with the chain using familiar Ethereum tooling and methods. This document outlines the supported [Ethereum JSON-RPC methods](https://ethereum.org/developers/docs/apis/json-rpc/#json-rpc-methods) and provides examples of how to use them.
This guide uses the Polkadot Hub TestNet endpoint:
```text
https://services.polkadothub-rpc.com/testnet
```
## Available Methods
### eth_accounts
Returns a list of addresses owned by the client. [Reference](https://ethereum.org/developers/docs/apis/json-rpc/#eth_accounts).
**Parameters**:
None.
**Example**:
```bash title="eth_accounts"
curl -X POST https://services.polkadothub-rpc.com/testnet \
-H "Content-Type: application/json" \
--data '{
"jsonrpc":"2.0",
"method":"eth_accounts",
"params":[],
"id":1
}'
```
---
### eth_blockNumber
Returns the number of the most recent block. [Reference](https://ethereum.org/developers/docs/apis/json-rpc/#eth_blocknumber).
**Parameters**:
None.
**Example**:
```bash title="eth_blockNumber"
curl -X POST https://services.polkadothub-rpc.com/testnet \
-H "Content-Type: application/json" \
--data '{
"jsonrpc":"2.0",
"method":"eth_blockNumber",
"params":[],
"id":1
}'
```
---
### eth_call
Executes a new message call immediately without creating a transaction. [Reference](https://ethereum.org/developers/docs/apis/json-rpc/#eth_call).
**Parameters**:
- **`transaction` ++"object"++**: The transaction call object.
- **`to` ++"string"++**: Recipient address of the call. Must be a [20-byte data](https://ethereum.org/developers/docs/apis/json-rpc/#unformatted-data-encoding) string.
- **`data` ++"string"++**: Hash of the method signature and encoded parameters. Must be a [data](https://ethereum.org/developers/docs/apis/json-rpc/#unformatted-data-encoding) string.
- **`from` ++"string"++**: (Optional) Sender's address for the call. Must be a [20-byte data](https://ethereum.org/developers/docs/apis/json-rpc/#unformatted-data-encoding) string.
- **`gas` ++"string"++**: (Optional) Gas limit to execute the call. Must be a [quantity](https://ethereum.org/developers/docs/apis/json-rpc/#quantities-encoding) string.
- **`gasPrice` ++"string"++**: (Optional) Gas price per unit of gas. Must be a [quantity](https://ethereum.org/developers/docs/apis/json-rpc/#quantities-encoding) string.
- **`value` ++"string"++**: (Optional) Value in wei to send with the call. Must be a [quantity](https://ethereum.org/developers/docs/apis/json-rpc/#quantities-encoding) string.
- **`blockValue` ++"string"++**: (Optional) Block tag or block number to execute the call at. Must be a [quantity](https://ethereum.org/developers/docs/apis/json-rpc/#quantities-encoding) string or a [default block parameter](https://ethereum.org/developers/docs/apis/json-rpc/#default-block).
- **`stateOverrides` ++"object"++**: (Optional) A mapping of addresses to state overrides. Allows temporary modification of account state for the duration of the call without persisting changes on-chain. Conforms to the [Geth state override specification](https://geth.ethereum.org/docs/interacting-with-geth/rpc/ns-eth#state-override-set).
- **Key**: Account address as a hex string (e.g., `"0x1234..."`)
- **Value**: An object with the following optional fields:
- **`balance` ++"string"++**: (Optional) Fake balance to set for the account. Must be a quantity string.
- **`nonce` ++"string"++**: (Optional) Fake nonce to set for the account. Must be a quantity string.
- **`code` ++"string"++**: (Optional) Fake bytecode to inject at the account address. On Polkadot Hub, this field accepts both EVM bytecode and PolkaVM (PVM) bytecode, which is detected automatically via magic bytes.
- **`state` ++"object"++**: (Optional) Completely replaces all storage slots for the account. A mapping of storage keys to storage values (both as 32-byte hex strings). Unspecified slots are zeroed. Mutually exclusive with `stateDiff`.
- **`stateDiff` ++"object"++**: (Optional) Patches only the specified storage slots, leaving all other slots unchanged. A mapping of storage keys to storage values (both as 32-byte hex strings). Mutually exclusive with `state`.
- **`movePrecompileToAddress` ++"string"++**: (Optional) Accepted for Geth compatibility but has no effect, as Polkadot Hub does not use relocatable precompile addresses.
**Example**:
=== "Basic"
```bash
curl -X POST https://services.polkadothub-rpc.com/testnet \
-H "Content-Type: application/json" \
--data '{
"jsonrpc":"2.0",
"method":"eth_call",
"params":[{
"to": "INSERT_RECIPIENT_ADDRESS",
"data": "INSERT_ENCODED_CALL"
}, "INSERT_BLOCK_VALUE"],
"id":1
}'
```
Ensure to replace `INSERT_RECIPIENT_ADDRESS`, `INSERT_ENCODED_CALL`, and `INSERT_BLOCK_VALUE` with the appropriate values.
=== "With state overrides"
```bash
curl -X POST https://services.polkadothub-rpc.com/testnet \
-H "Content-Type: application/json" \
--data '{
"jsonrpc":"2.0",
"method":"eth_call",
"params":[{
"to": "INSERT_RECIPIENT_ADDRESS",
"data": "INSERT_ENCODED_CALL"
}, "latest", {
"INSERT_ADDRESS": {
"balance": "0xDE0B6B3A7640000"
}
}],
"id":1
}'
```
In this example, the account at `INSERT_ADDRESS` is temporarily assigned a balance of 1 native token (10^18 in its smallest denomination) for the duration of the call. Ensure to replace `INSERT_RECIPIENT_ADDRESS`, `INSERT_ENCODED_CALL`, and `INSERT_ADDRESS` with the appropriate values.
!!! note "Differences from Ethereum"
Polkadot Hub's `eth_call` state overrides are fully compatible with the [Geth state override specification](https://geth.ethereum.org/docs/interacting-with-geth/rpc/ns-eth#state-override-set). One Polkadot-specific extension is that the `code` field accepts both EVM bytecode and PolkaVM (PVM) bytecode, detected automatically via magic bytes at the start of the blob.
---
### eth_chainId
Returns the chain ID used for signing transactions. [Reference](https://ethereum.org/developers/docs/apis/json-rpc/#eth_chainid).
**Parameters**:
None.
**Example**:
```bash title="eth_chainId"
curl -X POST https://services.polkadothub-rpc.com/testnet \
-H "Content-Type: application/json" \
--data '{
"jsonrpc":"2.0",
"method":"eth_chainId",
"params":[],
"id":1
}'
```
---
### eth_estimateGas
Estimates gas required for a transaction. [Reference](https://ethereum.org/developers/docs/apis/json-rpc/#eth_estimategas).
**Parameters**:
- **`transaction` ++"object"++**: The transaction call object.
- **`to` ++"string"++**: Recipient address of the call. Must be a [20-byte data](https://ethereum.org/developers/docs/apis/json-rpc/#unformatted-data-encoding) string.
- **`data` ++"string"++**: Hash of the method signature and encoded parameters. Must be a [data](https://ethereum.org/developers/docs/apis/json-rpc/#unformatted-data-encoding) string.
- **`from` ++"string"++**: (Optional) Sender's address for the call. Must be a [20-byte data](https://ethereum.org/developers/docs/apis/json-rpc/#unformatted-data-encoding) string.
- **`gas` ++"string"++**: (Optional) Gas limit to execute the call. Must be a [quantity](https://ethereum.org/developers/docs/apis/json-rpc/#quantities-encoding) string.
- **`gasPrice` ++"string"++**: (Optional) Gas price per unit of gas. Must be a [quantity](https://ethereum.org/developers/docs/apis/json-rpc/#quantities-encoding) string.
- **`value` ++"string"++**: (Optional) Value in wei to send with the call. Must be a [quantity](https://ethereum.org/developers/docs/apis/json-rpc/#quantities-encoding) string.
- **`blockValue` ++"string"++**: (Optional) Block tag or block number to execute the call at. Must be a [quantity](https://ethereum.org/developers/docs/apis/json-rpc/#quantities-encoding) string or a [default block parameter](https://ethereum.org/developers/docs/apis/json-rpc/#default-block).
**Example**:
```bash title="eth_estimateGas"
curl -X POST https://services.polkadothub-rpc.com/testnet \
-H "Content-Type: application/json" \
--data '{
"jsonrpc":"2.0",
"method":"eth_estimateGas",
"params":[{
"to": "INSERT_RECIPIENT_ADDRESS",
"data": "INSERT_ENCODED_FUNCTION_CALL"
}],
"id":1
}'
```
Ensure to replace the `INSERT_RECIPIENT_ADDRESS` and `INSERT_ENCODED_CALL` with the proper values.
---
### eth_gasPrice
Returns the current gas price in Wei. [Reference](https://ethereum.org/developers/docs/apis/json-rpc/#eth_gasprice).
**Parameters**:
None.
**Example**:
```bash title="eth_gasPrice"
curl -X POST https://services.polkadothub-rpc.com/testnet \
-H "Content-Type: application/json" \
--data '{
"jsonrpc":"2.0",
"method":"eth_gasPrice",
"params":[],
"id":1
}'
```
---
### eth_getBalance
Returns the balance of a given address. [Reference](https://ethereum.org/developers/docs/apis/json-rpc/#eth_getbalance).
**Parameters**:
- **`address` ++"string"++**: Address to query balance. Must be a [20-byte data](https://ethereum.org/developers/docs/apis/json-rpc/#unformatted-data-encoding) string.
- **`blockValue` ++"string"++**: (Optional) The block value to be fetched. Must be a [quantity](https://ethereum.org/developers/docs/apis/json-rpc/#quantities-encoding) string or a [default block parameter](https://ethereum.org/developers/docs/apis/json-rpc/#default-block).
**Example**:
```bash title="eth_getBalance"
curl -X POST https://services.polkadothub-rpc.com/testnet \
-H "Content-Type: application/json" \
--data '{
"jsonrpc":"2.0",
"method":"eth_getBalance",
"params":["INSERT_ADDRESS", "INSERT_BLOCK_VALUE"],
"id":1
}'
```
Ensure to replace the `INSERT_ADDRESS` and `INSERT_BLOCK_VALUE` with the proper values.
---
### eth_getBlockByHash
Returns information about a block by its hash. [Reference](https://ethereum.org/developers/docs/apis/json-rpc/#eth_getblockbyhash).
**Parameters**:
- **`blockHash` ++"string"++**: The hash of the block to retrieve. Must be a [32 byte data](https://ethereum.org/developers/docs/apis/json-rpc/#unformatted-data-encoding) string.
- **`fullTransactions` ++"boolean"++**: If `true`, returns full transaction details; if `false`, returns only transaction hashes.
**Example**:
```bash title="eth_getBlockByHash"
curl -X POST https://services.polkadothub-rpc.com/testnet \
-H "Content-Type: application/json" \
--data '{
"jsonrpc":"2.0",
"method":"eth_getBlockByHash",
"params":["INSERT_BLOCK_HASH", INSERT_BOOLEAN],
"id":1
}'
```
Ensure to replace the `INSERT_BLOCK_HASH` and `INSERT_BOOLEAN` with the proper values.
---
### eth_getBlockByNumber
Returns information about a block by its number. [Reference](https://ethereum.org/developers/docs/apis/json-rpc/#eth_getblockbynumber).
**Parameters**:
- **`blockValue` ++"string"++**: (Optional) The block value to be fetched. Must be a [quantity](https://ethereum.org/developers/docs/apis/json-rpc/#quantities-encoding) string or a [default block parameter](https://ethereum.org/developers/docs/apis/json-rpc/#default-block).
- **`fullTransactions` ++"boolean"++**: If `true`, returns full transaction details; if `false`, returns only transaction hashes.
**Example**:
```bash title="eth_getBlockByNumber"
curl -X POST https://services.polkadothub-rpc.com/testnet \
-H "Content-Type: application/json" \
--data '{
"jsonrpc":"2.0",
"method":"eth_getBlockByNumber",
"params":["INSERT_BLOCK_VALUE", INSERT_BOOLEAN],
"id":1
}'
```
Ensure to replace the `INSERT_BLOCK_VALUE` and `INSERT_BOOLEAN` with the proper values.
---
### eth_getBlockTransactionCountByNumber
Returns the number of transactions in a block from a block number. [Reference](https://ethereum.org/developers/docs/apis/json-rpc/#eth_getblocktransactioncountbynumber).
**Parameters**:
- **`blockValue` ++"string"++**: The block value to be fetched. Must be a [quantity](https://ethereum.org/developers/docs/apis/json-rpc/#quantities-encoding) string or a [default block parameter](https://ethereum.org/developers/docs/apis/json-rpc/#default-block).
**Example**:
```bash title="eth_getBlockTransactionCountByNumber"
curl -X POST https://services.polkadothub-rpc.com/testnet \
-H "Content-Type: application/json" \
--data '{
"jsonrpc":"2.0",
"method":"eth_getBlockTransactionCountByNumber",
"params":["INSERT_BLOCK_VALUE"],
"id":1
}'
```
Ensure to replace the `INSERT_BLOCK_VALUE` with the proper values.
---
### eth_getBlockTransactionCountByHash
Returns the number of transactions in a block from a block hash. [Reference](https://ethereum.org/developers/docs/apis/json-rpc/#eth_getblocktransactioncountbyhash).
**Parameters**:
- **`blockHash` ++"string"++**: The hash of the block to retrieve. Must be a [32 byte data](https://ethereum.org/developers/docs/apis/json-rpc/#unformatted-data-encoding) string.
**Example**:
```bash title="eth_getBlockTransactionCountByHash"
curl -X POST https://services.polkadothub-rpc.com/testnet \
-H "Content-Type: application/json" \
--data '{
"jsonrpc":"2.0",
"method":"eth_getBlockTransactionCountByHash",
"params":["INSERT_BLOCK_HASH"],
"id":1
}'
```
Ensure to replace the `INSERT_BLOCK_HASH` with the proper values.
---
### eth_getCode
Returns the code at a given address. [Reference](https://ethereum.org/developers/docs/apis/json-rpc/#eth_getcode).
**Parameters**:
- **`address` ++"string"++**: Contract or account address to query code. Must be a [20-byte data](https://ethereum.org/developers/docs/apis/json-rpc/#unformatted-data-encoding) string.
- **`blockValue` ++"string"++**: (Optional) The block value to be fetched. Must be a [quantity](https://ethereum.org/developers/docs/apis/json-rpc/#quantities-encoding) string or a [default block parameter](https://ethereum.org/developers/docs/apis/json-rpc/#default-block).
**Example**:
```bash title="eth_getCode"
curl -X POST https://services.polkadothub-rpc.com/testnet \
-H "Content-Type: application/json" \
--data '{
"jsonrpc":"2.0",
"method":"eth_getCode",
"params":["INSERT_ADDRESS", "INSERT_BLOCK_VALUE"],
"id":1
}'
```
Ensure to replace the `INSERT_ADDRESS` and `INSERT_BLOCK_VALUE` with the proper values.
---
### eth_getLogs
Returns an array of all logs matching a given filter object. [Reference](https://ethereum.org/developers/docs/apis/json-rpc/#eth_getlogs).
**Parameters**:
- **`filter` ++"object"++**: The filter object.
- **`fromBlock` ++"string"++**: (Optional) Block number or tag to start from. Must be a [quantity](https://ethereum.org/developers/docs/apis/json-rpc/#quantities-encoding) string or a [default block parameter](https://ethereum.org/developers/docs/apis/json-rpc/#default-block).
- **`toBlock` ++"string"++**: (Optional) Block number or tag to end at. Must be a [quantity](https://ethereum.org/developers/docs/apis/json-rpc/#quantities-encoding) string or a [default block parameter](https://ethereum.org/developers/docs/apis/json-rpc/#default-block).
- **`address` ++"string" or "array of strings"++**: (Optional) Contract address or a list of addresses from which to get logs. Must be a [20-byte data](https://ethereum.org/developers/docs/apis/json-rpc/#unformatted-data-encoding) string.
- **`topics` ++"array of strings"++**: (Optional) Array of topics for filtering logs. Each topic can be a single [32 byte data](https://ethereum.org/developers/docs/apis/json-rpc/#unformatted-data-encoding) string or an array of such strings (meaning OR).
- **`blockhash` ++"string"++**: (Optional) Hash of a specific block. Cannot be used with `fromBlock` or `toBlock`. Must be a [32 byte data](https://ethereum.org/developers/docs/apis/json-rpc/#unformatted-data-encoding) string.
**Example**:
```bash title="eth_getLogs"
curl -X POST https://services.polkadothub-rpc.com/testnet \
-H "Content-Type: application/json" \
--data '{
"jsonrpc":"2.0",
"method":"eth_getLogs",
"params":[{
"fromBlock": "latest",
"toBlock": "latest"
}],
"id":1
}'
```
---
### eth_getStorageAt
Returns the value from a storage position at a given address. [Reference](https://ethereum.org/developers/docs/apis/json-rpc/#eth_getstorageat).
**Parameters**:
- **`address` ++"string"++**: Contract or account address to query code. Must be a [20-byte data](https://ethereum.org/developers/docs/apis/json-rpc/#unformatted-data-encoding) string.
- **`storageKey` ++"string"++**: Position in storage to retrieve data from. Must be a [quantity](https://ethereum.org/developers/docs/apis/json-rpc/#quantities-encoding) string.
- **`blockValue` ++"string"++**: (Optional) The block value to be fetched. Must be a [quantity](https://ethereum.org/developers/docs/apis/json-rpc/#quantities-encoding) string or a [default block parameter](https://ethereum.org/developers/docs/apis/json-rpc/#default-block).
**Example**:
```bash title="eth_getStorageAt"
curl -X POST https://services.polkadothub-rpc.com/testnet \
-H "Content-Type: application/json" \
--data '{
"jsonrpc":"2.0",
"method":"eth_getStorageAt",
"params":["INSERT_ADDRESS", "INSERT_STORAGE_KEY", "INSERT_BLOCK_VALUE"],
"id":1
}'
```
Ensure to replace the `INSERT_ADDRESS`, `INSERT_STORAGE_KEY`, and `INSERT_BLOCK_VALUE` with the proper values.
---
### eth_getTransactionCount
Returns the number of transactions sent from an address (nonce). [Reference](https://ethereum.org/developers/docs/apis/json-rpc/#eth_gettransactioncount).
**Parameters**:
- **`address` ++"string"++**: Address to query balance. Must be a [20-byte data](https://ethereum.org/developers/docs/apis/json-rpc/#unformatted-data-encoding) string.
- **`blockValue` ++"string"++**: (Optional) The block value to be fetched. Must be a [quantity](https://ethereum.org/developers/docs/apis/json-rpc/#quantities-encoding) string or a [default block parameter](https://ethereum.org/developers/docs/apis/json-rpc/#default-block).
**Example**:
```bash title="eth_getTransactionCount"
curl -X POST https://services.polkadothub-rpc.com/testnet \
-H "Content-Type: application/json" \
--data '{
"jsonrpc":"2.0",
"method":"eth_getTransactionCount",
"params":["INSERT_ADDRESS", "INSERT_BLOCK_VALUE"],
"id":1
}'
```
Ensure to replace the `INSERT_ADDRESS` and `INSERT_BLOCK_VALUE` with the proper values.
---
### eth_getTransactionByHash
Returns information about a transaction by its hash. [Reference](https://ethereum.org/developers/docs/apis/json-rpc/#eth_gettransactionbyhash).
**Parameters**:
- **`transactionHash` ++"string"++**: The hash of the transaction. Must be a [32 byte data](https://ethereum.org/developers/docs/apis/json-rpc/#unformatted-data-encoding) string.
**Example**:
```bash title="eth_getTransactionByHash"
curl -X POST https://services.polkadothub-rpc.com/testnet \
-H "Content-Type: application/json" \
--data '{
"jsonrpc":"2.0",
"method":"eth_getTransactionByHash",
"params":["INSERT_TRANSACTION_HASH"],
"id":1
}'
```
Ensure to replace the `INSERT_TRANSACTION_HASH` with the proper values.
---
### eth_getTransactionByBlockNumberAndIndex
Returns information about a transaction by block number and transaction index. [Reference](https://ethereum.org/developers/docs/apis/json-rpc/#eth_gettransactionbyblocknumberandindex).
**Parameters**:
- **`blockValue` ++"string"++**: The block value to be fetched. Must be a [quantity](https://ethereum.org/developers/docs/apis/json-rpc/#quantities-encoding) string or a [default block parameter](https://ethereum.org/developers/docs/apis/json-rpc/#default-block).
- **`transactionIndex` ++"string"++**: The index of the transaction in the block. Must be a [quantity](https://ethereum.org/developers/docs/apis/json-rpc/#quantities-encoding) string.
**Example**:
```bash title="eth_getTransactionByBlockNumberAndIndex"
curl -X POST https://services.polkadothub-rpc.com/testnet \
-H "Content-Type: application/json" \
--data '{
"jsonrpc":"2.0",
"method":"eth_getTransactionByBlockNumberAndIndex",
"params":["INSERT_BLOCK_VALUE", "INSERT_TRANSACTION_INDEX"],
"id":1
}'
```
Ensure to replace the `INSERT_BLOCK_VALUE` and `INSERT_TRANSACTION_INDEX` with the proper values.
---
### eth_getTransactionByBlockHashAndIndex
Returns information about a transaction by block hash and transaction index. [Reference](https://ethereum.org/developers/docs/apis/json-rpc/#eth_gettransactionbyblockhashandindex).
**Parameters**:
- **`blockHash` ++"string"++**: The hash of the block. Must be a [32 byte data](https://ethereum.org/developers/docs/apis/json-rpc/#unformatted-data-encoding) string.
- **`transactionIndex` ++"string"++**: The index of the transaction in the block. Must be a [quantity](https://ethereum.org/developers/docs/apis/json-rpc/#quantities-encoding) string.
**Example**:
```bash title="eth_getTransactionByBlockHashAndIndex"
curl -X POST https://services.polkadothub-rpc.com/testnet \
-H "Content-Type: application/json" \
--data '{
"jsonrpc":"2.0",
"method":"eth_getTransactionByBlockHashAndIndex",
"params":["INSERT_BLOCK_HASH", "INSERT_TRANSACTION_INDEX"],
"id":1
}'
```
Ensure to replace the `INSERT_BLOCK_HASH` and `INSERT_TRANSACTION_INDEX` with the proper values.
---
### eth_getTransactionReceipt
Returns the receipt of a transaction by transaction hash. [Reference](https://ethereum.org/developers/docs/apis/json-rpc/#eth_gettransactionreceipt).
**Parameters**:
- **`transactionHash` ++"string"++**: The hash of the transaction. Must be a [32 byte data](https://ethereum.org/developers/docs/apis/json-rpc/#unformatted-data-encoding) string.
**Example**:
```bash title="eth_getTransactionReceipt"
curl -X POST https://services.polkadothub-rpc.com/testnet \
-H "Content-Type: application/json" \
--data '{
"jsonrpc":"2.0",
"method":"eth_getTransactionReceipt",
"params":["INSERT_TRANSACTION_HASH"],
"id":1
}'
```
Ensure to replace the `INSERT_TRANSACTION_HASH` with the proper values.
---
### eth_maxPriorityFeePerGas
Returns an estimate of the current priority fee per gas, in Wei, to be included in a block.
**Parameters**:
None.
**Example**:
```bash title="eth_maxPriorityFeePerGas"
curl -X POST https://services.polkadothub-rpc.com/testnet \
-H "Content-Type: application/json" \
--data '{
"jsonrpc":"2.0",
"method":"eth_maxPriorityFeePerGas",
"params":[],
"id":1
}'
```
---
### eth_sendRawTransaction
Submits a raw transaction. [Reference](https://ethereum.org/developers/docs/apis/json-rpc/#eth_sendrawtransaction).
**Parameters**:
- **`callData` ++"string"++**: Signed transaction data. Must be a [data](https://ethereum.org/developers/docs/apis/json-rpc/#unformatted-data-encoding) string.
**Example**:
```bash title="eth_sendRawTransaction"
curl -X POST https://services.polkadothub-rpc.com/testnet \
-H "Content-Type: application/json" \
--data '{
"jsonrpc":"2.0",
"method":"eth_sendRawTransaction",
"params":["INSERT_CALL_DATA"],
"id":1
}'
```
Ensure to replace the `INSERT_CALL_DATA` with the proper values.
---
### eth_sendTransaction
Creates and sends a new transaction. [Reference](https://ethereum.org/developers/docs/apis/json-rpc/#eth_sendtransaction).
**Parameters**:
- **`transaction` ++"object"++**: The transaction object.
- **`from` ++"string"++**: Address sending the transaction. Must be a [20-byte data](https://ethereum.org/developers/docs/apis/json-rpc/#unformatted-data-encoding) string.
- **`to` ++"string"++**: (Optional) Recipient address. No need to provide this value when deploying a contract. Must be a [20-byte data](https://ethereum.org/developers/docs/apis/json-rpc/#unformatted-data-encoding) string.
- **`gas` ++"string"++**: (optional, default: `90000`) gas limit for execution. Must be a [quantity](https://ethereum.org/developers/docs/apis/json-rpc/#quantities-encoding) string.
- **`gasPrice` ++"string"++**: (Optional) Gas price per unit. Must be a [quantity](https://ethereum.org/developers/docs/apis/json-rpc/#quantities-encoding) string.
- **`value` ++"string"++**: (Optional) Amount of Ether to send. Must be a [quantity](https://ethereum.org/developers/docs/apis/json-rpc/#quantities-encoding) string.
- **`data` ++"string"++**: (Optional) Contract bytecode or encoded method call. Must be a [data](https://ethereum.org/developers/docs/apis/json-rpc/#unformatted-data-encoding) string.
- **`nonce` ++"string"++**: (Optional) Transaction nonce. Must be a [quantity](https://ethereum.org/developers/docs/apis/json-rpc/#quantities-encoding) string.
**Example**:
```bash title="eth_sendTransaction"
curl -X POST https://services.polkadothub-rpc.com/testnet \
-H "Content-Type: application/json" \
--data '{
"jsonrpc":"2.0",
"method":"eth_sendTransaction",
"params":[{
"from": "INSERT_SENDER_ADDRESS",
"to": "INSERT_RECIPIENT_ADDRESS",
"gas": "INSERT_GAS_LIMIT",
"gasPrice": "INSERT_GAS_PRICE",
"value": "INSERT_VALUE",
"input": "INSERT_INPUT_DATA",
"nonce": "INSERT_NONCE"
}],
"id":1
}'
```
Ensure to replace the `INSERT_SENDER_ADDRESS`, `INSERT_RECIPIENT_ADDRESS`, `INSERT_GAS_LIMIT`, `INSERT_GAS_PRICE`, `INSERT_VALUE`, `INSERT_INPUT_DATA`, and `INSERT_NONCE` with the proper values.
---
### eth_syncing
Returns an object with syncing data or `false` if not syncing. [Reference](https://ethereum.org/developers/docs/apis/json-rpc/#eth_syncing).
**Parameters**:
None.
**Example**:
```bash title="eth_syncing"
curl -X POST https://services.polkadothub-rpc.com/testnet \
-H "Content-Type: application/json" \
--data '{
"jsonrpc":"2.0",
"method":"eth_syncing",
"params":[],
"id":1
}'
```
---
### net_listening
Returns `true` if the client is actively listening for network connections, otherwise `false`. [Reference](https://ethereum.org/developers/docs/apis/json-rpc/#net_listening).
**Parameters**:
None.
**Example**:
```bash title="net_listening"
curl -X POST https://services.polkadothub-rpc.com/testnet \
-H "Content-Type: application/json" \
--data '{
"jsonrpc":"2.0",
"method":"net_listening",
"params":[],
"id":1
}'
```
---
### net_peerCount
Returns the number of peers connected to the client.
**Parameters**:
None.
**Example**:
```bash title="net_peerCount"
curl -X POST https://services.polkadothub-rpc.com/testnet \
-H "Content-Type: application/json" \
--data '{
"jsonrpc":"2.0",
"method":"net_peerCount",
"params":[],
"id":1
}'
```
---
### net_version
Returns the current network ID as a string. [Reference](https://ethereum.org/developers/docs/apis/json-rpc/#net_version).
**Parameters**:
None.
**Example**:
```bash title="net_version"
curl -X POST https://services.polkadothub-rpc.com/testnet \
-H "Content-Type: application/json" \
--data '{
"jsonrpc":"2.0",
"method":"net_version",
"params":[],
"id":1
}'
```
---
### system_health
Returns information about the health of the system.
**Parameters**:
None.
**Example**:
```bash title="system_health"
curl -X POST https://services.polkadothub-rpc.com/testnet \
-H "Content-Type: application/json" \
--data '{
"jsonrpc":"2.0",
"method":"system_health",
"params":[],
"id":1
}'
```
---
### web3_clientVersion
Returns the current client version. [Reference](https://ethereum.org/developers/docs/apis/json-rpc/#web3_clientversion).
**Parameters**:
None.
**Example**:
```bash title="web3_clientVersion"
curl -X POST https://services.polkadothub-rpc.com/testnet \
-H "Content-Type: application/json" \
--data '{
"jsonrpc":"2.0",
"method":"web3_clientVersion",
"params":[],
"id":1
}'
```
---
### debug_traceBlockByNumber
Traces a block's execution by its number and returns a detailed execution trace for each transaction.
**Parameters**:
- **`blockValue` ++"string"++**: The block number or tag to trace. Must be a [quantity](https://ethereum.org/developers/docs/apis/json-rpc/#quantities-encoding) string or a [default block parameter](https://ethereum.org/developers/docs/apis/json-rpc/#default-block).
- **`options` ++"object"++**: (Optional) An object containing tracer options.
- **`tracer` ++"string"++**: The name of the tracer to use (e.g., `"callTracer"`, `"opTracer"`).
- Other tracer-specific options may be supported.
**Example**:
```bash title="debug_traceBlockByNumber"
curl -X POST https://services.polkadothub-rpc.com/testnet \
-H "Content-Type: application/json" \
--data '{
"jsonrpc":"2.0",
"method":"debug_traceBlockByNumber",
"params":["INSERT_BLOCK_VALUE", {"tracer": "callTracer"}],
"id":1
}'
```
Ensure to replace `INSERT_BLOCK_VALUE` with a proper block number if needed.
---
### debug_traceTransaction
Traces the execution of a single transaction by its hash and returns a detailed execution trace.
**Parameters**:
- **`transactionHash` ++"string"++**: The hash of the transaction to trace. Must be a [32 byte data](https://ethereum.org/developers/docs/apis/json-rpc/#unformatted-data-encoding) string.
- **`options` ++"object"++**: (Optional) An object containing tracer options (e.g., `tracer: "callTracer"`).
**Example**:
```bash title="debug_traceTransaction"
curl -X POST https://services.polkadothub-rpc.com/testnet \
-H "Content-Type: application/json" \
--data '{
"jsonrpc":"2.0",
"method":"debug_traceTransaction",
"params":["INSERT_TRANSACTION_HASH", {"tracer": "callTracer"}],
"id":1
}'
```
Ensure to replace the `INSERT_TRANSACTION_HASH` with the proper value.
!!! note "Differences from Ethereum (Geth)"
When using the default struct logger (opcode tracer), there is a difference in how `gasCost` is calculated for CALL-like opcodes (`CALL`, `DELEGATECALL`, `STATICCALL`, `CREATE`, `CREATE2`):
- **Geth behavior**: The `gasCost` includes the opcode's intrinsic cost plus all gas forwarded to child calls.
- **Polkadot Hub behavior**: The `gasCost` includes only the opcode's intrinsic cost, excluding forwarded gas. The intrinsic cost covers:
- Base cost of the CALL opcode.
- Post-call costs (for example, copying return data back to the caller's memory).
---
### debug_traceCall
Executes a new message call and returns a detailed execution trace without creating a transaction on the blockchain.
**Parameters**:
- **`transaction` ++"object"++**: The transaction call object, similar to `eth_call` parameters.
- **`to` ++"string"++**: Recipient address of the call. Must be a [20-byte data](https://ethereum.org/developers/docs/apis/json-rpc/#unformatted-data-encoding) string.
- **`data` ++"string"++**: Hash of the method signature and encoded parameters. Must be a [data](https://ethereum.org/developers/docs/apis/json-rpc/#unformatted-data-encoding) string.
- **`from` ++"string"++**: (Optional) Sender's address for the call. Must be a [20-byte data](https://ethereum.org/developers/docs/apis/json-rpc/#unformatted-data-encoding) string.
- **`gas` ++"string"++**: (Optional) Gas limit to execute the call. Must be a [quantity](https://ethereum.org/developers/docs/apis/json-rpc/#quantities-encoding) string.
- **`gasPrice` ++"string"++**: (Optional) Gas price per unit of gas. Must be a [quantity](https://ethereum.org/developers/docs/apis/json-rpc/#quantities-encoding) string.
- **`value` ++"string"++**: (Optional) Value in wei to send with the call. Must be a [quantity](https://ethereum.org/developers/docs/apis/json-rpc/#quantities-encoding) string.
- **`blockValue` ++"string"++**: (Optional) Block tag or block number to execute the call at. Must be a [quantity](https://ethereum.org/developers/docs/apis/json-rpc/#quantities-encoding) string or a [default block parameter](https://ethereum.org/developers/docs/apis/json-rpc/#default-block).
- **`options` ++"object"++**: (Optional) An object containing tracer options (e.g., `tracer: "callTracer"`).
**Example**:
```bash title="debug_traceCall"
curl -X POST https://services.polkadothub-rpc.com/testnet \
-H "Content-Type: application/json" \
--data '{
"jsonrpc":"2.0",
"method":"debug_traceCall",
"params":[{
"from": "INSERT_SENDER_ADDRESS",
"to": "INSERT_RECIPIENT_ADDRESS",
"data": "INSERT_ENCODED_CALL"
}, "INSERT_BLOCK_VALUE", {"tracer": "callTracer"}],
"id":1
}'
```
Ensure to replace the `INSERT_SENDER_ADDRESS`, `INSERT_RECIPIENT_ADDRESS`, `INSERT_ENCODED_CALL`, and `INSERT_BLOCK_VALUE` with the proper value.
---
## Response Format
All responses follow the standard JSON-RPC 2.0 format:
```json
{
"jsonrpc": "2.0",
"id": 1,
"result": ... // The return value varies by method
}
```
## Error Handling
If an error occurs, the response will include an error object:
```json
{
"jsonrpc": "2.0",
"id": 1,
"error": {
"code": -32000,
"message": "Error message here"
}
}
```
---
Page Title: Local Storage Method Group
- Resolved Markdown: https://docs.polkadot.com/reference/apps/protocol/truapi/local-storage.md
- Canonical (HTML): https://docs.polkadot.com/reference/apps/protocol/truapi/local-storage/
- Summary: TrUAPI Local Storage method group for per-Product, per-device key-value persistence, Host-managed namespaces, JSON helpers, and KvStore use.
- Word Count: 330; Token Estimate: 535
- Last Updated: 2026-06-16T14:17:44+00:00
- Version Hash: sha256:e579150cbfc831561481283ed7554384eae2783827c813c3b66afe7d565e5933
# Local Storage
## Introduction
The Local Storage method group exposes the per-Product, per-device key-value store a Product uses to remember values between sessions, such as user preferences, drafts, and cached values. The Product SDK wraps this group as a `KvStore` in the [`@parity/product-sdk-local-storage`](https://www.npmjs.com/package/@parity/product-sdk-local-storage) package.
Two properties matter for how this group is shaped:
- **Per-Product namespacing**: The Host prepends every key with a prefix derived from the Product's `.dot` domain. A Product cannot accidentally read or write another Product's keys; the boundary is at the Host, not in the Product's code.
- **Host-dependent backend**: Inside Polkadot Desktop, reads and writes go to the Host's on-device storage. Inside Polkadot Web, the Host backs them with browser-managed storage. The SDK abstracts the difference; the Product's code is identical either way.
## Conceptual Contract
The group exposes the standard key-value surface plus a few helpers:
- **`get(key)`, `set(key, value)`, and `remove(key)`**: Read, write, and delete a string-valued key.
- **`getJSON(key)` and `setJSON(key, value)`**: Read and write JSON-serializable values, with the Host handling encoding.
- **Prefixed-namespace creation**: A Product can carve out further sub-namespaces inside its own per-Product space, useful when multiple Product features share the store and want to avoid collisions.
Reads return `null` for absent keys; deletes are idempotent (no error on missing keys).
!!! warning "Provisional"
Quota policy (per-Product byte caps, eviction rules), the exact per-Host backend behavior (especially around Web's browser-managed storage), and any subscription-style key-change notifications are still being finalized. The basic key-value contract above is stable.
## Where to Go Next
- Guide **Persist Data Locally**
---
The Product-side how-to: initializing the store, reading and writing values, prefix namespaces, error handling.
[:octicons-arrow-right-24: Get Started](/apps/build/persist-data-locally/)
---
Page Title: Name Transfers
- Resolved Markdown: https://docs.polkadot.com/reference/apps/infrastructure/dotns/transfer.md
- Canonical (HTML): https://docs.polkadot.com/reference/apps/infrastructure/dotns/transfer/
- Summary: Transferring ownership of a .dot name to another account — the flow, the validation rules, and what changes on the new owner's side.
- Word Count: 497; Token Estimate: 692
- Last Updated: 2026-06-16T14:17:44+00:00
- Version Hash: sha256:fca6d071059cd81425cb5f1021a3800153b180435a67f6e4f057b8d382338a99
# Name Transfers
## Introduction
A `.dot` name is owned by an account on Asset Hub, and that ownership is transferable. A transfer changes _who controls the name's record_ — who can update where it points (its `contenthash`), sell it on, or set administrative fields — without changing the name itself or what it currently resolves to.
This page documents the conceptual transfer flow and the rules dotNS enforces on it.
!!! warning "Provisional"
The exact dispatch path for a name transfer (which contract, which signed extrinsic, the precise parameter shape), the supported acceptance / rejection mechanics on the receiving side, and any time-locked or escrow variants of transfer are still being finalized. This page documents the conceptual model; the operational reference will be added once confirmed.
## What Changes on Transfer
A transfer modifies one field of the name's record: the _owner_. Specifically:
- The new owner becomes the account that can sign updates to the name's record (changing the `contenthash`, transferring again, setting fields).
- The name itself — the dotted string the user sees — does not change.
- The currently-attached `contenthash` does not change. Users navigating to the name continue to see the same Product bundle they saw before, unless and until the new owner updates it.
- The PoP tier the original owner used to qualify for the name (Full or Lite tier eligibility) does _not_ transfer with the name. The new owner inherits the name regardless of their own PoP tier, but any future renewal-time or PopRules-evaluated operations are checked against the new owner's status.
## When the Tier Lock Matters
The "PopRules-checked operations" caveat above matters most for Lite-to-Full migration reservations. If a PoP Lite holder registered `alice01.dot` and consequently has `alice.dot` reserved for 12 weeks, that reservation is tied to the _original_ account, not to the name's record. Transferring `alice01.dot` to another account does not transfer the reserved `alice.dot` claim. Reservations are not transferable; the original holder either claims or forfeits the reservation themselves.
## What a Product Should Know
A Product reading a name's record from chain state should treat the owner field as _mutable_. A name pointing at the Product today may be transferred to a new owner tomorrow; the new owner may update the `contenthash` to a different Product. Products that depend on a specific name (linking to it, referencing it from on-chain state) should verify the `contenthash` at use, not cache the assumption that "name X points at this Product forever."
## Where to Go Next
- Learn **Name Mechanism**
---
The resolution flow that turns a name into bytes — what a Host actually does between the user typing a `.dot` and a Product loading.
[:octicons-arrow-right-24: Reference](/reference/apps/infrastructure/dotns/name-mechanism/)
- Learn **Architecture**
---
The contract responsibilities split, including which contract handles the transfer dispatch.
[:octicons-arrow-right-24: Reference](/reference/apps/infrastructure/dotns/architecture/)
---
Page Title: Networks
- Resolved Markdown: https://docs.polkadot.com/reference/parachains/networks.md
- Canonical (HTML): https://docs.polkadot.com/reference/parachains/networks/
- Summary: Explore Polkadot's networks, with Paseo as the official Polkadot TestNet for parachain and dApp development, plus Kusama and Westend for specialized use cases.
- Word Count: 1497; Token Estimate: 2025
- Last Updated: 2026-03-16T21:10:48+00:00
- Version Hash: sha256:3c5781d367df932ca11255253b6ff946a269caf3e3b2b29fc3cea524d3636606
# Networks
## Introduction
The Polkadot ecosystem is built on a robust set of networks that enable secure, scalable development. Whether you are testing new features or deploying to live production, Polkadot offers several network layers tailored to each stage of the development process. From local environments to the official Polkadot TestNet (Paseo), developers can thoroughly test, iterate, and validate their applications before deploying to Polkadot MainNet. This guide will introduce you to Polkadot's various networks and explain how they fit into the development workflow.
## Network Overview
Polkadot's development process is structured to ensure that new features and upgrades are rigorously tested before deployment to live production networks. For all parachain and dApp developers, the recommended progression follows a well-defined path: starting from local environments, testing on Paseo (the official Polkadot TestNet), and ultimately deploying to either Kusama or Polkadot MainNet. The diagram below outlines the recommended development flow:
``` mermaid
flowchart LR
id1[Local] --> id2[Paseo TestNet] --> id3[Kusama]
id1[Local] --> id2[Paseo TestNet] --> id4[Polkadot MainNet]
```
This flow ensures developers can thoroughly test and iterate without risking real tokens or affecting production networks. **Paseo TestNet is the recommended testing environment for all deployments**, whether targeting Kusama or Polkadot. Testing tools like [Chopsticks](#chopsticks) make it easier to experiment safely before releasing to production.
### Recommended Development Path
For all parachain teams and dApp developers, the recommended journey looks like this:
1. **Local development node**: Development starts in a local environment, where developers can create, test, and iterate on upgrades or new features using a local development node. This stage enables rapid experimentation in an isolated setup with no external dependencies. Parachain developers can leverage local TestNets, such as [Zombienet](#zombienet), for multi-chain testing.
2. **Paseo (Polkadot TestNet)**: After testing locally, deploy to [Paseo](#polkadot-testnet-paseo), the official Polkadot TestNet. Paseo is a stable, community-run TestNet that mirrors Polkadot's runtime and is specifically designed for parachain teams and dApp developers to test before deploying to production networks. **This is the recommended TestNet whether you plan to deploy to Kusama or Polkadot MainNet**.
3. **Production deployment**: After thorough testing on Paseo, features are considered ready for deployment to either:
- **Kusama**: An experimental "canary" network with real economic value, suitable for teams that want to deploy in a faster-moving production environment before Polkadot
- **Polkadot MainNet**: The primary production network with enterprise-grade security
### Alternative Networks
The Polkadot ecosystem also includes alternative networks, but these are not part of the recommended development flow:
- **Westend**: A protocol-focused TestNet maintained by Parity Technologies, primarily used for testing low-level protocol changes and infrastructure updates. Westend is designed for infrastructure operators and core protocol developers, not for general parachain or dApp development. **The onboarding process for Westend is not clearly documented, and external developers should use Paseo TestNet instead.** See the [Other Networks](#other-networks) section for details.
!!!note
The Rococo TestNet was deprecated on October 14, 2024. Paseo is now the official Polkadot TestNet for parachain and dApp development. For protocol-level testing, teams may use Westend, but most external developers should use Paseo as the default TestNet.
## Polkadot MainNet
Polkadot is the production network where real value and live applications operate. After thorough testing on Paseo and local development environments, teams deploy their parachains and dApps to Polkadot MainNet. Polkadot provides enterprise-grade security through its shared security model, where all parachains benefit from the collective security of the relay chain's validator set.
The native token for Polkadot is DOT. For more information about DOT, visit the [Native Assets](https://wiki.polkadot.com/learn/learn-dot/) page on the Polkadot Wiki.
## Polkadot TestNet (Paseo)
[Paseo](https://github.com/paseo-network) is the official Polkadot TestNet for parachain teams and dApp developers. As a stable, community-run TestNet that mirrors Polkadot's runtime, Paseo is specifically designed to provide a reliable testing environment for teams preparing to deploy to Polkadot MainNet.
**Paseo is the recommended TestNet for the vast majority of external developers.** It provides a Polkadot-like environment without the risks and costs associated with live networks, making it ideal for testing parachains, smart contracts, cross-chain messaging (XCM), governance mechanisms, and other application features.
Key characteristics of Paseo:
- **Official Polkadot TestNet**: Recognized as the primary TestNet for Polkadot ecosystem development
- **Stable and reliable**: Maintained by the community with a focus on stability and uptime
- **Runtime parity**: Mirrors Polkadot's runtime, ensuring your tests accurately reflect MainNet behavior
- **Community-driven**: Governed and operated by Polkadot community members
- **Purpose-built for developers**: Specifically designed for parachain and dApp testing workflows
The native token for Paseo is PAS. TestNet tokens are available from the [Polkadot faucet](https://faucet.polkadot.io/). Additional information on PAS is available on the [Native Assets](https://wiki.polkadot.com/learn/learn-dot/#__tabbed_2_1) page.
For more details about Paseo's role as the official Polkadot TestNet, see the [forum announcement](https://forum.polkadot.network/t/testnets-paseo-officially-becomes-the-polkadot-testnet-temporary-passet-hub-chain-for-smart-contracts-testing/13209).
## Other Networks
While Paseo serves as the default TestNet for most development workflows, the Polkadot ecosystem includes additional networks for specialized use cases.
### Kusama Network
Kusama is Polkadot's "canary" network—an experimental, production-grade environment with real economic value. Unlike TestNets, Kusama operates as a live network with actual incentives and economic consequences. It moves faster than Polkadot and has lower barriers to entry, making it suitable for teams that want to deploy in a real economic environment before moving to Polkadot.
Kusama is ideal for:
- Teams that want to test with real economic incentives
- Projects seeking a faster-moving governance and upgrade cycle
- Experiments and innovations that may eventually move to Polkadot
The native token for Kusama is KSM. For more information about KSM, visit the [Native Assets](https://wiki.polkadot.com/kusama/kusama-getting-started/) page.
### Westend
Westend is a protocol-focused TestNet maintained by Parity Technologies, primarily used for testing low-level Polkadot protocol changes, runtime upgrades, and infrastructure updates before they reach Kusama or Polkadot. Unlike Paseo, Westend is intentionally unstable and receives cutting-edge protocol changes first, making it better suited to core protocol development and infrastructure testing than to parachain or dApp development.
**Important**: Most external developers should **not** use Westend; instead, they should use Paseo TestNet. Westend's onboarding process is not clearly documented, and it is designed for infrastructure operators rather than general parachain teams. **Even if you plan to deploy to Kusama, you should test on Paseo TestNet, not Westend.**
Westend is primarily relevant for:
- Core Polkadot protocol developers testing runtime changes
- Infrastructure operators and validators testing low-level integrations
- Teams that specifically need to test against upcoming protocol changes before they reach production networks
Unlike temporary test networks, Westend is permanent and is not reset to the genesis block, making it an ongoing environment for long-term protocol testing.
The native token for Westend is WND. TestNet tokens are available from the [Polkadot faucet](https://faucet.polkadot.io/). More details about WND can be found on the [Native Assets](https://wiki.polkadot.com/learn/learn-dot/#__tabbed_2_2) page.
## Local Test Networks
Local test networks are an essential part of the development cycle for blockchain developers using the Polkadot SDK. They allow for fast, iterative testing in controlled, private environments without connecting to public TestNets. Developers can quickly spin up local instances to experiment, debug, and validate their code before deploying to Paseo TestNet and ultimately to production. Two key tools for local network testing are Zombienet and Chopsticks.
### Zombienet
[Zombienet](https://github.com/paritytech/zombienet) is a flexible testing framework for Polkadot SDK-based blockchains. It enables developers to create and manage ephemeral, short-lived networks. This feature makes Zombienet particularly useful for quick iterations, as it allows you to run multiple local networks concurrently, mimicking different runtime conditions. Whether you're developing a parachain or testing your custom blockchain logic, Zombienet gives you the tools to automate local testing.
Key features of Zombienet include:
- Creating dynamic, local networks with different configurations.
- Running parachains and relay chains in a simulated environment.
- Efficient testing of network components like cross-chain messaging and governance.
Zombienet is ideal for developers looking to test quickly and thoroughly before moving to more resource-intensive public TestNets.
### Chopsticks
[Chopsticks](https://github.com/AcalaNetwork/chopsticks) is a tool designed to create forks of Polkadot SDK-based blockchains, allowing developers to interact with network forks as part of their testing process. This capability makes Chopsticks a powerful option for testing upgrades, runtime changes, or cross-chain applications in a forked network environment.
Key features of Chopsticks include:
- Forking live Polkadot SDK-based blockchains for isolated testing.
- Simulating cross-chain messages in a private, controlled setup.
- Debugging network behavior by interacting with the fork in real-time.
Chopsticks provides a controlled environment for developers to safely explore the effects of runtime changes. It ensures that network behavior is tested and verified before upgrades are deployed to live networks.
---
Page Title: Node and Runtime
- Resolved Markdown: https://docs.polkadot.com/reference/parachains/node-and-runtime.md
- Canonical (HTML): https://docs.polkadot.com/reference/parachains/node-and-runtime/
- Summary: Learn how Polkadot SDK-based nodes function, how the client and runtime are separated, and how they communicate using SCALE-encoded data.
- Word Count: 621; Token Estimate: 901
- Last Updated: 2026-01-14T11:42:16+00:00
- Version Hash: sha256:7713ea77c4631525511f4bcf4dbe10506b8b806acc92a2b72a4557f518460442
# Node and Runtime
## Introduction
Every blockchain platform relies on a decentralized network of computers, called nodes, that communicate with each other about transactions and blocks. In this context, a node refers to the software running on the connected devices rather than the physical or virtual machines in the network.
Polkadot SDK-based nodes consist of two main components, each with distinct responsibilities: the client (also called node) and the runtime.
If the system were a monolithic protocol, any modification would require updating the entire system. Instead, Polkadot achieves true upgradeability by defining an immutable meta-protocol (the client) and a protocol (the runtime) that can be upgraded independently.
This separation gives the [Polkadot relay chain](/reference/polkadot-hub/consensus-and-security/relay-chain/) and all connected [parachains](/reference/parachains/) an evolutionary advantage over other blockchain platforms.
## Architectural Principles
The Polkadot SDK-based blockchain architecture is fundamentally built on two distinct yet interconnected components:
- Client (Meta-protocol):
- Handles the foundational infrastructure of the blockchain.
- Manages runtime execution, networking, consensus, and other off-chain components.
- Provides an immutable base layer that ensures network stability.
- Upgradable only through hard forks.
- Runtime (Protocol):
- Defines the blockchain's state transition logic.
- Determines the specific rules and behaviors of the blockchain.
- Compiled to WebAssembly (Wasm) for platform-independent execution.
- Capable of being upgraded without network-wide forking.
### Advantages of this Architecture
- **Forkless upgrades**: Runtime can be updated without disrupting the entire network.
- **Modularity**: Clear separation allows independent development of client and runtime.
- **Flexibility**: Enables rapid iteration and evolution of blockchain logic.
- **Performance**: WebAssembly compilation provides efficient, cross-platform execution.
## Node (Client)
The node, also known as the client, is the core component responsible for executing the Wasm runtime and orchestrating various essential blockchain components. It ensures the correct execution of the state transition function and manages multiple critical subsystems, including:
- **Wasm execution**: Runs the blockchain runtime, which defines the state transition rules.
- **Database management**: Stores blockchain data.
- **Networking**: Facilitates peer-to-peer communication, block propagation, and transaction gossiping.
- **Transaction pool (Mempool)**: Manages pending transactions before they are included in a block.
- **Consensus mechanism**: Ensures agreement on the blockchain state across nodes.
- **RPC services**: Provides external interfaces for applications and users to interact with the node.
## Runtime
The runtime is more than just a set of rules. It's the fundamental logic engine that defines a blockchain's entire behavior. In Polkadot SDK-based blockchains, the runtime represents a complete, self-contained description of the blockchain's state transition function.
### Characteristics
The runtime is distinguished by three key characteristics:
- **Business logic**: Defines the complete application-specific blockchain behavior.
- **WebAssembly compilation**: Ensures platform-independent, secure execution.
- **On-chain storage**: Stored within the blockchain's state, allowing dynamic updates.
### Key Functions
The runtime performs several critical functions, such as:
- Define state transition rules.
- Implement blockchain-specific logic.
- Manage account interactions.
- Control transaction processing.
- Define governance mechanisms.
- Handle custom pallets and modules.
## Communication Between Node and Runtime
The client and runtime communicate exclusively using [SCALE-encoded](/reference/parachains/data-encoding/) communication. This ensures efficient and compact data exchange between the two components.
### Runtime APIs
The Runtime API consists of well-defined functions and constants a client assumes are implemented in the Runtime Wasm blob. These APIs enable the client to interact with the runtime to execute blockchain operations and retrieve information. The client invokes these APIs to:
- Build, execute, and finalize blocks.
- Access metadata.
- Access consensus related information.
- Handle transaction execution.
### Host Functions
During execution, the runtime can access certain external client functionalities via host functions. The specific functions the client exposes allow the runtime to perform operations outside the WebAssembly domain. Host functions enable the runtime to:
- Perform cryptographic operations.
- Access the current blockchain state.
- Handle storage modifications.
- Allocate memory.
---
Page Title: On-Chain Governance Overview
- Resolved Markdown: https://docs.polkadot.com/reference/governance.md
- Canonical (HTML): https://docs.polkadot.com/reference/governance/
- Summary: Discover Polkadot’s cutting-edge OpenGov system, enabling transparent, decentralized decision-making through direct democracy and flexible governance tracks.
- Word Count: 984; Token Estimate: 1512
- Last Updated: 2026-01-14T11:42:16+00:00
- Version Hash: sha256:fd72debd641dda80a51f1cf76a0d8de8a267a51e33506a7906fa58753275d9d6
# On-Chain Governance
## Introduction
Polkadot’s governance system exemplifies decentralized decision-making, empowering its community of stakeholders to shape the network’s future through active participation. The latest evolution, OpenGov, builds on Polkadot’s foundation by providing a more inclusive and efficient governance model.
This guide will explain the principles and structure of OpenGov and walk you through its key components, such as Origins, Tracks, and Delegation. You will learn about improvements over earlier governance systems, including streamlined voting processes and enhanced stakeholder participation.
With OpenGov, Polkadot achieves a flexible, scalable, and democratic governance framework that allows multiple proposals to proceed simultaneously, ensuring the network evolves in alignment with its community's needs.
## Governance Evolution
Polkadot’s governance journey began with [Governance V1](https://wiki.polkadot.com/learn/learn-polkadot-opengov/#governance-summary), a system that proved effective in managing treasury funds and protocol upgrades. However, it faced limitations, such as:
- Slow voting cycles, causing delays in decision-making.
- Inflexibility in handling multiple referendums, restricting scalability.
To address these challenges, Polkadot introduced OpenGov, a governance model designed for greater inclusivity, efficiency, and scalability. OpenGov replaces the centralized structures of Governance V1, such as the Council and Technical Committee, with a fully decentralized and dynamic framework.
For a full comparison of the historic and current governance models, visit the [Gov1 vs. Polkadot OpenGov](https://wiki.polkadot.com/learn/learn-polkadot-opengov/#gov1-vs-polkadot-opengov) section of the Polkadot Wiki.
## OpenGov Key Features
OpenGov transforms Polkadot’s governance into a decentralized, stakeholder-driven model, eliminating centralized decision-making bodies like the Council. Key enhancements include:
- **Decentralization**: Shifts all decision-making power to the public, ensuring a more democratic process.
- **Enhanced delegation**: Allows users to delegate their votes to trusted experts across specific governance tracks.
- **Simultaneous referendums**: Multiple proposals can progress at once, enabling faster decision-making.
- **Polkadot Technical Fellowship**: A broad, community-driven group replacing the centralized Technical Committee.
This new system ensures Polkadot governance remains agile and inclusive, even as the ecosystem grows.
## Origins and Tracks
In OpenGov, origins and tracks are central to managing proposals and votes.
- **Origin**: Determines the authority level of a proposal (e.g., Treasury, Root) which decides the track of all referendums from that origin.
- **Track**: Define the procedural flow of a proposal, such as voting duration, approval thresholds, and enactment timelines.
Developers must be aware that referendums from different origins and tracks will take varying amounts of time to reach approval and enactment. The [Polkadot Technical Fellowship](https://wiki.polkadot.com/learn/learn-polkadot-technical-fellowship/) has the option to shorten this timeline by whitelisting a proposal and allowing it to be enacted through the [Whitelist Caller](https://wiki.polkadot.com/learn/learn-polkadot-opengov-origins/#whitelisted-caller) origin.
Visit [Origins and Tracks Info](https://wiki.polkadot.com/learn/learn-polkadot-opengov/#origins-and-tracks) for details on current origins and tracks, associated terminology, and parameters.
## Referendums
In OpenGov, anyone can submit a referendum, fostering an open and participatory system. The timeline for a referendum depends on the privilege level of the origin with more significant changes offering more time for community voting and participation before enactment.
The timeline for an individual referendum includes four distinct periods:
- **Lead-in**: A minimum amount of time to allow for community participation, available room in the origin, and payment of the decision deposit. Voting is open during this period.
- **Decision**: Voting continues.
- **Confirmation**: Referendum must meet [approval and support](https://wiki.polkadot.com/learn/learn-polkadot-opengov/#approval-and-support) criteria during entire period to avoid rejection.
- **Enactment**: Changes approved by the referendum are executed.
### Vote on Referendums
Voters can vote with their tokens on each referendum. Polkadot uses a voluntary token locking mechanism, called conviction voting, as a way for voters to increase their voting power. A token holder signals they have a stronger preference for approving a proposal based upon their willingness to lock up tokens. Longer voluntary token locks are seen as a signal of continual approval and translate to increased voting weight.
See [Voting on a Referendum](https://wiki.polkadot.com/learn/learn-polkadot-opengov/#voting-on-a-referendum) for a deeper look at conviction voting and related token locks.
### Delegate Voting Power
The OpenGov system also supports multi-role delegations, allowing token holders to assign their voting power on different tracks to entities with expertise in those areas.
For example, if a token holder lacks the technical knowledge to evaluate proposals on the [Root track](https://wiki.polkadot.com/learn/learn-polkadot-opengov-origins/#root), they can delegate their voting power for that track to an expert they trust to vote in the best interest of the network. This ensures informed decision-making across tracks while maintaining flexibility for token holders.
Visit [Multirole Delegation](https://wiki.polkadot.com/learn/learn-polkadot-opengov/#multirole-delegation) for more details on delegating voting power.
### Cancel a Referendum
Polkadot OpenGov has two origins for rejecting ongoing referendums:
- [**Referendum Canceller**](https://wiki.polkadot.com/learn/learn-polkadot-opengov-origins/#referendum-canceller): Cancels an active referendum when non-malicious errors occur and refunds the deposits to the originators.
- [**Referendum Killer**](https://wiki.polkadot.com/learn/learn-polkadot-opengov-origins/#referendum-killer): Used for urgent, malicious cases this origin instantly terminates an active referendum and slashes deposits.
See [Cancelling, Killing, and Blacklisting](https://wiki.polkadot.com/learn/learn-polkadot-opengov/#cancelling-killing--blacklisting) for additional information on rejecting referendums.
## Additional Resources
- **[Democracy pallet](https://github.com/paritytech/polkadot-sdk/tree/polkadot-stable2603/substrate/frame/democracy/src)**: Handles administration of general stakeholder voting.
- **[Gov2: Polkadot’s Next Generation of Decentralised Governance](https://medium.com/polkadot-network/gov2-polkadots-next-generation-of-decentralised-governance-4d9ef657d11b)**: Medium article by Gavin Wood.
- **[Polkadot Direction](https://matrix.to/#/#Polkadot-Direction:parity.io)**: Matrix Element client.
- **[Polkassembly](https://polkadot.polkassembly.io/)**: OpenGov dashboard and UI.
- **[Polkadot.js Apps Governance](https://polkadot.js.org/apps/#/referenda)**: Overview of active referendums.
---
Page Title: On-Chain polkadot.com
- Resolved Markdown: https://docs.polkadot.com/reference/apps/hosts/polkadot-web/onchain-polkadot-com.md
- Canonical (HTML): https://docs.polkadot.com/reference/apps/hosts/polkadot-web/onchain-polkadot-com/
- Summary: Reference for the on-chain-published presence backing polkadot.com discovery, a Polkadot Product that indexes and points at other Polkadot Products.
- Word Count: 465; Token Estimate: 689
- Last Updated: 2026-06-16T14:17:44+00:00
- Version Hash: sha256:fe124293494c155acb176bf1dd96fb38d937336df03712dd789d1ac9a958c4aa
# On-Chain `polkadot.com`
## Introduction
On-chain `polkadot.com` is `polkadot.com` itself, served as a Polkadot Product. It is the discovery layer for the ecosystem, a directory that points at other Polkadot Products, but it is not hosted on a centralized server. It is published as a bundle, resolved through [DotNS](/reference/apps/infrastructure/dotns/), and loaded by Polkadot Web or Polkadot Desktop into the Host sandbox, the same way any other Product is.
This page explains what makes the on-chain `polkadot.com` Product different from any other Product, and where it fits in the larger publishing flow. Mechanically, it is not different, and that is the point.
## Why an On-Chain Discovery Layer
A Polkadot Product is addressed by its `.dot` name, but `.dot` names alone are flat. A user has to know the name before they can visit it. Discovery is the layer above that: showcases, categories, recommendations, search.
Putting discovery on-chain as a Polkadot Product itself has two properties an off-chain discovery site does not:
- **Verifiable provenance**: The directory's contents are addressable and verifiable; a user can confirm that the discovery layer they are looking at matches the on-chain CID that DotNS resolves to, and the same shield-state checks that apply to any other Product apply here.
- **Composability**: Other Products can read the same on-chain discovery state through the chain client surface (see [Read Chain State](/apps/build/read-chain-state/)), without needing a private API to a centralized directory.
## Implications for a Product Developer
If you are building a Product, two things matter about on-chain `polkadot.com`:
- **Publishing target**: The flow for getting your Product listed on the canonical discovery surface goes through whatever submission and curation process on-chain `polkadot.com` defines. The Product-side how-to for the underlying publishing steps is [Register and Publish](/apps/deploy-your-app/).
- **Model to copy**: Any Product that wants to be a discovery surface for a specific category, such as a games directory, a wallet directory, or an asset explorer, can follow the same pattern: publish a Product whose state is the directory, read it from chain, and let the Host render it the same way.
## Where to Go Next
- Guide **Publish Your App Bundle**
---
The Product-side how-to for bundling and publishing your Product, including the artifact-addressing steps that any directory-listed Product goes through.
[:octicons-arrow-right-24: Get Started](/apps/deploy-your-app/)
- Guide **Read Chain State**
---
The how-to for reading on-chain state from inside a Product, including reading state published by other Products like on-chain `polkadot.com`.
[:octicons-arrow-right-24: Get Started](/apps/build/read-chain-state/)
---
Page Title: Origins and Tracks
- Resolved Markdown: https://docs.polkadot.com/reference/governance/origins-tracks.md
- Canonical (HTML): https://docs.polkadot.com/reference/governance/origins-tracks/
- Summary: Explore Polkadot's OpenGov origins and tracks system, defining privilege levels, decision processes, and tailored pathways for network proposals.
- Word Count: 463; Token Estimate: 617
- Last Updated: 2026-01-14T11:42:16+00:00
- Version Hash: sha256:bae612ad294e7b35edda5d5962140afdbea34e2a4fad45b3c29be99734f12f60
# Origins and Tracks
## Introduction
Polkadot's OpenGov system empowers decentralized decision-making and active community participation by tailoring the governance process to the impact of proposed changes. Through a system of origins and tracks, OpenGov ensures that every referendum receives the appropriate scrutiny, balancing security, inclusivity, and efficiency.
This guide will help you understand the role of origins in classifying proposals by privilege and priority. You will learn how tracks guide proposals through tailored stages like voting, confirmation, and enactment and how to select the correct origin for your referendum to align with community expectations and network governance.
Origins and tracks are vital in streamlining the governance workflow and maintaining Polkadot's resilience and adaptability.
## Origins
Origins are the foundation of Polkadot's OpenGov governance system. They categorize proposals by privilege and define their decision-making rules. Each origin corresponds to a specific level of importance and risk, guiding how referendums progress through the governance process.
- High-privilege origins like Root Origin govern critical network changes, such as core software upgrades.
- Lower-privilege origins like Small Spender handle minor requests, such as community project funding under 10,000 DOT.
Proposers select an origin based on the nature of their referendum. Origins determine parameters like approval thresholds, required deposits, and timeframes for voting and confirmation. Each origin is paired with a track, which acts as a roadmap for the proposal's lifecycle, including preparation, voting, and enactment.
For a detailed list of origins and their associated parameters, see the [Polkadot OpenGov Origins](https://wiki.polkadot.com/learn/learn-polkadot-opengov-origins/) entry in the Polkadot Wiki.
## Tracks
Tracks define a referendum's journey from submission to enactment, tailoring governance parameters to the impact of proposed changes. Each track operates independently and includes several key stages:
- **Preparation**: Time for community discussion before voting begins.
- **Voting**: Period for token holders to cast their votes.
- **Decision**: Finalization of results and determination of the proposal's outcome.
- **Confirmation**: Period to verify sustained community support before enactment.
- **Enactment**: Final waiting period before the proposal takes effect.
Tracks customize these stages with parameters like decision deposit requirements, voting durations, and approval thresholds, ensuring proposals from each origin receive the required scrutiny and process. For example, a runtime upgrade in the Root Origin track will have longer timeframes and stricter thresholds than a treasury request in the Small Spender track.
## Additional Resources
- For a list of origins and tracks for Polkadot and Kusama, including associated parameters, see the [Origins and Tracks Info](https://wiki.polkadot.com/learn/learn-polkadot-opengov-origins/#origins-and-tracks-info) entry in the Polkadot Wiki.
- For a deeper dive into the approval and support system, see the [Approval and Support](https://wiki.polkadot.com/learn/learn-polkadot-opengov/#approval-and-support) entry of the Polkadot Wiki.
---
Page Title: Overview of FRAME
- Resolved Markdown: https://docs.polkadot.com/parachains/customize-runtime.md
- Canonical (HTML): https://docs.polkadot.com/parachains/customize-runtime/
- Summary: Learn how Polkadot SDK’s FRAME framework simplifies blockchain development with modular pallets and support libraries for efficient runtime design.
- Word Count: 1070; Token Estimate: 1745
- Last Updated: 2026-05-27T20:25:14+00:00
- Version Hash: sha256:4fdb3ca1ee8b7da2d73f02c7842e34b2a5164f87e7148c5867902e3fc61ad6d3
# Customize Your Runtime
## Introduction
A blockchain runtime is more than just a fixed set of rules—it's a dynamic foundation that you can shape to match your specific needs. With Polkadot SDK's FRAME (Framework for Runtime Aggregation of Modularized Entities), customizing your runtime is straightforward and modular. Instead of building everything from scratch, you combine pre-built pallets with your own custom logic to create a runtime suited to your blockchain's purpose.
This overview explains how runtime customization works, introduces the building blocks you'll use, and guides you through the key patterns for extending your runtime.
## Understanding Your Runtime
The runtime is the core logic of your blockchain—it processes transactions, manages state, and enforces the rules that govern your network. When a transaction arrives at your blockchain, the [`frame_executive`](https://paritytech.github.io/polkadot-sdk/master/frame_executive/index.html) pallet receives it and routes it to the appropriate pallet for execution.
Think of your runtime as a collection of specialized modules, each handling a different aspect of your blockchain. Need token balances? Use the Balances pallet. Want governance? Add the Governance pallets. Need something custom? Create your own pallet. By mixing and matching these modules, you build a runtime that's efficient, secure, and tailored to your use case.
## Runtime Architecture
The following diagram shows how FRAME components work together to form your runtime:
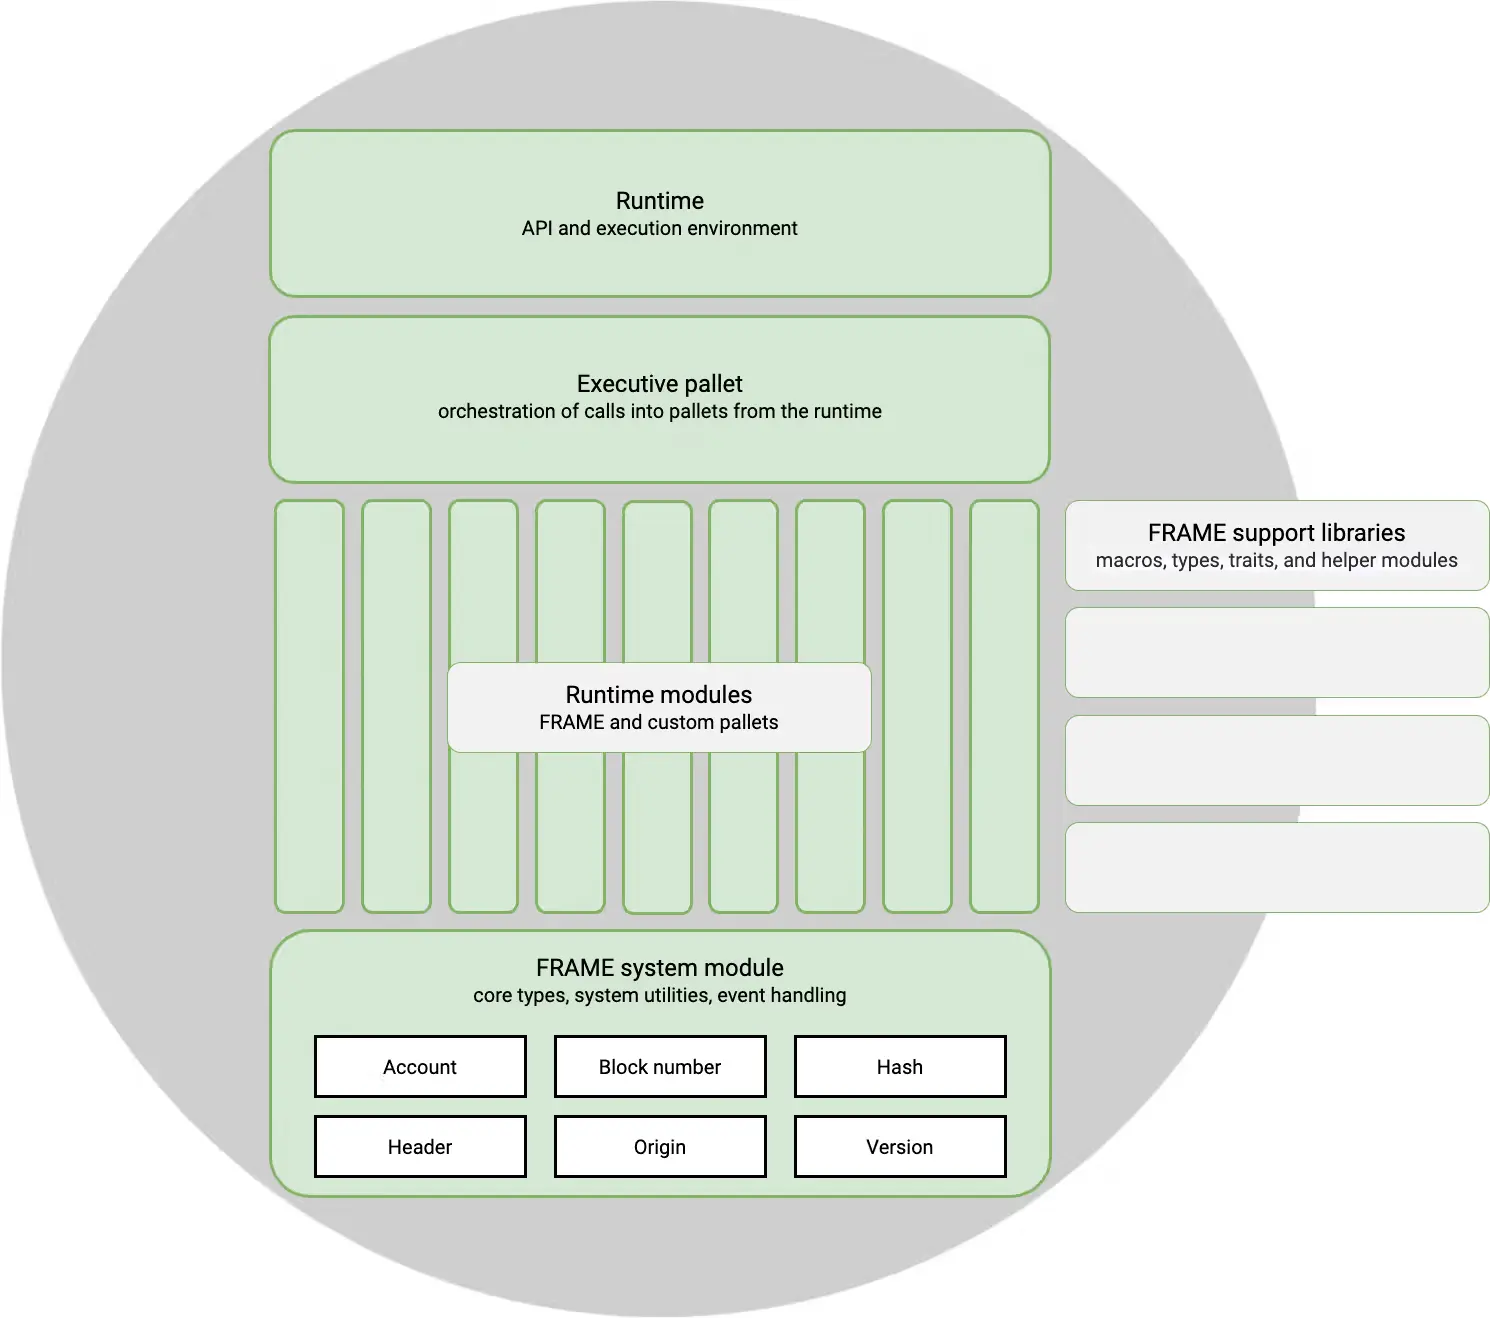
The main components are:
- **`frame_executive`**: Routes all incoming transactions to the correct pallet for execution.
- **Pallets**: Domain-specific modules that implement your blockchain's features and business logic.
- **`frame_system`**: Provides core runtime primitives and storage.
- **`frame_support`**: Utilities and macros that simplify pallet development.
## Building Blocks: Pallets
[Pallets](https://paritytech.github.io/polkadot-sdk/master/polkadot_sdk_docs/polkadot_sdk/frame_runtime/pallet/index.html) are the fundamental units of runtime customization. Each pallet encapsulates specific functionality and can be independently developed, tested, and integrated.
A pallet can implement virtually any blockchain feature you need:
- Expose new transactions that users can submit.
- Store data on-chain.
- Enforce business rules and validation logic.
- Emit events to notify users of state changes.
- Handle errors gracefully.
### Pre-Built Pallets vs. Custom Pallets
FRAME provides a comprehensive library of [pre-built pallets](https://github.com/paritytech/polkadot-sdk/tree/polkadot-stable2603/substrate/frame) for common blockchain features, including consensus, staking, balances, governance, and more. These pallets are battle-tested, optimized, and ready to use.
However, you're not limited to pre-built functionality. When pre-built pallets don't meet your needs, you can create custom pallets with entirely custom logic. The real power of FRAME is the flexibility to use pre-built modules for standard features while building your own for unique requirements.
### Pallet Structure
FRAME uses Rust macros extensively, allowing you to focus on your pallet's logic while the framework handles boilerplate and integration code.
A typical pallet looks like this:
```rust
pub use pallet::*;
#[frame_support::pallet]
pub mod pallet {
use frame_support::pallet_prelude::*;
use frame_system::pallet_prelude::*;
#[pallet::pallet]
#[pallet::generate_store(pub(super) trait Store)]
pub struct Pallet(_);
#[pallet::config] // snip
#[pallet::event] // snip
#[pallet::error] // snip
#[pallet::storage] // snip
#[pallet::call] // snip
}
```
Every pallet can implement these core macros:
- **`#[frame_support::pallet]`**: Marks your module as a FRAME pallet.
- **`#[pallet::pallet]`**: Designates the struct that holds pallet metadata.
- **`#[pallet::config]`**: Defines configuration and associated types.
- **`#[pallet::event]`**: Defines events emitted by your pallet.
- **`#[pallet::error]`**: Defines error types your pallet can return.
- **`#[pallet::storage]`**: Defines on-chain storage items.
- **`#[pallet::call]`**: Defines dispatchable functions (transactions).
For a comprehensive reference, see the [`pallet_macros` documentation](https://paritytech.github.io/polkadot-sdk/master/frame_support/pallet_macros/index.html).
## How Runtime Customization Works
Customizing your runtime typically follows these patterns:
**Adding Pre-Built Pallets**: Select pallets from the FRAME library and integrate them into your runtime configuration. This is the fastest way to add functionality.
**Creating Custom Pallets**: Write custom pallets for features that don't exist in the pre-built library. Custom pallets follow the same structure as pre-built ones and integrate seamlessly.
**Combining Multiple Pallets**: Layer multiple pallets together to create complex behaviors. Pallets can call each other and share storage when needed.
**Configuring Pallet Parameters**: Most pallets are configurable—you can adjust their behavior through configuration traits without modifying their code.
The following diagram illustrates how pallets combine to form a complete runtime:
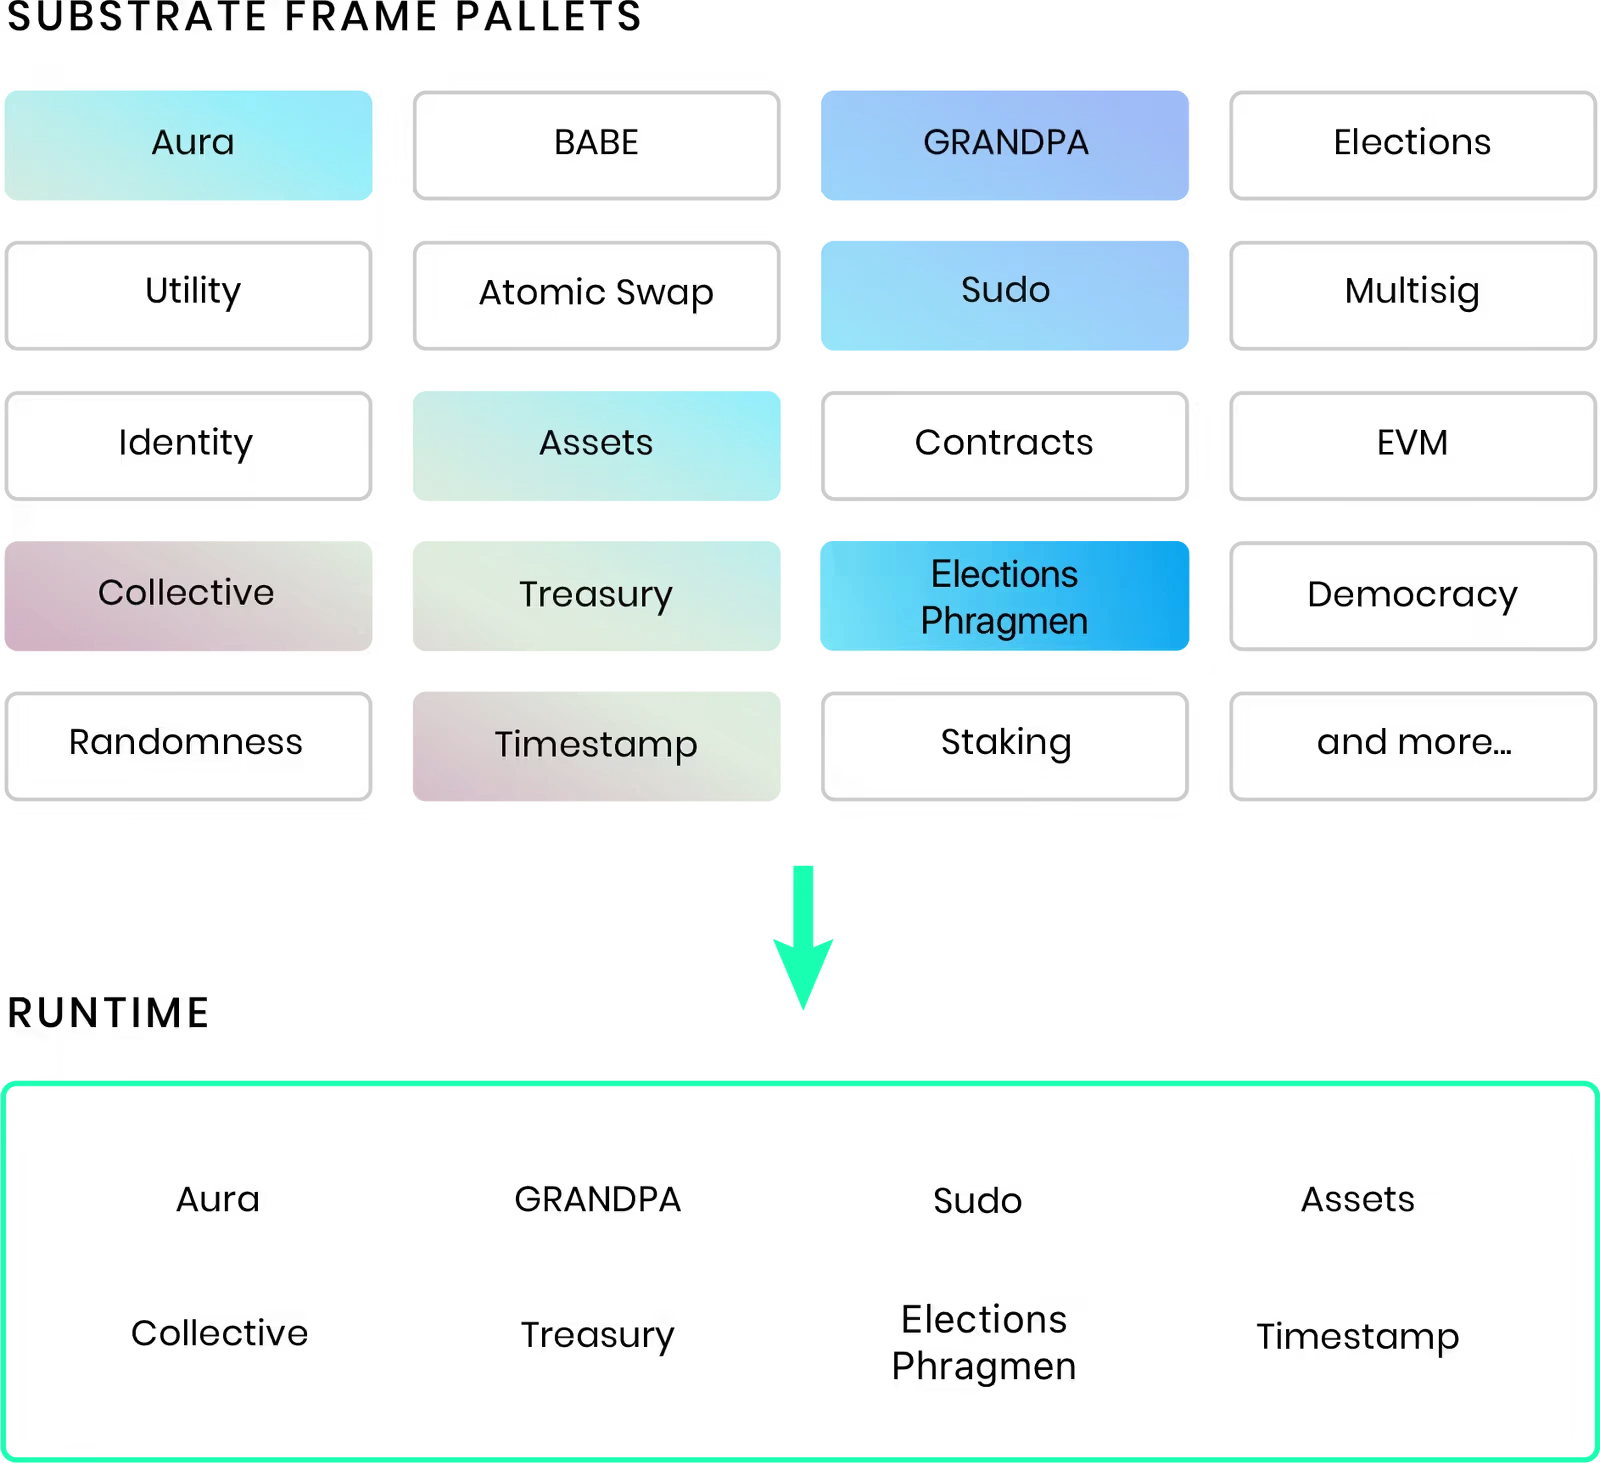
## Starting Templates
The easiest way to begin customizing your runtime is with a starter template. These templates provide a pre-configured foundation so you can focus on customization rather than setup.
- **[Polkadot SDK Parachain Template](https://github.com/paritytech/polkadot-sdk-parachain-template)**: The recommended choice for most developers, it includes pre-configured pallets for common features (balances, block production, governance), a complete runtime setup, and built-in parachain consensus support. This template offers the best balance of features and learning opportunities.
- **[Polkadot SDK Minimal Template](https://github.com/paritytech/polkadot-sdk-minimal-template)**: Provides a bare-bones runtime with only essential components. Choose this if you want maximum flexibility and prefer building from a clean slate.
- **[Polkadot SDK Solochain Template](https://github.com/paritytech/polkadot-sdk/tree/master/templates/solochain)**: Designed for building standalone blockchains with moderate features, simple consensus, and several core pallets. Use this if you want a sovereign blockchain independent of a relay chain.
- **[OpenZeppelin Runtime Templates](https://github.com/OpenZeppelin/polkadot-runtime-templates)**: Provides security-focused configurations following industry best practices. The [generic-template](https://github.com/OpenZeppelin/polkadot-runtime-templates/tree/main/generic-template) includes curated pallet selections and production-ready defaults—ideal if security is your top priority.
## Key Customization Scenarios
This section covers the most common customization patterns you'll encounter:
- **[Add Existing Pallets to Your Runtime](/parachains/customize-runtime/add-existing-pallets/)**: Integrate pre-built pallets from the FRAME library with minimal configuration.
- **[Add Multiple Instances of a Pallet](/parachains/customize-runtime/add-pallet-instances/)**: Run multiple instances of the same pallet with different configurations—useful for multi-token systems or parallel features.
- **[Add Smart Contract Functionality](/parachains/customize-runtime/add-smart-contract-functionality/)**: Enable smart contract execution on your parachain using Contracts pallets.
- **[Create Custom Pallets](/parachains/customize-runtime/pallet-development/create-a-pallet/)**: Build entirely custom pallets for features unique to your blockchain.
- **[Test Your Runtime](/parachains/customize-runtime/pallet-development/pallet-testing/)**: Unit test pallets and mock complete runtimes to ensure everything works correctly.
---
Page Title: Overview of the Polkadot Relay Chain
- Resolved Markdown: https://docs.polkadot.com/reference/polkadot-hub/consensus-and-security/relay-chain.md
- Canonical (HTML): https://docs.polkadot.com/reference/polkadot-hub/consensus-and-security/relay-chain/
- Summary: Explore Polkadot's core architecture, including its multi-chain vision, shared security, and the DOT token's governance and staking roles.
- Word Count: 1705; Token Estimate: 2391
- Last Updated: 2026-05-27T20:25:14+00:00
- Version Hash: sha256:0859be89440366a78bd1d2c522b62b9294a357f3803dc4bab10f55eae2abf498
# Overview
## Introduction
Polkadot is a next-generation blockchain protocol designed to support a multi-chain future by enabling secure communication and interoperability between different blockchains. Built as a Layer-0 protocol, Polkadot introduces innovations like application-specific Layer-1 chains ([parachains](/reference/parachains/)), shared security through Nominated Proof of Stake (NPoS), and cross-chain interactions via its native [Cross-Consensus Messaging Format (XCM)](/parachains/interoperability/get-started/).
This guide covers key aspects of Polkadot’s architecture, including its high-level protocol structure, blockspace commoditization, and the role of its native token, DOT, in governance, staking, and resource allocation.
## Polkadot 1.0
Polkadot 1.0 represents the state of Polkadot as of 2023, coinciding with the release of [Polkadot runtime v1.0.0](https://github.com/paritytech/polkadot/releases/tag/v1.0.0). This section will focus on Polkadot 1.0, along with philosophical insights into network resilience and blockspace.
As a Layer-0 blockchain, Polkadot contributes to the multi-chain vision through several key innovations and initiatives, including:
- **Application-specific Layer-1 blockchains (parachains)**: Polkadot's sharded network allows for parallel transaction processing, with shards that can have unique state transition functions, enabling custom-built L1 chains optimized for specific applications.
- **Shared security and scalability**: L1 chains connected to Polkadot benefit from its [Nominated Proof of Stake (NPoS)](/reference/polkadot-hub/consensus-and-security/pos-consensus/#nominated-proof-of-stake) system, providing security out-of-the-box without the need to bootstrap their own.
- **Secure interoperability**: Polkadot's native interoperability enables seamless data and value exchange between parachains. This interoperability can also be used outside of the ecosystem for bridging with external networks.
- **Resilient infrastructure**: Decentralized and scalable, Polkadot ensures ongoing support for development and community initiatives via its on-chain [treasury](https://wiki.polkadot.com/learn/learn-polkadot-opengov-treasury/) and governance.
- **Rapid L1 development**: The [Polkadot SDK](/reference/parachains/) allows fast, flexible creation and deployment of Layer-1 chains.
- **Cultivating the next generation of Web3 developers**: Polkadot supports the growth of Web3 core developers through initiatives such as.
- [Polkadot Blockchain Academy](https://polkadot.academy/)
- [EdX courses](https://www.edx.org/school/web3x)
- Rust and Substrate courses (coming soon)
### High-Level Architecture
Polkadot features a chain that serves as the central component of the system. This chain is depicted as a ring encircled by several parachains that are connected to it.
According to Polkadot's design, any blockchain that can compile to WebAssembly (Wasm) and adheres to the Parachains Protocol becomes a parachain on the Polkadot network.
Here’s a high-level overview of the Polkadot protocol architecture:
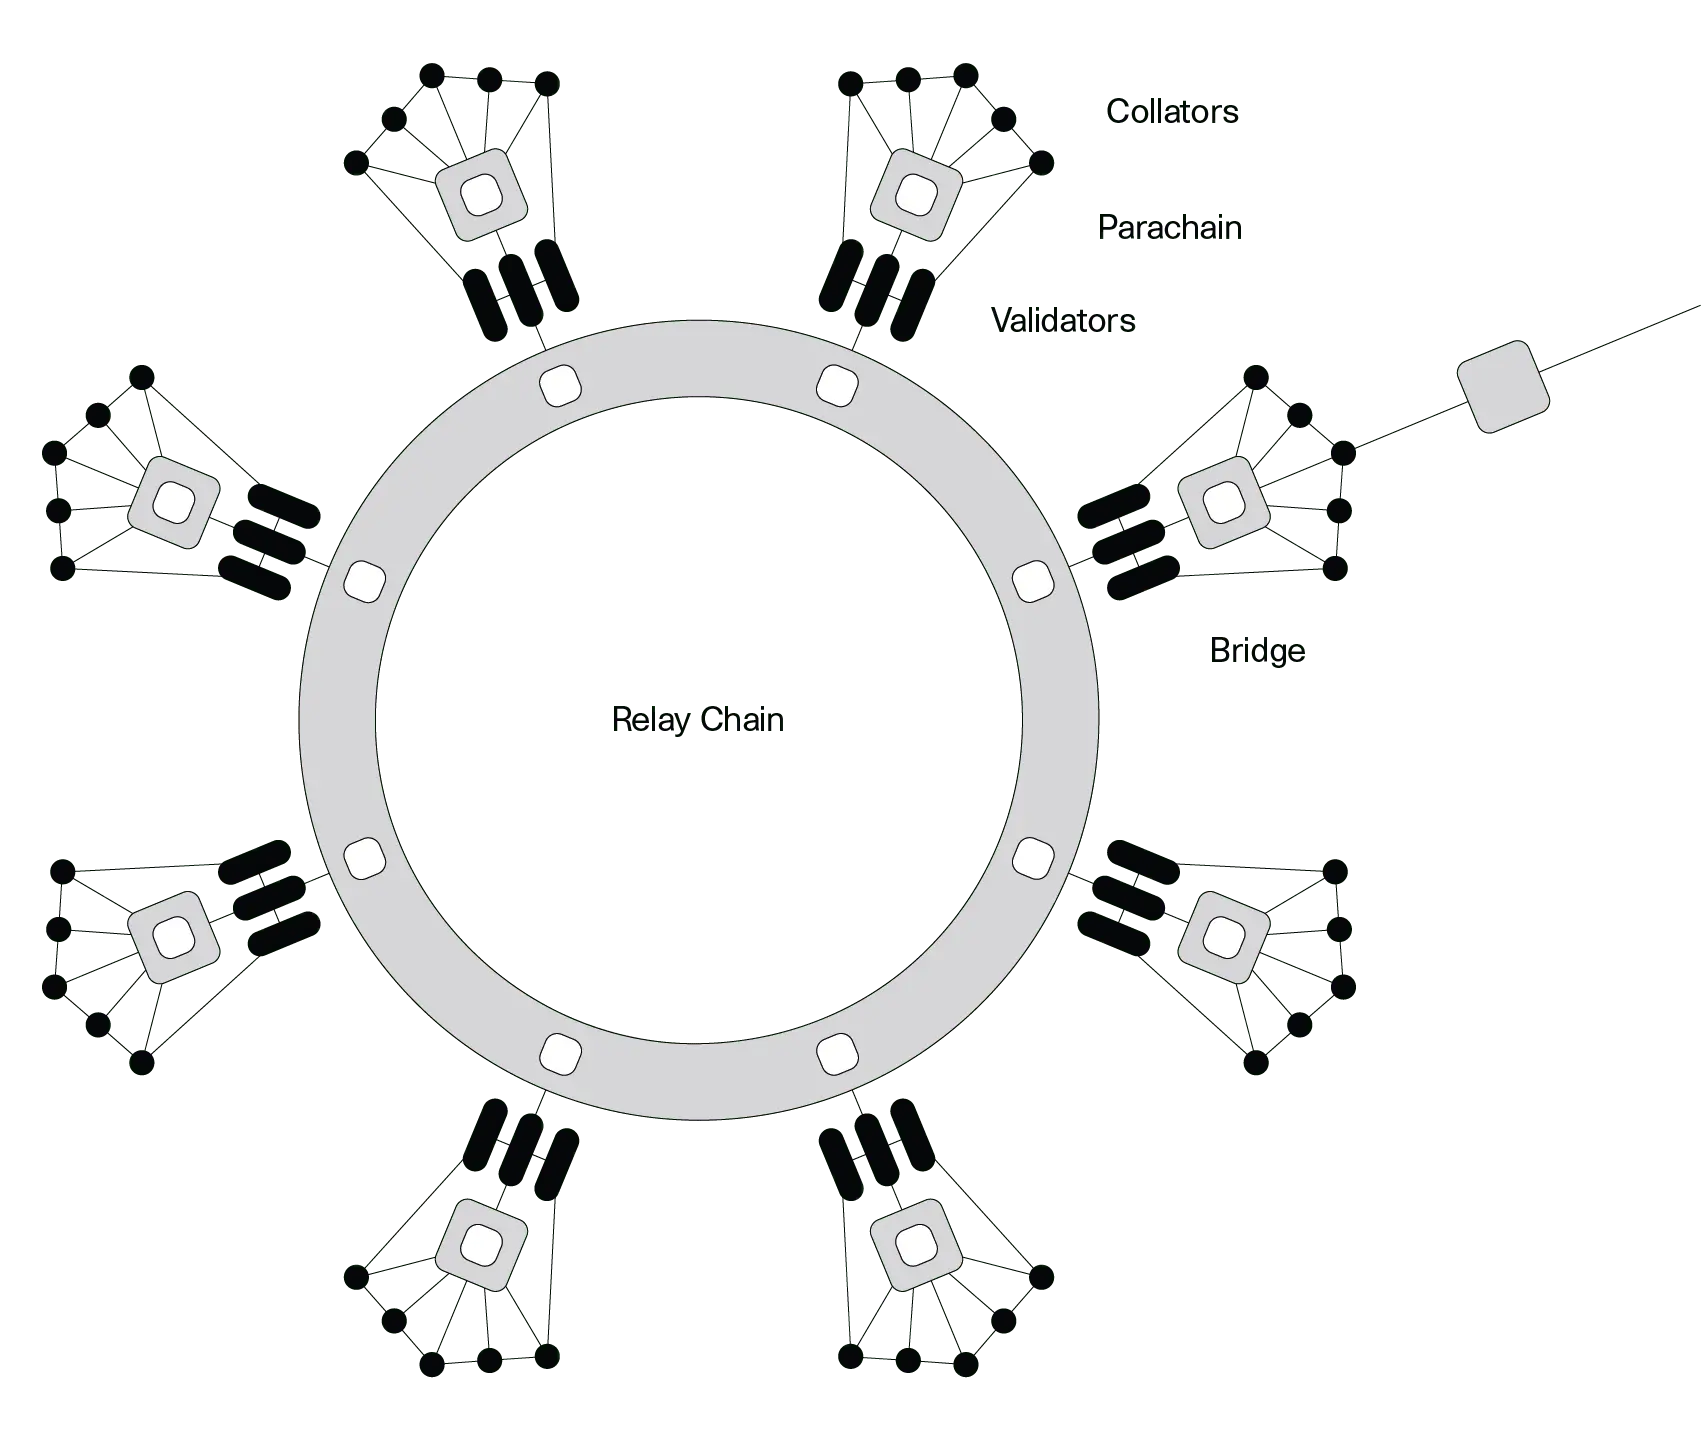
Parachains propose blocks to Polkadot validators, who check for availability and validity before finalizing them. With the relay chain providing security, collators—full nodes of parachains—can focus on their tasks without needing strong incentives.
The [Cross-Consensus Messaging Format (XCM)](/parachains/interoperability/get-started/) allows parachains to exchange messages freely, leveraging the chain's security for trust-free communication.
In order to interact with chains that want to use their own finalization process (e.g., Bitcoin), Polkadot has [bridges](/reference/parachains/interoperability/#bridges-connecting-external-networks) that offer two-way compatibility, meaning that transactions can be made between different parachains.
### Polkadot's Additional Functionalities
Historically, obtaining core slots on Polkadot chain relied upon crowdloans and auctions. Chain cores were leased through auctions for three-month periods, up to a maximum of two years. Crowdloans enabled users to securely lend funds to teams for lease deposits in exchange for pre-sale tokens, which is the only way to access slots on Polkadot 1.0. Auctions are now deprecated in favor of [coretime](/reference/polkadot-hub/consensus-and-security/agile-coretime/).
Additionally, the chain handles [staking](https://wiki.polkadot.com/learn/learn-staking/), [accounts](/reference/parachains/accounts/), balances, and [governance](/reference/governance/).
#### Agile Coretime
The new and more efficient way of obtaining core on Polkadot is to go through the process of purchasing coretime.
[Agile coretime](/reference/polkadot-hub/consensus-and-security/agile-coretime/) improves the efficient use of Polkadot's network resources and offers economic flexibility for developers, extending Polkadot's capabilities far beyond the original vision outlined in the [whitepaper](https://assets.polkadot.network/Polkadot-whitepaper.pdf)..
It enables parachains to purchase monthly "bulk" allocations of coretime (the time allocated for utilizing a core, measured in Polkadot relay chain blocks), ensuring heavy-duty parachains that can author a block every six seconds with [Asynchronous Backing](https://wiki.polkadot.com/learn/learn-async-backing/#asynchronous-backing) can reliably renew their coretime each month. Although six-second block times are now the default, parachains have the option of producing blocks less frequently.
Renewal orders are prioritized over new orders, offering stability against price fluctuations and helping parachains budget more effectively for project costs.
### Polkadot's Resilience
Decentralization is a vital component of blockchain networks, but it comes with trade-offs:
- An overly decentralized network may face challenges in reaching consensus and require significant energy to operate.
- Also, a network that achieves consensus quickly risks centralization, making it easier to manipulate or attack.
A network should be decentralized enough to prevent manipulative or malicious influence. In this sense, decentralization is a tool for achieving resilience.
Polkadot 1.0 currently achieves resilience through several strategies:
- **Nominated Proof of Stake (NPoS)**: Ensures that the stake per validator is maximized and evenly distributed among validators.
- **Decentralized nodes**: Designed to encourage operators to join the network. This program aims to expand and diversify the validators in the ecosystem who aim to become independent of the program during their term. Feel free to explore more about the program on the official [Decentralized Nodes](https://nodes.web3.foundation/) page.
- **On-chain treasury and governance**: Known as [OpenGov](/reference/governance/), this system allows every decision to be made through public referenda, enabling any token holder to cast a vote.
### Polkadot's Blockspace
Polkadot 1.0’s design allows for the commoditization of blockspace.
Blockspace is a blockchain's capacity to finalize and commit operations, encompassing its security, computing, and storage capabilities. Its characteristics can vary across different blockchains, affecting security, flexibility, and availability.
- **Security**: Measures the robustness of blockspace in Proof of Stake (PoS) networks linked to the stake locked on validator nodes, the variance in stake among validators, and the total number of validators. It also considers social centralization (how many validators are owned by single operators) and physical centralization (how many validators run on the same service provider).
- **Flexibility**: Reflects the functionalities and types of data that can be stored, with high-quality data essential to avoid bottlenecks in critical processes.
- **Availability**: Indicates how easily users can access blockspace. It should be easily accessible, allowing diverse business models to thrive, ideally regulated by a marketplace based on demand and supplemented by options for "second-hand" blockspace.
Polkadot is built on core blockspace principles, but there's room for improvement. Tasks like balance transfers, staking, and governance are managed on the relay chain.
Delegating these responsibilities to [system chains](/reference/polkadot-hub/#core-components) could enhance flexibility and allow the relay chain to concentrate on providing shared security and interoperability.
For more information about blockspace, read [Robert Habermeier’s technical blog post](https://www.rob.tech/blog/polkadot-blockspace-over-blockchains/).
## DOT Token
DOT is the native token of the Polkadot network, much like BTC for Bitcoin and Ether for the Ethereum blockchain. DOT has 10 decimals, uses the Planck base unit, and has a balance type of `u128`. The same is true for Kusama's KSM token with the exception of having 12 decimals.
### Redenomination of DOT
Polkadot conducted a community poll, which ended on 27 July 2020 at block 888,888, to decide whether to redenominate the DOT token. The stakeholders chose to redenominate the token, changing the value of 1 DOT from 1e12 plancks to 1e10 plancks.
Importantly, this did not affect the network's total number of base units (plancks); it only affects how a single DOT is represented. The redenomination became effective 72 hours after transfers were enabled, occurring at block 1,248,328 on 21 August 2020 around 16:50 UTC.
### The Planck Unit
The smallest unit of account balance on Polkadot SDK-based blockchains (such as Polkadot and Kusama) is called _Planck_, named after the Planck length, the smallest measurable distance in the physical universe.
Similar to how BTC's smallest unit is the Satoshi and ETH's is the Wei, Polkadot's native token DOT equals 1e10 Planck, while Kusama's native token KSM equals 1e12 Planck.
### Uses for DOT
DOT serves three primary functions within the Polkadot network:
- **Governance**: It is used to participate in the governance of the network.
- **Staking**: DOT is staked to support the network's operation and security.
- **Buying coretime**: Used to purchase coretime in-bulk or on-demand and access the chain to benefit from Polkadot's security and interoperability.
Additionally, DOT can serve as a transferable token. For example, DOT, held in the treasury, can be allocated to teams developing projects that benefit the Polkadot ecosystem.
## JAM and the Road Ahead
The Join-Accumulate Machine (JAM) represents a transformative redesign of Polkadot's core architecture, envisioned as the successor to the current relay chain. Unlike traditional blockchain architectures, JAM introduces a unique computational model that processes work through two primary functions:
- **Join**: Handles data integration.
- **Accumulate**: Folds computations into the chain's state.
JAM removes many of the opinions and constraints of the current relay chain while maintaining its core security properties. Expected improvements include:
- **Permissionless code execution**: JAM is designed to be more generic and flexible, allowing for permissionless code execution through services that can be deployed without governance approval.
- **More effective block time utilization**: JAM's efficient pipeline processing model places the prior state root in block headers instead of the posterior state root, enabling more effective utilization of block time for computations.
This architectural evolution promises to enhance Polkadot's scalability and flexibility while maintaining robust security guarantees. JAM is planned to be rolled out to Polkadot as a single, complete upgrade rather than a stream of smaller updates. This approach seeks to minimize the developer overhead required to address any breaking changes.
---
Page Title: pallet-coinage Reference
- Resolved Markdown: https://docs.polkadot.com/reference/apps/infrastructure/pop/pallet-coinage.md
- Canonical (HTML): https://docs.polkadot.com/reference/apps/infrastructure/pop/pallet-coinage/
- Summary: The PoP pallet behind the Polkadot App's Coinage feature — personhood-aware peer-to-peer payments with privacy properties beyond a standard Balances transfer.
- Word Count: 810; Token Estimate: 1487
- Last Updated: 2026-06-16T14:17:44+00:00
- Version Hash: sha256:f4e684532071f7ee2d25a4c0063d723db6970bb5fd774ef07a1d01be425fb499
# `pallet-coinage`
## Introduction
`pallet-coinage` is the on-chain pallet behind the [Polkadot App's Coinage feature](/reference/apps/hosts/polkadot-app/coinage/) — the peer-to-peer payment surface that lets a user send funds to another verified person, with privacy properties beyond what a standard `Balances.transfer_keep_alive` provides.
Two properties differentiate Coinage from a standard transfer at the pallet level:
- **Personhood-aware addressing**: Sends can target a recipient identified by their personhood identity rather than by their account address; the pallet resolves the address from the personhood claim.
- **Privacy-preserving by default**: Where appropriate, the pallet routes the transfer through alias / Ring-VRF surfaces so the on-chain trail does not directly link the sender's account to the recipient's account in the same way a public `Balances.transfer_keep_alive` does.
!!! info "Underlying asset: HOLLAR today, pUSD later"
`pallet-coinage` is backed by a stablecoin on Asset Hub (configured via `UnderlyingAssetId`). Today that asset is HOLLAR; the system is designed to migrate to pUSD when pUSD lands. The pallet itself works today against HOLLAR — the underlying asset is loaded into recyclers via `load_recycler_with_external_asset` and unloaded via the corresponding `unload_recycler_into_external_asset` variants. The dispatch surface stays the same across the HOLLAR → pUSD transition.
!!! warning "Provisional"
The complete enumeration of the `pallet-coinage` dispatch surface (every extrinsic, parameter shape, event, and error) is still being finalized. This page documents the conceptual model and the operation families; per-extrinsic specifics will be added once confirmed.
## Conceptual Surface
The pallet's operations cluster into four families:
- **Transfer**: A two-step "pull" mechanic. The sender shares the private key of the coin(s) being sent over an off-chain channel (typically the Polkadot App's encrypted chat). The receiver derives a fresh key from their own mnemonic and calls `transfer(to)` to move each coin to that new key. The coin's age increments by 1. Transfer is always free.
- **Split**: A user splits one coin into any combination of smaller coins whose values sum to the original. All output coins inherit `originalAge + 1`. Split is always free.
- **Recycle (load / unload)**: The privacy core. A user loads a coin (or equivalent stablecoin) into a recycler ring, waits for other entries to join, then unloads with a Ring-VRF proof — minting a fresh coin or withdrawing the backing stablecoin, with no on-chain link to the deposit. Loading is free; unloading is the only charged operation in the system.
- **Onboard / offboard**: Conversion between coins and the backing stablecoin. Onboarding loads stablecoin into a recycler and unloads anonymously into fresh coins. Offboarding does the reverse. A `direct_offboard_coin_into_external_asset` fast path skips the recycler for freshly-minted (age-0) coins that do not need anonymity.
## Relationship to Coinage in the App
The App's Coinage feature is the user-facing surface; `pallet-coinage` is the on-chain pallet that surface dispatches into. A Product developer who wants Coinage-style payments in their own Product invokes `pallet-coinage` via the standard signing surface (with the user approving each transaction on their App, as with all signed actions).
For the App-side feature reference see [Coinage in the Polkadot App](/reference/apps/hosts/polkadot-app/coinage/).
## Pallet Surface
The transfer, split, load, and unload extrinsics, the coin storage, and the recycler ring data are enumerated here.
!!! warning "Provisional"
Parameter shapes, event names, and error variants are pending Parity confirmation. The operation set below reflects the design as documented in the briefing.
| Symbol | Kind | Notes |
|:--------------------------------------------------------------------------------------------------------------------------------|:------------|:--------------------------------------------------------------------------|
| `transfer` | Extrinsic | Free; pull-mechanic — receiver moves the coin |
| `split` | Extrinsic | Free; one coin into many summing to its value |
| `load_recycler_with_coin` | Extrinsic | Free; coin origin; deposits a coin into the recycler ring |
| `load_recycler_with_external_asset` | Extrinsic | Free; signed origin; deposits backing stablecoin |
| `unload_recycler_into_coin` | Extrinsic | Ring-VRF proof; mint a fresh age-0 coin |
| `unload_recycler_into_external_asset` | Extrinsic | Ring-VRF proof; withdraw backing stablecoin |
| `unload_recycler_into_coins` | Extrinsic | Unload + split in one op; lifts power-of-two restriction |
| `unload_recycler_into_external_asset_non_anonymous` | Extrinsic | Signer pays fee directly; identity visible |
| `direct_offboard_coin_into_external_asset` | Extrinsic | Fast path for age-0 coins; bypasses the recycler |
| `pay_for_recycler_unload_fee_token_with_coin` | Extrinsic | Paid path for users out of free unload tokens |
| `pay_for_recycler_unload_fee_token_with_native` | Extrinsic | Paid path; DOT |
| `pay_for_recycler_unload_fee_token_with_stable` | Extrinsic | Paid path; stablecoin |
| `clean_recycler` / `clean_consumed_free_token` / `clean_paid_unload_token_ring` / `delete_expired_paid_unload_token_collection` | Extrinsic | Offchain-worker-authorised cleanup |
| `CoinsByOwner` | Storage map | Per-public-key coin record (storage is one entry per key) |
| `UnderlyingAssetId` / `UnderlyingAssetUnit` | Constant | The backing stablecoin id and base unit ($0.01); HOLLAR today, pUSD later |
| `MinimumExponent` / `MaximumExponent` | Constant | Valid coin denomination range (0–14 = $0.01–$163.84) |
| `MaximumAge` / `MinimumAgeForRecycling` | Constant | Coin age limits before mandatory recycling |
| `UnloadTokenAllowancePerTimePeriodForPeople` / `…ForLitePeople` | Constant | Free unload-token budget per period |
| `RecyclerExpirationTime` | Constant | Lifetime of a full recycler ring before cleanup |
## Where to Go Next
- Learn **Coinage in the Polkadot App**
---
The App-side feature reference — the user-visible surface that dispatches into this pallet.
[:octicons-arrow-right-24: Reference](/reference/apps/hosts/polkadot-app/coinage/)
---
Page Title: pallet-game Reference
- Resolved Markdown: https://docs.polkadot.com/reference/apps/infrastructure/pop/pallet-game.md
- Canonical (HTML): https://docs.polkadot.com/reference/apps/infrastructure/pop/pallet-game/
- Summary: The PoP pallet for personhood-gated on-chain games and randomized selection — fair-draw mechanics that rely on Ring-VRF aliases for unique participation.
- Word Count: 444; Token Estimate: 632
- Last Updated: 2026-06-16T14:17:44+00:00
- Version Hash: sha256:8e13d603364db5fb3af0b4a764f1a92dc583700c25f0f3e08fbf6194b8efb741
# `pallet-game`
## Introduction
`pallet-game` is the Proof of Personhood pallet for personhood-gated on-chain games and randomized selection flows. Its core property is _fair participation_: when the pallet selects from a set of entrants, it can guarantee each real person has exactly one entry, regardless of how many accounts they control — because the entrants are scoped by alias, not by account address.
Typical use cases include lottery-style draws, raffles, one-person-one-entry contests, randomized airdrops, and any flow where "one entry per real human" is part of the fairness contract.
!!! warning "Provisional"
The exact dispatch surface of `pallet-game` — extrinsics, parameter shapes, storage layout, supported game types, and its integration with the forthcoming `pallet-airdrop` — is still being finalized. This page documents the conceptual responsibilities; the per-extrinsic reference will be added once the surface confirms.
## What the Pallet Guarantees
Three properties the pallet enforces:
- **One entry per alias**: When a user enters under their per-game alias (resolved via `under_alias`), the pallet stores the alias. A second entry from the same user produces the same alias and is rejected or replaces the first, depending on the game's mode.
- **Verifiable randomness for selection**: When the pallet selects a winner (or a set of winners), the randomness is sourced from a verifiable source — a block hash, a VRF output, a beacon — that an external party can later check. The selection is not chosen by a privileged operator after the fact.
- **Account unlinkability for state**: The pallet's storage maps from alias to game-side state. The state cannot be linked back to a specific user account without that user's own cooperation.
## What a Product Uses It For
A Product can dispatch into `pallet-game` to:
- Register entries in a game on behalf of the current user — a call wrapped in `under_alias` so the pallet sees the alias.
- Read game state — current entrant count, current prize pool, outcome of a completed draw — through the standard chain client surface.
- Subscribe to outcomes when a game completes, so the Product UI can react in real time.
A Product does _not_ run the game itself; the pallet does. The Product is the UI that lets users enter and see results.
## Where to Go Next
- Learn **pallet-people**
---
The foundational pallet that issues the aliases this pallet keys on.
[:octicons-arrow-right-24: Reference](/reference/apps/infrastructure/pop/pallet-people/)
- Learn **TrUAPI Entropy**
---
The verifiable-randomness primitives that pair with `pallet-game` when a Product also wants its own randomness on the same chain state. *(Reference page forthcoming.)*
---
Page Title: pallet-identity Reference
- Resolved Markdown: https://docs.polkadot.com/reference/apps/infrastructure/pop/pallet-identity.md
- Canonical (HTML): https://docs.polkadot.com/reference/apps/infrastructure/pop/pallet-identity/
- Summary: The People Chain identity record associated with a PoP account — what it stores, how it relates to aliases, and how a Product reads from it.
- Word Count: 550; Token Estimate: 955
- Last Updated: 2026-06-16T14:17:44+00:00
- Version Hash: sha256:545be149ceacca1f2be7ef0f879f0e2a287f674190500f932af4f6bf7be7aeeb
# `pallet-identity`
## Introduction
`pallet-identity` is the People Chain pallet that holds the on-chain identity record associated with an account. It is not part of the alias machinery (aliases live in `pallet-people`); it is the place where a verified account's _direct_ identity — the fields associated with the account itself, not its per-context pseudonyms — lives.
For Product developers, the distinction matters: most personhood-gated flows reach for aliases (`under_alias`, `getAnonymousAlias`) because aliases preserve unlinkability. `pallet-identity` is the relevant pallet when the Product genuinely needs to read or write the user's _direct_ identity record — for example, to display a username the user has explicitly set on their account.
!!! warning "Provisional"
The exact dispatch surface of `pallet-identity` on the current build — the supported identity fields, the extrinsics that set them, and the verification rules — is still being finalized. This page documents the conceptual responsibilities; per-extrinsic specifics will be added once confirmed.
## What the Pallet Records
An identity record typically contains:
- **A username**: The human-readable name the user has set on their account, useful for display in cases where the user has opted in to a public-facing handle.
- **Display fields**: Additional administrative or display-oriented fields the user has chosen to associate with their account on-chain.
- **Verification metadata**: Markers indicating which of the fields have been verified by an authorized verifier, if applicable.
The fields are public — anyone reading chain state can see them. The user is the only party that can write to their own record (subject to the standard signing model).
## Identity vs. Aliases
A useful framing for picking the right pallet:
| You need to… | Use… |
|:--------------------------------------------------------------------------------|:----------------------------------------------------------------------|
| Recognize "the same real person" in your Product without revealing who they are | An _alias_ from `pallet-people` |
| Display a username the user has chosen publicly | `pallet-identity`'s username field |
| Check whether a user is a verified person (yes/no, not who) | A Ring-VRF proof from `pallet-people` |
| Display the user's verified display name in a public context | `pallet-identity` fields |
| Gate access on personhood | `under_alias` against a PoP pallet |
| Gate access on the specific user behind an alias | This is what aliases _cannot_ do — that link is intentionally severed |
## When to Use From a Product
A Product reaches for `pallet-identity` rarely. Most Products preserve unlinkability and never touch the user's direct identity. The pallet is the right tool when:
- The user has opted in to a public-facing presence in your Product context (a profile name, a public display name, a verified-handle badge), and you want to read or set that.
- Your Product bridges to off-chain identity systems that need the user's direct identity rather than a per-Product alias.
When in doubt, prefer aliases — they preserve the privacy default.
## Where to Go Next
- Learn **pallet-people**
---
The pallet that issues aliases — the unlinkable alternative to direct identity that most Products should prefer.
[:octicons-arrow-right-24: Reference](/reference/apps/infrastructure/pop/pallet-people/)
- Learn **Ring-VRF and Aliases**
---
The mechanism that makes aliases unlinkable and why most Product use cases prefer aliases over direct identity reads.
[:octicons-arrow-right-24: Reference](/reference/apps/infrastructure/pop/ring-vrf-and-aliases/)
---
Page Title: pallet-people Reference
- Resolved Markdown: https://docs.polkadot.com/reference/apps/infrastructure/pop/pallet-people.md
- Canonical (HTML): https://docs.polkadot.com/reference/apps/infrastructure/pop/pallet-people/
- Summary: The foundational Proof of Personhood pallet — personhood registration, ring membership, alias issuance, and the under_alias runtime origin.
- Word Count: 623; Token Estimate: 884
- Last Updated: 2026-06-16T14:17:44+00:00
- Version Hash: sha256:a15329e15f3ef215dc4ce74777411216d6a81796021429996e57a2d7b2710bcf
# `pallet-people`
## Introduction
`pallet-people` is the foundation of [Polkadot's Proof of Personhood](/reference/apps/infrastructure/pop/) on the People Chain. It's the pallet that records who has completed personhood verification, issues the aliases other Products gate on, and exposes the `under_alias` runtime origin every other PoP pallet (game, score, identity, ubc, coinage) builds on top of.
Its responsibilities cluster into three:
- **Maintaining the membership rings**: The full personhood ring (PoP Full) and the lite-people ring (PoP Lite) are this pallet's storage. Joining a ring means an entry is added; the ring's root is what subsequent Ring-VRF proofs are checked against.
- **Issuing aliases**: When a Product (via the App) requests an alias for a specific context, `pallet-people` is the runtime side that produces the alias and registers it as valid against the ring.
- **Implementing the `under_alias` origin**: When a runtime call comes in wrapped in `under_alias`, this is the pallet whose verification logic the runtime runs to decide whether to admit the call.
!!! warning "Provisional"
The exact dispatch surface of `pallet-people` — the precise extrinsics, their parameter shapes, the storage map names, and the events emitted — is still being finalized. This page documents the conceptual responsibilities; the per-extrinsic reference will be added once the surface confirms.
## Ring Membership
Two storage structures on `pallet-people` hold the rings:
- **The full personhood ring**: Holds the public keys of accounts that completed biometric PoP. Joining requires the App-side verification flow; the result is an extrinsic that adds the key.
- **The lite-people ring**: Holds accounts registered via a governance-authorized attestation. Attestations are submitted by approved attesters; the pallet validates and records the registration.
Each ring exposes a _ring root_ — the cryptographic commitment used to verify Ring-VRF proofs. The root updates when membership changes; consumers of proofs read the current root from this pallet's storage when validating.
## Alias Issuance
`pallet-people` is the issuing authority for aliases. When the App produces a Ring-VRF proof for a specific context (a `.dot` domain), the proof is generated against the pallet's ring root and the context. The alias the verifier sees is deterministic for *(user, context)* — same user, same context, same alias every time.
For cross-domain aliases — a Product requesting an alias scoped to another Product's `.dot` — the pallet has additional checks to ensure the request was user-consented and the destination context is valid.
## `under_alias` Dispatch
When the runtime sees a call wrapped in `under_alias`, the validator path is:
1. Read the relevant ring root from `pallet-people`'s storage.
2. Verify the included Ring-VRF proof against the ring root and the dispatched context.
3. On valid proof, dispatch the inner call with the origin resolved to the user's alias for that context.
4. The receiving pallet sees the alias, not the underlying account.
This is the property that lets downstream pallets (game, score, identity, ubc) gate their logic on alias identity while keeping their state unlinkable to user accounts.
## Pallets That Depend on This One
Every other pallet in the PoP set ultimately reads `pallet-people`'s ring root or accepts `under_alias` calls validated against it. The downstream pallets are listed in the [Proof of Personhood overview](/reference/apps/infrastructure/pop/); the foundational guarantee they all rely on is that this pallet's rings represent the current set of real persons on the network.
## Where to Go Next
- Learn **Ring-VRF and Aliases**
---
The cryptographic and runtime mechanism this pallet implements — what Ring-VRF is, what an alias is, how `under_alias` works at the runtime layer.
[:octicons-arrow-right-24: Reference](/reference/apps/infrastructure/pop/ring-vrf-and-aliases/)
---
Page Title: pallet-score Reference
- Resolved Markdown: https://docs.polkadot.com/reference/apps/infrastructure/pop/pallet-score.md
- Canonical (HTML): https://docs.polkadot.com/reference/apps/infrastructure/pop/pallet-score/
- Summary: The PoP pallet for personhood-anchored reputation and scoring — per-alias scores that accumulate while staying unlinkable to user accounts.
- Word Count: 486; Token Estimate: 706
- Last Updated: 2026-06-16T14:17:44+00:00
- Version Hash: sha256:9d253337e5d33bf68dcc408519fbce84bf0be1a80506312024e7f92eaa8bf072
# `pallet-score`
## Introduction
`pallet-score` is the Proof of Personhood pallet for personhood-anchored reputation and scoring. It records per-alias scores that accumulate from on-chain activity, providing a primitive that a Product (or another pallet) can read to make decisions: "has this real person built up enough reputation in this context to be trusted with X?"
The pallet's storage is keyed by alias, so two scores belonging to the same user across different Products do not link to each other or to the user's account.
!!! warning "Provisional"
The exact dispatch surface of `pallet-score` — what extrinsics adjust scores, what events cause automatic adjustments, the scoring rules, the storage shape — is still being finalized. This page documents the conceptual responsibilities; the per-extrinsic reference will be added once the surface confirms.
## What the Pallet Records
The conceptual storage is (alias, context) → score:
- A user's _alias_ in a specific context — typically a Product's `.dot` domain — has a per-context score.
- The same user has different aliases in different contexts, so their scores in different contexts are stored under different keys and cannot be linked.
- Scores can be positive (reputation earned) or negative (penalties), depending on the rules the context defines.
The pallet does not impose a single scoring rule; it provides the storage and the alias-scoped key. Other pallets and Products configure how scores adjust.
## Read and Write Paths
Two paths interact with `pallet-score`:
- **Adjustment dispatch**: A call (typically under `under_alias`, but other patterns are possible) increments or decrements the score for the calling alias. Whether a Product can adjust scores directly, or whether adjustments are gated to specific privileged callers, depends on the context's configuration.
- **Read access**: Anyone can read scores from chain state. The score is associated with an alias, so a reader cannot trivially identify the underlying user — but the alias is, by design, observable to anyone who knows the context.
## Use Cases
Two common patterns:
- **Sybil-resistant reputation**: A reputation system that needs "real-person reputation" rather than "account reputation" reads from `pallet-score` to confirm the entity it is evaluating is a verified person and to retrieve their cumulative score.
- **Gating with thresholds**: A Product gates a premium feature on a score threshold ("you need at least N reputation in this context to do X"); the threshold check reads from the pallet and the Product's UI only unlocks the feature if it passes.
## Where to Go Next
- Learn **pallet-people**
---
The foundational pallet that issues the aliases this pallet keys on.
[:octicons-arrow-right-24: Reference](/reference/apps/infrastructure/pop/pallet-people/)
- Learn **Ring-VRF and Aliases**
---
The mechanism that makes the alias-scoping property work — why scores under different contexts cannot be linked.
[:octicons-arrow-right-24: Reference](/reference/apps/infrastructure/pop/ring-vrf-and-aliases/)
---
Page Title: pallet-ubc Reference
- Resolved Markdown: https://docs.polkadot.com/reference/apps/infrastructure/pop/pallet-ubc.md
- Canonical (HTML): https://docs.polkadot.com/reference/apps/infrastructure/pop/pallet-ubc/
- Summary: The Universal Basic Capacity pallet — per-person on-chain capacity primitives, including the periodic fee-free transaction quota for verified persons.
- Word Count: 566; Token Estimate: 778
- Last Updated: 2026-06-16T14:17:44+00:00
- Version Hash: sha256:61d0724990e1e28da04c2cea53abb3e2271ec69f914bef2a260cd1d5009faa56
# `pallet-ubc`
## Introduction
`pallet-ubc` is the Universal Basic Capacity pallet. Its job is to give every verified person a periodic on-chain _capacity allotment_ — most notably, a quota of fee-free transactions per period. The motivating use case is the "first interaction is free" pattern: a new user can sign and submit one or more transactions without first acquiring DOT, removing the cold-start friction that gates Web3 onboarding.
For a Product developer, `pallet-ubc` is the mechanism that lets your Product be the first thing a new user touches without forcing them to fund their account before they can do anything.
!!! warning "Provisional"
The exact dispatch surface, the per-period quota amount, the period length, and the precise eligibility rules of `pallet-ubc` on the current build are still being finalized. The "Q11" open question on `pallet-ubc` stable flows is one of the items being firmed up. This page documents the conceptual model; per-extrinsic specifics will be added once confirmed.
## What the Pallet Provides
Three primitives, organized around the per-period capacity model:
- **The capacity allotment**: Each verified person receives a quota per period (the period length and quota amount are runtime parameters). Within the quota, the user can perform certain operations without paying transaction fees.
- **Consumption tracking**: The pallet records each person's consumption against their current period's quota so subsequent operations correctly account for what is remaining.
- **Eligibility checks**: Operations that _can_ be performed under UBC have their eligibility verified at dispatch — a non-verified account, or an account that has already exhausted the period's quota, falls back to the normal fee path.
## When a Product Reaches for UBC
The canonical pattern is the first-interaction onboarding flow:
1. A new user opens a Polkadot Product.
2. The Product has the user complete (or confirm) PoP via the App.
3. The Product invokes a UBC-eligible action — typically a small initial setup transaction, a "welcome" claim, a vote, or an action that establishes the user's presence in your Product.
4. The action goes through under the user's UBC quota; the user has not yet acquired any DOT and is still able to participate.
5. After the UBC quota is exhausted (within the period), subsequent transactions follow the normal fee path; by then the user has had a chance to fund their account through the normal channels.
The pallet's value is largely UX: removing the requirement to acquire and hold DOT before doing anything in the Product.
## Eligibility Constraints
Not every transaction is eligible to consume UBC quota. Typical constraints:
- The user must be a verified person — accounts without PoP cannot consume.
- The operation must be one the runtime has declared UBC-eligible — this is a runtime configuration, not an arbitrary application choice.
- The user must have remaining quota in the current period.
When any of these fail, the transaction does not silently fail — it follows the normal fee path, and the user pays in DOT.
## Where to Go Next
- Learn **pallet-people**
---
The pallet that records PoP status — the eligibility input UBC checks against.
[:octicons-arrow-right-24: Reference](/reference/apps/infrastructure/pop/pallet-people/)
- Guide **Verify Your Identity**
---
The setup step that produces the PoP status UBC requires.
[:octicons-arrow-right-24: Get Started](/reference/apps/infrastructure/pop/)
---
Page Title: Parachain Consensus
- Resolved Markdown: https://docs.polkadot.com/reference/parachains/consensus.md
- Canonical (HTML): https://docs.polkadot.com/reference/parachains/consensus/
- Summary: Understand how the blocks authored by parachain collators are secured by the relay chain validators and how the parachain transactions achieve finality.
- Word Count: 856; Token Estimate: 1250
- Last Updated: 2026-05-27T20:25:14+00:00
- Version Hash: sha256:ad20d2c3b2471eb8fcc31a2d5666c34bd874525900ad49c1e95329f86f338410
# Parachain Consensus
## Introduction
Parachains are independent blockchains built with the Polkadot SDK, designed to leverage Polkadot’s relay chain for shared security and transaction finality. These specialized chains operate as part of Polkadot’s execution sharding model, where each parachain manages its own state and transactions while relying on the relay chain for validation and consensus.
At the core of parachain functionality are collators, specialized nodes that sequence transactions into blocks and maintain the parachain’s state. Collators optimize Polkadot’s architecture by offloading state management from the relay chain, allowing relay chain validators to focus solely on validating parachain blocks.
This guide explores how parachain consensus works, including the roles of collators and validators, and the steps involved in securing parachain blocks within Polkadot’s scalable and decentralized framework.
## The Role of Collators
Collators are responsible for sequencing end-user transactions into blocks and maintaining the current state of their respective parachains. Their role is akin to Ethereum’s sequencers but optimized for Polkadot's architecture.
Key responsibilities include:
- **Transaction sequencing**: Organizing transactions into [Proof of Validity (PoV)](https://wiki.polkadot.com/general/glossary/#proof-of-validity) blocks.
- **State management**: Maintaining parachain states without burdening the relay chain validators.
- **Consensus participation**: Sending PoV blocks to relay chain validators for approval.
## Consensus and Validation
Parachain consensus operates in tandem with the relay chain, leveraging Nominated Proof of Stake (NPoS) for shared security. The process ensures parachain transactions achieve finality through the following steps:
1. **Packaging transactions**: Collators bundle transactions into PoV blocks (parablocks).
2. **Submission to validator**: Parablocks are submitted to a randomly selected subset of relay chain validators, known as paravalidators.
3. **Validation of PoV Blocks**: Paravalidators use the parachain’s state transition function (already available on the relay chain) to verify transaction validity.
4. **Backing and inclusion**: If a sufficient number of positive validations are received, the parablock is backed and included via a para-header on the relay chain.
The following sections describe the actions taking place during each stage of the process.
### Path of a Parachain Block
Polkadot achieves scalability through execution sharding, where each parachain operates as an independent shard with its own blockchain and state. Shared security for all parachains is provided by the relay chain, powered by Nominated Proof of Stake (NPoS). This framework allows parachains to focus on transaction processing and state management, while the relay chain ensures validation and finality.
The journey of parachain transactions to reach consensus and finality can be described as follows:
- Collators and parablocks:
- Collators, specialized nodes on parachains, package transactions into Proof of Validity (PoV) blocks, also called parablocks.
- These parablocks are sent to a subset of relay chain validators, known as paravalidators, for validation.
- The parachain's state transition function (Wasm blob) is not re-sent, as it is already stored on the relay chain.
```mermaid
flowchart TB
%% Subgraph: Parachain
subgraph Parachain
direction LR
Txs[Network Transactions]
Collator[Collator Node]
ParaBlock[ParaBlock + PoV]
Txs -->|Package Transactions| Collator
Collator -->|Create| ParaBlock
end
subgraph Relay["Relay Chain"]
ParaValidator
end
%% Main Flow
Parachain -->|Submit To| Relay
```
- Validation by paravalidators:
- Paravalidators are groups of approximately five relay chain validators, randomly assigned to parachains and shuffled every minute.
- Each paravalidator downloads the parachain's Wasm blob and validates the parablock by ensuring all transactions comply with the parachain’s state transition rules.
- Paravalidators sign positive or negative validation statements based on the block’s validity.
- Backing and approval:
- If a parablock receives sufficient positive validation statements, it is backed and included on the relay chain as a para-header.
- An additional approval process resolves disputes. If a parablock contains invalid transactions, additional validators are tasked with verification.
- Validators who back invalid parablocks are penalized through slashing, creating strong incentives for honest behavior.
```mermaid
flowchart
subgraph RelayChain["Relay Chain"]
direction TB
subgraph InitialValidation["Initial Validation"]
direction LR
PValidators[ParaValidators]
Backing[Backing
Process]
Header[Submit Para-header
on Relay Chain]
end
subgraph Secondary["Secondary Validation"]
Approval[Approval
Process]
Dispute[Dispute
Resolution]
Slashing[Slashing
Mechanism]
end
end
%% Validation Process
PValidators -->|Download
Wasm
Validate Block| Backing
Backing -->|If Valid
Signatures| Header
InitialValidation -->|Additional
Verification| Secondary
%% Dispute Flow
Approval -->|If Invalid
Detected| Dispute
Dispute -->|Penalize
Dishonest
Validators| Slashing
```
It is important to understand that relay chain blocks do not store full parachain blocks (parablocks). Instead, they include para-headers, which serve as summaries of the backed parablocks. The complete parablock remains within the parachain network, maintaining its autonomy while relying on the relay chain for validation and finality.
## Where to Go Next
Explore more about Parachain consensus through these resources:
- Learn __Elastic Scaling__
---
Learn more about how Elastic Scaling boosts parachain performance.
[:octicons-arrow-right-24: Elastic Scaling](/reference/parachains/consensus/elastic-scaling/)
- Learn __Asynchronous Backing__
---
Read about pipelining parachain block production via Async Backing.
[:octicons-arrow-right-24: Asynchronous Backing](/reference/parachains/consensus/async-backing/)
- Learn __Parachain Wiki__
---
Explore more on Parachains in the Wiki.
[:octicons-arrow-right-24: Parachains](https://wiki.polkadot.com/learn/learn-parachains/)
---
Page Title: Parachains Overview
- Resolved Markdown: https://docs.polkadot.com/reference/parachains.md
- Canonical (HTML): https://docs.polkadot.com/reference/parachains/
- Summary: Learn about parachains, specialized blockchains on Polkadot that gain shared security and interoperability. Discover how they work and the tools to build them.
- Word Count: 1012; Token Estimate: 1706
- Last Updated: 2026-05-27T20:25:14+00:00
- Version Hash: sha256:4420c2a6316058662ff876d3d56cc41bf901bac99661daff6c190e7e1a9e5c95
# Parachains Overview
## Introduction
A Parachain is a specialized blockchain that connects to the Polkadot relay chain, benefiting from shared security, interoperability, and scalability. Parachains are built using the [Polkadot SDK](https://github.com/paritytech/polkadot-sdk), a powerful toolkit written in Rust that provides everything needed to create custom blockchain logic while integrating seamlessly with the Polkadot network.
Unlike standalone blockchains that must bootstrap their own validator sets and security, parachains leverage Polkadot's pooled security model. This allows parachain developers to focus on their application-specific functionality rather than consensus and security infrastructure. Parachains can communicate with each other through Cross-Consensus Messaging (XCM), enabling seamless interoperability across the Polkadot ecosystem.
Key capabilities that parachains provide include:
- **Shared security**: Inherit security from Polkadot's validator set without maintaining your own.
- **Interoperability**: Communicate trustlessly with other parachains via XCM.
- **Scalability**: Process transactions in parallel with other parachains.
- **Customization**: Build application-specific logic tailored to your use case.
- **Upgradeability**: Upgrade runtime logic without hard forks.
## Polkadot SDK: Parachain Architecture
Building a parachain involves understanding and utilizing several key components of the Polkadot SDK:
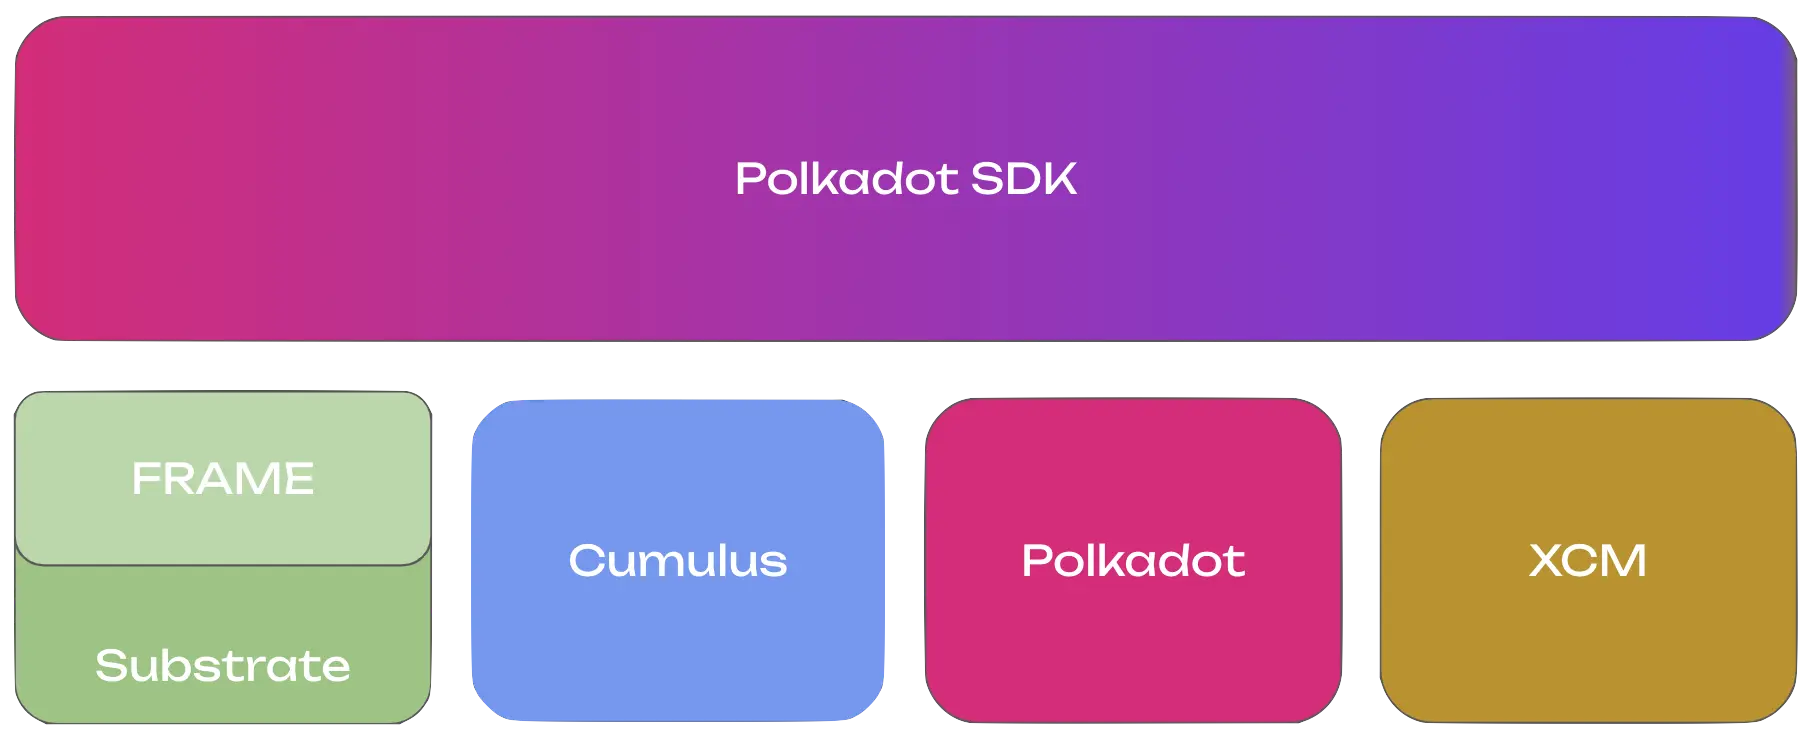
- **[Substrate](https://paritytech.github.io/polkadot-sdk/master/polkadot_sdk_docs/polkadot_sdk/substrate/index.html)**: The foundation providing core blockchain primitives and libraries.
- **[FRAME](https://paritytech.github.io/polkadot-sdk/master/polkadot_sdk_docs/polkadot_sdk/frame_runtime/index.html)**: A modular framework for building your parachain's runtime logic.
- **[Cumulus](https://paritytech.github.io/polkadot-sdk/master/polkadot_sdk_docs/polkadot_sdk/cumulus/index.html)**: Essential libraries and pallets that enable parachain functionality.
- **[XCM (Cross Consensus Messaging)](https://paritytech.github.io/polkadot-sdk/master/polkadot_sdk_docs/polkadot_sdk/xcm/index.html)**: The messaging format for communicating with other parachains and the relay chain.
- **[Polkadot](https://paritytech.github.io/polkadot-sdk/master/polkadot_sdk_docs/polkadot_sdk/polkadot/index.html)**: The relay chain that provides security and coordination.
### Substrate: The Foundation
Substrate provides the core infrastructure that every parachain is built upon. It handles the low-level blockchain functionality, allowing you to focus on your application's unique features. Substrate includes implementations for networking, database management, consensus participation, and the execution environment for your runtime.
Every Polkadot SDK node consists of two main components:
- **Client (Host)**: Handles infrastructure services.
- Native binary that runs on validator and collator nodes.
- Executes the Wasm-compiled runtime.
- Manages networking, database, mempool, and block production.
- Interfaces with the relay chain for validation.
- **Runtime (State Transition Function)**: Contains your business logic.
- Defines how your Polkadot SDK node processes transactions.
- Compiled to [Wasm](https://webassembly.org/) for deterministic execution.
- Stored on-chain and upgradeable via governance.
```mermaid
%%{init: {'flowchart': {'padding': 5, 'nodeSpacing': 50, 'rankSpacing': 10}}}%%
graph TB
classDef title font-size:20px,font-weight:bold,stroke-width:0px
classDef clientStyle font-size:16px,font-weight:bold
classDef clientSubNodeStyle margin-top:10px
classDef runtimeCallExecutorStyle padding-top:10px
subgraph sg1[Parachain
Node]
direction TB
I[RuntimeCall Executor]
B[Wasm Runtime - STF]
subgraph sg2[Client]
direction TB
C[Network and Blockchain
Infrastructure Services
+ Relay Chain Interface]
end
I --> B
end
class sg1 title
class sg2 clientStyle
class C clientSubNodeStyle
class I runtimeCallExecutorStyle
```
### FRAME: Building Blocks for Your Runtime
FRAME provides a modular component called a Pallet that you can configure and combine to build your parachain's runtime. Each pallet provides specific functionality that you can customize for your needs. This modular approach allows you to quickly assemble complex functionality without writing everything from scratch.
```mermaid
graph LR
subgraph SP["Parachain Runtime"]
direction LR
Timestamp ~~~ Aura ~~~ ParachainSystem
Balances ~~~ TransactionPayment ~~~ Sudo
subgraph Timestamp["Timestamp"]
SS1[Custom Config]
end
subgraph Aura["Aura"]
SS2[Custom Config]
end
subgraph ParachainSystem["Parachain System"]
SS3[Custom Config]
end
subgraph Balances["Balances"]
SS4[Custom Config]
end
subgraph TransactionPayment["Transaction Payment"]
SS5[Custom Config]
end
subgraph Sudo["Sudo"]
SS6[Custom Config]
end
style Timestamp stroke:#FF69B4
style Aura stroke:#FF69B4
style ParachainSystem stroke:#FF69B4
style Balances stroke:#FF69B4
style TransactionPayment stroke:#FF69B4
style Sudo stroke:#FF69B4
style SS1 stroke-dasharray: 5
style SS2 stroke-dasharray: 5
style SS3 stroke-dasharray: 5
style SS4 stroke-dasharray: 5
style SS5 stroke-dasharray: 5
style SS6 stroke-dasharray: 5
end
subgraph AP["Available FRAME Pallets"]
direction LR
A1[Aura]~~~A2[Parachain
System]~~~A3[Transaction
Payment]~~~A4[Sudo]
B1[Identity]~~~B2[Balances]~~~B3[Assets]~~~B4[EVM]
C1[Timestamp]~~~C2[Staking]~~~C3[Contracts]~~~C4[and more...]
end
AP --> SP
```
### Cumulus: Parachain-Specific Functionality
Cumulus is what transforms a Polkadot SDK-based runtime into a parachain-capable runtime. It provides the essential components for communicating with the relay chain, participating in Polkadot's consensus, and handling parachain-specific operations like block validation and collation.
Key Cumulus components include:
- **Parachain system pallet**: Core parachain functionality and relay chain communication.
- **Collator consensus**: Block production logic for parachain collators.
- **Relay chain interface**: APIs for interacting with the Polkadot relay chain.
- **Validation data**: Handling proof-of-validity data required by relay chain validators.
## Where to Go Next
Building a parachain requires understanding the relationship between your chain and the Polkadot relay chain. The Polkadot SDK provides all the tools needed to design custom runtime logic, enable cross-chain communication, and deploy your parachain to production.
The following sections provide detailed guidance on each aspect of parachain development, from initial design through deployment and ongoing maintenance.
- Guide __Launch a Simple Parachain__
---
Walk through the complete parachain launch flow: from setup and deployment to obtaining coretime.
[:octicons-arrow-right-24: Deploy](/parachains/launch-a-parachain/set-up-the-parachain-template/)
- Guide __Customize Your Runtime__
---
Design your parachain's runtime logic and choose appropriate pallets for your use case.
[:octicons-arrow-right-24: Get Started](/parachains/customize-runtime/)
- Guide __Interoperability__
---
Implement XCM for trustless cross-chain communication with other parachains.
[:octicons-arrow-right-24: Learn More](/parachains/interoperability/get-started/)
- Guide __Runtime Upgrades__
---
Upgrade your parachain's runtime without hard forks using forkless upgrade mechanisms.
[:octicons-arrow-right-24: Maintain](/parachains/runtime-maintenance/runtime-upgrades/)
---
Page Title: Payment Method Group
- Resolved Markdown: https://docs.polkadot.com/reference/apps/protocol/truapi/payment.md
- Canonical (HTML): https://docs.polkadot.com/reference/apps/protocol/truapi/payment/
- Summary: TrUAPI method group for payment flows, including the standard Balances transfer surface and the Pocket peer-to-peer flow for Product payments.
- Word Count: 356; Token Estimate: 534
- Last Updated: 2026-06-16T14:17:44+00:00
- Version Hash: sha256:5d4a4d615a9cddaa7a85acc1775cafd8747629844911f6dac35d1e05bb35cab8
# Payment
## Introduction
The Payment method group lets a Product accept or initiate payments. Payments are signed transactions like any other transaction, but this group collects the two payment shapes a Product is most likely to need, the standard `Balances.transfer_keep_alive` flow and the personhood-aware Pocket flow.
For most Product use cases, this group is consumed through `@parity/product-sdk-tx` and helpers in `@parity/product-sdk-utils` (formatting, validation), with the same `signAndSubmit` round trip every other signed call goes through.
## Conceptual Contract
The group covers:
- **Building a payment request**: The Product encodes what a merchant is asking for, including recipient, amount, and optional memo, into a payload the payer's Product can parse and pre-fill into a transfer form. No on-chain interaction happens at request-build time; the request is an application-layer payload.
- **Constructing a transfer extrinsic**: Given a validated recipient and a planck-denominated amount, building a `Balances.transfer_keep_alive` (or `transfer_allow_death` when the sender intends to drain the account) ready to sign.
- **Submitting and watching the payment**: The Product passes the extrinsic through the standard Signing surface and observes status transitions of `signing`, `broadcasting`, `in-block`, and `finalized`.
- **Pocket variant**: Pocket is personhood-aware and two-sided. The sender acts on Desktop, the receiver acts on the App, and the receiver explicitly accepts or declines. See [Pocket on Polkadot Desktop](/reference/apps/hosts/polkadot-desktop/pocket/) for the conceptual model.
The Payment group does not introduce new signing semantics. Every payment-side transaction still routes through the per-transaction approval flow on the paired App.
!!! warning "Provisional"
The Pocket-specific TrUAPI methods (whether and how a Product can initiate a Pocket transfer programmatically versus relying on Host UI), payment-request URL formats as a canonical wire format, and any asset-aware extensions (multi-asset transfers, pUSD-specific calls) are still being finalized.
## Where to Go Next
- Learn **Pocket on Polkadot Desktop**
---
The Pocket send flow's conceptual model and how it pairs with the App-side recipient view.
[:octicons-arrow-right-24: Reference](/reference/apps/hosts/polkadot-desktop/pocket/)
---
Page Title: People Chain
- Resolved Markdown: https://docs.polkadot.com/reference/polkadot-hub/people-and-identity.md
- Canonical (HTML): https://docs.polkadot.com/reference/polkadot-hub/people-and-identity/
- Summary: Learn how People chain secures decentralized identity management, empowering users to control and verify digital identities without central authorities.
- Word Count: 606; Token Estimate: 879
- Last Updated: 2026-01-14T11:42:16+00:00
- Version Hash: sha256:e1ee302b7b89f14716a94d1f3bf67a551776792828b5996aa8f2d0ac7eb34a1b
# People Chain
## Introduction
People chain is a specialized parachain within the Polkadot ecosystem dedicated to secure, decentralized identity management.
This solution empowers users to create, control, and verify their digital identities without reliance on centralized authorities. By prioritizing user sovereignty and data privacy, People chain establishes a foundation for trusted interactions throughout the Polkadot ecosystem while returning control of personal information to individuals.
## Identity Management System
People chain provides a comprehensive identity framework allowing users to:
- Establish verifiable on-chain identities.
- Control disclosure of personal information.
- Receive verification from trusted registrars.
- Link multiple accounts under a unified identity.
Users must reserve funds in a bond to store their information on chain. These funds are locked, not spent, and returned when the identity is cleared.
### Sub-Identities
The platform supports hierarchical identity structures through sub-accounts:
- Primary accounts can establish up to 100 linked sub-accounts.
- Each sub-account maintains its own distinct identity.
- All sub-accounts require a separate bond deposit.
## Verification Process
### Judgment Requests
After establishing an on-chain identity, users can request verification from [registrars](#registrars):
1. Users specify the maximum fee they're willing to pay for judgment.
2. Only registrars whose fees fall below this threshold can provide verification.
3. Registrars assess the provided information and issue a judgment.
### Judgment Classifications
Registrars can assign the following confidence levels to identity information:
- **Unknown**: Default status; no judgment rendered yet.
- **Reasonable**: Data appears valid but without formal verification (standard for most verified identities).
- **Known good**: Information certified correct through formal verification (requires documentation; limited to registrars).
- **Out of date**: Previously verified information that requires updating.
- **Low quality**: Imprecise information requiring correction.
- **Erroneous**: Incorrect information, potentially indicating fraudulent intent.
A temporary "Fee Paid" status indicates judgment in progress. Both "Fee Paid" and "Erroneous" statuses lock identity information from modification until resolved.
### Registrars
Registrars serve as trusted verification authorities within the People chain ecosystem. These entities validate user identities and provide attestations that build trust in the network.
- Registrars set specific fees for their verification services.
- They can specialize in verifying particular identity fields.
- Verification costs vary based on complexity and thoroughness.
When requesting verification, users specify their maximum acceptable fee. Only registrars whose fees fall below this threshold can provide judgment. Upon completing the verification process, the user pays the registrar's fee, and the registrar issues an appropriate confidence level classification based on their assessment.
Multiple registrars operate across the Polkadot and People chain ecosystems, each with unique specializations and fee structures. To request verification:
1. Research available registrars and their verification requirements.
2. Contact your chosen registrar directly through their specified channels.
3. Submit required documentation according to their verification process.
4. Pay the associated verification fee.
You must contact specific registrars individually to request judgment. Each registrar maintains its own verification procedures and communication channels.
## Where to Go Next
- External __Polkadot.js Guides about Identity__
---
Step-by-step instructions for managing identities through the Polkadot.js interface, with practical examples and visual guides.
[:octicons-arrow-right-24: Reference](https://wiki.polkadot.com/learn/learn-guides-identity/)
- External __How to Set and Clear an Identity__
---
Practical walkthrough covering identity setup and removal process on People chain.
[:octicons-arrow-right-24: Reference](https://support.polkadot.network/support/solutions/articles/65000181981-how-to-set-and-clear-an-identity)
- External __People Chain Runtime Implementation__
---
Source code for the People chain runtime, detailing the technical architecture of decentralized identity management.
[:octicons-arrow-right-24: Reference](https://github.com/polkadot-fellows/runtimes/tree/main/system-parachains/people)
---
Page Title: Permissions in Polkadot Desktop
- Resolved Markdown: https://docs.polkadot.com/reference/apps/hosts/polkadot-desktop/permissions.md
- Canonical (HTML): https://docs.polkadot.com/reference/apps/hosts/polkadot-desktop/permissions/
- Summary: Reference for how Polkadot Desktop enforces sandbox permissions a Product declares, including capability types, manifest declaration, and denial UX.
- Word Count: 518; Token Estimate: 709
- Last Updated: 2026-06-16T14:17:44+00:00
- Version Hash: sha256:652be9fbeaef2c89c9198256df1af0657dd47d61e10039e7b90d2b87f0fc2e0d
# Permissions
## Introduction
A Polkadot Product runs inside a Host-governed sandbox; it cannot reach the network, the chain, the user's microphone, or any other resource without an explicit permission. Permissions are declared in your Product's manifest and enforced by Polkadot Desktop at the Host API boundary. This page is the reference for what each permission means, how the declaration works, and what happens when the user denies a permission.
## Capability Types
!!! warning "Provisional"
The exact permission taxonomy on the active Desktop build is still being finalized. The capabilities below are the ones a Product developer encounters in this surface; the complete reference (every permission name, its scope, and its enforcement point) will be added once the taxonomy is confirmed.
The three permissions most Products will encounter:
- **`Microphone`**: Grants the Product audio-input access. Standard browser-style media permission.
- **`ExternalRequest`**: Grants the Product the ability to make outbound HTTP requests to URLs that match a declared pattern. The pattern is part of the declaration, not requested at runtime. Your manifest says "my Product needs to talk to `https://api.example.com/v1/*`", and Desktop blocks any request the Product makes to URLs outside that pattern, even if the user granted the permission. Pattern scoping is the boundary, not user consent.
- **`ChainSubmit`**: Grants the Product the ability to request a transaction signing. Despite the name, this does not authorize Desktop to sign for the user; every individual transaction still requires a per-request approval on the paired App. See [Signing](/reference/apps/hosts/polkadot-desktop/signing/) for the full model.
## Declaring Permissions
Permissions are declared in your Product's manifest. The declaration is static: your Product cannot dynamically request new permission types at runtime. If a future feature needs a permission you did not declare, you publish a new bundle with an updated manifest and the user re-approves on first open of the new version.
On the first time a user opens your Product, Desktop presents the declared permissions as prompts. The user grants or denies each one. Their decision is persisted; subsequent opens of the same Product do not re-prompt unless the manifest changes.
## Denial UX
When a permission is denied:
- **Capability response**: The capability returns `PermissionDenied` every time the Product attempts to use it. Your Product code should handle this error explicitly: show the user why the feature cannot proceed and what they can do about it.
- **Desktop prompt**: Desktop surfaces an "Enable access in App Settings" prompt alongside your Product's error UI, pointing the user to the settings screen where they can flip the permission back on.
A Product that crashes on `PermissionDenied` (instead of falling through to a graceful "this feature needs X, enable it in Settings" state) is failing this contract. The denial path is part of the normal control flow, not an exception.
## Where to Go Next
- Learn **Signing**
---
The signing model that the `ChainSubmit` permission gates: what the permission grants and what it does not grant.
[:octicons-arrow-right-24: Reference](/reference/apps/hosts/polkadot-desktop/signing/)
---
Page Title: Permissions Method Group
- Resolved Markdown: https://docs.polkadot.com/reference/apps/protocol/truapi/permissions.md
- Canonical (HTML): https://docs.polkadot.com/reference/apps/protocol/truapi/permissions/
- Summary: TrUAPI method group for declaring, querying, and gating on Product capabilities, including the ChainSubmit, ExternalRequest, and Microphone surfaces.
- Word Count: 395; Token Estimate: 564
- Last Updated: 2026-06-16T14:17:44+00:00
- Version Hash: sha256:084802d73d3a92119becce9d40151d2b6f4145154c4301f4edd1d9fe56e605f3
# Permissions
## Introduction
The Permissions method group is the gate every other method group implicitly passes through. Before a Product can sign a transaction, make an outbound request, or access the microphone, the Host checks two things: did the Product declare the required permission, and did the user grant it? This method group is how a Product reads its own permission state, and how the Host enforces it.
Most Products do not call these methods explicitly. Declarations live in the Product's manifest, and gating happens at the boundary of the methods that actually need a permission, such as signing, network, and media. The Permissions method group exposes the runtime query surface for checking whether a permission is granted.
## Conceptual Contract
Three things sit in this group:
- **Permission queries**: A Product can check whether a given capability is granted, such as with `isGranted("ChainSubmit")`. The shape lets a Product branch on permission state without trying the capability and catching `PermissionDenied`.
- **Permission grants and re-prompts**: The Host can expose runtime prompts for capabilities the user can elect at runtime rather than at install. The set of runtime-elective permissions versus install-time-only permissions is part of the Host's policy.
- **Permission-denied error reporting**: Every capability-gated method group bubbles up consistently, so a Product can treat `PermissionDenied` as a uniform failure mode wherever it happens.
!!! note "Permission names: spec vs. Host-side aliases"
Some permission names in this documentation are Host-side normalizations, not the literal identifiers in the TrUAPI v0.2 spec. In particular, `ExternalRequest` (outbound network access) is a Polkadot Desktop alias; the protocol-level construct is `RemotePermission::Remote(Vec)`, which carries the list of permitted hosts. A Host implementer reading the spec should map the friendly names used here to their spec enum variants.
For the conceptual model, see the [Polkadot Desktop Permissions](/reference/apps/hosts/polkadot-desktop/permissions/) reference.
!!! warning "Provisional"
The exhaustive permission taxonomy and the exact runtime-query surface (method names, parameter shapes, return values) are still being finalized. This page documents the conceptual contract; the per-method specifics will be added as the surface confirms.
## Where to Go Next
- Learn **Polkadot Desktop Permissions**
---
Host-side enforcement: capability types, manifest declaration, and the denial UX.
[:octicons-arrow-right-24: Reference](/reference/apps/hosts/polkadot-desktop/permissions/)
---
Page Title: Pocket Recipient in the Polkadot App
- Resolved Markdown: https://docs.polkadot.com/reference/apps/hosts/polkadot-app/pocket.md
- Canonical (HTML): https://docs.polkadot.com/reference/apps/hosts/polkadot-app/pocket/
- Summary: Reference for how the Polkadot App receives a Pocket transfer initiated from Desktop, including the recipient-side flow for funds or assets.
- Word Count: 370; Token Estimate: 499
- Last Updated: 2026-06-16T14:17:44+00:00
- Version Hash: sha256:ba7aec517cbc7b211155090b517ba573ad64531fd9c16555e2b354c7a6d150eb
# Pocket Recipient
## Introduction
Pocket is Polkadot Desktop's send flow, a feature that lets a Desktop user package a payment or asset transfer and route it to a recipient identified by their App identity. This page documents the App-side counterpart, covering how the Polkadot App receives a Pocket transfer initiated from Desktop and the user-visible flow inside the App.
The Desktop sender-side view is documented at [Pocket Send Flow in Polkadot Desktop](/reference/apps/hosts/polkadot-desktop/pocket/). This page is the receiver's view.
!!! warning "Provisional"
The recipient-side flow inside the App is still being defined. The exact handshake between Desktop's Pocket dispatch and the App's incoming-Pocket UI, the notification surface, and the accept and decline mechanics are still being finalized. This page captures the conceptual model only; the detailed flow and any sequence diagram will be added once they are confirmed.
## Conceptual Model
From the recipient's perspective:
- A Desktop user (the sender) initiates a Pocket transfer addressed to the recipient's paired App identity.
- The transfer arrives at the App as a pending incoming item, surfaced to the recipient in the App's UI.
- The recipient reviews and either accepts or declines the transfer.
- On accept, the transfer settles to the recipient's account. On decline (or timeout), it does not.
The distinguishing property of Pocket relative to a plain `Balances.transfer_keep_alive` is the accept step. A standard transfer settles unilaterally, so the recipient cannot reject it. Pocket's two-sided flow gives the recipient a chance to refuse, which matters when the transfer is contextually meaningful (an in-band payment between users who know each other) rather than a balance change.
The Product-developer surface that bridges to Pocket is part of the open question above, including whether a Product can initiate a Pocket transfer programmatically, or only the Desktop UI can. Once resolved, the integration pattern will be documented here.
## Where to Go Next
- Reference **Payment Method Group**
---
The TrUAPI method group covering `Balances.transfer_keep_alive` and the Pocket peer-to-peer payment flow available to Products.
[:octicons-arrow-right-24: View Reference](/reference/apps/protocol/truapi/payment/)
---
Page Title: Pocket Send Flow in Polkadot Desktop
- Resolved Markdown: https://docs.polkadot.com/reference/apps/hosts/polkadot-desktop/pocket.md
- Canonical (HTML): https://docs.polkadot.com/reference/apps/hosts/polkadot-desktop/pocket/
- Summary: Reference for Pocket, Polkadot Desktop's peer-to-peer send flow with personhood-aware addressing, and how it pairs with the App-side recipient view.
- Word Count: 520; Token Estimate: 707
- Last Updated: 2026-06-16T14:17:44+00:00
- Version Hash: sha256:c98f9c618ea366d3e0b055134c764fef545a951e711e8b45bac2534affa2e90c
# Pocket
## Introduction
Pocket is Polkadot Desktop's peer-to-peer send flow. From the sender's side, Pocket is a UI in Desktop that lets a user package a payment or asset transfer addressed to another real person. The recipient is identified by their personhood identity in Polkadot's network, not necessarily by their account address. The receiver sees the incoming transfer in their paired Polkadot App and can accept or decline.
This page is the sender's view. The App-side receiver view is documented at [Pocket Recipient](/reference/apps/hosts/polkadot-app/pocket/).
!!! warning "Provisional"
Pocket's exact developer surface is still being finalized, including whether a Product can initiate a Pocket transfer programmatically, the supported asset types and amounts, and the cross-chain routing details. This page captures the conceptual model and the user-visible flow only; the API-level reference and any sequence diagram will be added once the surface is confirmed.
## Conceptual Model
Three properties distinguish Pocket from a plain `Balances.transfer_keep_alive`:
- **Personhood-aware addressing**: Instead of (or alongside) an SS58 account address, the sender can address a transfer to a recipient identified by their personhood. The sender does not need to know the recipient's account up front. The recipient resolves to the right address inside their App.
- **Two-sided confirmation**: A standard transfer settles unilaterally, so the recipient cannot refuse it. A Pocket transfer arrives at the recipient's App as a pending item; the recipient explicitly accepts or declines. On accept, it settles; on decline (or timeout), it does not.
- **Split UX**: The sender UX lives in Desktop, and the receiver UX lives in the App. The two sides of the flow are deliberately on different devices: the sender packages the transfer at a desk, the receiver approves on their phone with the same per-transaction approval model that gates every signed action.
## What the User Sees
From the sender's side in Desktop:
1. The sender opens Pocket from Desktop's UI and selects a recipient (by personhood identifier, contact name, or address).
2. The sender enters the amount and any optional memo.
3. The sender confirms in Desktop, which triggers the standard signing modal and routes a per-transaction approval to the sender's own paired App.
4. After the sender approves on their App, Desktop dispatches the Pocket transfer.
5. The recipient sees an incoming Pocket item in their App and either accepts or declines (see [Pocket Recipient](/reference/apps/hosts/polkadot-app/pocket/)).
For everyday merchant-style payments where the payer is responsive in a browser or a Product, and the merchant wants the funds settled, use the standard `Balances.transfer_keep_alive` flow. Pocket is the right tool when the recipient identity matters more than the recipient address, and when accept-decline semantics fit the interaction.
## Where to Go Next
- Learn **Pocket Recipient (App side)**
---
The other half of the round trip: what a Pocket transfer looks like to the recipient, including the accept and decline mechanics.
[:octicons-arrow-right-24: Reference](/reference/apps/hosts/polkadot-app/pocket/)
---
Page Title: Polkadot App Reference
- Resolved Markdown: https://docs.polkadot.com/reference/apps/hosts/polkadot-app.md
- Canonical (HTML): https://docs.polkadot.com/reference/apps/hosts/polkadot-app/
- Summary: Reference for the Polkadot App, the mobile Host in the Triangle that holds the user's signing key, runs PoP, and approves every Product transaction.
- Word Count: 712; Token Estimate: 1113
- Last Updated: 2026-06-16T14:17:44+00:00
- Version Hash: sha256:6fa48dbbd281e0ce6bc7e77b7be07346c6c551d15ba9c66076b1d8d4595e4dd5
# Polkadot App
## Introduction
The Polkadot App is the mobile wallet that holds every Polkadot Product user's private key. It runs on the user's phone and is the only place in the [Polkadot Triangle](/reference/glossary/#triangle) where the key lives — [Polkadot Desktop](/reference/apps/hosts/polkadot-desktop/) and [Polkadot Web](/reference/apps/hosts/polkadot-web/) never touch it.
From a Product developer's perspective, the App plays three roles no other Host plays:
- **It holds the user's private key**: The key lives on the device, in the App's on-device storage. No other Host and no Product ever sees the key.
- **It signs every transaction**: Every signing request that originates from a Product — whether the Product runs inside Desktop or Web — is routed back to the App for the user to approve on their phone.
- **It runs Proof of Personhood**: [Proof of Personhood](pop/) is the privacy-preserving "real human" check that unlocks alias-gated features. The verification happens inside the App; the Product never sees who the user is.
The App also exposes two groups of features that Products integrate against:
- **Host-level features**: [Chat](chat/) is the messaging surface that pairs the [Statement Store](/reference/apps/infrastructure/statement-store/) and [Bulletin Chain](/reference/apps/infrastructure/bulletin-chain/). [Sign In with Polkadot](sign-in/) is the cross-Host authentication handshake initiated by Desktop or Web.
- **Payment-side features**: [Coinage](coinage/) is the peer-to-peer payment flow. [Pocket](pocket/) is the App-side recipient counterpart to Desktop's Pocket send flow.
## How It Works
From a Product developer's perspective, three things matter about how the App runs:
- **Session pairing**: Pairing establishes a session, not a copy of the key. When the user pairs the App with Polkadot Desktop, the App returns a derived _session public key_ (see [Install Desktop and Pair](/apps/get-started/)). Desktop stores that public key so it can identify the user and construct per-Product sub-accounts. The private key never leaves the phone.
- **Asynchronous signing**: Signing is asynchronous because it happens on a separate device. When a Product calls `signAndSubmit`, Desktop renders a signing modal locally, but the actual signature happens on the user's phone after they approve in the App. Build UI that tolerates the round-trip; see the [Sign and Submit Transactions](/apps/build/sign-and-submit/) guide for the patterns.
- **PoP verification**: The App is the only place PoP runs. A Product can gate features on Proof of Personhood (alias-based or general personhood), but the verification flow itself happens in the App. The Product never sees the underlying biometric or the user's identity record, only the alias or alias-proof it requested through TrUAPI.
## Where the App Fits in the SDK Surface
The App is both a consumer and a producer of [TrUAPI](/reference/apps/protocol/truapi/) methods:
- The App consumes Host API methods for chain interaction and storage when its own features (Chat, Coinage, PoP) need to talk to the People Chain, Statement Store, or Bulletin Chain.
- The App produces the signing primitive every other Host's `signAndSubmit` ultimately resolves against. Methods Products call through the SDK — like `createProof` and `getAnonymousAlias` — complete in the App on the user's phone.
## Where to Go Next
- Learn **Chat**
---
The in-App messaging surface: room/bot registration, the typed-message system, and how Chat composes the Statement Store with the Bulletin Chain.
[:octicons-arrow-right-24: Reference](/reference/apps/hosts/polkadot-app/chat/)
- Learn **Proof of Personhood**
---
Where the App's PoP verification happens, what Ring-VRF aliases are, and the PoP Full vs PoP Lite tier model.
[:octicons-arrow-right-24: Reference](/reference/apps/hosts/polkadot-app/pop/)
- Learn **Sign In with Polkadot**
---
The Host-level handshake the App resolves when Desktop or Web wants to authenticate a session against the paired identity.
[:octicons-arrow-right-24: Reference](/reference/apps/hosts/polkadot-app/sign-in/)
- Guide **Accounts and Signing**
---
The how-to guide for wiring a Product up to a paired account and submitting signed transactions through the SDK.
[:octicons-arrow-right-24: Get Started](/apps/build/sign-and-submit/)
---
Page Title: Polkadot Desktop Reference
- Resolved Markdown: https://docs.polkadot.com/reference/apps/hosts/polkadot-desktop.md
- Canonical (HTML): https://docs.polkadot.com/reference/apps/hosts/polkadot-desktop/
- Summary: Reference for Polkadot Desktop, the desktop Host that loads Products by .dot name, mediates signing to the App, and enforces sandbox permissions.
- Word Count: 671; Token Estimate: 1090
- Last Updated: 2026-06-16T14:17:44+00:00
- Version Hash: sha256:f5317dea45acadb53d1873cc8a99dc26e22bc500ec6f3c59da0a38ae1ad2fb26
# Polkadot Desktop
## Introduction
Polkadot Desktop is the workstation app where developers and users actually run Polkadot Products. Think of it as a specialized browser — but instead of typing a URL, the user types a `.dot` name, and instead of rendering arbitrary web pages, Desktop fetches a published Product bundle from decentralized cloud storage and runs it inside a sandbox where signing, storage, and outbound network requests are all mediated by the Host.
Desktop never holds the user's private key. The key lives on the paired [Polkadot App](/reference/apps/hosts/polkadot-app/) on the user's phone. Desktop holds only a derived session public key, enough to identify the user and construct per-Product accounts. Every signing operation routes back to the App for user approval.
This section documents Desktop's developer-facing surface: how a Product runs inside it, how signing works end to end, how the permissions model enforces sandbox boundaries, and how Desktop exposes [Statement Store](/reference/apps/hosts/polkadot-desktop/statement-store/), [Preimage](/reference/apps/hosts/polkadot-desktop/preimage/), and [Pocket](/reference/apps/hosts/polkadot-desktop/pocket/) features to Products and users.
## How It Works
From a Product developer's perspective, three properties define how Desktop behaves:
- **`.dot`-name addressing**: A published Product is addressed by its `.dot` name. Desktop resolves the name through [dotNS](/reference/apps/infrastructure/dotns/), fetches the published bundle, and loads it in the sandbox. During development, Desktop's address bar accepts `localhost:PORT` as a whitelisted bypass so you can iterate against a local dev server. See [Set Up Your Project](/apps/build/#set-up-your-project).
- **Sandboxed runtime**: A Product runs inside a sandboxed container, not an arbitrary browser tab. It cannot make outbound network requests, access local storage, or sign transactions except through the Host API. See [Permissions](/reference/apps/hosts/polkadot-desktop/permissions/).
- **Mediated signing**: Every transaction a Product submits, whether dispatched through the Product SDK or directly through TrUAPI, goes through Desktop's signing modal and on to the paired App. There is no path for a Product to sign without user approval. See [Signing](/reference/apps/hosts/polkadot-desktop/signing/).
## Where Desktop Fits in the SDK Surface
Desktop both consumes and produces the [TrUAPI](/reference/apps/protocol/truapi/) surface:
- It consumes Host API methods from the App (signing, PoP proofs) and from infrastructure layers (Bulletin Chain, Statement Store, dotNS) when its own features (Pocket, Preimage, Statement Store mediation) need to talk to those layers.
- It produces the surface Products call into: chain interaction, local storage, account management, signing, statement submission, preimage submission, and so on. The Product SDK (`@parity/product-sdk` and friends) is a typed wrapper over that surface.
## Where to Go Next
- Learn **Signing**
---
The full mediated-signing flow: how a `signAndSubmit` call travels from a Product through Desktop to the paired App and back, including the `ChainSubmit` permission model and the timeout or rejection failure modes you need to handle.
[:octicons-arrow-right-24: Reference](/reference/apps/hosts/polkadot-desktop/signing/)
- Learn **Permissions**
---
What a Product can do inside the Desktop sandbox is gated by declared permissions. Reference for the permission types, the manifest declaration model, and how denial is surfaced.
[:octicons-arrow-right-24: Reference](/reference/apps/hosts/polkadot-desktop/permissions/)
- Learn **Statement Store via Host API**
---
How a Product publishes to and subscribes from the Statement Store through Desktop's mediated surface.
[:octicons-arrow-right-24: Reference](/reference/apps/hosts/polkadot-desktop/statement-store/)
- Learn **Preimage**
---
Preimage submission through Desktop, including the Statement-vs-Preimage distinction for off-chain content.
[:octicons-arrow-right-24: Reference](/reference/apps/hosts/polkadot-desktop/preimage/)
- Learn **Pocket**
---
Desktop's peer-to-peer send flow. Pair this with the [App-side recipient view](/reference/apps/hosts/polkadot-app/pocket/) for the full round trip.
[:octicons-arrow-right-24: Reference](/reference/apps/hosts/polkadot-desktop/pocket/)
---
Page Title: Polkadot Hub Assets
- Resolved Markdown: https://docs.polkadot.com/reference/polkadot-hub/assets.md
- Canonical (HTML): https://docs.polkadot.com/reference/polkadot-hub/assets/
- Summary: Learn about asset management on Polkadot Hub, including on-chain assets, foreign asset integration, and XCM for cross-chain asset transfers.
- Word Count: 1241; Token Estimate: 1824
- Last Updated: 2026-05-27T20:25:14+00:00
- Version Hash: sha256:69067fa60ec15d3799301424145f3ce1a066594a38fa707a2492cb3353baeaeb
# Assets on Polkadot Hub
## Introduction
Polkadot Hub is Polkadot’s system parachain that provides core functionality for the network, including issuing and managing on-chain assets. While the relay chain provides security, Polkadot Hub handles asset logic—minting, burning, transfers, and metadata—efficiently and cost-effectively.
Polkadot Hub supports native assets issued on the parachain and foreign assets from other chains, both of which can move seamlessly across the network via XCM.
This guide explains how assets are created, managed, and moved across chains, including key operations, roles, and the differences between native and foreign assets.
## Why Use Polkadot Hub?
Polkadot Hub provides a standardized framework for creating and managing fungible and non-fungible assets. Projects can issue tokens, manage supply, and transfer assets across parachains, extending the functionality of the Polkadot relay chain, which only supports its native token (DOT).
**Key features**:
- **Built-in asset operations**: Mint, burn, and transfer like ERC-20 on Ethereum, but native to Polkadot's runtime.
- **Custom asset creation**: Issue tokens or NFTs with configurable permissions and metadata.
- **Low fees**: Transactions cost roughly one-tenth of relay chain fees.
- **Lower deposits**: Minimal on-chain storage costs for asset data.
- **Pay fees in any asset**: Users don’t need DOT to transact; supported assets can cover fees.
- **Cross-chain ready**: Assets can be transferred to other parachains using XCM.
## Types of Assets
Polkadot Hub supports two types of assets:
- **Native assets**: Tokens and NFTs issued directly on Polkadot Hub using the Assets pallet. These assets benefit from the platform's custom features, such as configurable permissions and low fees
- **Foreign assets**: Tokens originating from other Polkadot parachains or external networks (like Ethereum, via bridges). Once registered on Polkadot Hub, they are treated similarly to native assets.
## Asset Structure
Each asset is identified by a unique ID and stores:
- Asset administrators
- Total supply and holder count
- Minimum balance configuration
- Sufficiency–whether the asset can keep an account alive without DOT
- Metadata (name, symbol, decimals)
If a balance falls below the configured minimum, called the Existential Deposit, it may be removed as “dust.” This ensures efficient storage while giving developers control over asset economics.
## Common Asset IDs
The following well-known native assets are registered on Polkadot Hub:
| Asset ID | Symbol | Name | Decimals | Sufficient |
|:---:|:---:|:---:|:---:|:---:|
| 1984 | USDt | Tether USD | 6 | Yes |
| 1337 | USDC | USD Coin | 6 | Yes |
!!! note
The on-chain symbol for Tether on Polkadot Hub is `USDt`, which is commonly referred to as "USDT" on exchanges and in wallets.
A sufficient asset can keep an account alive without requiring a DOT balance.
## How Native Assets Work
Native assets on Polkadot Hub are created and managed via the Assets pallet from the Polkadot SDK. This pallet defines the runtime logic for issuing, configuring, and administering fungible assets with customizable permissions.
It supports both permissioned and permissionless asset creation, enabling everything from simple user-issued tokens to governed assets controlled by teams or DAOs.
For implementation details, see the [Assets Pallet Rust docs](https://paritytech.github.io/polkadot-sdk/master/pallet_assets/index.html).
### Asset Operations
The Assets pallet provides both state-changing operations and read-only queries for full lifecycle management of assets.
Core operations include:
- **Asset issuance**: Create new assets and assign initial supply.
- **Transfers**: Move assets between accounts with balance tracking.
- **Burning**: Reduce total supply by destroying tokens.
- **Delegated transfers**: Approve transfers on behalf of another account without giving up custody.
- **Freezing and thawing**: Temporarily lock and unlock an account's balance.
For a complete list of extrinsics, see the [`pallet-assets` dispatchable functions reference](https://docs.rs/pallet-assets/latest/pallet_assets/pallet/enum.Call.html).
Data queries make it possible to:
- Check account balances and total supply.
- Retrieve asset metadata and configuration details.
- Inspect account and asset status on-chain.
For a full list of queries, see the [Pallet reference](https://docs.rs/pallet-assets/latest/pallet_assets/pallet/struct.Pallet.html).
### Roles and Permissions
The Assets pallet uses role-based permissions to control who can manage different parts of an asset’s lifecycle:
- **Owner**: Overarching control, including destroying an asset class; can set or update Issuer, Freezer, and Admin roles.
- **Admin**: Can freeze assets and forcibly transfer balances between accounts. Admins can also reduce the balance of an asset class across arbitrary accounts.
- **Issuer**: Responsible for minting new tokens. When new assets are created, the Issuer is the account that controls their distribution to other accounts.
- **Freezer**: Can lock the transfer of assets from an account, preventing the account holder from moving their balance.
These roles allow projects to enforce governance and security policies around their assets.
### Freezing Assets
Assets can be temporarily locked to prevent transfers from specific accounts. This is useful for dispute resolution, fraud prevention, or compliance controls.
**How it works**:
- Only authorized parties can freeze or unfreeze (thaw) assets.
- Freezing pauses the movement of the asset without burning or removing it.
- Once thawed, the asset can be transferred normally.
Freezing provides a safe way to control asset flow while maintaining full ownership.
**Key functions**: `freeze` and `thaw`.
### Delegated Transfers
Polkadot Hub supports delegated asset transfers, allowing one account to authorize another to move a limited amount of its assets—without giving up full control. This is useful for escrow logic, automated payments, and multi-party applications.
**How it works**:
- An account can grant permission to another account to transfer a specific amount of its assets.
- Permissions can be revoked at any time, preventing further transfers.
- Authorized accounts can execute transfers on behalf of the original owner within the approved limits.
Delegated transfers simplify multi-step transactions and enable complex asset flows.
**Key functions**: `approve_transfer`, `cancel_approval`, and `transfer_approved`.
## How Foreign Assets Work
Foreign assets are assets originating from other chains and are managed on Polkadot Hub via an instance of the Assets pallet that is configured specifically for foreign assets. It enables transfers, balance checks, and other standard asset operations, while handling foreign-asset specifics such as:
- **Asset identifiers**: Foreign assets use an XCM multilocation as their identifier, rather than a numeric AssetId. This ensures assets from different chains can be referenced and moved safely across parachains.
- **Transfers**: Once registered on Polkadot Hub, foreign assets can be transferred between accounts just like native assets. If supported, they can also be returned to their original blockchain using cross-chain messaging.
This unified interface makes it easy for dApps to handle both native and cross-chain assets.
## Moving Assets Across Chains
Polkadot Hub enables assets to move safely between parachains and the relay chain using XCM (Cross-Consensus Messaging). XCM ensures assets can move securely between chains while preserving ownership and traceability
To learn more about asset transfers with XCM, please refer to the [Introduction to XCM](/parachains/interoperability/get-started/) page.
## Where to Go Next
- Guide __Register a Foreign Asset__
---
Learn step-by-step how to register a foreign asset on Polkadot Hub.
[:octicons-arrow-right-24: Get Started](/chain-interactions/token-operations/register-foreign-asset/)
- Guide __Register a Local Asset__
---
Learn step-by-step how to register a local asset on Polkadot Hub.
[:octicons-arrow-right-24: Get Started](/chain-interactions/token-operations/register-local-asset/)
- Guide __Convert Assets__
---
Learn how to convert and manage assets on Asset Hub, including creating liquidity pools, adding liquidity, swapping assets, and withdrawing liquidity.
[:octicons-arrow-right-24: Get Started](/chain-interactions/token-operations/convert-assets/)
---
Page Title: Polkadot Hub Overview
- Resolved Markdown: https://docs.polkadot.com/reference/polkadot-hub.md
- Canonical (HTML): https://docs.polkadot.com/reference/polkadot-hub/
- Summary: Learn how Polkadot Hub serves as the entry point to Polkadot, providing access to smart contracts, staking, governance, identity management, and cross-ecosystem interoperability.
- Word Count: 808; Token Estimate: 1209
- Last Updated: 2026-04-01T02:33:47+00:00
- Version Hash: sha256:9446faf408431203779c64f746efb53c9652095a368ad9b3da2b161b1ff43513
## Introduction
Polkadot Hub is the entry point for all users and application developers to Polkadot. It provides access to essential Web3 services, including smart contracts, staking, governance, identity management, and cross-ecosystem interoperability—without requiring you to deploy or manage a parachain.
The Hub encompasses a set of core functionality that enables developers and users to build and interact with applications on Polkadot. This specialized system of parachains and services works together seamlessly to deliver a unified platform experience. The modular approach lets you interact with services optimized for specific use cases, while still benefiting from Polkadot's shared security.
## Polkadot Hub Capabilities
Whether you're just getting started or building complex applications, the Hub supports the ability to:
- Hold, send, and receive DOT and other assets across the network.
- Stake DOT to participate in network security and earn rewards.
- Vote in governance referendums and shape Polkadot's future.
- Create both fungible and non-fungible tokens and assets for your projects.
- Pay transaction fees in any asset, not just DOT.
- Register as an individual and establish your on-chain identity.
For more sophisticated development use cases, the Hub enables you to:
- Deploy Ethereum-compatible smart contracts using Solidity or other EVM languages.
- Build decentralized applications that leverage Polkadot's security and interoperability.
- Create and manage fungible tokens and NFTs with low fees and flexible operations.
- Manage cross-chain interactions through XCM messaging with other parachains.
- Set verified identities and apply for network opportunities like the Ambassador Program.
- Join collectives and participate in governance organizations with specialized roles.
## Core Components
The Polkadot Hub consists of several specialized system parachains and services working together as described in the following sections.
### Smart Contracts
[Smart Contracts](/reference/polkadot-hub/smart-contracts/) on Polkadot Hub enable developers to deploy Ethereum-compatible smart contracts written in Solidity and other familiar EVM languages. Build decentralized applications with full access to Polkadot's security, interoperability, and cross-chain capabilities. Smart contracts on the Hub benefit from lower fees and integration with native Polkadot features, such as identity management and asset operations.
### Asset Management
[Asset Management](/reference/polkadot-hub/assets/) provides the foundation for on-chain asset management. Create, manage, and transfer fungible tokens and NFTs across the ecosystem. Asset Management offers significantly lower transaction fees—approximately one-tenth the cost of relay chain transactions—and reduced deposit requirements, making it ideal for projects managing digital assets at scale. It also enables payment of transaction fees in non-native assets, providing developers and users with greater flexibility.
### People Chain
[People Chain](/reference/polkadot-hub/people-and-identity/) powers Polkadot's decentralized identity system. Establish verifiable on-chain identities, control disclosure of personal information, and receive verification from trusted registrars. People Chain enables secure identity management with hierarchical sub-account support, forming the foundation for trusted interactions throughout the ecosystem.
### Bridge Hub
[Bridge Hub](/reference/polkadot-hub/bridging/) facilitates trustless interactions between Polkadot and external blockchains like Ethereum and Kusama. Through implementations such as Snowbridge, Bridge Hub enables secure cross-chain communication via on-chain light clients and trustless relayers. This component ensures seamless interoperability beyond the Polkadot ecosystem.
### Consensus & Security
[Consensus and Security](/reference/polkadot-hub/consensus-and-security/relay-chain/) covers the fundamental mechanisms that protect the network. Learn about validator participation, how the relay chain validates all transactions, and the cryptoeconomic incentives that secure Polkadot. Understanding these mechanisms is essential for validators and anyone building critical infrastructure on the network.
### Collectives & DAOs
[Collectives and DAOs](/reference/polkadot-hub/collectives-and-daos/) enable specialized governance organizations within Polkadot. Participate in collective membership, manage treasury operations, and engage in coordinated decision-making with groups aligned around specific purposes. This functionality supports the creation of autonomous organizations on Polkadot.
## Where to Go Next
Consider the following resources to explore specific Hub functionality.
- Learn **Smart Contracts**
---
Deploy Ethereum-compatible smart contracts and build decentralized applications.
[:octicons-arrow-right-24: Reference](/reference/polkadot-hub/smart-contracts/)
- Learn **Asset Management**
---
Manage fungible tokens and NFTs with low fees and flexible asset operations.
[:octicons-arrow-right-24: Reference](/reference/polkadot-hub/assets/)
- Learn **People Chain**
---
Establish and verify decentralized identities for trusted interactions on Polkadot.
[:octicons-arrow-right-24: Reference](/reference/polkadot-hub/people-and-identity/)
- Learn **Bridge Hub**
---
Facilitate trustless cross-chain interactions with Ethereum and other blockchains.
[:octicons-arrow-right-24: Reference](/reference/polkadot-hub/bridging/)
- Learn **Consensus & Security**
---
Understand how Polkadot validates transactions and secures the network.
[:octicons-arrow-right-24: Reference](/reference/polkadot-hub/consensus-and-security/relay-chain/)
- Learn **Collectives & DAOs**
---
Participate in specialized governance organizations with coordinated decision-making.
[:octicons-arrow-right-24: Reference](/reference/polkadot-hub/collectives-and-daos/)
---
Page Title: Polkadot Hub Smart Contracts
- Resolved Markdown: https://docs.polkadot.com/reference/polkadot-hub/smart-contracts.md
- Canonical (HTML): https://docs.polkadot.com/reference/polkadot-hub/smart-contracts/
- Summary: Learn how Polkadot Hub supports smart contracts through the REVM, a Rust-based Ethereum Virtual Machine compatible runtime.
- Word Count: 448; Token Estimate: 648
- Last Updated: 2026-01-14T11:42:16+00:00
- Version Hash: sha256:6d4aeddfc6a457f54d30fdbefdc4c8cf953d7b09024449c6402e41c24908414e
# Smart Contracts on Polkadot Hub
## Introduction
Polkadot Hub enables developers to deploy and interact with Solidity contracts through REVM, a high-performance, Rust-based Ethereum Virtual Machine implementation. Polkadot-native precompiles bring Ethereum compatibility to Polkadot Hub, letting teams use familiar Solidity tooling, integrate with on-chain features like governance and XCM, and take advantage of cross-chain interoperability.
For projects that require maximum computational performance, Polkadot Hub also supports PolkaVM (PVM), a native RISC-V execution engine. PVM is optional and designed for high-throughput, performance-intensive smart contracts.
### REVM Smart Contracts
[REVM](https://github.com/bluealloy/revm) brings full EVM compatibility to Polkadot Hub through a fast, memory-safe Rust implementation of the Ethereum Virtual Machine. Unlike PolkaVM, which compiles contracts to RISC-V for native execution, REVM executes standard Ethereum bytecode directly—making it ideal for teams who want to migrate existing Solidity projects to Polkadot with minimal changes.
With REVM, developers can:
- Deploy existing Solidity contracts without rewriting them.
- Use familiar Ethereum tooling like Hardhat, Foundry, Remix, and MetaMask.
- Interact with other parachains and on-chain assets using XCM and Polkadot Hub features.
REVM builds on Rust’s safety guarantees and performance optimizations while retaining full opcode compatibility with the EVM.
Ethereum-native developers can use Polkadot-native precompiles to access Polkadot features—such as governance, treasury, multisig, and XCM—within a unified, interoperable runtime environment.
### PVM Smart Contracts
PVM is Polkadot Hub’s native, high-performance smart contract engine. Instead of emulating EVM bytecode, it runs contracts compiled to a [RISC-V](https://en.wikipedia.org/wiki/RISC-V) instruction set, unlocking higher performance and parallel execution while staying friendly to Ethereum-style development.
With PVM, developers can:
- Write Solidity contracts and use familiar tooling (e.g., Hardhat, Foundry) targeting PVM
- Benefit from fast, predictable execution with carefully metered gas/weight.
- Access detailed observability through Substrate events and contract logs for indexing and debugging.
PolkaVM delivers maximum performance for computationally intensive contracts, offering a native, high-throughput option for Ethereum-style developers on Polkadot Hub.
!!! smartcontract "PVM Preview Release"
PVM smart contracts with Ethereum compatibility are in **early-stage development and may be unstable or incomplete**.
## Where to Go Next
- Guide __Deploy a Basic Contract__
---
Learn step-by-step how to deploy a basic Solidity smart contract to Polkadot Hub.
[:octicons-arrow-right-24: Get Started](/smart-contracts/cookbook/smart-contracts/deploy-basic/basic-remix/)
- Guide __Explore Development Environments__
---
Check out the development environments you can use to build, test, and deploy smart contracts.
[:octicons-arrow-right-24: Get Started](/smart-contracts/dev-environments/local-dev-node/)
---
Page Title: Polkadot Product Skills
- Resolved Markdown: https://docs.polkadot.com/reference/apps/skills.md
- Canonical (HTML): https://docs.polkadot.com/reference/apps/skills/
- Summary: Reference for the product-sdk skills — modular instructions that teach an AI agent how to work effectively across the Polkadot Products stack.
- Word Count: 721; Token Estimate: 1566
- Last Updated: 2026-06-23T11:32:12+00:00
- Version Hash: sha256:6b1615ea3a5b5039faf0d2bb9868c69afd743952344b2fa47cbb5186810f4aad
# Skills
## Introduction
Product Skills are small, modular instruction sets that teach an AI coding agent how to work effectively across specific parts of the Polkadot Products stack. A skill bundles together what the agent needs to know about one slice of the surface (chain connections, bulletin storage, contract interactions, and so on) so that when you ask it for help in that area, it has the right context loaded.
If you are working on a Polkadot Product with an AI coding agent, installing the relevant skills tilts the agent toward correct, idiomatic answers instead of generic boilerplate.
The skills live inside the [`paritytech/product-sdk`](https://github.com/paritytech/product-sdk) monorepo under `product-sdk/skills/`.
## Skills List
| Skill | What It Covers |
|:---------------------------------------------------------------------------------------------------------------------------:|:-----------------------------------------------------------------------------------------------------------------------------------------------------------------------------------------------------------------------:|
| [`product-sdk-app-builder`](https://github.com/paritytech/product-sdk/tree/main/product-sdk/skills/product-sdk-app-builder) | End-to-end scaffolding and implementation of Polkadot apps using `@parity/product-sdk` packages. Foundational orchestrator skill — reach for this when starting a new project or scaffolding chain interactions. |
| [`product-sdk-bulletin`](https://github.com/paritytech/product-sdk/tree/main/product-sdk/skills/product-sdk-bulletin) | Upload and retrieve data on the Polkadot Bulletin Chain. Covers CID-based content-addressed storage, IPFS gateway access, the `BulletinClient` SDK, batch uploads, and CID computation. |
| [`product-sdk-chain-connection`](https://github.com/paritytech/product-sdk/tree/main/product-sdk/skills/product-sdk-chain-connection) | Typed access to Polkadot chains via `@parity/product-sdk-chain-client` and `@parity/product-sdk-descriptors`. Covers preset and BYOD (bring-your-own-descriptors) paths, state queries, and storage subscriptions. |
| [`product-sdk-contracts`](https://github.com/paritytech/product-sdk/tree/main/product-sdk/skills/product-sdk-contracts) | Smart contract interaction (PolkaVM / Solidity) on Asset Hub. Covers `ContractManager` with `cdm.json` manifests, ad-hoc `createContract`, `ContractRuntime`, and contract type codegen. |
| [`product-sdk-statement-store`](https://github.com/paritytech/product-sdk/tree/main/product-sdk/skills/product-sdk-statement-store) | Publish and subscribe to ephemeral messages on the Polkadot Statement Store. Covers `StatementStoreClient` lifecycle, host and local connection modes, channels with last-write-wins semantics, and the 512-byte size limit. |
| [`product-sdk-transactions`](https://github.com/paritytech/product-sdk/tree/main/product-sdk/skills/product-sdk-transactions) | Submit transactions, manage signers, and derive keys. Covers `@parity/product-sdk-tx`, `@parity/product-sdk-signer`, and `@parity/product-sdk-keys` — multi-provider wallet accounts, Host API signing (Desktop/Mobile), and dev signers for testnet. |
| [`product-sdk-utilities`](https://github.com/paritytech/product-sdk/tree/main/product-sdk/skills/product-sdk-utilities) | Foundational utilities — SS58/H160 address encoding, AES/ChaCha/NaCl crypto, HKDF key derivation, byte encoding, token (planck) formatting, key-value storage, and structured logging. |
## How to Install
Clone the `paritytech/product-sdk` repo:
```bash
git clone https://github.com/paritytech/product-sdk.git
```
Skills live under `product-sdk/skills//` in the cloned directory. Register whichever skills are relevant with your agent — Claude Code, Cursor, Codex, or a custom harness — using that agent's skill or context-loading mechanism.
Skills trigger based on context. You can also invoke a skill directly by name before asking a question. For example, before asking the agent for help chunking a large upload to the Bulletin Chain, load the relevant context up front:
```text
/product-sdk-bulletin how do I chunk a 50 MB file across multiple transactions?
```
The agent now has the SDK's API patterns and best practices loaded before it answers, instead of falling back on generic JavaScript knowledge.
## Updating
!!! tip "Keep skills current"
Polkadot Products surfaces are in active development. A skill that has not been refreshed for a while will teach the agent stale API patterns, which is worse than no skill at all. Refresh after major releases.
Pull the latest changes from your clone:
```bash
git pull
```
Then re-register any updated skills with your agent as needed.
## Where to Go Next
- Guide **App Development How-To**
---
The how-to guides themselves, the same conceptual content the skills above index into.
[:octicons-arrow-right-24: Get Started](/apps/get-started/)
- External **product-sdk repo**
---
The source of truth for the skills documented above, including per-skill README files and updates.
[:octicons-arrow-right-24: Visit Repo](https://github.com/paritytech/product-sdk)
---
Page Title: Polkadot SDK Accounts
- Resolved Markdown: https://docs.polkadot.com/reference/parachains/accounts.md
- Canonical (HTML): https://docs.polkadot.com/reference/parachains/accounts/
- Summary: Learn about account structures, balances, and address formats in the Polkadot SDK, including how to manage lifecycle, references, and balances.
- Word Count: 4124; Token Estimate: 6300
- Last Updated: 2026-01-14T11:42:16+00:00
- Version Hash: sha256:ec3a15386bdb148a52a3b478469563de94e7565cd64e36c9c039355d68d67517
# Accounts
## Introduction
Accounts are essential for managing identity, transactions, and governance on the network in the Polkadot SDK. Understanding these components is critical for seamless development and operation on the network, whether you're building or interacting with Polkadot-based chains.
This page will guide you through the essential aspects of accounts, including their data structure, balance types, reference counters, and address formats. You’ll learn how accounts are managed within the runtime, how balances are categorized, and how addresses are encoded and validated.
## Account Data Structure
Accounts are foundational to any blockchain, and the Polkadot SDK provides a flexible management system. This section explains how the Polkadot SDK defines accounts and manages their lifecycle through data structures within the runtime.
### Account
The [`Account` data type](https://paritytech.github.io/polkadot-sdk/master/frame_system/pallet/type.Account.html) is a storage map within the [System pallet](https://paritytech.github.io/polkadot-sdk/master/src/frame_system/lib.rs.html) that links an account ID to its corresponding data. This structure is fundamental for mapping account-related information within the chain.
The code snippet below shows how accounts are defined:
```rs
/// The full account information for a particular account ID.
#[pallet::storage]
#[pallet::getter(fn account)]
pub type Account = StorageMap<
_,
Blake2_128Concat,
T::AccountId,
AccountInfo,
ValueQuery,
>;
```
The preceding code block defines a storage map named `Account`. The `StorageMap` is a type of on-chain storage that maps keys to values. In the `Account` map, the key is an account ID, and the value is the account's information. Here, `T` represents the generic parameter for the runtime configuration, which is defined by the pallet's configuration trait (`Config`).
The `StorageMap` consists of the following parameters:
- **`_`**: Used in macro expansion and acts as a placeholder for the storage prefix type. Tells the macro to insert the default prefix during expansion.
- **`Blake2_128Concat`**: The hashing function applied to keys in the storage map.
- **`T: :AccountId`**: Represents the key type, which corresponds to the account’s unique ID.
- **`AccountInfo`**: The value type stored in the map. For each account ID, the map stores an `AccountInfo` struct containing:
- **`T::Nonce`**: A nonce for the account, which is incremented with each transaction to ensure transaction uniqueness.
- **`T: :AccountData`**: Custom account data defined by the runtime configuration, which could include balances, locked funds, or other relevant information.
- **`ValueQuery`**: Defines how queries to the storage map behave when no value is found; returns a default value instead of `None`.
For a detailed explanation of storage maps, see the [`StorageMap`](https://paritytech.github.io/polkadot-sdk/master/frame_support/storage/types/struct.StorageMap.html) entry in the Rust docs.
### Account Info
The `AccountInfo` structure is another key element within the [System pallet](https://paritytech.github.io/polkadot-sdk/master/src/frame_system/lib.rs.html), providing more granular details about each account's state. This structure tracks vital data, such as the number of transactions and the account’s relationships with other modules.
```rs
/// Information of an account.
#[derive(Clone, Eq, PartialEq, Default, RuntimeDebug, Encode, Decode, TypeInfo, MaxEncodedLen)]
pub struct AccountInfo {
/// The number of transactions this account has sent.
pub nonce: Nonce,
/// The number of other modules that currently depend on this account's existence. The account
/// cannot be reaped until this is zero.
pub consumers: RefCount,
/// The number of other modules that allow this account to exist. The account may not be reaped
/// until this and `sufficients` are both zero.
pub providers: RefCount,
/// The number of modules that allow this account to exist for their own purposes only. The
/// account may not be reaped until this and `providers` are both zero.
pub sufficients: RefCount,
/// The additional data that belongs to this account. Used to store the balance(s) in a lot of
/// chains.
pub data: AccountData,
}
```
The `AccountInfo` structure includes the following components:
- **`nonce`**: Tracks the number of transactions initiated by the account, which ensures transaction uniqueness and prevents replay attacks.
- **`consumers`**: Counts how many other modules or pallets rely on this account’s existence. The account cannot be removed from the chain (reaped) until this count reaches zero.
- **`providers`**: Tracks how many modules permit this account’s existence. An account can only be reaped once both `providers` and `sufficients` are zero.
- **`sufficients`**: Represents the number of modules that allow the account to exist for internal purposes, independent of any other modules.
- **`AccountData`**: A flexible data structure that can be customized in the runtime configuration, usually containing balances or other user-specific data.
This structure helps manage an account's state and prevents its premature removal while it is still referenced by other on-chain data or modules. The [`AccountInfo`](https://paritytech.github.io/polkadot-sdk/master/frame_system/struct.AccountInfo.html) structure can vary as long as it satisfies the trait bounds defined by the `AccountData` associated type in the [`frame-system::pallet::Config`](https://paritytech.github.io/polkadot-sdk/master/frame_system/pallet/trait.Config.html) trait.
### Account Reference Counters
Polkadot SDK uses reference counters to track an account’s dependencies across different runtime modules. These counters ensure that accounts remain active while data is associated with them.
The reference counters include:
- **`consumers`**: Prevents account removal while other pallets still rely on the account.
- **`providers`**: Ensures an account is active before other pallets store data related to it.
- **`sufficients`**: Indicates the account’s independence, ensuring it can exist even without a native token balance, such as when holding sufficient alternative assets.
#### Providers Reference Counters
The `providers` counter ensures that an account is ready to be depended upon by other runtime modules. For example, it is incremented when an account has a balance above the existential deposit, which marks the account as active.
The system requires this reference counter to be greater than zero for the `consumers` counter to be incremented, ensuring the account is stable before any dependencies are added.
#### Consumers Reference Counters
The `consumers` counter ensures that the account cannot be reaped until all references to it across the runtime have been removed. This check prevents the accidental deletion of accounts that still have active on-chain data.
It is the user’s responsibility to clear out any data from other runtime modules if they wish to remove their account and reclaim their existential deposit.
#### Sufficients Reference Counter
The `sufficients` counter tracks accounts that can exist independently without relying on a native account balance. This is useful for accounts holding other types of assets, like tokens, without needing a minimum balance in the native token.
For instance, the [Assets pallet](https://paritytech.github.io/polkadot-sdk/master/pallet_assets/index.html), may increment this counter for an account holding sufficient tokens.
#### Account Deactivation
In Polkadot SDK-based chains, an account is deactivated when its reference counters (such as `providers`, `consumers`, and `sufficient`) reach zero. These counters ensure the account remains active as long as other runtime modules or pallets reference it.
When all dependencies are cleared and the counters drop to zero, the account becomes deactivated and may be removed from the chain (reaped). This is particularly important in Polkadot SDK-based blockchains, where accounts with balances below the existential deposit threshold are pruned from storage to conserve state resources.
Each pallet that references an account has cleanup functions that decrement these counters when the pallet no longer depends on the account. Once these counters reach zero, the account is marked for deactivation.
#### Updating Counters
The Polkadot SDK provides runtime developers with various methods to manage account lifecycle events, such as deactivation or incrementing reference counters. These methods ensure that accounts cannot be reaped while still in use.
The following helper functions manage these counters:
- **`inc_consumers()`**: Increments the `consumer` reference counter for an account, signaling that another pallet depends on it.
- **`dec_consumers()`**: Decrements the `consumer` reference counter, signaling that a pallet no longer relies on the account.
- **`inc_providers()`**: Increments the `provider` reference counter, ensuring the account remains active.
- **`dec_providers()`**: Decrements the `provider` reference counter, allowing for account deactivation when no longer in use.
- **`inc_sufficients()`**: Increments the `sufficient` reference counter for accounts that hold sufficient assets.
- **`dec_sufficients()`**: Decrements the `sufficient` reference counter.
To ensure proper account cleanup and lifecycle management, a corresponding decrement should be made for each increment action.
The `System` pallet offers three query functions to assist developers in tracking account states:
- **[`can_inc_consumer()`](https://paritytech.github.io/polkadot-sdk/master/frame_system/pallet/struct.Pallet.html#method.can_inc_consumer)**: Checks if the account can safely increment the consumer reference.
- **[`can_dec_provider()`](https://paritytech.github.io/polkadot-sdk/master/frame_system/pallet/struct.Pallet.html#method.can_dec_provider)**: Ensures that no consumers exist before allowing the decrement of the provider counter.
- **[`is_provider_required()`](https://paritytech.github.io/polkadot-sdk/master/frame_system/pallet/struct.Pallet.html#method.is_provider_required)**: Verifies whether the account still has any active consumer references.
This modular and flexible system of reference counters tightly controls the lifecycle of accounts in Polkadot SDK-based blockchains, preventing the accidental removal or retention of unneeded accounts. You can refer to the [System pallet Rust docs](https://paritytech.github.io/polkadot-sdk/master/frame_system/pallet/struct.Pallet.html) for more details.
## Account Balance Types
In the Polkadot ecosystem, account balances are categorized into different types based on how the funds are utilized and their availability. These balance types determine the actions that can be performed, such as transferring tokens, paying transaction fees, or participating in governance activities. Understanding these balance types helps developers manage user accounts and implement balance-dependent logic.
!!! note "A more efficient distribution of account balance types is in development"
Soon, pallets in the Polkadot SDK will implement the [`Fungible` trait](https://paritytech.github.io/polkadot-sdk/master/frame_support/traits/tokens/fungible/index.html) (see the [tracking issue](https://github.com/paritytech/polkadot-sdk/issues/226) for more details). For example, the [`transaction-storage`](https://paritytech.github.io/polkadot-sdk/master/pallet_transaction_storage/index.html) pallet changed the implementation of the [`Currency`](https://paritytech.github.io/polkadot-sdk/master/frame_support/traits/tokens/currency/index.html) trait (see the [Refactor transaction storage pallet to use fungible traits](https://github.com/paritytech/polkadot-sdk/pull/1800) PR for further details):
```rust
type BalanceOf = <::Currency as Currency<::AccountId>>::Balance;
```
To the [`Fungible`](https://paritytech.github.io/polkadot-sdk/master/frame_support/traits/tokens/fungible/index.html) trait:
```rust
type BalanceOf = <::Currency as FnInspect<::AccountId>>::Balance;
```
This update will enable more efficient use of account balances, allowing the free balance to be utilized for on-chain activities such as setting proxies and managing identities.
### Balance Types
The five main balance types are:
- **Free balance**: Represents the total tokens available to the account for any on-chain activity, including staking, governance, and voting. However, it may not be fully spendable or transferrable if portions of it are locked or reserved.
- **Locked balance**: Portions of the free balance that cannot be spent or transferred because they are tied up in specific activities like [staking](https://wiki.polkadot.com/learn/learn-staking/#nominating-validators), [vesting](https://wiki.polkadot.com/learn/learn-guides-transfers/#vested-transfers-with-the-polkadot-js-ui), or participating in [governance](https://wiki.polkadot.com/learn/learn-polkadot-opengov/#voting-on-a-referendum). While the tokens remain part of the free balance, they are non-transferable for the duration of the lock.
- **Reserved balance**: Funds locked by specific system actions, such as setting up an [identity](https://wiki.polkadot.com/learn/learn-identity/), creating [proxies](https://wiki.polkadot.com/learn/learn-proxies/), or submitting [deposits for governance proposals](https://wiki.polkadot.com/learn/learn-guides-polkadot-opengov/#claiming-opengov-deposits). These tokens are not part of the free balance and cannot be spent unless they are unreserved.
- **Spendable balance**: The portion of the free balance that is available for immediate spending or transfers. It is calculated by subtracting the maximum of locked or reserved amounts from the free balance, ensuring that existential deposit limits are met.
- **Untouchable balance**: Funds that cannot be directly spent or transferred but may still be utilized for on-chain activities, such as governance participation or staking. These tokens are typically tied to certain actions or locked for a specific period.
The spendable balance is calculated as follows:
```text
spendable = free - max(locked - reserved, ED)
```
Here, `free`, `locked`, and `reserved` are defined above. The `ED` represents the [existential deposit](https://wiki.polkadot.com/learn/learn-accounts/#existential-deposit-and-reaping), the minimum balance required to keep an account active and prevent it from being reaped. You may find you can't see all balance types when looking at your account via a wallet. Wallet providers often display only spendable, locked, and reserved balances.
### Locks
Locks are applied to an account's free balance, preventing that portion from being spent or transferred. Locks are automatically placed when an account participates in specific on-chain activities, such as staking or governance. Although multiple locks may be applied simultaneously, they do not stack. Instead, the largest lock determines the total amount of locked tokens.
Locks follow these basic rules:
- If different locks apply to varying amounts, the largest lock amount takes precedence.
- If multiple locks apply to the same amount, the lock with the longest duration governs when the balance can be unlocked.
#### Locks Example
Consider an example where an account has 80 DOT locked for both staking and governance purposes like so:
- 80 DOT is staked with a 28-day lock period.
- 24 DOT is locked for governance with a 1x conviction and a 7-day lock period.
- 4 DOT is locked for governance with a 6x conviction and a 224-day lock period.
In this case, the total locked amount is 80 DOT because only the largest lock (80 DOT from staking) governs the locked balance. These 80 DOT will be released at different times based on the lock durations. In this example, the 24 DOT locked for governance will be released first since the shortest lock period is seven days. The 80 DOT stake with a 28-day lock period is released next. Now, all that remains locked is the 4 DOT for governance. After 224 days, all 80 DOT (minus the existential deposit) will be free and transferable.
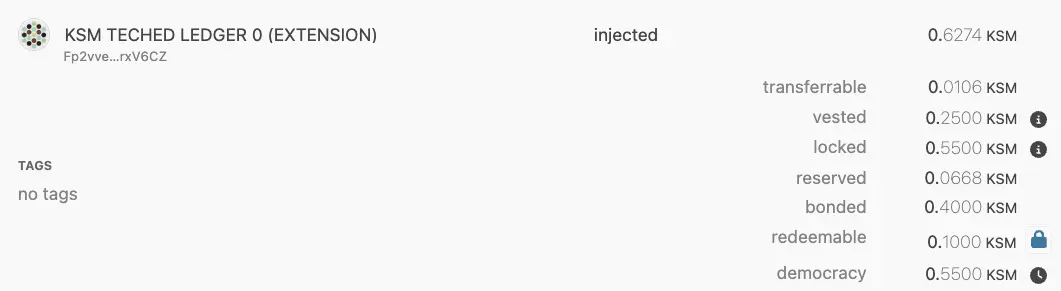
#### Edge Cases for Locks
In scenarios where multiple convictions and lock periods are active, the lock duration and amount are determined by the longest period and largest amount. For example, if you delegate with different convictions and attempt to undelegate during an active lock period, the lock may be extended for the full amount of tokens. For a detailed discussion on edge case lock behavior, see this [Stack Exchange post](https://substrate.stackexchange.com/questions/5067/delegating-and-undelegating-during-the-lock-period-extends-it-for-the-initial-am).
### Balance Types on Polkadot.js
Polkadot.js provides a user-friendly interface for managing and visualizing various account balances on Polkadot and Kusama networks. When interacting with Polkadot.js, you will encounter multiple balance types that are critical for understanding how your funds are distributed and restricted. This section explains how different balances are displayed in the Polkadot.js UI and what each type represents.
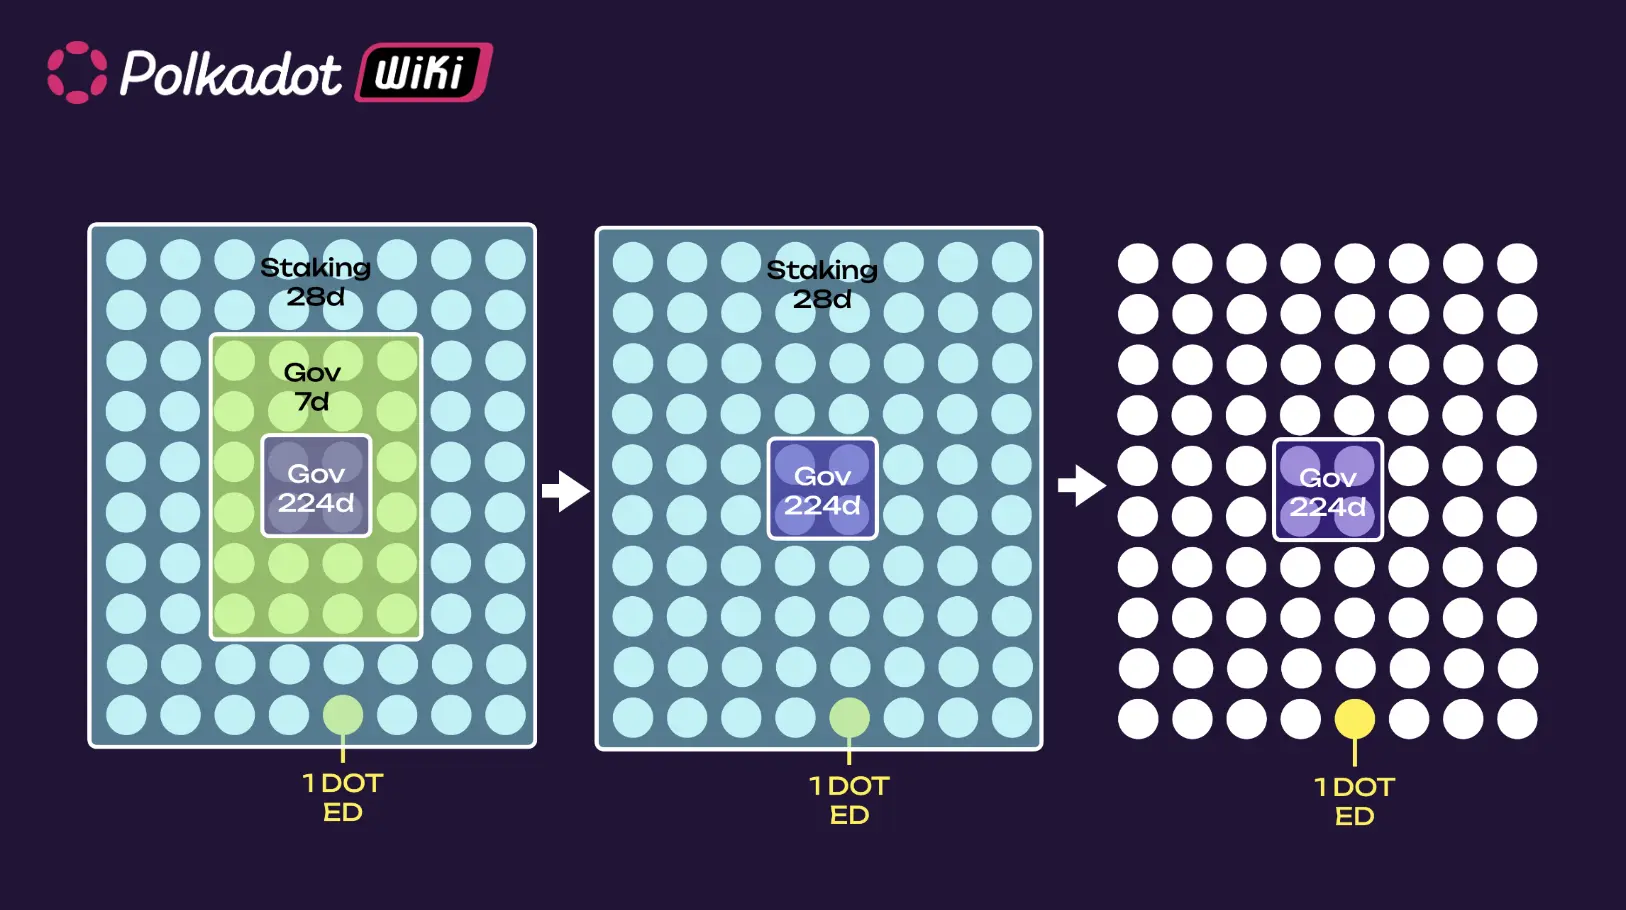
The most common balance types displayed on Polkadot.js are:
- **Total balance**: The total number of tokens available in the account. This includes all tokens, whether they are transferable, locked, reserved, or vested. However, the total balance does not always reflect what can be spent immediately. In this example, the total balance is 0.6274 KSM.
- **Transferable balance**: Shows how many tokens are immediately available for transfer. It is calculated by subtracting the locked and reserved balances from the total balance. For example, if an account has a total balance of 0.6274 KSM and a transferable balance of 0.0106 KSM, only the latter amount can be sent or spent freely.
- **Vested balance**: Tokens that allocated to the account but released according to a specific schedule. Vested tokens remain locked and cannot be transferred until fully vested. For example, an account with a vested balance of 0.2500 KSM means that this amount is owned but not yet transferable.
- **Locked balance**: Tokens that are temporarily restricted from being transferred or spent. These locks typically result from participating in staking, governance, or vested transfers. In Polkadot.js, locked balances do not stack—only the largest lock is applied. For instance, if an account has 0.5500 KSM locked for governance and staking, the locked balance would display 0.5500 KSM, not the sum of all locked amounts.
- **Reserved balance**: Refers to tokens locked for specific on-chain actions, such as setting an identity, creating a proxy, or making governance deposits. Reserved tokens are not part of the free balance, but can be freed by performing certain actions. For example, removing an identity would unreserve those funds.
- **Bonded balance**: The tokens locked for staking purposes. Bonded tokens are not transferable until they are unbonded after the unbonding period.
- **Redeemable balance**: The number of tokens that have completed the unbonding period and are ready to be unlocked and transferred again. For example, if an account has a redeemable balance of 0.1000 KSM, those tokens are now available for spending.
- **Democracy balance**: Reflects the number of tokens locked for governance activities, such as voting on referenda. These tokens are locked for the duration of the governance action and are only released after the lock period ends.
By understanding these balance types and their implications, developers and users can better manage their funds and engage with on-chain activities more effectively.
## Address Formats
The SS58 address format is a core component of the Polkadot SDK that enables accounts to be uniquely identified across Polkadot-based networks. This format is a modified version of Bitcoin's Base58Check encoding, specifically designed to accommodate the multi-chain nature of the Polkadot ecosystem. SS58 encoding allows each chain to define its own set of addresses while maintaining compatibility and checksum validation for security.
### Basic Format
SS58 addresses consist of three main components:
```text
base58encode(concat(, , ))
```
- **Address type**: A byte or set of bytes that define the network (or chain) for which the address is intended. This ensures that addresses are unique across different Polkadot SDK-based chains.
- **Address**: The public key of the account encoded as bytes.
- **Checksum**: A hash-based checksum which ensures that addresses are valid and unaltered. The checksum is derived from the concatenated address type and address components, ensuring integrity.
The encoding process transforms the concatenated components into a Base58 string, providing a compact and human-readable format that avoids easily confused characters (e.g., zero '0', capital 'O', lowercase 'l'). This encoding function ([`encode`](https://docs.rs/bs58/latest/bs58/fn.encode.html)) is implemented exactly as defined in Bitcoin and IPFS specifications, using the same alphabet as both implementations.
For more details about the SS58 address format implementation, see the [`Ss58Codec`](https://paritytech.github.io/polkadot-sdk/master/sp_core/crypto/trait.Ss58Codec.html) trait in the Rust Docs.
### Address Type
The address type defines how an address is interpreted and to which network it belongs. Polkadot SDK uses different prefixes to distinguish between various chains and address formats:
- **Address types `0-63`**: Simple addresses, commonly used for network identifiers.
- **Address types `64-127`**: Full addresses that support a wider range of network identifiers.
- **Address types `128-255`**: Reserved for future address format extensions.
For example, Polkadot’s main network uses an address type of 0, while Kusama uses 2. This ensures that addresses can be used without confusion between networks.
The address type is always encoded as part of the SS58 address, making it easy to quickly identify the network. Refer to the [SS58 registry](https://github.com/paritytech/ss58-registry) for the canonical listing of all address type identifiers and how they map to Polkadot SDK-based networks.
### Address Length
SS58 addresses can have different lengths depending on the specific format. Address lengths range from as short as 3 to 35 bytes, depending on the complexity of the address and network requirements. This flexibility allows SS58 addresses to adapt to different chains while providing a secure encoding mechanism.
| Total | Type | Raw account | Checksum |
|-------|------|-------------|----------|
| 3 | 1 | 1 | 1 |
| 4 | 1 | 2 | 1 |
| 5 | 1 | 2 | 2 |
| 6 | 1 | 4 | 1 |
| 7 | 1 | 4 | 2 |
| 8 | 1 | 4 | 3 |
| 9 | 1 | 4 | 4 |
| 10 | 1 | 8 | 1 |
| 11 | 1 | 8 | 2 |
| 12 | 1 | 8 | 3 |
| 13 | 1 | 8 | 4 |
| 14 | 1 | 8 | 5 |
| 15 | 1 | 8 | 6 |
| 16 | 1 | 8 | 7 |
| 17 | 1 | 8 | 8 |
| 35 | 1 | 32 | 2 |
SS58 addresses also support different payload sizes, allowing a flexible range of account identifiers.
### Checksum Types
A checksum is applied to validate SS58 addresses. Polkadot SDK uses a Blake2b-512 hash function to calculate the checksum, which is appended to the address before encoding. The checksum length can vary depending on the address format (e.g., 1-byte, 2-byte, or longer), providing varying levels of validation strength.
The checksum ensures that an address is not modified or corrupted, adding an extra layer of security for account management.
### Validating Addresses
SS58 addresses can be validated using the subkey command-line interface or the Polkadot.js API. These tools help ensure an address is correctly formatted and valid for the intended network. The following sections will provide an overview of how validation works with these tools.
#### Using Subkey
[Subkey](https://paritytech.github.io/polkadot-sdk/master/subkey/index.html) is a CLI tool provided by Polkadot SDK for generating and managing keys. It can inspect and validate SS58 addresses.
The `inspect` command gets a public key and an SS58 address from the provided secret URI. The basic syntax for the `subkey inspect` command is:
```bash
subkey inspect [flags] [options] uri
```
For the `uri` command-line argument, you can specify the secret seed phrase, a hex-encoded private key, or an SS58 address. If the input is a valid address, the `subkey` program displays the corresponding hex-encoded public key, account identifier, and SS58 addresses.
For example, to inspect the public keys derived from a secret seed phrase, you can run a command similar to the following:
```bash
subkey inspect "caution juice atom organ advance problem want pledge someone senior holiday very"
```
The command displays output similar to the following:
subkey inspect "caution juice atom organ advance problem want pledge someone senior holiday very"
Secret phrase `caution juice atom organ advance problem want pledge someone senior holiday very` is account:
Secret seed: 0xc8fa03532fb22ee1f7f6908b9c02b4e72483f0dbd66e4cd456b8f34c6230b849
Public key (hex): 0xd6a3105d6768e956e9e5d41050ac29843f98561410d3a47f9dd5b3b227ab8746
Public key (SS58): 5Gv8YYFu8H1btvmrJy9FjjAWfb99wrhV3uhPFoNEr918utyR
Account ID: 0xd6a3105d6768e956e9e5d41050ac29843f98561410d3a47f9dd5b3b227ab8746
SS58 Address: 5Gv8YYFu8H1btvmrJy9FjjAWfb99wrhV3uhPFoNEr918utyR
The `subkey` program assumes an address is based on a public/private key pair. If you inspect an address, the command returns the 32-byte account identifier.
However, not all addresses in Polkadot SDK-based networks are based on keys.
Depending on the command-line options you specify and the input you provided, the command output might also display the network for which the address has been encoded. For example:
```bash
subkey inspect "12bzRJfh7arnnfPPUZHeJUaE62QLEwhK48QnH9LXeK2m1iZU"
```
The command displays output similar to the following:
subkey inspect "12bzRJfh7arnnfPPUZHeJUaE62QLEwhK48QnH9LXeK2m1iZU"
Public Key URI `12bzRJfh7arnnfPPUZHeJUaE62QLEwhK48QnH9LXeK2m1iZU` is account:
Network ID/Version: polkadot
Public key (hex): 0x46ebddef8cd9bb167dc30878d7113b7e168e6f0646beffd77d69d39bad76b47a
Account ID: 0x46ebddef8cd9bb167dc30878d7113b7e168e6f0646beffd77d69d39bad76b47a
Public key (SS58): 12bzRJfh7arnnfPPUZHeJUaE62QLEwhK48QnH9LXeK2m1iZU
SS58 Address: 12bzRJfh7arnnfPPUZHeJUaE62QLEwhK48QnH9LXeK2m1iZU
#### Using Polkadot.js API
To verify an address in JavaScript or TypeScript projects, you can use the functions built into the [Polkadot.js API](https://polkadot.js.org/docs/). For example:
```js
// Import Polkadot.js API dependencies
const { decodeAddress, encodeAddress } = require('@polkadot/keyring');
const { hexToU8a, isHex } = require('@polkadot/util');
// Specify an address to test.
const address = 'INSERT_ADDRESS_TO_TEST';
// Check address
const isValidSubstrateAddress = () => {
try {
encodeAddress(isHex(address) ? hexToU8a(address) : decodeAddress(address));
return true;
} catch (error)
};
// Query result
const isValid = isValidSubstrateAddress();
console.log(isValid);
```
If the function returns `true`, the specified address is a valid address.
#### Other SS58 Implementations
Support for encoding and decoding Polkadot SDK SS58 addresses has been implemented in several other languages and libraries.
- **Crystal**: [`wyhaines/base58.cr`](https://github.com/wyhaines/base58.cr)
- **Go**: [`itering/subscan-plugin`](https://github.com/itering/subscan-plugin)
- **Python**: [`polkascan/py-scale-codec`](https://github.com/polkascan/py-scale-codec)
- **TypeScript**: [`subsquid/squid-sdk`](https://github.com/subsquid/squid-sdk)
---
Page Title: Polkadot Web Reference
- Resolved Markdown: https://docs.polkadot.com/reference/apps/hosts/polkadot-web.md
- Canonical (HTML): https://docs.polkadot.com/reference/apps/hosts/polkadot-web/
- Summary: Reference for Polkadot Web (dot.li), the browser-based Host that loads Polkadot Products by their .dot name without requiring a desktop installation.
- Word Count: 706; Token Estimate: 1059
- Last Updated: 2026-06-16T14:17:44+00:00
- Version Hash: sha256:dc3d064bc144536ccffd21f72a6f7454034302ffc1ae1e054655a40c5934608b
# Polkadot Web
## Introduction
Polkadot Web is the browser-based Host that loads Polkadot Products from any browser tab — no install required. Served at `dot.li`, it is the third sibling alongside the [Polkadot App](/reference/apps/hosts/polkadot-app/) and [Polkadot Desktop](/reference/apps/hosts/polkadot-desktop/). Its job is the same as theirs: load a Polkadot Product inside a sandbox, mediate everything it touches (signing, chain access, storage, outbound requests) through the Host API.
What makes Web different from Desktop is not the _model_ — it is the _delivery_. Web runs in a regular browser instead of an installed application, which changes:
- **The trust surface**: The browser is the runtime.
- **The visiting flow**: A Product is loaded by navigating to it in a browser tab, not from an installed address bar.
- **The upgrade path**: Products and the Host itself update on page load, not via an OS installer.
The Product surface a developer targets, including `.dot` name addressing, the TrUAPI surface, and the per-Product sub-account model, is the same in either Host.
!!! warning "Provisional"
Polkadot Web is being actively built and several of its developer-facing surfaces are not yet finalized. Pages in this subsection document the conceptual model and the parts that are stable; surface-level specifics carry per-page provisional callouts and will be filled in once confirmed.
## Architecture
At a high level, three properties matter to a Product developer building for Web:
- **Browser-tab runtime**: Polkadot Web is a regular browser page at `dot.li`. Products are loaded inside it, not as standalone tabs.
- **Same sandbox contract as Desktop**: A Product running on Web sees the same per-Product account model, the same TrUAPI surface, and the same permission system as a Product running on Desktop. Code that works in Desktop will work on Web, with surface differences called out per-page in this subsection.
- **Pairs with the Polkadot App for signing**: Like Desktop, Polkadot Web does not hold the user's signing key. A browser session pairs with the user's paired App, and every signed action goes through the App for per-transaction approval.
## Visiting and Shield States
Two concepts are specific enough to Web to deserve their own pages:
- [Visiting a Product](/reference/apps/hosts/polkadot-web/visiting/): How a `.dot` name is resolved and a Product is loaded into a browser tab, and how this differs from Desktop's address-bar flow.
- [Shield States](/reference/apps/hosts/polkadot-web/shield-states/): The security-indicator UI that surfaces the trust posture of the loaded Product, including bundle verification and Host state.
## Host API on Web
The TrUAPI surface a Product calls on Web is materially the same as on Desktop. There are a small number of capabilities where the underlying behavior differs because of the browser context (storage, outbound requests, media access), and those are documented at [Host API](/reference/apps/hosts/polkadot-web/host-api/).
## On-Chain `polkadot.com`
A Polkadot Product can also serve as the meta-surface that points to other Products: a discovery layer running as a Product itself. The canonical instance of this is [On-Chain polkadot.com](/reference/apps/hosts/polkadot-web/onchain-polkadot-com/), which is the on-chain-published presence backing the `polkadot.com` site.
## Upload Journeys
!!! warning "Provisional"
The flows for publishing content from a Polkadot Web Host are still being defined, including uploading assets, registering a `.dot` Product, and updating a published bundle from within Web. They will be documented here once finalized.
## Where to Go Next
- Learn **Visiting a Product**
---
How Polkadot Web resolves a `.dot` name and loads the resulting Product into a browser tab.
[:octicons-arrow-right-24: Reference](/reference/apps/hosts/polkadot-web/visiting/)
- Learn **Shield States**
---
The security-indicator UI on Web and what each shield state means for a Product the user is interacting with.
[:octicons-arrow-right-24: Reference](/reference/apps/hosts/polkadot-web/shield-states/)
- Learn **Host API on Web**
---
Where the Web Host's TrUAPI surface differs in behavior from Desktop because of the browser context.
[:octicons-arrow-right-24: Reference](/reference/apps/hosts/polkadot-web/host-api/)
---
Page Title: PopRules and dotNS Pricing
- Resolved Markdown: https://docs.polkadot.com/reference/apps/infrastructure/dotns/poprules-pricing.md
- Canonical (HTML): https://docs.polkadot.com/reference/apps/infrastructure/dotns/poprules-pricing/
- Summary: The pricing ladder for .dot name registration — who can register what name length at what cost, organized by PoP tier and suffix shape.
- Word Count: 617; Token Estimate: 1044
- Last Updated: 2026-06-16T14:17:44+00:00
- Version Hash: sha256:5f8b0a9912424db6b770d792c3c349e456c2a3584e6e0c0c67ce05483d30acec
# PopRules and Pricing
## Introduction
dotNS uses a scarcity ladder for `.dot` name registration. The shortest, most-premium names are reserved for governance or free to personhood holders; longer names are open to anyone for a deposit. The mechanism that enforces "free for personhood holders" is `PopRules` — the contract that evaluates a proposed registration against the registering account's PoP status and the requested name's length and suffix shape.
This page documents the ladder, the two PoP tiers `PopRules` recognizes, and the deposit formulas for open-tier registrations.
## The Two PoP Tiers
`PopRules` recognizes two personhood tiers, registered separately on the People Chain:
- **PoP Full**: Cryptographically proven personhood, the destination state. The user completes the full biometric verification flow in the Polkadot App; their key joins the active membership ring on the People Chain. PoP Full holders can generate zero-knowledge proofs of personhood. See the [Proof of Personhood reference](/reference/apps/hosts/polkadot-app/pop/) for details.
- **PoP Lite**: Third-party attestation. An authorized attester submits an on-chain attestation that an account belongs to a real user; the account is registered against a separate `lite-people` ring. Lite supply is bounded by governance — it is the on-ramp; Full is the destination.
Both tiers qualify for free name registration, but at different name-length tiers.
!!! note "Self-declared PoP tier"
dotNS reads PoP tier from a status the user sets themselves. On-chain verification against the People Chain is a forthcoming integration; until that ships, treat the tier check as cooperative, not adversarial.
## The Pricing Ladder
| Name format | Who can register | Deposit |
|:------------------------------------------------|:-------------------------|:----------------------------------------|
| ≤5 chars | Governance only | — |
| 6–8 chars (no numeric suffix) | PoP Full holders | Free |
| 6–8 chars + 2-digit suffix (e.g. `alice01`) | PoP Lite or Full holders | Free |
| 9–14 chars (no numeric suffix) | PoP Full holders | Free |
| 9–14 chars + 2-digit suffix (e.g. `acmecorp01`) | Anyone | `startingPrice × (15 − nameLength)` DOT |
| 15+ chars | Anyone | `startingPrice / 2` DOT |
Two patterns explain the ladder:
- **Premium = short and unmarked**: A 6–8-character name with no numeric suffix is the most valuable shape; `PopRules` reserves it for PoP Full. A 6–8-character name with a 2-digit suffix is the next tier down; both PoP tiers can register one. Beyond that, the ladder opens up.
- **Anyone can buy length**: A 9–14-character name with a numeric suffix is open to anyone for a sliding-scale deposit; the longer the name, the smaller the deposit. A 15+-character name uses a fixed half-`startingPrice` deposit.
## Lite → Full Migration Reservation
When a PoP Lite holder registers a Lite-tier name (6–8 chars with suffix, or longer), dotNS reserves the matching no-suffix base name for them for 12 weeks. If the Lite holder upgrades to PoP Full within that window, they can claim the base name without contention — without the reservation, by the time they upgraded, someone else might have grabbed the unsuffixed name and they would have lost their identity continuity.
The reservation is automatic. A PoP Lite holder registering `alice01.dot` reserves `alice.dot` for themselves for 12 weeks; if they upgrade to Full in that window, `alice.dot` is claimable.
## Where to Go Next
- Learn **Proof of Personhood**
---
Where the `PopRules` contract reads the PoP tier from — the App-side mechanism that produces Full and Lite registrations.
[:octicons-arrow-right-24: Reference](/reference/apps/hosts/polkadot-app/pop/)
- Guide **Register and Publish**
---
The Product-side how-to that consumes the PopRules check — registering a `.dot` name and seeing the deposit or free-tier outcome.
[:octicons-arrow-right-24: Get Started](/apps/deploy-your-app/)
---
Page Title: Preimage Method Group
- Resolved Markdown: https://docs.polkadot.com/reference/apps/protocol/truapi/preimage.md
- Canonical (HTML): https://docs.polkadot.com/reference/apps/protocol/truapi/preimage/
- Summary: TrUAPI method group for submitting off-chain content that on-chain operations dereference by hash, with preimage and Statement Store distinction.
- Word Count: 327; Token Estimate: 490
- Last Updated: 2026-06-16T14:17:44+00:00
- Version Hash: sha256:d1bcdaf018c39e533e2ad0175c69159ba40ccef55dfacdc2425b3f331785c433
# Preimage
## Introduction
The Preimage method group lets a Product submit off-chain content that on-chain operations dereference by hash. A typical use case is a governance proposal, where the on-chain referendum points at a hash, the preimage is the bytes of the proposal call, and the bytes must be available when the referendum executes.
The Statement Store and Preimage surfaces look superficially similar because both submit bytes, return a hash, and let on-chain logic reference that hash. They are not interchangeable. See the [Statement vs Preimage](/reference/apps/hosts/polkadot-desktop/preimage/#statement-vs-preimage) decision table for which to use when.
## Conceptual Contract
The group covers:
- **Submitting a preimage**: The Product submits bytes for an on-chain operation that will reference them. The Host signs the submission with the user's per-Product account, subject to the standard signing model, the `ChainSubmit` permission, and per-transaction approval on the paired App.
- **Hosting the bytes**: The preimage layer hosts the referenced bytes so the on-chain operation can dereference them when it executes. In practice, the Host often routes storage through Bulletin Chain.
- **Lifecycle management**: Preimages are durable until the referenced operation completes or until they are explicitly cleaned up, unlike statements, which expire after their time to live (TTL).
!!! warning "Provisional"
The exact set of host calls in this group, supported preimage size limits, the relationship with Bulletin Chain storage, and any preimage-availability hooks for runtime introspection are still being finalized.
## Where to Go Next
- Learn **Preimage on Polkadot Desktop**
---
The Host-side reference including the Statement-vs-Preimage decision table.
[:octicons-arrow-right-24: Reference](/reference/apps/hosts/polkadot-desktop/preimage/)
- Guide **Store Data on Chain**
---
The Product-side how-to for Bulletin Chain storage that the preimage surface often delegates to underneath.
[:octicons-arrow-right-24: Get Started](/apps/build/store-data-on-chain/)
---
Page Title: Preimage Submission via Polkadot Desktop
- Resolved Markdown: https://docs.polkadot.com/reference/apps/hosts/polkadot-desktop/preimage.md
- Canonical (HTML): https://docs.polkadot.com/reference/apps/hosts/polkadot-desktop/preimage/
- Summary: Reference for how Polkadot Desktop mediates preimage submission for Products, and the Statement vs Preimage distinction for off-chain content.
- Word Count: 591; Token Estimate: 1049
- Last Updated: 2026-06-16T14:17:44+00:00
- Version Hash: sha256:9a2412ca04cad191ffbcf0cc32747b60ea9ca77e80ebb09f322f27191f41f76e
# Preimage
## Introduction
A preimage is the original content of a hash that has been referenced on-chain. The classic example: a governance referendum points at the hash of a proposal, and the preimage is the proposal's actual bytes. The chain stores only the hash to keep block size down; the bytes have to be made available off-chain before the referenced operation can execute. Polkadot Desktop exposes a preimage submission surface that Products can call through the Host API.
This page is the reference for that surface. The [Bulletin Chain reference](/reference/apps/infrastructure/bulletin-chain/) documents the storage layer that preimage submission often interacts with.
## What the Preimage Surface Does
!!! warning "Provisional"
The exact set of host calls Desktop exposes for preimage submission, the supported size limits, and the lifecycle hooks for preimage availability are still being finalized. This page documents the conceptual model; the current method-group frame is in the [Preimage TrUAPI reference](/reference/apps/protocol/truapi/preimage/).
Conceptually, the preimage surface lets a Product:
- **Submit a preimage**: Submit off-chain content for an on-chain operation that will reference it by hash. The Host signs the submission with the user's account, subject to the usual `ChainSubmit` permission and per-transaction approval on the paired App.
- **Provide hosting**: Host the preimage so it is reachable when the on-chain operation executes. In practice, this often means writing the bytes to the Bulletin Chain and recording the resulting CID, but the exact storage path is part of the surface still being finalized.
## Statement vs Preimage
Statements and preimages are off-chain content addressed by hash, and both surfaces look superficially similar: your Product submits some bytes, gets a hash back, and the on-chain world refers to that hash later. The two are not interchangeable, though, and choosing the wrong one is a real failure mode.
| Property | Statement (Statement Store) | Preimage |
| :--------------------: | :-------------------------------------------------------------------------------------: | :----------------------------------------------------------------------------------------------------------: |
| What it is for | Real-time signaling between users: chat, presence, typing indicators, multiplayer state | Off-chain content that an on-chain operation must dereference: governance proposals, scheduled call payloads |
| Lifetime | Short TTL (default 30 seconds, gossip-distributed) | Lives until the referencing on-chain operation has completed (or until explicitly cleaned up) |
| Availability guarantee | Best-effort gossip; can be missed entirely if no peer was listening on the topic | Must be available for the referencing operation to execute; storage is durable |
| Validation gate | Allowance-gated by `pallet-statement-store` (`max_count` and `max_size` per account) | Gated by the same permission and signing requirements as any other on-chain submission |
| When to use | Anything users observe in real time and accept losing if the network dropped it | Anything an on-chain operation needs to read back later |
A useful rule of thumb: if your Product would still be correct after the bytes expire from network gossip, it is a statement. If the bytes need to be there in 30 minutes for a referendum to execute, it is a preimage.
## Where to Go Next
- Learn **Statement Store via Host API**
---
The other half of the Statement-vs-Preimage decision: when your content belongs on the gossip-distributed signaling layer instead of as an on-chain-referenced preimage.
[:octicons-arrow-right-24: Reference](/reference/apps/hosts/polkadot-desktop/statement-store/)
- Guide **Store Data on Chain**
---
The Product-side how-to for Bulletin Chain storage, which the preimage surface often delegates to underneath.
[:octicons-arrow-right-24: Get Started](/apps/build/store-data-on-chain/)
---
Page Title: Proof of Personhood in the Polkadot App
- Resolved Markdown: https://docs.polkadot.com/reference/apps/hosts/polkadot-app/pop.md
- Canonical (HTML): https://docs.polkadot.com/reference/apps/hosts/polkadot-app/pop/
- Summary: Reference for how the Polkadot App runs Proof of Personhood, with biometric verification, Ring-VRF aliases on People Chain, and the PoP tier model.
- Word Count: 664; Token Estimate: 914
- Last Updated: 2026-06-16T14:17:44+00:00
- Version Hash: sha256:c2ebc1b107b42d2c815f881b1311c2a60e6504efb73e843cbab28d4624116e55
# Proof of Personhood
## Introduction
Proof of Personhood (PoP) is Polkadot's privacy-preserving "real human" check. The Polkadot App is the only place PoP verification happens. When a user completes PoP, they do it on their phone, in the App, once. From then on, a single proof unlocks the developer-facing surface area that gates on personhood, including the TestNet faucet, short `.dot` names, and any alias-gated feature inside a Polkadot Product.
The App's role is narrow but load-bearing. It runs the verification flow, registers the result on the People Chain, and produces Ring-VRF aliases on demand for Products that ask for one through the Host API. Products see the aliases, not the underlying identity.
!!! warning "Provisional"
The exact PoP verification flow inside the App (the video or biometric interaction, the on-device key-derivation path, peer-attestation cadence for ongoing membership) is still being finalized. Lifecycle diagrams and the precise list of pallets a PoP submission touches will be added once they are confirmed.
## Ring-VRF Aliases
A Ring-VRF alias is a context-specific pseudonym derived from the user's PoP-anchored identity. Aliases have three properties Product developers depend on:
- **Anchored in personhood**: An alias only exists for users who have completed PoP. A valid Ring-VRF proof over an alias is also a valid proof of personhood for the user behind it.
- **Scoped to a context**: The default context is the requesting Product's `.dot` domain. The same user produces a consistent alias each time they return to your Product, but a different alias for any other Product.
- **Unlinkable across domains**: Two Products cannot correlate that they share a user unless the user explicitly grants a cross-domain alias.
The App is the side of the system that holds the alias-producing material. A Product's call to `app.wallet.getAnonymousAlias()` resolves to the App on the user's phone, which signs the alias request.
## PoP Tiers: Full vs. Lite
The People Chain recognizes two personhood tiers, both registered in the App:
- **PoP Full**: Cryptographically proven personhood. The user completes the full verification flow in the App: a biometric scan plus ongoing peer-attestation via recurring online sessions. The user's key joins the active membership ring on the People Chain. PoP Full holders can generate zero-knowledge proofs that they are a real person without revealing which one.
- **PoP Lite**: Third-party attestation. An attester authorized by governance submits an on-chain attestation that an account belongs to a real user. The account is then registered against a separate `lite-people` ring on the People Chain alongside a communication identifier and a username. Lite supply is bounded by governance, which is the spam-resistance mechanism. Lite holders can produce lite-ring Ring-VRF proofs but do not yet hold membership in the full personhood ring.
Lite is the on-ramp; Full is the destination. The dotNS registrar uses tier to gate which name lengths a user can register for free. See [dotNS PopRules Pricing](/reference/apps/infrastructure/dotns/poprules-pricing/) for the full PopRules tier table.
## What This Unlocks for a Product
A Product running inside Polkadot Desktop can reach the App's PoP surface in two ways via `@parity/product-sdk`:
- **Alias-gated features**: Call `getAnonymousAlias()` for the user's per-Product alias, then `createProof(challenge)` to prove control of that alias against a challenge. Gate features on the proof rather than on the user's account address.
- **On-chain personhood gates**: Dispatch calls under the `under_alias` runtime origin against PoP pallets (e.g. `pallet-people`). The runtime verifies the underlying Ring-VRF proof and the called pallet's view of the caller is the alias, not the underlying account.
## Where to Go Next
- Guide **Verify Your Identity**
---
The setup step where the developer completes PoP, plus the PopRules tier table.
[:octicons-arrow-right-24: Get Started](/reference/apps/infrastructure/dotns/poprules-pricing/)
---
Page Title: Proof of Personhood Reference
- Resolved Markdown: https://docs.polkadot.com/reference/apps/infrastructure/pop.md
- Canonical (HTML): https://docs.polkadot.com/reference/apps/infrastructure/pop/
- Summary: Reference for Polkadot's Proof of Personhood infrastructure — Ring-VRF and aliases, plus per-pallet documentation for the pallets that gate logic on personhood.
- Word Count: 478; Token Estimate: 1009
- Last Updated: 2026-06-16T14:17:44+00:00
- Version Hash: sha256:d0813ca9641f0606b36b1c59bf2bb754f3ef0b74e64f3d6c3ac8154d5190fdd7
# Proof of Personhood
## Introduction
Proof of Personhood (PoP) is Polkadot's privacy-preserving way to confirm a user is a real human, without exposing _which_ human. A user completes PoP once (in the [Polkadot App](/reference/apps/hosts/polkadot-app/)); from then on, a single proof unlocks personhood-gated features — the TestNet faucet, short `.dot` names, alias-gated checks inside a Polkadot Product, and on-chain payments routed through personhood-aware pallets.
For a Product developer, PoP shows up in two places:
- **As a primitive your Product calls into**: Through the Product SDK your Product requests an alias for the current user, has the user prove control of that alias against a challenge, and gates features on the result. The Polkadot App is where the proving happens; your Product never sees the underlying biometric or the user's identity record.
- **As a runtime origin your Product dispatches under**: Polkadot's PoP pallets accept calls under the `under_alias` origin, so your Product can submit on-chain operations that resolve to the user's alias inside the called pallet — pallet state stays unlinkable to the underlying account.
This reference is organized into two halves: the mechanism (Ring-VRF, aliases, the unlinkability property, how `under_alias` works) on its own page, and per-pallet reference for the pallets a Product is most likely to dispatch into.
## The Mechanism
[Ring-VRF and Aliases](/reference/apps/infrastructure/pop/ring-vrf-and-aliases/) is the conceptual deep dive: how the PoP cryptography produces unlinkable per-Product aliases, what `under_alias` is at the runtime layer, and the privacy property the whole stack delivers.
## The Pallets
| Pallet | What It Covers |
|--------------------------------------------------------------------------|---------------------------------------------------------------------------------------------------------------------------------------|
| [`pallet-people`](/reference/apps/infrastructure/pop/pallet-people/) | Personhood registration, alias-issuing, and the `under_alias` runtime origin. The foundational pallet the rest of the set depends on. |
| [`pallet-game`](/reference/apps/infrastructure/pop/pallet-game/) | Personhood-gated on-chain games and randomized selection flows. |
| [`pallet-score`](/reference/apps/infrastructure/pop/pallet-score/) | Personhood-anchored reputation and scoring primitives. |
| [`pallet-identity`](/reference/apps/infrastructure/pop/pallet-identity/) | The identity record on People Chain associated with a PoP account. |
| [`pallet-ubc`](/reference/apps/infrastructure/pop/pallet-ubc/) | Universal Basic Capacity — the per-person on-chain capacity primitives. |
| [`pallet-coinage`](/reference/apps/infrastructure/pop/pallet-coinage/) | The personhood-aware peer-to-peer payment surface behind the App's Coinage feature. |
## Where to Go Next
- Learn **Ring-VRF and Aliases**
---
The cryptographic and runtime mechanism — how PoP produces unlinkable per-Product aliases, what `under_alias` is, and the privacy property the whole stack delivers.
[:octicons-arrow-right-24: Reference](/reference/apps/infrastructure/pop/ring-vrf-and-aliases/)
- Learn **pallet-people**
---
The foundational pallet of the PoP set — registration, alias-issuing, and the `under_alias` runtime origin.
[:octicons-arrow-right-24: Reference](/reference/apps/infrastructure/pop/pallet-people/)
---
Page Title: Proof of Stake Consensus
- Resolved Markdown: https://docs.polkadot.com/reference/polkadot-hub/consensus-and-security/pos-consensus.md
- Canonical (HTML): https://docs.polkadot.com/reference/polkadot-hub/consensus-and-security/pos-consensus/
- Summary: Explore Polkadot's consensus protocols for secure, scalable, and decentralized network operation, including NPoS, BABE, GRANDPA, and BEEFY.
- Word Count: 1727; Token Estimate: 2293
- Last Updated: 2026-05-27T20:25:14+00:00
- Version Hash: sha256:7c3cfbb5b8353213a244ae0370322443ce11c1bdab0f219a0b6e775c48faa131
# Proof of Stake Consensus
## Introduction
Polkadot's Proof of Stake consensus model leverages a unique hybrid approach by design to promote decentralized and secure network operations. In traditional Proof of Stake (PoS) systems, a node's ability to validate transactions is tied to its token holdings, which can lead to centralization risks and limited validator participation. Polkadot addresses these concerns through its Nominated Proof of Stake (NPoS) model and a combination of advanced consensus mechanisms to ensure efficient block production and strong finality guarantees. This combination enables the Polkadot network to scale while maintaining security and decentralization.
## Nominated Proof of Stake
Polkadot uses Nominated Proof of Stake (NPoS) to select the validator set and secure the network. This model is designed to maximize decentralization and security by balancing the roles of [validators](https://wiki.polkadot.com/learn/learn-validator/) and [nominators](https://wiki.polkadot.com/learn/learn-nominator/).
- **Validators**: Play a key role in maintaining the network's integrity. They produce new blocks, validate parachain blocks, and ensure the finality of transactions across the relay chain.
- **Nominators**: Support the network by selecting validators to back with their stake. This mechanism allows users who don't want to run a validator node to still participate in securing the network and earn rewards based on the validators they support.
In Polkadot's NPoS system, nominators can delegate their tokens to trusted validators, giving them voting power in selecting validators while spreading security responsibilities across the network.
## Hybrid Consensus
Polkadot employs a hybrid consensus model that combines two key protocols: a finality gadget called [GRANDPA](#finality-gadget-grandpa) and a block production mechanism known as [BABE](#block-production-babe). This hybrid approach enables the network to benefit from both rapid block production and provable finality, ensuring security and performance.
The hybrid consensus model has some key advantages:
- **Probabilistic finality**: With BABE constantly producing new blocks, Polkadot ensures that the network continues to make progress, even when a final decision has not yet been reached on which chain is the true canonical chain.
- **Provable finality**: GRANDPA guarantees that once a block is finalized, it can never be reverted, ensuring that all network participants agree on the finalized chain.
By using separate protocols for block production and finality, Polkadot can achieve rapid block creation and strong guarantees of finality while avoiding the typical trade-offs seen in traditional consensus mechanisms.
## Block Production - BABE
Blind Assignment for Blockchain Extension (BABE) is Polkadot's block production mechanism, working with GRANDPA to ensure blocks are produced consistently across the network. As validators participate in BABE, they are assigned block production slots through a randomness-based lottery system. This helps determine which validator is responsible for producing a block at a given time. BABE shares similarities with [Ouroboros Praos](https://eprint.iacr.org/2017/573.pdf) but differs in key aspects like chain selection rules and slot timing.
Key features of BABE include:
- **Epochs and slots**: BABE operates in phases called epochs, each of which is divided into slots (around 6 seconds per slot). Validators are assigned slots at the beginning of each epoch based on stake and randomness.
- **Randomized block production**: Validators enter a lottery to determine which will produce a block in a specific slot. This randomness is sourced from the relay chain's [randomness cycle](/reference/parachains/randomness/).
- **Multiple block producers per slot**: In some cases, more than one validator might win the lottery for the same slot, resulting in multiple blocks being produced. These blocks are broadcasted, and the network's fork choice rule helps decide which chain to follow.
- **Handling empty slots**: If no validators win the lottery for a slot, a secondary selection algorithm ensures that a block is still produced. Validators selected through this method always produce a block, ensuring no slots are skipped.
BABE's combination of randomness and slot allocation creates a secure, decentralized system for consistent block production while also allowing for fork resolution when multiple validators produce blocks for the same slot.
### Validator Participation
In BABE, validators participate in a lottery for every slot to determine whether they are responsible for producing a block during that slot. This process's randomness ensures a decentralized and unpredictable block production mechanism.
There are two lottery outcomes for any given slot that initiate additional processes:
- **Multiple validators in a slot**: Due to the randomness, multiple validators can be selected to produce a block for the same slot. When this happens, each validator produces a block and broadcasts it to the network resulting in a race condition. The network's topology and latency then determine which block reaches the majority of nodes first. BABE allows both chains to continue building until the finalization process resolves which one becomes canonical. The [Fork Choice](#fork-choice) rule is then used to decide which chain the network should follow.
- **No validators in a slot**: On occasions when no validator is selected by the lottery, a secondary validator selection algorithm steps in. This backup ensures that a block is still produced, preventing skipped slots. However, if the primary block produced by a verifiable random function [(VRF)-selected](/reference/parachains/randomness/#vrf) validator exists for that slot, the secondary block will be ignored. As a result, every slot will have either a primary or a secondary block.
This design ensures continuous block production, even in cases of multiple competing validators or an absence of selected validators.
### Additional Resources
For further technical insights about BABE, including cryptographic details and formal proofs, see the [BABE paper](https://github.com/paritytech/research/blob/master/docs/Polkadot/protocols/block-production/Babe.md).
## Finality Gadget - GRANDPA
GRANDPA (GHOST-based Recursive ANcestor Deriving Prefix Agreement) serves as the finality gadget for Polkadot's relay chain. Operating alongside the BABE block production mechanism, it ensures provable finality, giving participants confidence that blocks finalized by GRANDPA cannot be reverted.
Key features of GRANDPA include:
- **Independent finality service**: GRANDPA runs separately from the block production process, operating in parallel to ensure seamless finalization.
- **Chain-based finalization**: Instead of finalizing one block at a time, GRANDPA finalizes entire chains, speeding up the process significantly.
- **Batch finalization**: Can finalize multiple blocks in a single round, enhancing efficiency and minimizing delays in the network.
- **Partial synchrony tolerance**: GRANDPA works effectively in a partially synchronous network environment, managing both asynchronous and synchronous conditions.
- **Byzantine fault tolerance**: Can handle up to 1/5 Byzantine (malicious) nodes, ensuring the system remains secure even when faced with adversarial behavior.
??? note "What is GHOST?"
[GHOST (Greedy Heaviest-Observed Subtree)](https://eprint.iacr.org/2018/104.pdf) is a consensus protocol used in blockchain networks to select the heaviest branch in a block tree. Unlike traditional longest-chain rules, GHOST can more efficiently handle high block production rates by considering the weight of subtrees rather than just the chain length.
### Probabilistic vs. Provable Finality
In traditional Proof of Work (PoW) blockchains, finality is probabilistic. As blocks are added to the chain, the probability that a block is final increases, but it can never be guaranteed. Eventual consensus means that all nodes will agree on a single version of the blockchain over time, but this process can be unpredictable and slow.
Conversely, GRANDPA provides provable finality, which means that once a block is finalized, it is irreversible. By using Byzantine fault-tolerant agreements, GRANDPA finalizes blocks more efficiently and securely than probabilistic mechanisms like Nakamoto consensus. Like Ethereum's Casper the Friendly Finality Gadget (FFG), GRANDPA ensures that finalized blocks cannot be reverted, offering stronger consensus guarantees.
### Additional Resources
For technical insights, including formal proofs and detailed algorithms, see the [GRANDPA paper](https://github.com/w3f/consensus/blob/master/pdf/grandpa.pdf) from Web3 Foundation.
For a deeper look at the code behind GRANDPA, see the following GitHub repositories:
- [GRANDPA Rust implementation](https://github.com/paritytech/finality-grandpa)
- [GRANDPA Pallet](https://github.com/paritytech/polkadot-sdk/blob/polkadot-stable2603/substrate/frame/grandpa/src/lib.rs)
## Fork Choice
The fork choice of the relay chain combines BABE and GRANDPA:
1. BABE must always build on the chain that GRANDPA has finalized.
2. When there are forks after the finalized head, BABE builds on the chain with the most primary blocks to provide probabilistic finality.
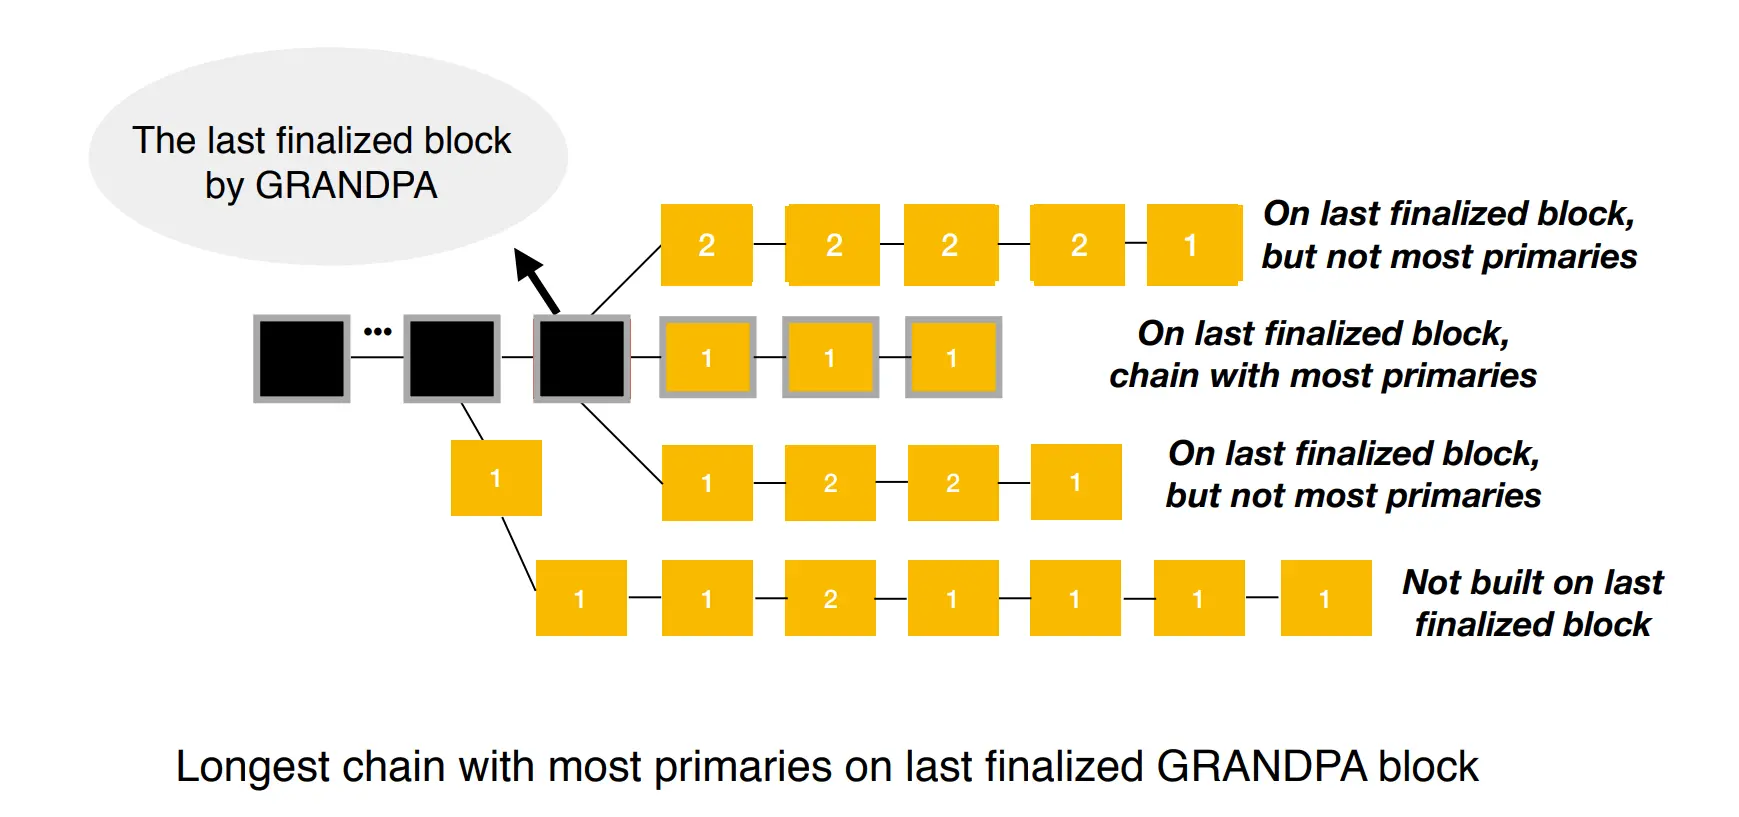
In the preceding diagram, finalized blocks are black, and non-finalized blocks are yellow. Primary blocks are labeled '1', and secondary blocks are labeled '2.' The topmost chain is the longest chain originating from the last finalized block, but it is not selected because it only has one primary block at the time of evaluation. In comparison, the one below it originates from the last finalized block and has three primary blocks.
### Additional Resources
To learn more about how BABE and GRANDPA work together to produce and finalize blocks on Kusama, see this [Block Production and Finalization in Polkadot](https://youtu.be/FiEAnVECa8c) talk from Web3 Foundation's Bill Laboon.
For an in-depth academic discussion about Polkadot's hybrid consensus model, see this [Block Production and Finalization in Polkadot: Understanding the BABE and GRANDPA Protocols](https://www.youtube.com/watch?v=1CuTSluL7v4&t=4s) MIT Cryptoeconomic Systems 2020 talk by Web3 Foundation's Bill Laboon.
## Bridging - BEEFY
Bridge Efficiency Enabling Finality Yielder (BEEFY) is a specialized protocol that extends the finality guarantees provided by GRANDPA. It is specifically designed to facilitate efficient bridging between Polkadot relay chains (such as Polkadot and Kusama) and external blockchains like Ethereum. While GRANDPA is well-suited for finalizing blocks within Polkadot, it has limitations when bridging external chains that weren't built with Polkadot's interoperability features in mind. BEEFY addresses these limitations by ensuring other networks can efficiently verify finality proofs.
Key features of BEEFY include:
- **Efficient finality proof verification**: BEEFY enables external networks to easily verify Polkadot finality proofs, ensuring seamless communication between chains.
- **Merkle Mountain Ranges (MMR)**: This data structure is used to efficiently store and transmit proofs between chains, optimizing data storage and reducing transmission overhead.
- **ECDSA signature schemes**: BEEFY uses ECDSA signatures, which are widely supported on Ethereum and other EVM-based chains, making integration with these ecosystems smoother.
- **Light client optimization**: BEEFY reduces the computational burden on light clients by allowing them to check for a super-majority of validator votes rather than needing to process all validator signatures, improving performance.
---
Page Title: Randomness
- Resolved Markdown: https://docs.polkadot.com/reference/parachains/randomness.md
- Canonical (HTML): https://docs.polkadot.com/reference/parachains/randomness/
- Summary: Explore the importance of randomness in PoS blockchains, focusing on Polkadot’s VRF-based approach to ensure fairness and security in validator selection.
- Word Count: 986; Token Estimate: 1336
- Last Updated: 2026-04-23T12:21:22+00:00
- Version Hash: sha256:e7d5de8207c507e8305224bd244333575155d0391ee6e8ae0db9ea9628c45b0e
# Randomness
## Introduction
Randomness is crucial in Proof of Stake (PoS) blockchains to ensure a fair and unpredictable distribution of validator duties. However, computers are inherently deterministic, meaning the same input always produces the same output. What we typically refer to as "random" numbers on a computer are actually pseudo-random. These numbers rely on an initial "seed," which can come from external sources like [atmospheric noise](https://www.random.org/randomness/), [heart rates](https://mdpi.altmetric.com/details/47574324), or even [lava lamps](https://en.wikipedia.org/wiki/Lavarand). While this may seem random, given the same "seed," the same sequence of numbers will always be generated.
In a global blockchain network, relying on real-world entropy for randomness isn’t feasible because these inputs vary by time and location. If nodes use different inputs, blockchains can fork. Hence, real-world randomness isn't suitable for use as a seed in blockchain systems.
Currently, two primary methods for generating randomness in blockchains are used: [`RANDAO`](#randao) and [`VRF`](#vrf) (Verifiable Random Function). Polkadot adopts the `VRF` approach for its randomness.
## VRF
A Verifiable Random Function (VRF) is a cryptographic function that generates a random number and proof that ensures the submitter produced the number. This proof allows anyone to verify the validity of the random number.
Polkadot's VRF is similar to the one used in [**Ouroboros Praos**](https://eprint.iacr.org/2017/573.pdf), which secures randomness for block production in systems like [BABE](/reference/polkadot-hub/consensus-and-security/pos-consensus/#block-production-babe) (Polkadot’s block production mechanism).
The key difference is that Polkadot's VRF doesn’t rely on a central clock—avoiding the issue of whose clock to trust. Instead, it uses its own past results and slot numbers to simulate time and determine future outcomes.
### How VRF Works
Slots on Polkadot are discrete units of time, each lasting six seconds, and can potentially hold a block. Multiple slots form an epoch, with 2400 slots making up one four-hour epoch.
In each slot, validators execute a "die roll" using a VRF. The VRF uses three inputs:
1. A "secret key," unique to each validator, is used for the die roll.
2. An epoch randomness value, derived from the hash of VRF outputs from blocks two epochs ago (N-2), so past randomness influences the current epoch (N).
3. The current slot number.
This process helps maintain fair randomness across the network.
Here is a graphical representation:
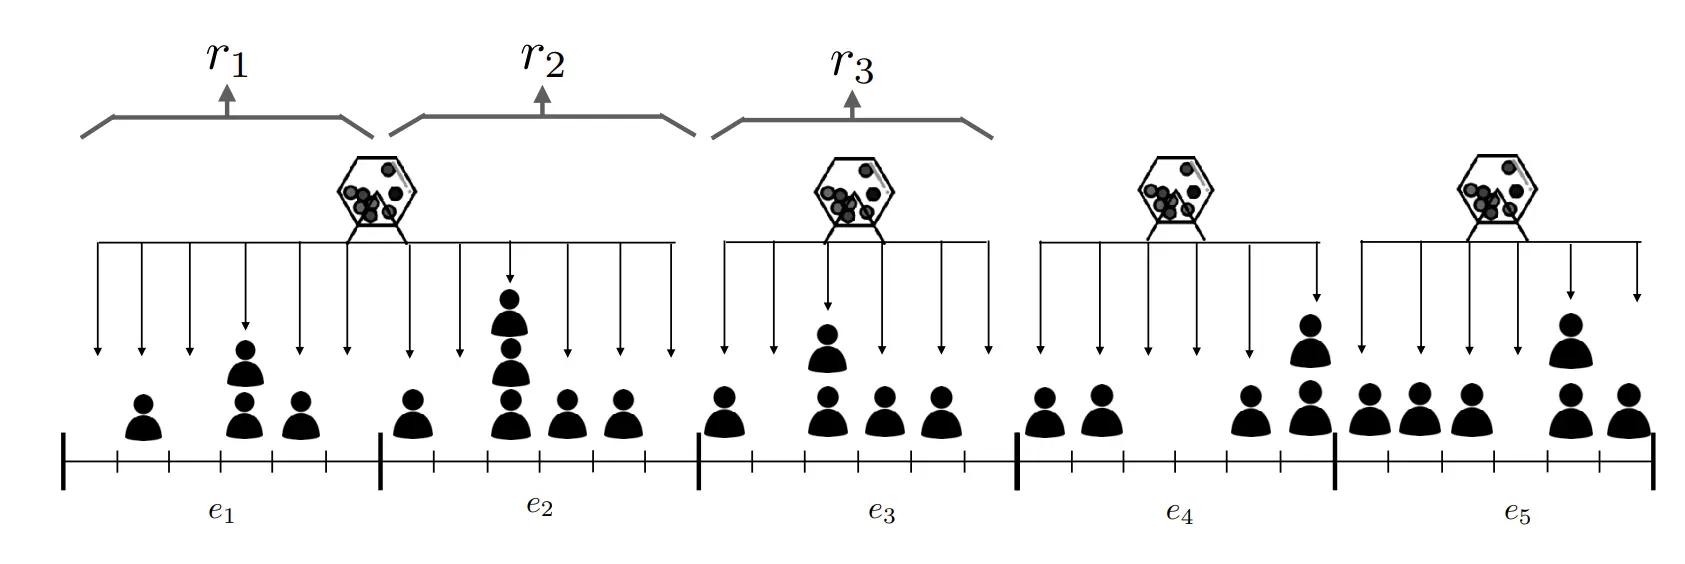
The VRF produces two outputs: a result (the random number) and a proof (verifying that the number was generated correctly).
The result is checked by the validator against a protocol threshold. If it's below the threshold, the validator becomes a candidate for block production in that slot.
The validator then attempts to create a block, submitting it along with the `PROOF` and `RESULT`.
So, VRF can be expressed like:
`(RESULT, PROOF) = VRF(SECRET, EPOCH_RANDOMNESS_VALUE, CURRENT_SLOT_NUMBER)`
Put simply, performing a "VRF roll" generates a random number along with proof that the number was genuinely produced and not arbitrarily chosen.
After executing the VRF, the `RESULT` is compared to a protocol-defined `THRESHOLD`. If the `RESULT` is below the `THRESHOLD`, the validator becomes a valid candidate to propose a block for that slot. Otherwise, the validator skips the slot.
As a result, there may be multiple validators eligible to propose a block for a slot. In this case, the block accepted by other nodes will prevail, provided it is on the chain with the latest finalized block as determined by the GRANDPA finality gadget. It's also possible for no block producers to be available for a slot, in which case the AURA consensus takes over. AURA is a fallback mechanism that randomly selects a validator to produce a block, running in parallel with BABE and only stepping in when no block producers exist for a slot. Otherwise, it remains inactive.
Because validators roll independently, no block candidates may appear in some slots if all roll numbers are above the threshold.
To verify resolution of this issue and that Polkadot block times remain near constant-time, see the [PoS Consensus](/reference/polkadot-hub/consensus-and-security/pos-consensus/) page of this documentation.
## RANDAO
An alternative on-chain randomness method is Ethereum's RANDAO, where validators perform thousands of hashes on a seed and publish the final hash during a round. The collective input from all validators forms the random number, and as long as one honest validator participates, the randomness is secure.
To enhance security, RANDAO can optionally be combined with a Verifiable Delay Function (VDF), ensuring that randomness can't be predicted or manipulated during computation.
For more information about RANDAO, see the [Randomness - RANDAO](https://eth2book.info/capella/part2/building_blocks/randomness/) section of the Upgrading Ethereum documentation.
## VDFs
Verifiable Delay Functions (VDFs) are time-bound computations that, even on parallel computers, take a set amount of time to complete.
They produce a unique result that can be quickly verified publicly. When combined with RANDAO, feeding RANDAO's output into a VDF introduces a delay that nullifies an attacker's chance to influence the randomness.
However, VDF likely requires specialized ASIC devices to run separately from standard nodes.
!!!warning
While only one is needed to secure the system, and they will be open-source and inexpensive, running VDF devices involves significant costs without direct incentives, adding friction for blockchain users.
## Additional Resources
For more information about the reasoning for choices made along with proofs, see Polkadot's research on blockchain randomness and sortition in the [Randomness](https://wiki.polkadot.com/learn/learn-cryptography/#randomness) entry of the Polkadot Wiki.
For a discussion with Web3 Foundation researchers about when and under what conditions Polkadot's randomness can be utilized, see the [Discussion on Randomness used in Polkadot](https://github.com/use-ink/ink/issues/57) issue on GitHub.
---
Page Title: Register a Local Asset
- Resolved Markdown: https://docs.polkadot.com/chain-interactions/token-operations/register-local-asset.md
- Canonical (HTML): https://docs.polkadot.com/chain-interactions/token-operations/register-local-asset/
- Summary: Learn how to register a local asset on Polkadot Hub, including prerequisites, deposits, and step-by-step instructions using Polkadot.js Apps.
- Word Count: 988; Token Estimate: 1476
- Last Updated: 2026-06-04T16:08:37+00:00
- Version Hash: sha256:5e9bf242e67b73f8d06dde94177b29257b9ab7f5ebf430c4b43598dd3a9e1030
# Register a Local Asset on Polkadot Hub
## Introduction
As detailed in the [Assets on Polkadot Hub Overview](/reference/polkadot-hub/assets/) page, Polkadot Hub accommodates two types of assets: local and foreign. Local assets are those that were created in Polkadot Hub and are identifiable by an integer ID. On the other hand, foreign assets originate from a sibling parachain and are identified by a Multilocation.
This guide will take you through the steps of registering a local asset on Polkadot Hub.
## Prerequisites
Before you begin, ensure you have access to the [Polkadot.js Apps](https://polkadot.js.org/apps/) interface and a funded wallet with DOT or KSM.
- For Polkadot Hub, you would need a deposit of 10 DOT and around 0.201 DOT for the metadata.
- For Kusama Hub, the deposit is 0.1 KSM and around 0.000669 KSM for the metadata.
You need to ensure that your Polkadot Hub account balance is a bit more than the sum of those two deposits, which should seamlessly account for the required deposits and transaction fees.
## Register a Local Asset
To register a local asset on Polkadot Hub, follow these steps:
1. Open the [Polkadot.js Apps](https://polkadot.js.org/apps/) interface and connect to the Polkadot Asset Hub using the network selector in the top left corner.
- You may prefer to test local asset registration on TestNet before registering the asset on a MainNet hub. If you still need to set up a local testing environment, review the [Environment setup](#test-setup-environment) section for instructions. Once the local environment is set up, connect to the Local Node (Chopsticks) available on `ws://127.0.0.1:8000`.
- For the live network, connect to the **Asset Hub** parachain. Either Polkadot or Kusama Asset Hub can be selected from the dropdown list, choosing the desired RPC provider.
2. Click on the **Network** tab on the top navigation bar and select **Assets** from the dropdown list.
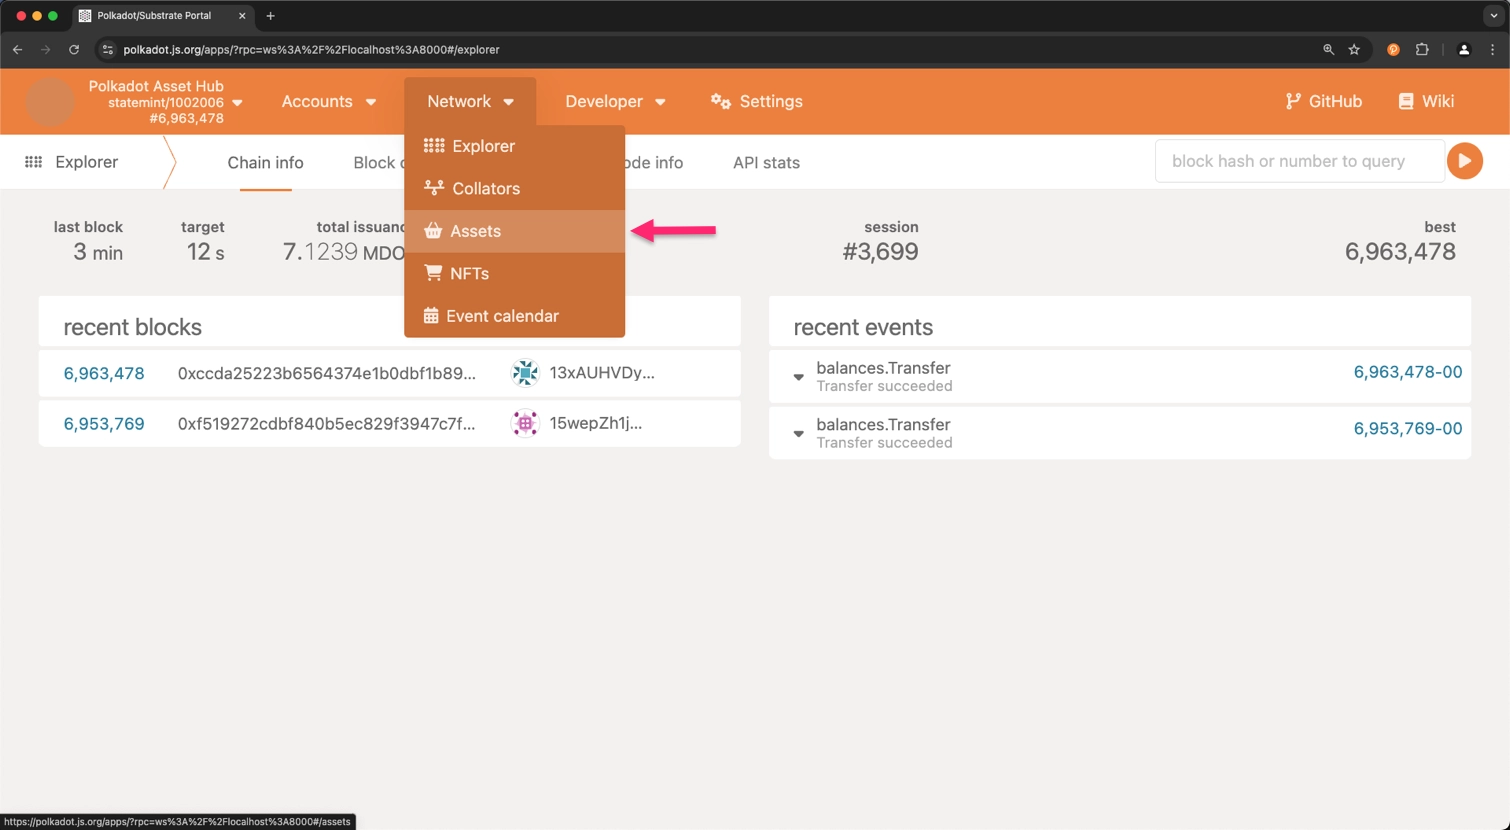
3. Now, you need to examine all the registered asset IDs. This step is crucial to ensure that the asset ID you are about to register is unique. Asset IDs are displayed in the **assets** column.
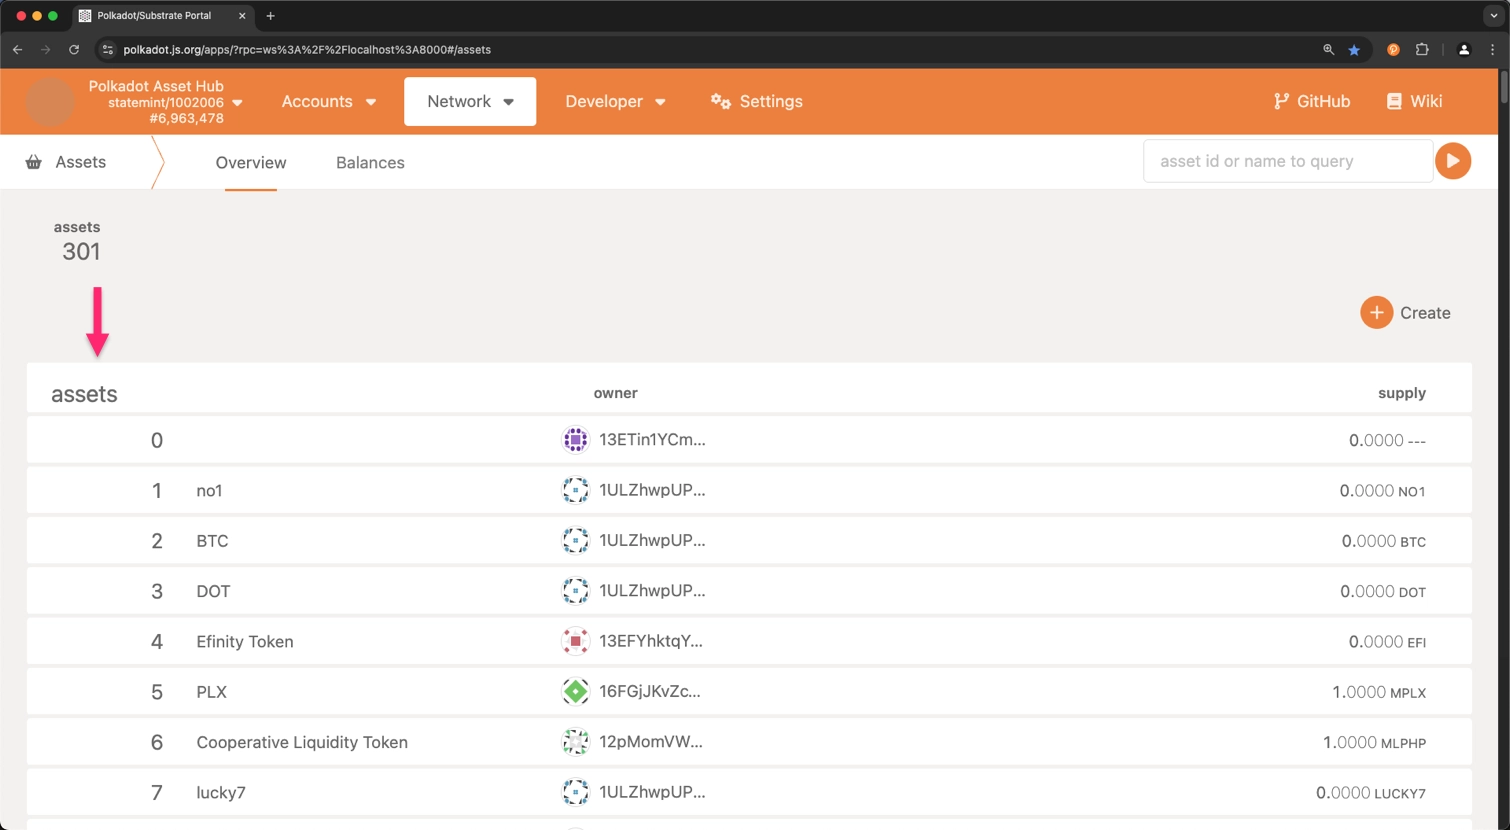
4. Once you have confirmed that the asset ID is unique, click on the **Create** button on the top right corner of the page.
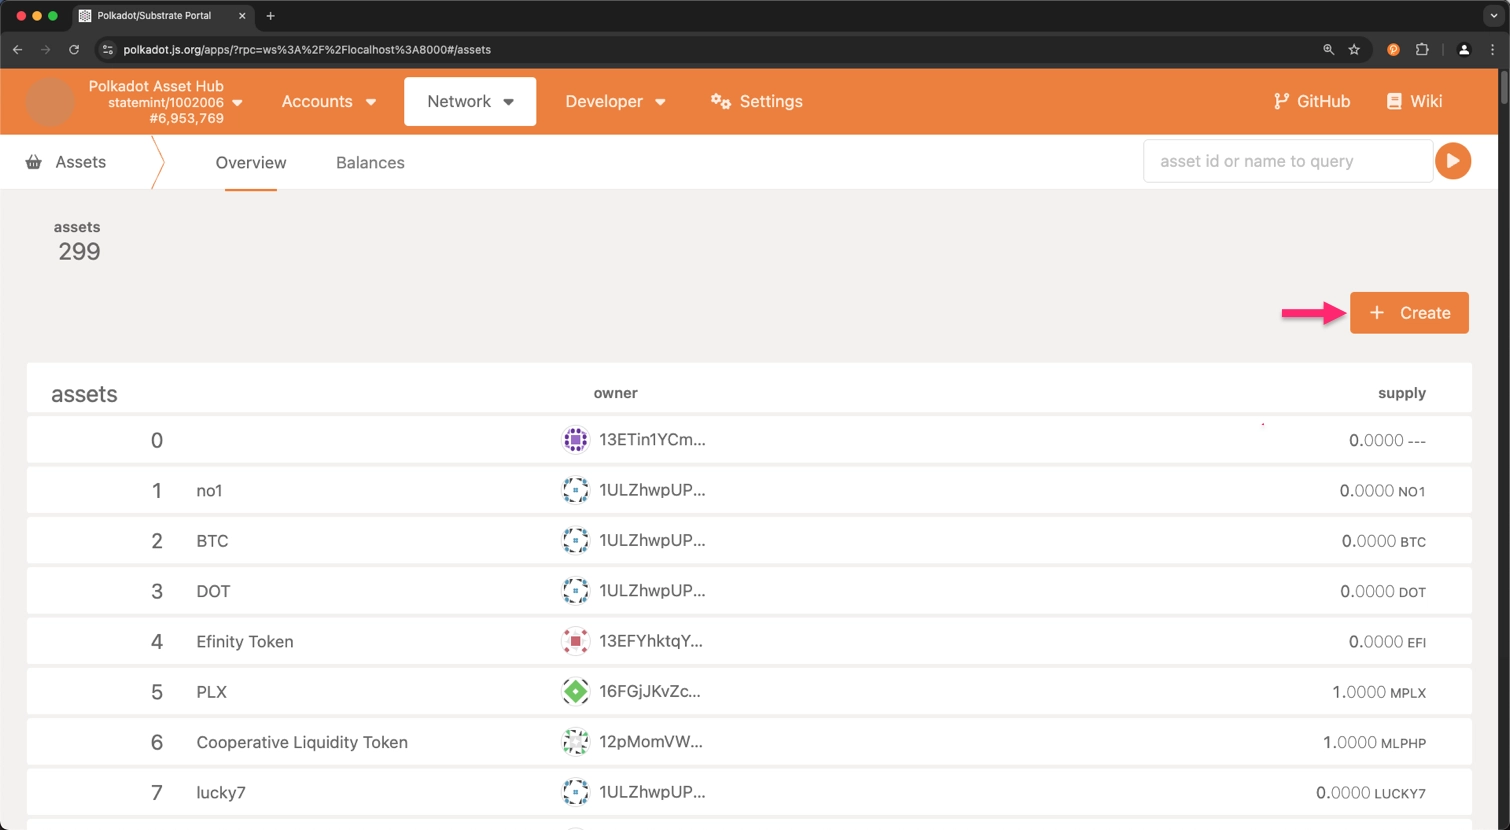
5. Fill in the required fields in the **Create Asset** form:
1. **creator account**: The account to be used for creating this asset and setting up the initial metadata.
2. **asset name**: The descriptive name of the asset you are registering.
3. **asset symbol**: The symbol that will be used to represent the asset.
4. **asset decimals**: The number of decimal places for this token, with a maximum of 20 allowed through the user interface.
5. **minimum balance**: The minimum balance for the asset. This is specified in the units and decimals as requested.
6. **asset ID**: The selected id for the asset. This should not match an already-existing asset id.
7. Click on the **Next** button.
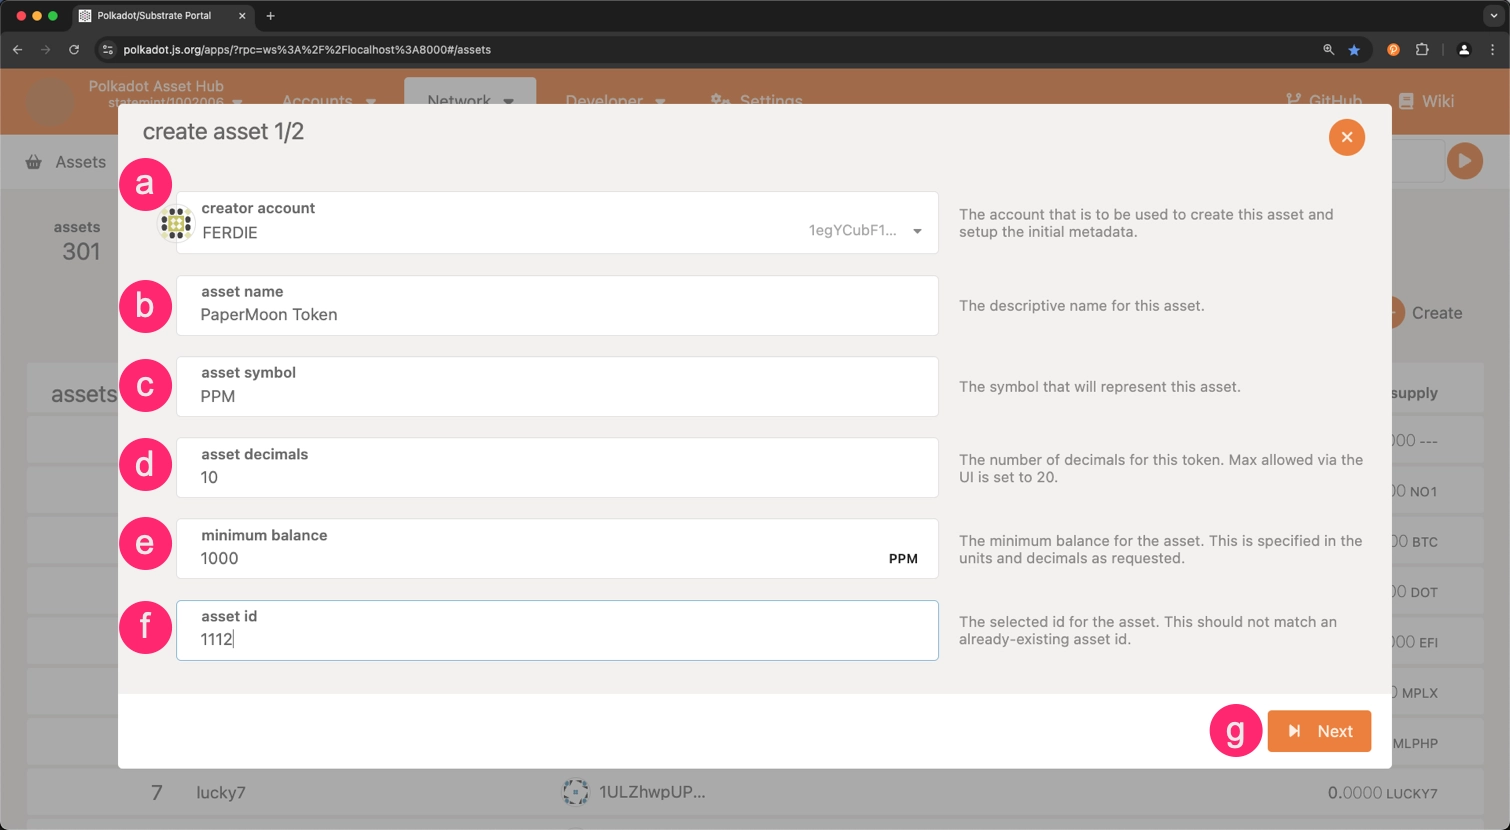
6. Choose the accounts for the roles listed below:
1. **admin account**: The account designated for continuous administration of the token.
2. **issuer account**: The account that will be used for issuing this token.
3. **freezer account**: The account that will be used for performing token freezing operations.
4. Click on the **Create** button.
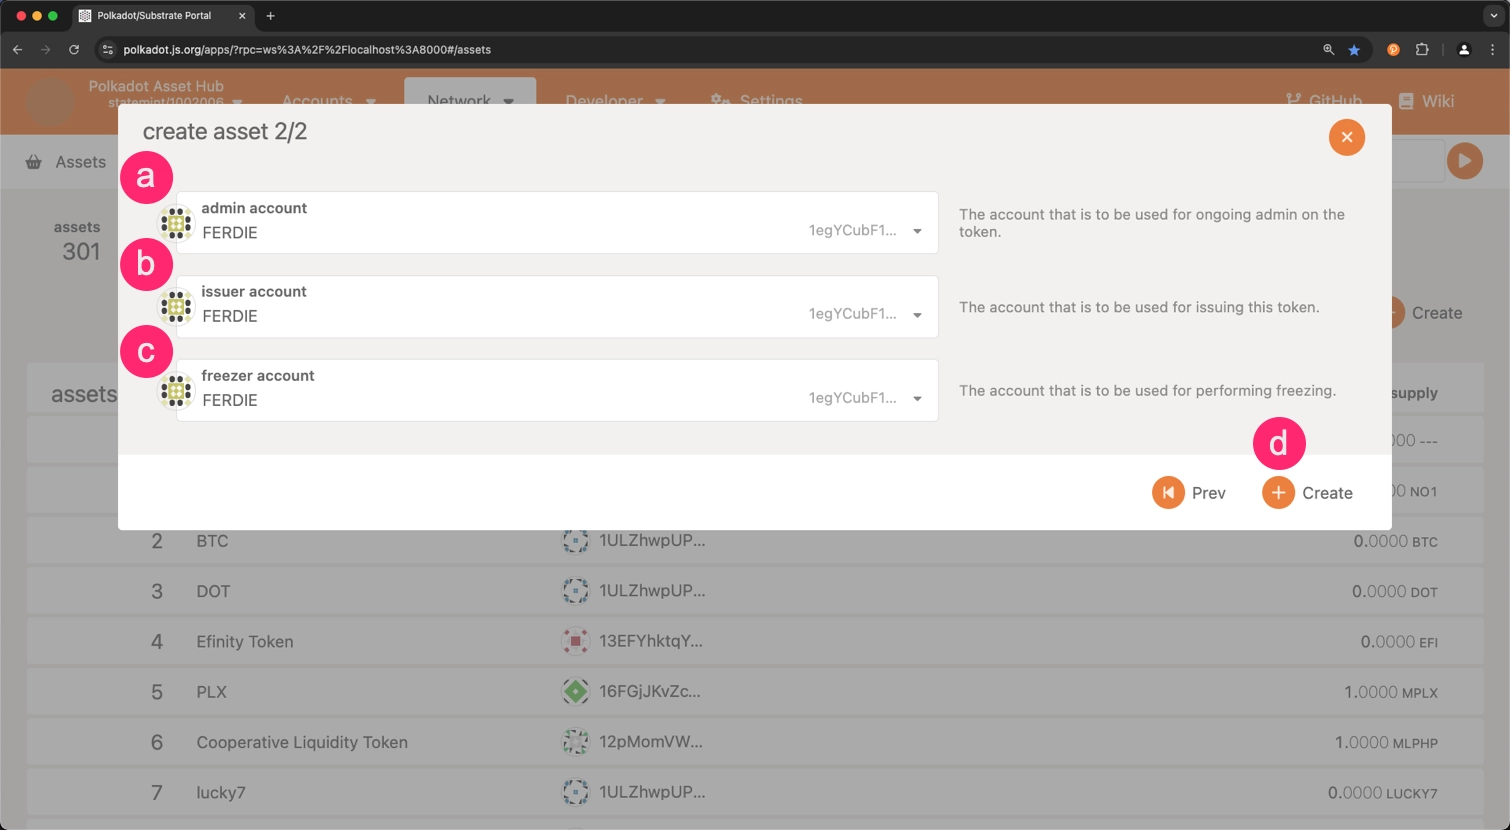
7. Click on the **Sign and Submit** button to complete the asset registration process.
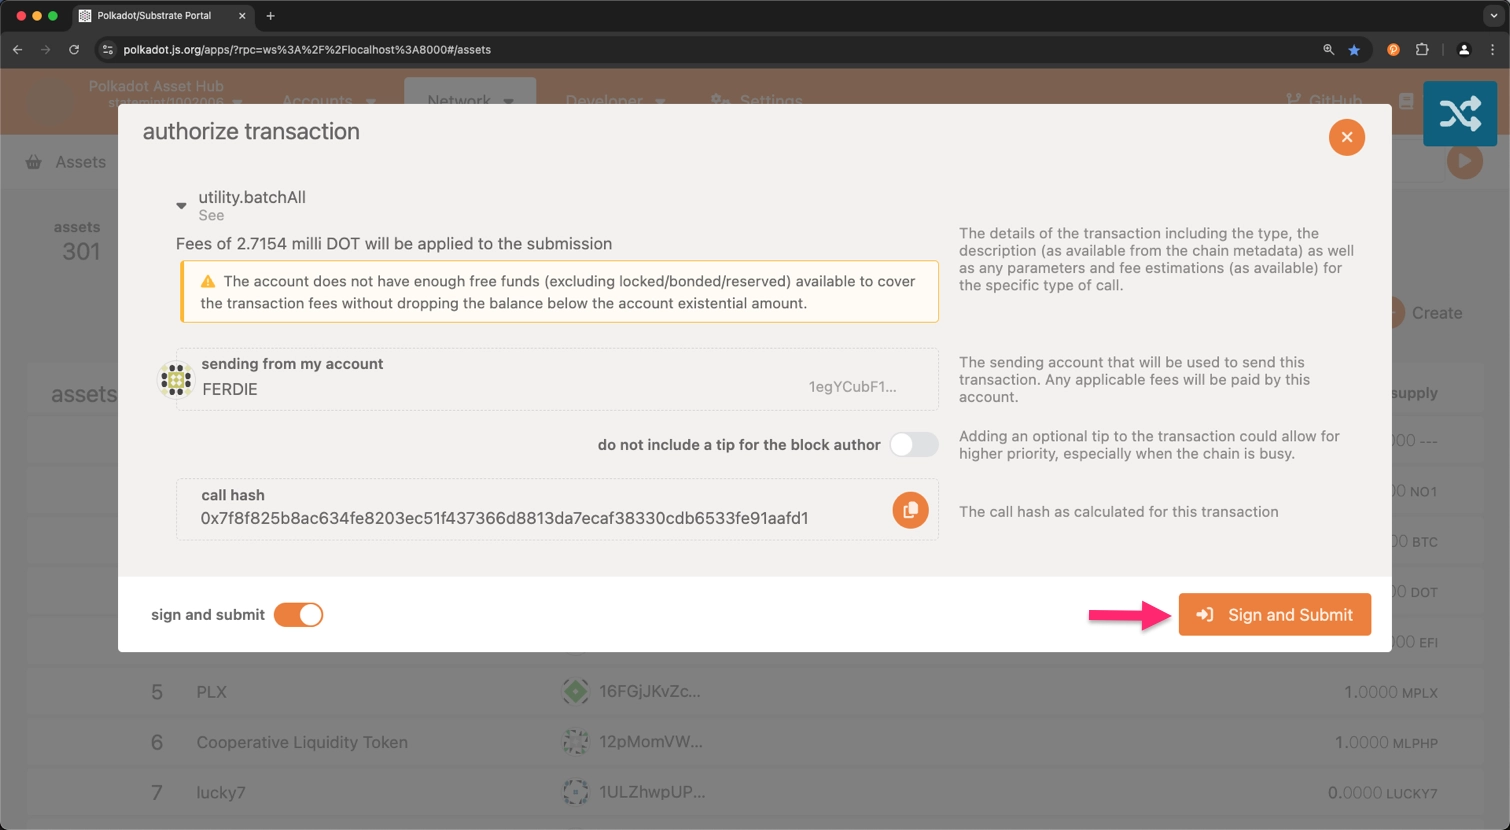
## Verify Asset Registration
After completing these steps, the asset will be successfully registered. You can now view your asset listed on the [**Assets**](https://polkadot.js.org/apps/?rpc=wss%3A%2F%2Fasset-hub-polkadot-rpc.dwellir.com#/assets) section of the Polkadot.js Apps interface.

!!! tip
Take into consideration that the **Assets** section’s link may differ depending on the network you are using. For the local environment, enter `ws://127.0.0.1:8000` into the **Custom Endpoint** field.
In this way, you have successfully registered a local asset on the Polkadot Hub.
For an in-depth explanation about Polkadot Hub and its features, see the [Polkadot Hub](/chain-interactions/token-operations/convert-assets/) entry in the Polkadot Wiki.
## Test Setup Environment
You can set up a local parachain environment to test the asset registration process before deploying it on the live network. This guide uses Chopsticks to simulate that process. For further information on chopsticks usage, refer to the [Chopsticks](/parachains/testing/fork-a-parachain/) documentation.
To set up a test environment, execute the following command:
```bash
npx @acala-network/chopsticks \
--config=https://raw.githubusercontent.com/AcalaNetwork/chopsticks/master/configs/polkadot-asset-hub.yml
```
The above command will spawn a lazy fork of Polkadot Hub with the latest block data from the network. If you need to test Kusama Hub, replace `polkadot-asset-hub.yml` with `kusama-asset-hub.yml` in the command.
A Polkadot Hub instance is now running locally, and you can proceed with the asset registration process. Note that the local registration process does not differ from the live network process. Once you have a successful TestNet transaction, you can use the same steps to register the asset on MainNet.
---
Page Title: Ring-VRF and Aliases
- Resolved Markdown: https://docs.polkadot.com/reference/apps/infrastructure/pop/ring-vrf-and-aliases.md
- Canonical (HTML): https://docs.polkadot.com/reference/apps/infrastructure/pop/ring-vrf-and-aliases/
- Summary: How Polkadot's Proof of Personhood produces unlinkable per-Product aliases with Ring-VRF, and how under_alias lets pallets gate on aliases.
- Word Count: 755; Token Estimate: 1032
- Last Updated: 2026-06-16T14:17:44+00:00
- Version Hash: sha256:9706a58945bea4114d4b6547adf129977417b55045f73c6eabffd05209c81985
# Ring-VRF and Aliases
## Introduction
Polkadot's Proof of Personhood delivers a key privacy guarantee: _two Products cannot correlate that they share a user without an explicit cross-domain grant from that user_. That guarantee rests on two pieces of machinery — _Ring-VRF_, the cryptographic primitive that produces context-specific pseudonyms (aliases), and the _`under_alias` runtime origin_, the mechanism that lets pallets gate logic on those pseudonyms instead of on raw accounts.
This page is the conceptual deep dive on both. The App-side reference for _where_ PoP runs is the [Polkadot App's Proof of Personhood](/reference/apps/hosts/polkadot-app/pop/) page.
## What PoP Produces
When a user completes Proof of Personhood in the Polkadot App, the result is membership in a ring on the People Chain. A "ring" here is the cryptographic group of all currently-verified persons; being in the ring is what makes the user's later proofs valid.
Two rings coexist on the People Chain:
- **The full personhood ring**: Accounts that completed the biometric PoP flow (PoP Full). Membership requires the full verification ceremony.
- **The lite-people ring**: Accounts that received a governance-authorized attestation (PoP Lite). A separate ring; supply is bounded by governance.
Both rings produce Ring-VRF proofs; what differs is the strength of the membership claim each ring represents.
## What an Alias Is
An _alias_ is a context-specific pseudonym derived from the user's ring membership. Three properties define it:
- **Anchored in personhood**: A valid Ring-VRF proof over an alias is also a valid proof of personhood for the user behind it — the alias _is_ the personhood claim, scoped to the specific context.
- **Scoped to a context**: The context is typically a Product's `.dot` domain. The same user produces a consistent alias every time they return to the same Product, but a different alias when they use any other Product.
- **Verifiable without revealing the account**: A verifier confirms "this alias belongs to a real person in the ring" using a Ring-VRF proof. The verifier learns the alias, not the account behind it.
That last property is the load-bearing one for privacy: aliases are unlinkable across Products by design. If two Products could compare their alias lists, every Product would turn into a tracking surface. The alias model makes that combination impossible by default — and the cross-domain alias path (where Product A asks for an alias scoped to Product B's `.dot`) is gated by an explicit user-consent modal.
## The `under_alias` Runtime Origin
For on-chain operations, Polkadot's runtime exposes the `under_alias` dispatchable origin. A user dispatches a call wrapped in `under_alias` and the runtime verifies the underlying Ring-VRF proof before letting the inner call execute. Inside the called pallet, the origin resolves to the user's alias — not the user's account — so the pallet's state stays unlinkable to the account that triggered it.
Two kinds of pallets consume `under_alias` differently:
- Alias-gated pallets key on the alias value itself. The pallet's storage maps from alias to some per-alias state (a vote, a score, a balance, a registration). Two visits from the same user produce the same alias, so the pallet recognizes "the same person came back," but the pallet's storage carries no link back to the user's account.
- Personhood-gated pallets key on the proof itself, not the alias value. The pallet only needs to know that _some_ verified person performed the action; the alias is discarded after the proof check. Useful for "any verified person gets a fee allowance" patterns.
Both shapes are documented per-pallet in the rest of this section.
## Cross-Product Aliases
A Product can request an alias scoped to another Product's `.dot` domain. This is the only path by which two Products can cryptographically confirm they share a user. The request triggers a user-consent modal — the user has to explicitly grant the cross-domain alias before the request succeeds. Without that grant, the unlinkability default holds.
## Where to Go Next
- Learn **pallet-people**
---
The pallet that issues aliases and implements the `under_alias` origin — the foundation of the PoP pallet set.
[:octicons-arrow-right-24: Reference](/reference/apps/infrastructure/pop/pallet-people/)
- Learn **Proof of Personhood in the Polkadot App**
---
The App-side reference for _where_ PoP verification happens, including the Full and Lite tier model.
[:octicons-arrow-right-24: Reference](/reference/apps/hosts/polkadot-app/pop/)
---
Page Title: Runtime API Calls
- Resolved Markdown: https://docs.polkadot.com/chain-interactions/query-data/runtime-api-calls.md
- Canonical (HTML): https://docs.polkadot.com/chain-interactions/query-data/runtime-api-calls/
- Summary: Learn how to call Polkadot runtime APIs to access the Wasm runtime and retrieve computed results using PAPI, Polkadot.js, Dedot, Python, and Subxt.
- Word Count: 2305; Token Estimate: 4688
- Last Updated: 2026-06-04T16:08:37+00:00
- Version Hash: sha256:fcb314a99ba11441c3c85af3feab2d68ed90df9e87dae26604ec58c19e3feac0
# Runtime API Calls
[](https://github.com/polkadot-developers/polkadot-cookbook/actions/workflows/polkadot-docs-runtime-api-calls.yml)
## Introduction
Polkadot SDK runtime APIs provide direct access to the blockchain's WebAssembly (Wasm) runtime, enabling specialized queries and computations that go beyond simple storage reads. Unlike storage queries that fetch static data, runtime APIs execute logic within the runtime to compute results dynamically.
Common runtime APIs include:
- **AccountNonceApi**: Retrieves the current transaction nonce for an account.
- **Metadata**: Queries available metadata versions and runtime information.
- **TransactionPaymentApi**: Estimates transaction fees before submission.
- **NominationPoolsApi**: Retrieves staking pool information and pending rewards.
- **StakingApi**: Accesses staking-related computations.
## Call Runtime APIs
This section demonstrates how to call runtime APIs using the following SDKs:
- **Polkadot API (PAPI)**: Modern TypeScript library with type-safe APIs.
- **Polkadot.js API**: Comprehensive JavaScript library (maintenance mode).
- **Dedot**: Lightweight TypeScript library optimized for performance.
- **Python Substrate Interface**: Python library for Substrate chains.
- **Subxt**: Rust library with compile-time type safety.
Select your preferred SDK below to see complete, runnable examples that query Polkadot Hub TestNet for account nonces and metadata information.
=== "PAPI"
**Prerequisites**
- [Node.js](https://nodejs.org/) v18 or higher
- npm, pnpm, or yarn package manager
**Environment Setup**
1. Create and initialize a new project:
```bash
mkdir papi-runtime-api-example && cd papi-runtime-api-example && \
npm init -y && npm pkg set type=module
```
2. Install dependencies:
```bash
npm install polkadot-api && \
npm install --save-dev @types/node tsx typescript
```
3. Generate types for Polkadot Hub TestNet:
```bash
npx papi add polkadotTestNet -w wss://asset-hub-paseo.dotters.network
```
**Call Runtime APIs**
The following example demonstrates calling several runtime APIs:
- **`AccountNonceApi.account_nonce`**: Gets the current nonce for an account.
- **`Metadata.metadata_versions`**: Retrieves supported metadata versions.
Create a file named `runtime-apis.ts` and add the following code:
```typescript title="runtime-apis.ts"
import { createClient } from 'polkadot-api';
import { getWsProvider } from 'polkadot-api/ws';
import { polkadotTestNet } from '@polkadot-api/descriptors';
const POLKADOT_TESTNET_RPC = 'INSERT_WS_ENDPOINT';
// Example address to query
const ADDRESS = 'INSERT_ADDRESS';
async function main()\n`);
// Call AccountNonceApi to get the account nonce
const nonce = await api.apis.AccountNonceApi.account_nonce(ADDRESS);
console.log('AccountNonceApi Results:');
console.log(` Account Nonce: ${nonce}`);
// Query metadata versions using Metadata runtime API
const metadataVersions = await api.apis.Metadata.metadata_versions();
console.log('\nMetadata API Results:');
console.log(` Supported Metadata Versions: [${metadataVersions.join(', ')}]`);
// Disconnect the client
client.destroy();
}
main().catch(console.error);
```
Ensure to replace `INSERT_WS_ENDPOINT` with a valid WebSocket endpoint (e.g., `wss://asset-hub-paseo.dotters.network`) and `INSERT_ADDRESS` with the account address you want to query.
Run the script:
```bash
npx tsx runtime-apis.ts
```
You should see output similar to:
npx tsx runtime-apis.ts
Connected to Polkadot Hub TestNet
Querying runtime APIs for: 15oF4uVJwmo4TdGW7VfQxNLavjCXviqxT9S1MgbjMNHr6Sp5
AccountNonceApi Results:
Account Nonce: 11
Metadata API Results:
Supported Metadata Versions: [14, 15, 16]
=== "Polkadot.js"
!!! warning "Maintenance Mode Only"
The Polkadot.js API is no longer actively developed. New projects should use [PAPI](/reference/tools/papi/) or [Dedot](/reference/tools/dedot/) as actively maintained alternatives.
**Prerequisites**
- [Node.js](https://nodejs.org/) v18 or higher
- npm, pnpm, or yarn package manager
**Environment Setup**
1. Create and initialize a new project:
```bash
mkdir pjs-runtime-api-example && cd pjs-runtime-api-example && \
npm init -y && npm pkg set type=module
```
2. Install dependencies:
```bash
npm install @polkadot/api
```
**Call Runtime APIs**
The following example demonstrates calling several runtime APIs:
- **`accountNonceApi.accountNonce`**: Gets the current nonce for an account.
- **`metadata.metadataVersions`**: Retrieves supported metadata versions.
Create a file named `runtime-apis.js` and add the following code:
```javascript title="runtime-apis.js"
import { ApiPromise, WsProvider } from '@polkadot/api';
const POLKADOT_TESTNET_RPC = 'INSERT_WS_ENDPOINT';
// Example address to query
const ADDRESS = 'INSERT_ADDRESS';
async function main());
console.log('Connected to Polkadot Hub TestNet');
console.log(`Querying runtime APIs for: ${ADDRESS}\n`);
// Call AccountNonceApi to get the account nonce
const nonce = await api.call.accountNonceApi.accountNonce(ADDRESS);
console.log('AccountNonceApi Results:');
console.log(` Account Nonce: ${nonce.toString()}`);
// Query metadata versions using Metadata runtime API
const metadataVersions = await api.call.metadata.metadataVersions();
console.log('\nMetadata API Results:');
console.log(
` Supported Metadata Versions: [${metadataVersions.map((v) => v.toString()).join(', ')}]`
);
// Disconnect from the node
await api.disconnect();
}
main().catch(console.error);
```
Ensure to replace `INSERT_WS_ENDPOINT` with a valid WebSocket endpoint (e.g., `wss://asset-hub-paseo.dotters.network`) and `INSERT_ADDRESS` with the account address you want to query.
Run the script:
```bash
node runtime-apis.js
```
You should see output similar to:
node runtime-apis.js
Connected to Polkadot Hub TestNet
Querying runtime APIs for: 15oF4uVJwmo4TdGW7VfQxNLavjCXviqxT9S1MgbjMNHr6Sp5
AccountNonceApi Results:
Account Nonce: 11
Metadata API Results:
Supported Metadata Versions: [14, 15, 16]
=== "Dedot"
**Prerequisites**
- [Node.js](https://nodejs.org/) v18 or higher
- npm, pnpm, or yarn package manager
**Environment Setup**
1. Create and initialize a new project:
```bash
mkdir dedot-runtime-api-example && cd dedot-runtime-api-example && \
npm init -y && npm pkg set type=module
```
2. Install dependencies:
```bash
npm install dedot && \
npm install --save-dev @dedot/chaintypes @types/node tsx typescript
```
**Call Runtime APIs**
The following example demonstrates calling several runtime APIs:
- **`accountNonceApi.accountNonce`**: Gets the current nonce for an account.
- **`metadata.metadataVersions`**: Retrieves supported metadata versions.
Create a file named `runtime-apis.ts` and add the following code:
```typescript title="runtime-apis.ts"
import { DedotClient, WsProvider } from 'dedot';
import type { PolkadotAssetHubApi } from '@dedot/chaintypes';
const POLKADOT_TESTNET_RPC = 'INSERT_WS_ENDPOINT';
// Example address to query
const ADDRESS = 'INSERT_ADDRESS';
async function main()\n`);
// Call AccountNonceApi to get the account nonce
const nonce = await client.call.accountNonceApi.accountNonce(ADDRESS);
console.log('AccountNonceApi Results:');
console.log(` Account Nonce: ${nonce}`);
// Query metadata versions using Metadata runtime API
const metadataVersions = await client.call.metadata.metadataVersions();
console.log('\nMetadata API Results:');
console.log(` Supported Metadata Versions: [${metadataVersions.join(', ')}]`);
// Disconnect the client
await client.disconnect();
}
main().catch(console.error);
```
Ensure to replace `INSERT_WS_ENDPOINT` with a valid WebSocket endpoint (e.g., `wss://asset-hub-paseo.dotters.network`) and `INSERT_ADDRESS` with the account address you want to query.
Run the script:
```bash
npx tsx runtime-apis.ts
```
You should see output similar to:
npx tsx runtime-apis.ts
Connected to Polkadot Hub TestNet
Querying runtime APIs for: 15oF4uVJwmo4TdGW7VfQxNLavjCXviqxT9S1MgbjMNHr6Sp5
AccountNonceApi Results:
Account Nonce: 11
Metadata API Results:
Supported Metadata Versions: [14, 15, 16]
=== "Py Substrate Interface"
**Prerequisites**
- [Python](https://www.python.org/) 3.8 or higher
- pip package manager
**Environment Setup**
1. Create a new project directory and set up a virtual environment:
```bash
mkdir psi-runtime-api-example && cd psi-runtime-api-example && \
python3 -m venv venv && source venv/bin/activate
```
2. Install the substrate-interface package:
```bash
pip install substrate-interface
```
**Call Runtime APIs**
The following example demonstrates calling several runtime APIs:
- **`AccountNonceApi.account_nonce`**: Gets the current nonce for an account.
- **`Core.version`**: Retrieves runtime version information.
Create a file named `runtime_apis.py` and add the following code:
```python title="runtime_apis.py"
from substrateinterface import SubstrateInterface
POLKADOT_TESTNET_RPC = "INSERT_WS_ENDPOINT"
# Example address to query
ADDRESS = "INSERT_ADDRESS"
def main():
# Connect to Polkadot Hub TestNet
substrate = SubstrateInterface(url=POLKADOT_TESTNET_RPC)
print("Connected to Polkadot Hub TestNet")
print(f"Querying runtime APIs for: {ADDRESS}\n")
# Call AccountNonceApi to get the account nonce
nonce = substrate.runtime_call("AccountNonceApi", "account_nonce", [ADDRESS])
print("AccountNonceApi Results:")
print(f" Account Nonce: {nonce.value}")
# Query runtime version using Core runtime API
version = substrate.runtime_call("Core", "version", [])
print("\nCore API Results:")
print(f" Spec Name: {version.value['spec_name']}")
print(f" Spec Version: {version.value['spec_version']}")
print(f" Impl Version: {version.value['impl_version']}")
# Close connection
substrate.close()
if __name__ == "__main__":
main()
```
Ensure to replace `INSERT_WS_ENDPOINT` with a valid WebSocket endpoint (e.g., `wss://asset-hub-paseo.dotters.network`) and `INSERT_ADDRESS` with the account address you want to query.
Run the script:
```bash
python runtime_apis.py
```
You should see output similar to:
python runtime_apis.py
Connected to Polkadot Hub TestNet
Querying runtime APIs for: 15oF4uVJwmo4TdGW7VfQxNLavjCXviqxT9S1MgbjMNHr6Sp5
AccountNonceApi Results:
Account Nonce: 11
Core API Results:
Spec Name: asset-hub-paseo
Spec Version: 1004001
Impl Version: 0
=== "Subxt"
[Subxt](/reference/tools/subxt/) is a Rust library that provides compile-time type safety through code generation from chain metadata.
**Prerequisites**
- [Rust](https://rustup.rs/) toolchain (latest stable)
- Cargo package manager
**Environment Setup**
1. Create a new Rust project:
```bash
cargo new subxt-runtime-api-example && cd subxt-runtime-api-example
```
2. Install the Subxt CLI:
```bash
cargo install subxt-cli@0.50.0
```
3. Download the Polkadot Hub TestNet metadata:
```bash
subxt metadata --url INSERT_WS_ENDPOINT -o polkadot_testnet_metadata.scale
```
Ensure to replace `INSERT_WS_ENDPOINT` with the proper WebSocket endpoint, such as `wss://asset-hub-paseo.dotters.network` for Polkadot Hub TestNet.
4. Update `Cargo.toml` with the required dependencies:
```toml title="Cargo.toml"
[package]
name = "subxt-runtime-api-example"
version = "0.1.0"
edition = "2021"
[[bin]]
name = "runtime_apis"
path = "src/bin/runtime_apis.rs"
[dependencies]
subxt = "0.50.0"
tokio = { version = "1", features = ["rt", "macros"] }
```
**Call Runtime APIs**
The following example demonstrates calling several runtime APIs:
- **`AccountNonceApi.account_nonce`**: Gets the current nonce using the static interface.
- **`Metadata.metadata_versions`**: Retrieves supported metadata versions using the dynamic interface.
Create a file at `src/bin/runtime_apis.rs` and add the following code:
```rust title="src/bin/runtime_apis.rs"
use std::str::FromStr;
use subxt::dynamic::Value;
use subxt::utils::AccountId32;
use subxt::{OnlineClient, PolkadotConfig};
// Generate an interface from the node's metadata
#[subxt::subxt(runtime_metadata_path = "polkadot_testnet_metadata.scale")]
pub mod polkadot_testnet {}
const POLKADOT_TESTNET_RPC: &str = "INSERT_WS_ENDPOINT";
// Example address to query
const ADDRESS: &str = "INSERT_ADDRESS";
#[tokio::main(flavor = "current_thread")]
async fn main() -> Result<(), Box> {
// Initialize the Subxt client
let api = OnlineClient::::from_url(POLKADOT_TESTNET_RPC).await?;
// Anchor to the current block
let at_block = api.at_current_block().await?;
println!("Connected to Polkadot Hub TestNet");
println!("Querying runtime APIs for: {}\n", ADDRESS);
// Parse the address
let account = AccountId32::from_str(ADDRESS)?;
// Call AccountNonceApi using static interface
let nonce_call = polkadot_testnet::runtime_apis()
.account_nonce_api()
.account_nonce(account.clone());
let nonce = at_block.runtime_apis().call(nonce_call).await?;
println!("AccountNonceApi Results:");
println!(" Account Nonce: {}", nonce);
// Call Metadata API to get supported versions using dynamic call
let metadata_versions_call =
subxt::dynamic::runtime_api_call::<_, Value>("Metadata", "metadata_versions", ());
let versions_result = at_block
.runtime_apis()
.call(metadata_versions_call)
.await?;
println!("\nMetadata API Results:");
println!(
" Supported Metadata Versions: {}",
versions_result
);
Ok(())
}
```
Ensure to replace `INSERT_WS_ENDPOINT` with a valid WebSocket endpoint (e.g., `wss://asset-hub-paseo.dotters.network`) and `INSERT_ADDRESS` with the account address you want to query.
Run the script:
```bash
cargo run --bin runtime_apis
```
You should see output similar to:
cargo run --bin runtime_apis
Connected to Polkadot Hub TestNet
Querying runtime APIs for: 15oF4uVJwmo4TdGW7VfQxNLavjCXviqxT9S1MgbjMNHr6Sp5
AccountNonceApi Results:
Account Nonce: 11
Metadata API Results:
Supported Metadata Versions: (14, 15, 16)
## Available Runtime APIs
The following runtime APIs are commonly available on Polkadot SDK-based chains:
| API | Description |
|-----|-------------|
| `AccountNonceApi` | Get current transaction nonce for an account |
| `TransactionPaymentApi` | Query transaction fees and weight information |
| `TransactionPaymentCallApi` | Estimate fees for a call without creating an extrinsic |
| `Metadata` | Query metadata versions and runtime metadata |
| `BlockBuilder` | Access block building functionality |
| `Core` | Core runtime version and execution |
| `TaggedTransactionQueue` | Validate transactions in the pool |
| `OffchainWorkerApi` | Offchain worker functionality |
| `SessionKeys` | Session key management |
| `GrandpaApi` | GRANDPA finality information |
| `BabeApi` | BABE consensus information |
| `NominationPoolsApi` | Nomination pools data and pending rewards |
| `StakingApi` | Staking-related computations |
!!! note
Available runtime APIs vary by chain. Check your target chain's metadata to see which APIs are exposed.
[](https://github.com/polkadot-developers/polkadot-cookbook/actions/workflows/polkadot-docs-runtime-api-calls.yml)
[:material-code-tags: View tests](https://github.com/polkadot-developers/polkadot-cookbook/blob/master/polkadot-docs/chain-interactions/runtime-api-calls/tests/docs.test.ts)
## Where to Go Next
Now that you understand how to call runtime APIs to execute logic within the runtime, explore these related topics:
- __Query with SDKs__
---
Use TypeScript, Python, or Rust SDKs for programmatic access.
[:octicons-arrow-right-24: Get Started](/chain-interactions/query-data/query-sdks/)
- __Query On-Chain State with Sidecar REST API__
---
Learn how to query on-chain state using the Sidecar REST API
[:octicons-arrow-right-24: Get Started](/chain-interactions/query-data/query-rest/)
- __Send Transactions__
---
Learn to construct and submit transactions.
[:octicons-arrow-right-24: Get Started](/chain-interactions/send-transactions/with-sdks/)
---
Page Title: Sandbox and Sub-Accounts in TrUAPI
- Resolved Markdown: https://docs.polkadot.com/reference/apps/protocol/truapi/sandbox.md
- Canonical (HTML): https://docs.polkadot.com/reference/apps/protocol/truapi/sandbox/
- Summary: Why a Polkadot Product gets a per-domain sub-account, why the Host API is the only egress, and how permissions selectively relax that isolation.
- Word Count: 695; Token Estimate: 942
- Last Updated: 2026-06-16T14:17:44+00:00
- Version Hash: sha256:685e7f6b9ad61473ca6d126c8b0f5a295386853514757c7155218c833ba103da
# Sandbox and Sub-Accounts
## Introduction
A Polkadot Product runs inside a sandbox enforced by the Host. The sandbox is what makes the platform meaningfully different from "run third-party code in a browser tab" — three deliberate constraints, none of which a Product can bypass:
- A Product gets a derived sub-account, not the user's root identity.
- The Host API is the only egress, meaning the only way a Product can reach the world outside its sandbox.
- Permissions selectively relax isolation for the capabilities the user has explicitly granted.
This page is the deep dive on what each constraint means and how it is enforced.
## Why Derived Sub-Accounts, Not Root Identity
A user has one root identity on the People Chain. If a Product could ask the Host for the user's root key, or for a single account that represents the user across everything, every Product would see the same user, and every Product would be a tracking surface.
Instead, each Product gets a per-domain sub-account, derived deterministically from the user's identity and the Product's `.dot` domain:
- The same user opening `app-a.dot` and `app-b.dot` sees a different account in each Product.
- The two Products cannot link those accounts back to a shared user without an explicit cross-domain permission grant.
- The derivation is local (no round trip to the paired App is needed to compute the address), so getting an account is instantaneous from the Product's perspective.
The trade-off is that the Product cannot accumulate "the user's full identity." It can only see the user's behavior in this Product. Cross-Product correlation is a permission the user grants explicitly, not a default.
For the Product-side how-to that consumes this surface, see [Sign and Submit Transactions](/apps/build/sign-and-submit/).
## Why the Host API Is the Only Egress
A Product running inside a Host has no other way to reach the world. The browser-level network stack, the chain-client, the storage backend, and the signing primitive are all behind the Host API. The Product asks the Host, and the Host decides.
This matters for two reasons:
- **Consistent sandbox boundary**: Any capability a Product attempts to use crosses TrUAPI. The Host applies permission checks, account scoping, and policy enforcement at that single point. There is no side channel to leak data through.
- **Backend substitution**: A Product calling `app.wallet.getAnonymousAlias()` gets the same answer whether the Host fetches it from a local cache, a paired phone, or a future Host implementation that resolves it some other way. The Product targets the API, not the implementation.
The corollary: a Product that wants to do anything not exposed through TrUAPI cannot. There is no escape hatch by design.
## How Permissions Selectively Relax Isolation
Isolation is the _default_, not the only mode. The user can grant permissions that selectively widen what a Product can do:
- A Product can request a cross-domain alias, which is an alias scoped to another Product's `.dot` domain. The user sees a consent modal and explicitly approves or denies.
- A Product can declare an `ExternalRequest` permission with a URL pattern, opening a specific outbound network path the sandbox would otherwise block.
- A Product can request `ChainSubmit` for the ability to ask the Host to present a signing prompt to the user. The grant covers only the ability to ask; per-transaction approval is still required.
Every permission is a narrow, declared widening, not a broad "trust this Product" toggle. Full isolation is the default when the user installs a new Product without granting anything.
## Where to Go Next
- Guide **Accounts and Signing**
---
The Product-side how-to that consumes the sub-account surface: setting up the signer, building transactions, and submitting them through the Host.
[:octicons-arrow-right-24: Get Started](/apps/build/sign-and-submit/)
- Learn **Signing in Polkadot Desktop**
---
How the `ChainSubmit` permission grants ability-to-request without granting auto-sign, and how Desktop enforces that distinction.
[:octicons-arrow-right-24: Reference](/reference/apps/hosts/polkadot-desktop/signing/)
---
Page Title: Set Up the Polkadot SDK Parachain Template
- Resolved Markdown: https://docs.polkadot.com/parachains/launch-a-parachain/set-up-the-parachain-template.md
- Canonical (HTML): https://docs.polkadot.com/parachains/launch-a-parachain/set-up-the-parachain-template/
- Summary: Learn how to set up and run the Polkadot SDK Parachain Template locally, creating a ready-to-customize foundation for your parachain.
- Word Count: 1613; Token Estimate: 2571
- Last Updated: 2026-06-04T16:08:37+00:00
- Version Hash: sha256:9d7d1ff02d06fea92df66e2de5a860c6fa2535697d25c8992bc3b70b04886484
# Set Up the Polkadot SDK Parachain Template
## Introduction
The [Polkadot SDK](https://github.com/paritytech/polkadot-sdk) includes several [templates](/parachains/customize-runtime/#starting-templates) designed to help you quickly start building your own blockchain. Each template offers a different level of configuration, from minimal setups to feature-rich environments, allowing you to choose the foundation that best fits your project's needs.
Among these, the [Parachain Template](https://github.com/paritytech/polkadot-sdk-parachain-template) provides a preconfigured runtime with commonly used pallets, making it an ideal starting point for most parachain development projects.
This guide walks you through the full process of working with this template. You will:
- Set up the Polkadot SDK Parachain Template.
- Understand the project structure and key components.
- Verify your template is ready for development.
- Run the parachain template locally in development mode.
By the end of this guide, you'll have a working template ready to customize and deploy as a parachain.
## Prerequisites
Before getting started, ensure you have done the following:
- Completed the [Install Polkadot SDK](/parachains/install-polkadot-sdk/) guide and successfully installed [Rust](https://rust-lang.org/) and the required packages to set up your development environment.
For this tutorial series, you need to use Rust `1.88`. Newer versions of the compiler may not work with this parachain template version.
Run the following commands to set up the correct Rust version:
=== "macOS"
```bash
rustup install 1.88
rustup default 1.88
rustup target add wasm32-unknown-unknown --toolchain 1.88-aarch64-apple-darwin
rustup component add rust-src --toolchain 1.88-aarch64-apple-darwin
```
=== "Ubuntu"
```bash
rustup toolchain install 1.88.0
rustup default 1.88.0
rustup target add wasm32-unknown-unknown --toolchain 1.88.0
rustup component add rust-src --toolchain 1.88.0
```
## Polkadot SDK Utility Tools
This tutorial requires two essential tools:
- [**Chain spec builder**](https://crates.io/crates/staging-chain-spec-builder/16.0.0) - a Polkadot SDK utility for generating chain specifications. Refer to the [Generate Chain Specs](/parachains/launch-a-parachain/deploy-to-polkadot/#generate-the-chain-specification) documentation for detailed usage
- [**Polkadot Omni Node**](https://crates.io/crates/polkadot-omni-node/0.13.2) - a white-labeled binary, released as a part of Polkadot SDK, that can act as the collator of a parachain in production, with all the related auxiliary functionalities that a normal collator node has: RPC server, archiving state, etc. It can also run the Wasm blob of the parachain locally for testing and development
Download the pre-built binaries from the [Polkadot SDK release](https://github.com/paritytech/polkadot-sdk/releases/tag/polkadot-stable2512-2) (recommended):
=== "macOS"
```bash
curl -L -o chain-spec-builder https://github.com/paritytech/polkadot-sdk/releases/download/polkadot-stable2512-2/chain-spec-builder-aarch64-apple-darwin
curl -L -o polkadot-omni-node https://github.com/paritytech/polkadot-sdk/releases/download/polkadot-stable2512-2/polkadot-omni-node-aarch64-apple-darwin
chmod +x chain-spec-builder polkadot-omni-node
sudo mv chain-spec-builder polkadot-omni-node /usr/local/bin/
```
=== "Ubuntu"
```bash
curl -L -o chain-spec-builder https://github.com/paritytech/polkadot-sdk/releases/download/polkadot-stable2512-2/chain-spec-builder
curl -L -o polkadot-omni-node https://github.com/paritytech/polkadot-sdk/releases/download/polkadot-stable2512-2/polkadot-omni-node
chmod +x chain-spec-builder polkadot-omni-node
sudo mv chain-spec-builder polkadot-omni-node /usr/local/bin/
```
Alternatively, you can install from source using `cargo`:
```bash
cargo install --locked staging-chain-spec-builder@16.0.0
cargo install --locked polkadot-omni-node@0.13.2
```
## Clone the Template
The [Polkadot SDK Parachain Template](https://github.com/paritytech/polkadot-sdk-parachain-template) provides a ready-to-use development environment for building with the [Polkadot SDK](https://github.com/paritytech/polkadot-sdk). Follow these steps to set up the template:
1. Clone the template repository:
```bash
git clone https://github.com/paritytech/polkadot-sdk-parachain-template.git parachain-template
```
2. Navigate into the project directory:
```bash
cd parachain-template
```
## Explore the Project Structure
Before building the template, take a moment to familiarize yourself with its structure. Understanding this organization will help you navigate the codebase as you develop your parachain.
The template follows a standard Polkadot SDK project layout:
```text
parachain-template/
├── node/ # Node implementation and client
├── pallets/ # Custom pallets for your parachain
├── runtime/ # Runtime configuration and logic
├── Cargo.toml # Workspace configuration
└── README.md # Documentation
```
Key directories explained:
- **runtime/**: Contains your parachain's state transition function and pallet configuration. This is where you'll define what your blockchain can do.
- **node/**: Houses the client implementation that runs your blockchain, handles networking, and manages the database.
- **pallets/**: Where you'll create custom business logic modules (pallets) for your specific use case.
- **Cargo.toml**: The workspace configuration that ties all components together.
!!!note
The runtime is compiled to WebAssembly (Wasm), enabling forkless upgrades. The node binary remains constant while the runtime can be updated on-chain.
## Compile the Runtime
Now that you understand the template structure, let's compile the runtime to ensure everything is working correctly.
1. Compile the runtime:
```bash
cargo build --release --locked
```
!!!tip
Initial compilation may take several minutes, depending on your machine specifications. Use the `--release` flag for improved runtime performance compared to the default `--debug` build. If you need to troubleshoot issues, the `--debug` build provides better diagnostics.
For production deployments, consider using a dedicated `--profile production` flag - this can provide an additional 15-30% performance improvement over the standard `--release` profile.
2. Upon successful compilation, you should see output indicating the build was successful. The compiled runtime will be located at:
`./target/release/wbuild/parachain-template-runtime/parachain_template_runtime.compact.compressed.wasm`
## Verify the Build
After compilation completes, verify that the runtime was created successfully by checking for the Wasm blob:
```bash
ls -la ./target/release/wbuild/parachain-template-runtime/
```
You should see the `parachain_template_runtime.compact.compressed.wasm` file in the output, confirming the build was successful.
## Run the Node Locally
After successfully compiling your runtime, you can spin up a local chain and produce blocks. This process will start your local parachain using the Polkadot Omni Node and allow you to interact with it. You'll first need to generate a chain specification that defines your network's identity, initial connections, and genesis state, providing the foundational configuration for how your nodes connect and what initial state they agree upon.
Follow these steps to launch your node in development mode:
1. Generate the chain specification file of your parachain:
```bash
chain-spec-builder create -t development \
--relay-chain paseo \
--para-id 1000 \
--runtime ./target/release/wbuild/parachain-template-runtime/parachain_template_runtime.compact.compressed.wasm \
named-preset development
```
2. Start the Omni Node with the generated chain spec. You'll start it in development mode (without a relay chain config), producing and finalizing blocks:
```bash
polkadot-omni-node --chain ./chain_spec.json --dev
```
The `--dev` option does the following:
- Deletes all active data (keys, blockchain database, networking information) when stopped.
- Ensures a clean working state each time you restart the node.
3. Verify that your node is running by reviewing the terminal output. You should see log messages indicating block production and finalization.
4. Confirm that your blockchain is producing new blocks by checking if the number after `finalized` is increasing in the output.
The details of the log output will be explored in a later tutorial. For now, knowing that your node is running and producing blocks is sufficient.
## Interact with the Node
When running the template node, it's accessible by default at `ws://localhost:9944`. To interact with your node using the [Polkadot.js Apps](https://polkadot.js.org/apps/#/explorer) interface, follow these steps:
1. Open [Polkadot.js Apps](https://polkadot.js.org/apps/#/explorer) in your web browser and click the network icon (which should be the Polkadot logo) in the top left corner:
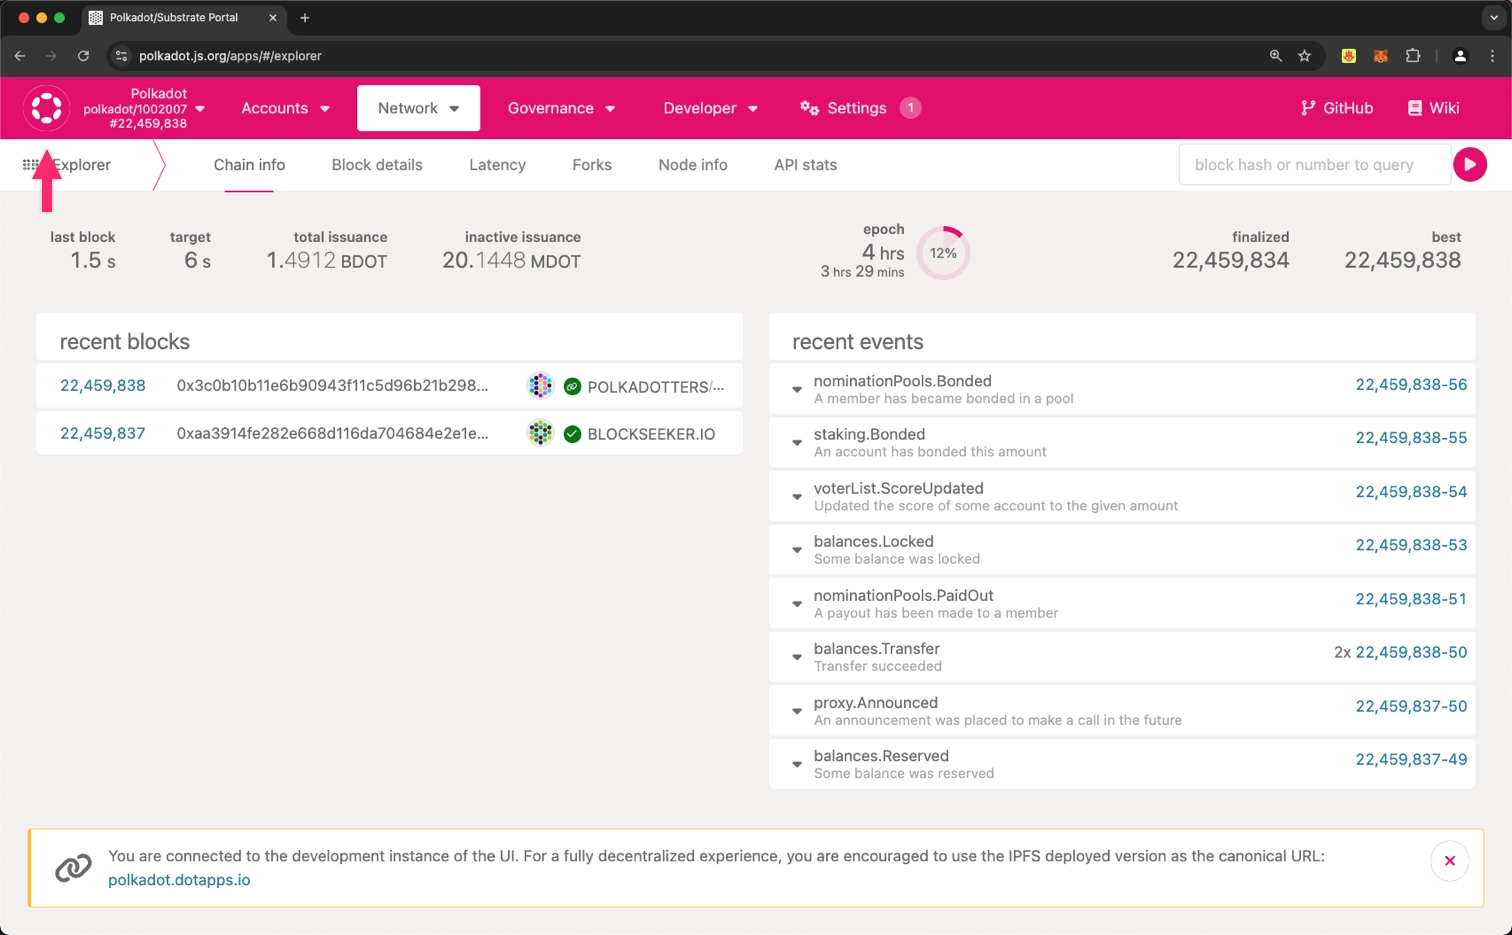
2. Connect to your local node:
1. Scroll to the bottom and select **Development**.
2. Choose **Custom**.
3. Enter `ws://localhost:9944` in the **custom endpoint** input field.
4. Click the **Switch** button.
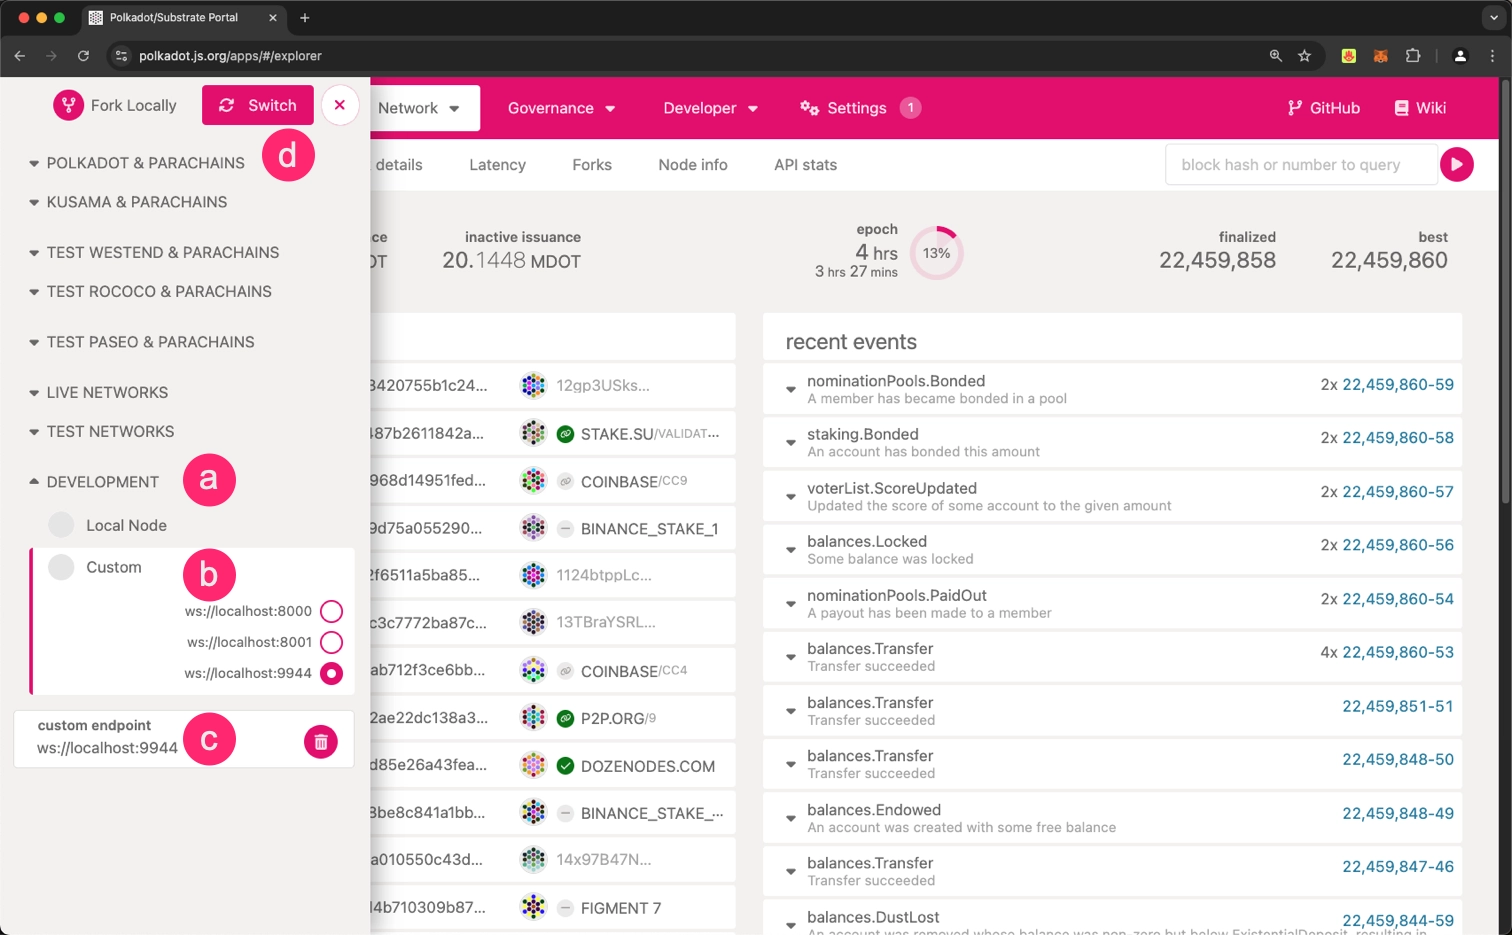
3. Once connected, you should see **parachain-template-runtime** in the top left corner, with the interface displaying information about your local blockchain.
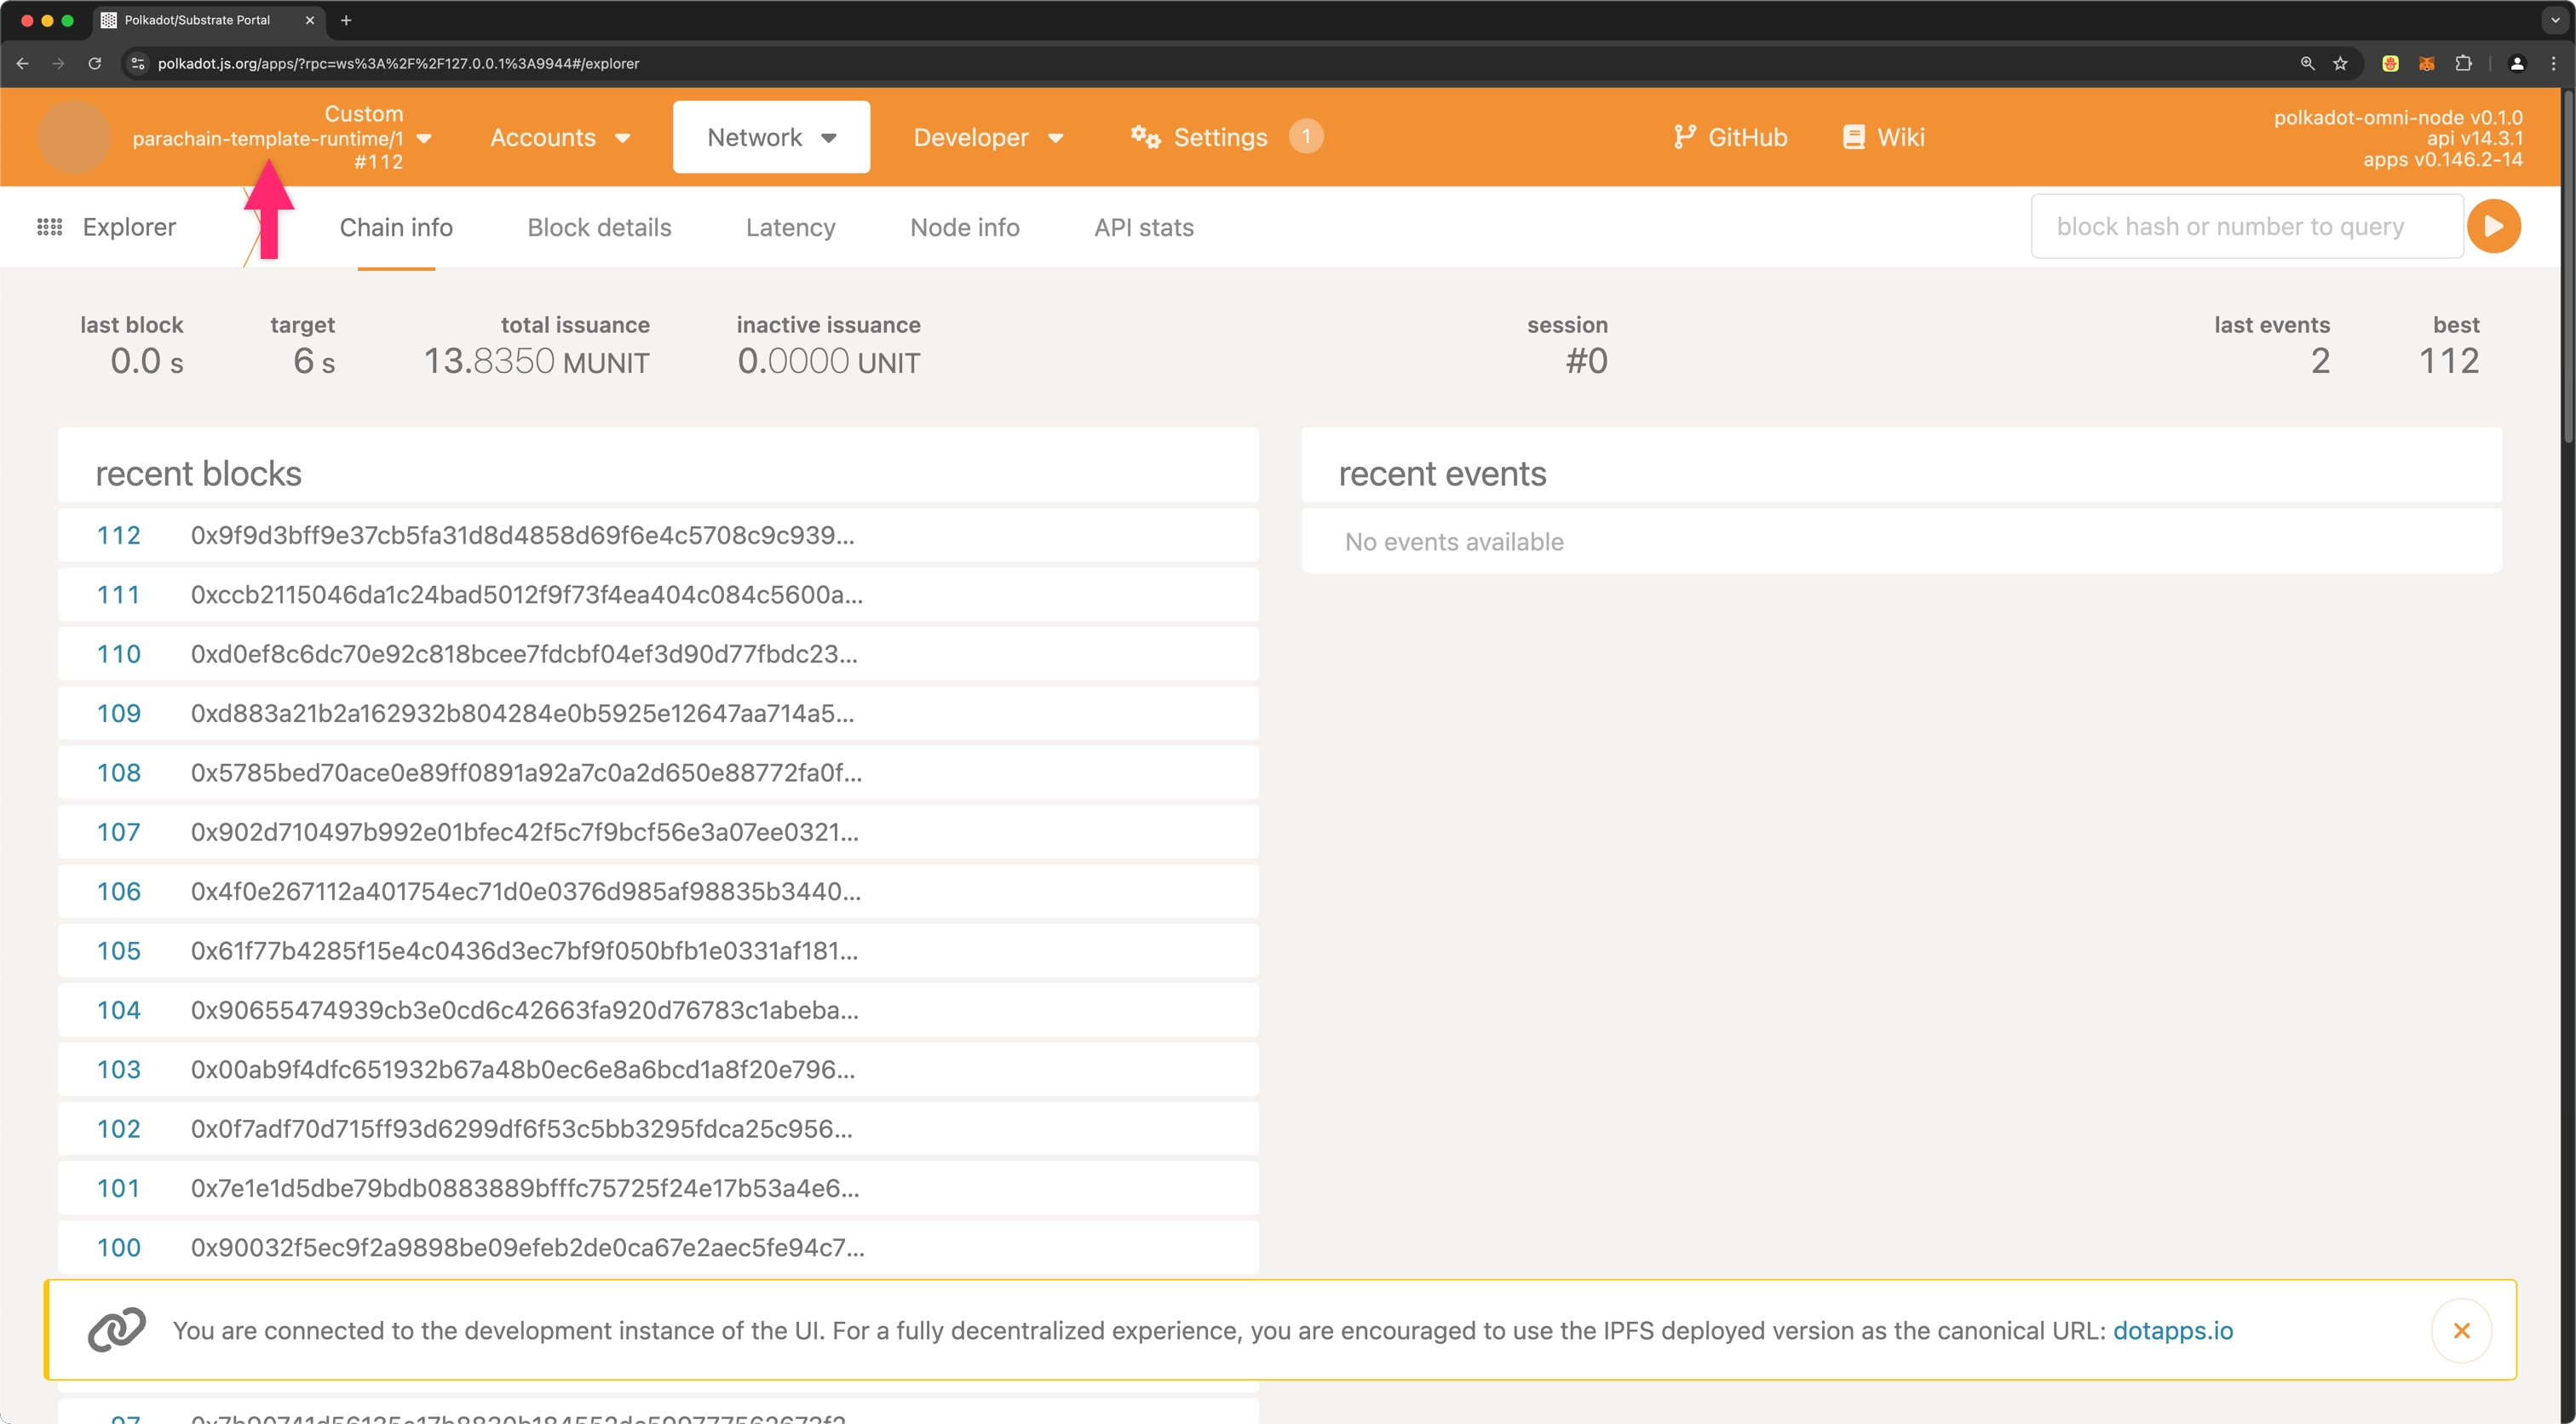
You are now connected to your local node and can interact with it through the Polkadot.js Apps interface. This tool enables you to explore blocks, execute transactions, and interact with your blockchain's features. For in-depth guidance on using the interface effectively, refer to the [Polkadot.js Guides](https://wiki.polkadot.com/general/polkadotjs/) available on the Polkadot Wiki.
## Stop the Node
When you're done exploring your local node, you can stop it to remove any state changes you've made. Since you started the node with the `--dev` option, stopping the node will purge all persistent block data, allowing you to start fresh the next time.
To stop the local node:
1. Return to the terminal window where the node output is displayed.
2. Press `Control-C` to stop the running process.
3. Verify that your terminal returns to the prompt in the `parachain-template` directory.
## Where to Go Next
- Tutorial __Deploy to Polkadot__
---
Learn how to deploy your parachain template to a relay chain testnet. Configure your chain specification, register as a parachain, and start producing blocks.
[:octicons-arrow-right-24: Get Started](/parachains/launch-a-parachain/deploy-to-polkadot/)
---
Page Title: Shield States in Polkadot Web
- Resolved Markdown: https://docs.polkadot.com/reference/apps/hosts/polkadot-web/shield-states.md
- Canonical (HTML): https://docs.polkadot.com/reference/apps/hosts/polkadot-web/shield-states/
- Summary: Reference for the shield-state UI in Polkadot Web, including how the Host surfaces the trust posture of the loaded Product and what each state means.
- Word Count: 479; Token Estimate: 651
- Last Updated: 2026-06-16T14:17:44+00:00
- Version Hash: sha256:fdd1c248297c5c50233e9abcd37d1e3a908bfafba42eef93234896c09d042b44
# Shield States
## Introduction
When a user opens a Polkadot Product on Polkadot Web, they're trusting a few things: that the bundle their browser fetched matches what [DotNS](/reference/apps/infrastructure/dotns/) says the `.dot` name points at, that the Host's state is what it should be, and that nothing in the runtime has been tampered with. Shield states are how Polkadot Web surfaces that trust posture in the browser UI — a security indicator the user can glance at to see whether the loaded Product is in a known-good state.
This page documents what shield states exist, what each one means, and when the state changes.
!!! warning "Provisional"
The full list of shield states, the exact UI affordances Polkadot Web uses to surface them, and the triggers that cause a state transition are still being finalized. This page describes the conceptual model; the per-state reference (every name, color, icon, and verbatim explanation surfaced to the user) will be added once confirmed.
## Conceptual Model
A shield state communicates two things at once:
- **Bundle integrity**: Does the running bundle match the CID that DotNS resolves to for the `.dot` name in the address bar? A mismatch, such as a Product loaded from a stale cache that no longer matches the published version, is a state transition worth showing.
- **Host posture**: Is the Host's expected runtime state intact? Web's sandbox guarantees only hold if the Host itself is in a known state; the shield surfaces deviations.
A user will see a single shield indicator at any moment, and that indicator tells them whether everything is in the "expected" posture or whether something the user should know about has happened.
## Why Products Should Care
For a Product developer, the shield states are not a surface your code calls directly. They are a property of the Host that affects how users perceive your Product. Two implications:
- **Host-owned indicator**: A Product cannot override or hide the shield state. The indicator lives in the Host's UI, outside the Product's sandbox. This is intentional: a Product cannot mask a security state from its users.
- **Reload signals**: Drastic shield-state changes can signal a reload. If a user is in the middle of a long-running interaction with your Product and DotNS points the `.dot` name at a different CID, the Host may transition to an "out-of-sync" state and prompt the user to reload. Build flows that tolerate this, such as idempotent retries and durable client-side state via [`KvStore`](/apps/build/persist-data-locally/), rather than assuming a single Product session is uninterrupted.
## Where to Go Next
- Learn **Visiting a Product**
---
The visiting flow that establishes the initial shield state when a Product is loaded.
[:octicons-arrow-right-24: Reference](/reference/apps/hosts/polkadot-web/visiting/)
---
Page Title: Sign In with Polkadot
- Resolved Markdown: https://docs.polkadot.com/reference/apps/hosts/polkadot-app/sign-in.md
- Canonical (HTML): https://docs.polkadot.com/reference/apps/hosts/polkadot-app/sign-in/
- Summary: Reference for Sign In with Polkadot, the Host-level authentication handshake between Polkadot Desktop or Polkadot Web and the paired Polkadot App.
- Word Count: 597; Token Estimate: 834
- Last Updated: 2026-06-16T14:17:44+00:00
- Version Hash: sha256:89a79e315bf21447eb75c11eabf453cacb70d0deb6e792bab6e89e6a0be37e4c
# Sign In with Polkadot
## Introduction
Sign In with Polkadot is the handshake that lets a user authenticate to [Polkadot Desktop](/reference/apps/hosts/polkadot-desktop/) or [Polkadot Web](/reference/apps/hosts/polkadot-web/) using just their paired Polkadot App on their phone — no password, no extension, no copied keys. Desktop or Web initiates the handshake, the user approves on their phone, and the session is established.
This feature lives in the App's reference because the App is the side that _resolves_ the handshake, while Desktop or Web initiates it and the App signs.
!!! info "Products do not invoke this directly"
For a Product running inside Polkadot Desktop, sign-in is complete before your code loads. The user paired their App with Desktop during set-up, and Desktop established a session at that point. Sign In with Polkadot is the host-level primitive sitting underneath your Product's session, not a function you call. The Product-side surfaces you reach for instead are `getAnonymousAlias`, `createProof`, and `under_alias`.
## How the Handshake Works
The handshake uses the Statement Store as its rendezvous and the paired session as its trust anchor:
1. The Host (Desktop or Web) posts a sign-in request statement to the Statement Store, addressed to the paired App.
2. The App, subscribed to its own inbox, picks up the request from gossip.
3. The user sees a sign-in prompt in the App and approves or rejects on their phone.
4. On approval, the App returns a signed payload back over the encrypted channel.
5. The Host validates the payload and binds the session.
The handshake is one-time per session; subsequent Product calls inside the session reuse the binding rather than re-prompting the user.
!!! warning "Provisional"
The exact wire format of the request and response statements, the topic-filter scoping at the Statement Store boundary, the timeout/rejection failure modes, and any per-session session-key derivation steps are still being finalized. This page documents the developer-observable shape only; the protocol-level details will be added once they are confirmed.
## Where Sign In Differs from Per-Transaction Signing
Both Sign In and `signAndSubmit` route to the App and require user approval, but they serve different jobs:
- **Sign In**: Establishes session identity. It runs once when the user lands in a Host, and reruns if the session expires. It tells the Host who the user is so the Host can construct per-Product sub-accounts and surface Product UI.
- **`signAndSubmit`**: Signs a _specific transaction_ with a Product's account. Every transaction requires its own approval in the App; there is no "auto-sign for the rest of this session" mode. This is intentional. See the [Sign and Submit Transactions](/apps/build/sign-and-submit/) reference for the rationale.
A Product that wants to gate a feature on "is this the real user paired with this session?" can rely on the session being authenticated already and instead reach for alias-based or `under_alias` patterns. Re-running Sign In is not the right primitive for that.
## Where to Go Next
- Guide **Accounts and Signing**
---
How `signAndSubmit` works for per-transaction signing: the surface a Product actually calls, with the round-trip-to-phone pattern.
[:octicons-arrow-right-24: Get Started](/apps/build/sign-and-submit/)
- Guide **Install and Pair**
---
The set-up step that establishes the initial paired session between Desktop and the App, before Sign In with Polkadot can resolve.
[:octicons-arrow-right-24: Get Started](/apps/get-started/)
---
Page Title: Signing in Polkadot Desktop
- Resolved Markdown: https://docs.polkadot.com/reference/apps/hosts/polkadot-desktop/signing.md
- Canonical (HTML): https://docs.polkadot.com/reference/apps/hosts/polkadot-desktop/signing/
- Summary: Reference for how Polkadot Desktop mediates transaction signing, including the App signer, ChainSubmit permission, approval, timeout, and rejection.
- Word Count: 811; Token Estimate: 1145
- Last Updated: 2026-06-16T14:17:44+00:00
- Version Hash: sha256:27783b70091c1c656d336c54bad17aec3b38462d13e42522074c6852e2aa3459
# Signing
## Introduction
Polkadot Desktop is the mediator in the signing model; the Polkadot App on the user's phone is the signer. Desktop never has the private key, and Desktop cannot sign anything on its own. Every transaction a Product submits, no matter how small, completes only after the user explicitly approves it on their phone.
This page is the reference for how that mediation actually works. The Product-side how-to lives at [Sign and Submit Transactions](/apps/build/sign-and-submit/); this page documents the part of the flow Desktop owns.
## The Three-Actor Model
A signing operation always involves three actors:
- **Product**: Builds the transaction and calls `signAndSubmit` through `@parity/product-sdk` or directly through TrUAPI.
- **Polkadot Desktop**: Receives the encoded payload, renders the signing modal showing the user what they are about to sign, and forwards the request to the paired App.
- **Polkadot App**: Receives the request, prompts the user on their phone, signs on approval, and returns the signature.
```mermaid
sequenceDiagram
participant Product
participant Desktop as Polkadot Desktop
participant App as Polkadot App
Product->>Desktop: signAndSubmit(payload)
Desktop->>Desktop: render signing modal
Desktop->>App: signing request (via paired session)
App->>App: user approves or rejects
App->>Desktop: signature or rejection
Desktop->>Desktop: broadcast signed extrinsic
Desktop->>Product: result
```
Your Product code awaits a single promise for this entire round trip.
## `ChainSubmit`: Ability to Request ≠ Auto-Sign
The most common point of confusion in the signing model is what the `ChainSubmit` permission actually grants. It does not authorize Desktop to sign on the user's behalf. It authorizes your Product to _request_ that a signing prompt be presented to the user.
The distinction matters because it determines what UI you need to build:
- Without `ChainSubmit`, your Product cannot even ask. Desktop blocks the dispatch at the Host API boundary and returns `PermissionDenied`. The user has to enable the permission in App Settings before your Product can request signing.
- With `ChainSubmit`, your Product can ask, and every individual transaction triggers a fresh per-request prompt on the paired App that the user must approve. There is no "auto-sign for the rest of this session" mode. Two consecutive transactions produce two prompts; ten produce ten.
This is intentional. The key only ever leaves the App as a signature over a specific payload the user reviewed, never as a blanket consent.
## What the User Sees
When your Product calls `signAndSubmit`, Desktop drives the following sequence:
1. Desktop displays a signing modal. The modal shows the network name, transaction type (for example, Balances Transfer), the call arguments, and an estimated fee. A **More details** toggle reveals the encoded call data for advanced users.
2. The user clicks **Continue to Sign**. Desktop transitions to a waiting screen with the message **Open the Polkadot App on your device, then tap Sign or Reject** and a countdown timer indicating the remaining session validity.
3. The user approves or rejects on the App. The App returns the signature or a rejection.
4. Desktop receives the result. If approved, Desktop broadcasts the signed extrinsic and returns the outcome to your Product. If rejected, or if the timer reached zero before the user responded, Desktop returns an error.
## Asynchronous Approval and Timeouts
Because the App is a separate device, signing is inherently asynchronous. Your Product needs to tolerate the round-trip latency between the dispatch and the result.
Two failure modes are first-class and your Product UI should handle both:
- **User-initiated rejection**: The user dismissed the prompt on the App. From your Product's perspective, this should be treated like a cancellation. Return the user to a stable UI state and let them retry. The Product SDK surfaces this as `HostRejectedError`.
- **Session timeout**: The countdown reached zero before the user responded. From your Product's perspective, this is functionally identical to a rejection. Use the same response: stable UI, retry available. The Product SDK surfaces this as `TimeoutError`.
For the Product-side `try`/`catch` pattern, see [Sign and Submit Transactions](/apps/build/sign-and-submit/).
A practical UI consequence: do not freeze your interface for the duration of a sign request. The user may glance at their phone, get distracted, and approve later. Show a non-blocking pending state and make sure your retry path is idempotent in case the user attempts the same action twice.
## Where to Go Next
- Guide **Accounts and Signing**
---
The Product-side how-to for building, signing, and submitting transactions, including the `try`/`catch` patterns for the failure modes documented above.
[:octicons-arrow-right-24: Get Started](/apps/build/sign-and-submit/)
- Learn **Permissions**
---
How `ChainSubmit` is declared in your Product manifest and how Desktop enforces it at the Host API boundary.
[:octicons-arrow-right-24: Reference](/reference/apps/hosts/polkadot-desktop/permissions/)
---
Page Title: Signing Method Group
- Resolved Markdown: https://docs.polkadot.com/reference/apps/protocol/truapi/signing.md
- Canonical (HTML): https://docs.polkadot.com/reference/apps/protocol/truapi/signing/
- Summary: TrUAPI method group for dispatching transactions through the Host to the paired Polkadot App for per-transaction approval, signing, and results.
- Word Count: 593; Token Estimate: 891
- Last Updated: 2026-06-16T14:17:44+00:00
- Version Hash: sha256:c94fbdc9970d3bbcaf2855b547b44142d33c0b7d645cc91c223783ed00b8de19
# Signing
## Introduction
The Signing method group lets a Product submit a signed transaction. The Host on the other side does not sign. It mediates by rendering the signing modal, forwarding the payload to the paired Polkadot App, waiting for the user's approval on their phone, and returning the result as a signature, rejection, or timeout.
The Product SDK wraps this as `tx.signAndSubmit(signer)` on a Polkadot API (PAPI) transaction object plus a signer returned by `SignerManager.getSigner()`. From the Product's perspective, it is a single awaited promise. Underneath, it is a TrUAPI dispatch and a round trip to the user's phone.
## Conceptual Contract
The group covers:
- **Submitting a payload for signing**: The Product hands the Host a pre-built, account-bound transaction. The Host renders the signing modal and forwards the payload to the paired App.
- **Watching the result**: The Host returns the outcome — signature obtained (Host then broadcasts), explicit user rejection (`HostRejectedError`), or session timeout (`TimeoutError`).
- **Surfacing status transitions**: Through PAPI's `submitAndWatch` companion surface, the Product sees status events (`signing`, `broadcasting`, `in-block`, and `finalized`) as the transaction progresses.
The default contract is the one that makes the model trustworthy: every transaction requires a per-request approval on the phone, with no session-scoped consent and no path for a Product to obtain a signature without the user approving the specific payload they were shown. This per-request flow is what a Product gets unless an Auto-Signing resource has been explicitly allocated.
### Auto-Signing
The shipping [`@parity/truapi`](https://www.npmjs.com/package/@parity/truapi) wire carries an **Auto-Signing** capability on top of the per-request default. A Product requests it as an allocatable resource through `host_request_resource_allocation`; the user must explicitly grant the allocation, and the Host scopes what it covers. Polkadot Desktop ships this as `signing-bot-autopair`, which pairs a signing bot so that allocated transactions are signed without a per-transaction prompt. Auto-Signing is opt-in, user-granted, and bounded — it does not remove the approval requirement for ordinary signing; it replaces it, within the allocated scope, with an up-front consent the user can revoke.
!!! note "Newer than the v0.2 method-group surface"
Auto-Signing is carried by the `@parity/truapi` wire but is not part of the v0.2 method-group surface documented in these pages, so it is a place where the shipping protocol is ahead of the documented groups. A Host implementer working only from the v0.2 method groups will not find it there; a Product running on today's Desktop can use it.
For the full mediated-signing flow (the three-actor model, the `ChainSubmit` permission, failure-mode UX), see the [Signing in Polkadot Desktop](/reference/apps/hosts/polkadot-desktop/signing/) reference.
!!! warning "Provisional"
Edge cases still being defined include multi-signature flows that aggregate across multiple Hosts, batched transactions that present as a single user prompt, and custom signing policies (delegation, time-windowed allowances). The single-transaction, single-prompt contract described in this section is stable.
## Where to Go Next
- Learn **Signing in Polkadot Desktop**
---
The mediated-signing flow in detail: how the Host renders the modal, forwards to the paired App, and surfaces timeouts and rejections.
[:octicons-arrow-right-24: Reference](/reference/apps/hosts/polkadot-desktop/signing/)
- Guide **Accounts and Signing**
---
The Product-side how-to with the `try`/`catch` patterns for `HostRejectedError` and `TimeoutError`.
[:octicons-arrow-right-24: Get Started](/apps/build/sign-and-submit/)
---
Page Title: Smart Contracts Cookbook
- Resolved Markdown: https://docs.polkadot.com/smart-contracts/cookbook.md
- Canonical (HTML): https://docs.polkadot.com/smart-contracts/cookbook/
- Summary: Explore our full collection of tutorials and guides to learn step-by-step how to build, deploy, and work with smart contracts on Polkadot.
- Word Count: 34; Token Estimate: 37
- Last Updated: 2026-06-04T16:08:37+00:00
- Version Hash: sha256:4aed37f738d115d9828ab18bb685636a4cb78b3653fb32d600929d52e4204027
# Smart Contracts Cookbook
Welcome to the Polkadot smart contracts cookbook index.
This page contains a list of all relevant tutorials and guides to help you get started coding smart contracts and dApps in Polkadot.
---
Page Title: Smart Contracts Overview
- Resolved Markdown: https://docs.polkadot.com/smart-contracts/overview.md
- Canonical (HTML): https://docs.polkadot.com/smart-contracts/overview/
- Summary: Learn about smart contract development on Polkadot Hub with native PVM support, dual-VM execution, and seamless cross-chain capabilities.
- Word Count: 572; Token Estimate: 883
- Last Updated: 2026-02-13T21:12:03+00:00
- Version Hash: sha256:dd1216cd7869f321a2335bc514c0392634aabd33921ee68c63237f61bc539bc2
# Smart Contracts on Polkadot Hub
## Introduction
Polkadot Hub provides a production-ready smart contract platform that combines Ethereum compatibility with the performance and cross-chain capabilities of the Polkadot ecosystem. Developers can deploy smart contracts directly on Polkadot Hub while using familiar Ethereum tooling, workflows, and programming languages.
Built with a dual-VM approach, Polkadot Hub offers two execution backends: REVM for unmodified EVM compatibility and native PVM for optimized computationally expensive workloads. This dual-VM architecture enables developers to migrate existing Ethereum contracts instantly or optimize for speed and efficiency with native execution.
## Why Build on Polkadot Hub
### Ethereum Compatibility
Deploy existing Ethereum contracts with zero modifications while maintaining full compatibility with your existing development stack:
- **Complete JSON-RPC API support**: Use MetaMask, Hardhat, Remix, Foundry, and all standard Ethereum tooling.
- **Standard libraries**: Integrate Ethers.js, Web3.js, Viem, Wagmi, and Web3.py without changes.
- **Solidity development**: Write contracts in Solidity or migrate existing code directly. Use the [OpenZeppelin Contracts Wizard for Polkadot](https://wizard.openzeppelin.com/polkadot) to generate secure ERC-20, ERC-721, and other OpenZeppelin-standard contracts.
- **Familiar workflows**: Maintain your existing deployment, testing, and monitoring processes.
### Performance Options
Choose between two execution backends:
- **REVM**: Run unmodified Ethereum contracts with full EVM/Ethereum compatibility.
- **PVM**: Compile to optimized RISC-V bytecode for enhanced performance and lower fees while keeping Ethereum-compatibility. You can write PVM contracts in Solidity (via `resolc`) or Rust—for Rust, tooling is maturing; use LLMs and coding agents to assist development.
Both backends share the same RPC interface and tooling support, allowing seamless transitions. In addition, smart contracts can interact with Polkadot native services via [precompile contracts](/smart-contracts/precompiles/).
### Cross-VM & Cross-Chain Capabilities
Smart contracts written for one VM (for example, EVM) can interact directly with other smart contracts written for the RISC-V PVM, and back. This allows to use full EVM compatible contracts but extend to heavy/complex execution workloads to the PVM RISC-V backend.
Furthermore, all smart contracts in Polkadot Hub can interact with any service in the Polkadot ecosystem through [XCM](/smart-contracts/precompiles/xcm/), enabling token transfers, remote execution, and cross-chain composability without bridges or intermediaries.
## Other Smart Contract Environments
Beyond Polkadot Hub's native EVM and PVM support, the ecosystem offers one main alternative for smart contract development:
- **EVM-compatible parachains**: Provide access to Ethereum's extensive developer ecosystem, smart contract portability, and established tooling like Hardhat, Remix, Foundry, and OpenZeppelin. The main options include Moonbeam (the first full Ethereum-compatible parachain serving as an interoperability hub), Astar (featuring dual VM support for both EVM and WebAssembly contracts), and Acala (DeFi-focused with enhanced Acala EVM+ offering advanced DeFi primitives).
## Next Steps
- Guide __Get Started__
---
Quick-start guides for connecting, deploying, and building your first smart contract.
[:octicons-arrow-right-24: Get Started](/smart-contracts/get-started/)
- Guide __Cookbook__
---
Step-by-step tutorials for deploying contracts, tokens, NFTs, and full dApps.
[:octicons-arrow-right-24: View Tutorials](/smart-contracts/cookbook/)
- Guide __Ethereum Developers__
---
Understand key differences in accounts, fees, gas model, and deployment on Polkadot Hub.
[:octicons-arrow-right-24: Learn More](/smart-contracts/for-eth-devs/accounts/)
- Guide __Precompiles__
---
Discover advanced functionalities including XCM for cross-chain interactions.
[:octicons-arrow-right-24: Explore Precompiles](/smart-contracts/precompiles/)
---
Page Title: Statement Lifecycle
- Resolved Markdown: https://docs.polkadot.com/reference/apps/infrastructure/statement-store/lifecycle.md
- Canonical (HTML): https://docs.polkadot.com/reference/apps/infrastructure/statement-store/lifecycle/
- Summary: How a Statement Store submission moves through validation, gossip propagation, TTL expiry, and eviction — and what each step guarantees.
- Word Count: 563; Token Estimate: 811
- Last Updated: 2026-06-16T14:17:44+00:00
- Version Hash: sha256:2c3b45652d2695051bc2f9560b505c92f03613ab80b07ec9b15f314e2b66595f
# Lifecycle
## Introduction
A Statement Store submission passes through five recognizable steps between a `publish` call and being dropped from the network. Knowing where in that lifecycle a given statement is helps you reason about delivery: some failure modes can only happen at one step, and some guarantees only exist between two of them.
## The Five Steps
1. **Submission**: The Product calls `publish` on its Statement Store client (or the equivalent TrUAPI call). The Host obtains an authentication proof from the paired App and forwards the request to the People Chain node's `statement_submit` JSON-RPC.
2. **Validation**: `pallet-statement-store` checks the submission against the per-account allowance (see [Allowance](/reference/apps/infrastructure/statement-store/allowance/)). If `max_count` or `max_size` would be exceeded, or the authentication proof is invalid, the submission is _rejected_ at this step and never reaches any subscriber. The publish call returns `false` (statement was rejected) rather than throwing.
3. **Acceptance into the pool**: A validated submission enters the local node's statement pool, the in-memory data structure that holds live statements. The publish call returns `true` at this point — the statement is now live on this node.
4. **Gossip propagation**: The node propagates accepted statements to peers that have registered a matching topic filter. Each peer's node decides whether the statement matches and forwards or drops accordingly. This is best-effort: peers may not be listening, may drop the statement under load, or may have already seen a duplicate.
5. **Expiry and eviction**: Each statement carries a TTL (default 30 seconds, configurable per submission up to the pallet-enforced cap). When the TTL elapses, the statement is evicted from each node's pool. After eviction, subscribers who join late will not see it — there is no "fetch by hash" recovery for an expired statement, and there is no chain block to look it up in.
## What Each Step Guarantees
A few load-bearing facts that fall out of the lifecycle:
- **Between submission and acceptance, the chain enforces validity**: A spam-flood attempt against your Product's topic does not reach subscribers because invalid or quota-exceeding submissions are rejected at step 2.
- **Between acceptance and expiry, propagation is best-effort**: A subscriber connected to the same node *will* see an accepted statement; a subscriber connected to a different node may or may not, depending on the gossip path.
- **After expiry there is no recovery**: If your Product needs the bytes to be retrievable later, the canonical pattern is to write them to the Bulletin Chain and publish the resulting CID as the statement payload. The statement carries the live signal; the Bulletin Chain holds the durable content.
## On-Chain Trigger (Forthcoming)
!!! warning "Forthcoming"
On-chain-triggered statements — submissions originated by an OCW (off-chain worker) rather than a Product — are a forthcoming surface for runtime developers, not Product developers. The reference for this path will be added separately.
## Where to Go Next
- Learn **Allowance**
---
The validation step's quota mechanism — what gets rejected at step 2 and why.
[:octicons-arrow-right-24: Reference](/reference/apps/infrastructure/statement-store/allowance/)
- Learn **Subscriptions**
---
How a subscriber attaches to the gossip stream at step 4 and the dedup behavior on the receiving side.
[:octicons-arrow-right-24: Reference](/reference/apps/infrastructure/statement-store/subscriptions/)
---
Page Title: Statement Store Allowance
- Resolved Markdown: https://docs.polkadot.com/reference/apps/infrastructure/statement-store/allowance.md
- Canonical (HTML): https://docs.polkadot.com/reference/apps/infrastructure/statement-store/allowance/
- Summary: How per-account statement quota is enforced — max_count for live statements and max_size for total bytes — and why submissions are gated rather than fee-priced.
- Word Count: 558; Token Estimate: 787
- Last Updated: 2026-06-16T14:17:44+00:00
- Version Hash: sha256:88b81eec224d630400ea61d461b3cd0fb15b22f4de45eff8bb5a6d7ae831978f
# Allowance
## Introduction
Submissions to the Statement Store are _not_ priced by transaction fees. The People Chain doesn't charge per statement; instead, every account that wants to publish needs an on-chain allowance record that caps how many live statements it may have at once and how many bytes those statements may total.
The allowance is the spam-resistance mechanism. Without it, a misbehaving account could flood the network's gossip layer with valid (and validly signed) statements that no fee model would meaningfully limit. With it, the network has a deterministic upper bound on per-account traffic that subscribers don't have to defend against at the application layer.
## What an Allowance Records
`pallet-statement-store` stores a per-account `StatementAllowance` record with two limits:
- **`max_count`**: The maximum number of statements the account may have live in the pool at once. As statements expire (TTL elapses, channel replacement evicts an older value), they free up count for new submissions.
- **`max_size`**: The maximum total bytes across the account's currently-live statements. Each submission's payload counts against this; as statements expire, their bytes free up.
Both limits are checked at validation (step 2 of the [lifecycle](/reference/apps/infrastructure/statement-store/lifecycle/)). A submission that would exceed either is rejected at the pallet boundary before it ever enters the gossip layer.
## How the Limits Interact
A typical Product hits the _count_ limit before the size limit if it publishes many small messages, and the _size_ limit before the count limit if it publishes fewer but larger payloads. Two practical consequences:
- A chat-like Product (lots of small statements) should budget primarily against `max_count`. Each message stays live until its TTL elapses, so a chatty user can occupy several `max_count` slots simultaneously.
- A Product that publishes occasional large payloads (configuration blobs, large status updates) should budget primarily against `max_size`. The size limit is total-across-live, not per-statement, so a few big payloads can saturate the quota even if `max_count` is far from full.
A Product can lower its size pressure by moving content to the Bulletin Chain and publishing only a small statement carrying the resulting CID. The CID is short; the bytes live on Bulletin and don't count against the Statement Store allowance.
## Per-Statement Size Limit
Independent of the per-account allowance, each statement payload has a hard 512-byte limit (after JSON encoding) enforced by the SDK. Larger payloads throw `StatementDataTooLargeError` before submission. For content bigger than 512 bytes, the recommended pattern is the Bulletin Chain + CID composition above.
## Provisioning on TestNet
!!! warning "Provisional"
The process for obtaining a Statement Store allowance on TestNet is still being defined. The [Get TestNet Tokens](/apps/get-started/get-testnet-tokens/) guide is the source of truth as the provisioning flow stabilizes.
On TestNet today, allowances are provisioned by calling the `increase_allowance_by` extrinsic — typically through a governance or sudo route, since the call is privileged.
## Where to Go Next
- Learn **Lifecycle**
---
Where allowance validation sits in the statement lifecycle (step 2 — before gossip propagation).
[:octicons-arrow-right-24: Reference](/reference/apps/infrastructure/statement-store/lifecycle/)
- Guide **Get TestNet Funds**
---
The setup step where TestNet allowances are provisioned.
[:octicons-arrow-right-24: Get Started](/apps/get-started/get-testnet-tokens/)
---
Page Title: Statement Store Channels
- Resolved Markdown: https://docs.polkadot.com/reference/apps/infrastructure/statement-store/channels.md
- Canonical (HTML): https://docs.polkadot.com/reference/apps/infrastructure/statement-store/channels/
- Summary: The last-write-wins primitive on top of statements — a channel field causes the pallet to replace older entries from the same account on the same channel.
- Word Count: 571; Token Estimate: 846
- Last Updated: 2026-06-16T14:17:44+00:00
- Version Hash: sha256:9812120cd6f74e827b1d93b72d577e78d4c416ef889e19d5680f71437992f472
# Channels
## Introduction
`pallet-statement-store` supports an optional channel field on every statement. When a new submission carries the same `channel` as an existing live statement from the same account, the pallet replaces the older one in the node's pool — and the replacement propagates to subscribed peers, who drop the old statement in favor of the new one.
The result is a last-write-wins primitive on top of the standard pub/sub: each channel name, scoped per-account, maps to a single live value at any moment.
The Product SDK abstracts this as `ChannelStore` in `@parity/product-sdk-statement-store`. The underlying storage primitive is the same — every channel value is still a statement going through the same lifecycle — but the read surface looks like a key-value map keyed by channel name.
## When to Reach for Channels
Three patterns are the canonical fit:
- **Presence indicators**: _"Alice is online."_ Only the latest value matters; older states should be replaced as the user goes idle and active again.
- **Multiplayer cursors and other live UI state**: The user has moved their cursor to position N; the previous position is no longer relevant.
- **"Now playing" / live status**: Only the current track matters, not the history of what was playing earlier in the session.
For append-only events — chat messages, action logs, social-feed posts — channels are the wrong primitive. Each event needs to live independently; using a channel would erase the previous message every time the user sent a new one. For those use cases, keep using `client.publish` directly.
## Scope and Replacement Rules
Channels are scoped per-account. The pallet's replacement rule only matches statements from the same signer — one user cannot overwrite another user's channel value. Two users posting on the same channel name produce two independent live values, one per account.
The replacement is atomic from a subscriber's perspective: the older statement is evicted from the pool and the newer one inserted in the same step. A subscriber sees the new value; the old value, if it was in flight to the subscriber's node, is dropped before it reaches the application callback.
## The Channel-Store API
The SDK's `ChannelStore` exposes the standard surface:
- **`channels.write(name, value)`**: Publish a new value on the named channel. The SDK hashes the channel name with Blake2b-256, attaches the per-account scoping, and submits as a statement.
- **`channels.read(name)`**: Return the latest value seen on that channel locally.
- **`channels.readAll()`**: Return the full map of `(channel name → latest value)` the local node has seen.
- **`channels.onChange(callback)`**: Fire on every transition (a new write replacing an older value).
`ChannelStore` automatically timestamps the value if your `T` omits a timestamp, so consumers can reason about ordering when needed.
!!! warning "Provisional"
The maximum number of live channels per account, the interaction between channels and the per-account `max_count` allowance limit, and any cross-account aggregation primitives are still being finalized.
## Where to Go Next
- Learn **Subscriptions**
---
The subscription surface that delivers channel transitions to subscribers, including the per-channel dedup behavior.
[:octicons-arrow-right-24: Reference](/reference/apps/infrastructure/statement-store/subscriptions/)
- Guide **Exchange Ephemeral Messages**
---
The Product-side how-to including the `ChannelStore` walkthrough.
[:octicons-arrow-right-24: Get Started](/apps/build/pub-sub-off-chain-data/)
---
Page Title: Statement Store Method Group
- Resolved Markdown: https://docs.polkadot.com/reference/apps/protocol/truapi/statement-store.md
- Canonical (HTML): https://docs.polkadot.com/reference/apps/protocol/truapi/statement-store/
- Summary: TrUAPI method group for publishing and subscribing to gossip-distributed signed statements on the People Chain through the Host and SDK client.
- Word Count: 442; Token Estimate: 696
- Last Updated: 2026-06-16T14:17:44+00:00
- Version Hash: sha256:55ed5dce29241b3176843fadd0cab62908339f8124fb37e476f5f5fe7b16e951
# Statement Store
## Introduction
The Statement Store method group lets a Product publish and subscribe to signed, gossip-distributed statements on the People Chain. The Statement Store itself, including the pallet, gossip layer, lifecycle, and validation rules, is a network-layer pub/sub primitive. It is short-lived, allowance-gated, and propagated peer-to-peer. This TrUAPI group is how a Product reaches it through the Host.
The Product SDK wraps this surface as `StatementStoreClient` from [`@parity/product-sdk-statement-store`](https://www.npmjs.com/package/@parity/product-sdk-statement-store). For the conceptual model of what statements are good for (versus the Bulletin Chain or local storage), see [Storage options for your Product](/apps/build/pub-sub-off-chain-data/).
## Conceptual Contract
The group exposes the standard pub/sub surface with the Host filling in the parts a Product cannot do safely on its own:
- **Publishing a statement**: The Product hands the Host a payload (under the per-statement 512-byte limit), a topic, a channel, a time to live (TTL), and any options. The Host requests an authentication proof from the paired App, attaches the per-Product account context and primary topic (`blake2b(appName)`), and submits to the People Chain node's `statement_submit` JSON-RPC.
- **Subscribing to a topic filter**: The Product registers a callback for statements matching its primary topic plus any secondary `topic2`. The Host opens the underlying `statement_subscribeStatement` JSON-RPC, decodes payloads, and deduplicates by content hash before invoking the callback.
- **Channel-based last-write-wins**: When a statement carries a `channel`, the pallet replaces older statements from the same account on the same channel. The SDK abstracts this as `ChannelStore` on top of the underlying method group.
Delivery is best-effort gossip, with no retry, acknowledgment, or ordering guarantee. Reliability is composed at the application layer. For example, if a recipient needs to confirm receipt, they publish an acknowledgment statement back.
For the Desktop-side mediation perspective, see [Statement Store via Host API](/reference/apps/hosts/polkadot-desktop/statement-store/).
!!! warning "Provisional"
Detailed error taxonomy, allowance-management primitives, and any direct topic-walking API remain provisional.
## Where to Go Next
- Guide **Exchange Ephemeral Messages**
---
The Product-side how-to: setting up the client, subscribing, publishing typed statements, and using channels.
[:octicons-arrow-right-24: Get Started](/apps/build/pub-sub-off-chain-data/)
- Learn **Statement Store via Host API**
---
What Polkadot Desktop adds when mediating Statement Store traffic, including proof routing, account context, and per-Product topic scoping.
[:octicons-arrow-right-24: Reference](/reference/apps/hosts/polkadot-desktop/statement-store/)
---
Page Title: Statement Store Reference
- Resolved Markdown: https://docs.polkadot.com/reference/apps/infrastructure/statement-store.md
- Canonical (HTML): https://docs.polkadot.com/reference/apps/infrastructure/statement-store/
- Summary: Reference for the Statement Store — Polkadot's network-layer pub/sub primitive on the People Chain, with on-chain rules and off-chain payloads via gossip.
- Word Count: 627; Token Estimate: 1007
- Last Updated: 2026-06-16T14:17:44+00:00
- Version Hash: sha256:23b6b1b5bb7ea418b85f184171cd7e4798203f0d47b2f3762a5f4fb9fc845cca
# Statement Store
## Introduction
The Statement Store is Polkadot's publish/subscribe layer for short-lived, signed messages between Product users. A Product publishes a small statement; the People Chain validates it; the network gossips it out to anyone subscribed to a matching topic. Statements never enter the chain's block storage — they live briefly in nodes' local pools and decay after a short TTL.
The split is the point: pallet rules on chain, payloads in gossip. The chain enforces who can publish and how much; the gossip layer carries the data. That is what makes the Statement Store the right tool for _real-time signaling between users_ (chat messages, presence, multiplayer cursors, typing indicators, "now playing" status), and for anything else that has to propagate fast and does not need to be permanent.
For when to reach for this versus the [Bulletin Chain](/reference/apps/infrastructure/bulletin-chain/) or local storage, see the [Storage options for your Product](/apps/build/pub-sub-off-chain-data/) callout.
## How a Statement Reaches Subscribers
Three properties define the path from a publish call to a subscriber's callback firing:
- **Signed at the source**: Every submission carries an authentication proof (Sr25519 by default). The Host requests the proof through the App; the Product never handles keys.
- **Allowance-gated by the pallet**: The People Chain's `pallet-statement-store` enforces a per-account quota — `max_count` live statements and `max_size` total bytes. Submissions exceeding the quota are rejected at the pallet boundary, so spam does not reach subscribers. See [Allowance](/reference/apps/infrastructure/statement-store/allowance/).
- **Gossiped, not block-stored**: Once accepted into the node's statement pool, the submission propagates peer-to-peer through the People Chain network's gossip layer. Subscribers see it via their node's filtered statement subscription. See [Subscriptions](/reference/apps/infrastructure/statement-store/subscriptions/).
For the full statement lifecycle (validation, propagation, expiry, maintenance) see [Lifecycle](/reference/apps/infrastructure/statement-store/lifecycle/).
## Delivery Semantics
The Statement Store does not retry, acknowledge, or guarantee ordering — those are network-layer guarantees the gossip protocol does not provide. Delivery is best-effort. If your Product needs to know a message reached a peer, the peer publishes an acknowledgment statement; reliability is composed at the application layer, not at the protocol.
If the content needs to outlive the TTL, store it on the Bulletin Chain and publish a CID as the statement payload. The composition — Statement Store for the live signal, Bulletin Chain for content that has to be there later — is documented in the Polkadot App's [Chat reference](/reference/apps/hosts/polkadot-app/chat/).
## Where to Go Next
- Learn **Lifecycle**
---
How a statement progresses from submission through validation, gossip, TTL, and eviction — and what each step guarantees.
[:octicons-arrow-right-24: Reference](/reference/apps/infrastructure/statement-store/lifecycle/)
- Learn **Subscriptions**
---
How a subscriber registers a topic filter, what `topic2` adds, and the dedup behavior on the receiving side.
[:octicons-arrow-right-24: Reference](/reference/apps/infrastructure/statement-store/subscriptions/)
- Learn **Channels**
---
The last-write-wins primitive built on top of statements — useful for soft state like presence indicators where only the latest version matters.
[:octicons-arrow-right-24: Reference](/reference/apps/infrastructure/statement-store/channels/)
- Learn **Allowance**
---
The allowance model that gates submissions — `max_count`, `max_size`, and how a Product budgets traffic against an account's quota.
[:octicons-arrow-right-24: Reference](/reference/apps/infrastructure/statement-store/allowance/)
- Guide **Exchange Ephemeral Messages**
---
The Product-side how-to: setting up the client, subscribing, publishing typed statements, using channels.
[:octicons-arrow-right-24: Get Started](/apps/build/pub-sub-off-chain-data/)
---
Page Title: Statement Store Subscriptions
- Resolved Markdown: https://docs.polkadot.com/reference/apps/infrastructure/statement-store/subscriptions.md
- Canonical (HTML): https://docs.polkadot.com/reference/apps/infrastructure/statement-store/subscriptions/
- Summary: How a subscriber registers a topic filter against the People Chain node — primary topic, optional secondary topic, dedup behavior, and unsubscription.
- Word Count: 586; Token Estimate: 820
- Last Updated: 2026-06-16T14:17:44+00:00
- Version Hash: sha256:62055a454cad743ab43770ab9c5fda25da4e0cd4995f2e588bed32756b1d6b76
# Subscriptions
## Introduction
A Product subscribes to the Statement Store by registering a topic filter with a People Chain node. The node forwards only the statements matching that filter to the Product's callback; everything else on the gossip stream is dropped before it reaches the Product. The filter is the Product's lever — pick it correctly and the Product sees exactly the traffic it wants.
The Product SDK wraps this as `client.subscribe(callback, options?)` in `@parity/product-sdk-statement-store`. Underneath, it calls the node's `statement_subscribeStatement` JSON-RPC with the appropriate filter, decodes payloads into the typed `T`, and dedupes by content hash before invoking the callback.
## How Topics Filter
Two topics shape every subscription:
- **The primary topic**: The Product's identity on the gossip layer. The SDK derives it as `blake2b(appName)` and tags every submission your Product publishes with that primary topic. Subscribers from _other_ Products on the same network see only their own traffic, and your subscribers see only yours — the node filters traffic from other Products at the boundary before it reaches your callback.
- **The optional `topic2`**: Scopes a subscription further within your Product's primary topic. Pass it as a room id, a document id, or any other secondary key. The SDK hashes it with Blake2b-256 and adds it to the filter; only statements that match both topics are forwarded.
A Product subscribing without `topic2` sees every statement published anywhere in your Product. With `topic2`, it sees only the slice that matches the secondary key. Both shapes are routinely useful — global Product chat needs the full stream; a specific room needs the scoped one.
## What the Callback Receives
The subscription delivers each matching statement to your callback decoded into your typed `T` and deduped by channel and content hash. The dedup means:
- A statement that propagates to the Product's node via multiple gossip paths fires the callback only once.
- A statement replaced on the same channel by a newer one (see [Channels](/reference/apps/infrastructure/statement-store/channels/)) fires the callback for the newer value only.
## Subscription Lifecycle
`client.subscribe` returns an `Unsubscribable` whose `unsubscribe()` method tears down the JSON-RPC subscription on the node and stops the callback from receiving further events. Tear subscriptions down when the Product no longer needs them — typically on view unmount or process shutdown — so the node doesn't hold open a filter your Product has stopped reading.
## Initial-State Behavior
Some `subscribe` implementations return the current statement pool matching the filter (a backfill of statements that haven't expired yet) plus an ongoing stream of new matches; some return only the ongoing stream. The Product SDK's default returns the current pool plus the ongoing stream, so a subscriber that joins late still sees recently published statements that haven't aged out.
!!! warning "Provisional"
The exact backfill behavior, the per-node pool size limits visible to subscribers, and the reconnection / missed-events semantics when a Product's node loses gossip connectivity are still being finalized.
## Where to Go Next
- Learn **Channels**
---
The last-write-wins primitive built on the same gossip layer — `topic2` filters by scope; channels filter by replacement semantics.
[:octicons-arrow-right-24: Reference](/reference/apps/infrastructure/statement-store/channels/)
- Learn **Lifecycle**
---
Where in the lifecycle a subscription attaches (step 4: gossip propagation) and what the dedup behavior protects against.
[:octicons-arrow-right-24: Reference](/reference/apps/infrastructure/statement-store/lifecycle/)
---
Page Title: Statement Store via Polkadot Desktop's Host API
- Resolved Markdown: https://docs.polkadot.com/reference/apps/hosts/polkadot-desktop/statement-store.md
- Canonical (HTML): https://docs.polkadot.com/reference/apps/hosts/polkadot-desktop/statement-store/
- Summary: Reference for how Polkadot Desktop mediates Statement Store access, including proof routing, account context, and Bulletin Chain composition pattern.
- Word Count: 625; Token Estimate: 897
- Last Updated: 2026-06-16T14:17:44+00:00
- Version Hash: sha256:d867d834da6a0f437f3d76edbab5098efb8f9db5177230b4f288bd3dfa0efd6e
# Statement Store via the Host API
## Introduction
The Statement Store is a network-layer pub/sub primitive on Polkadot's People Chain for short-lived, gossiped, signed statements. Products do not talk to a Statement Store node directly; they go through Polkadot Desktop's Host API, which adds the things a Product on its own cannot do safely, including producing an authentication proof on the user's behalf, attaching the right account context, and applying the per-Product topic scope.
This page documents what Desktop adds when it mediates Statement Store traffic for a Product. The Statement Store itself (the pallet, the gossip layer, the lifecycle and validation rules) is documented separately in the [Statement Store infrastructure reference](/reference/apps/infrastructure/statement-store/). The Product-side how-to is the [Publish and Subscribe to Off-Chain Data](/apps/build/pub-sub-off-chain-data/) guide.
## What Desktop Adds
A Product that calls `client.publish(...)` through the Product SDK is really doing this through Desktop:
- **Proof routing**: Every Statement Store submission carries an authentication proof. The Product does not produce the proof itself. It requests one through the Host API, and Desktop forwards the request to the paired App, which signs and returns the proof. Desktop then submits the statement to the People Chain node on the Product's behalf with the proof attached.
- **Account context**: The statement is signed by the user's per-Product account: a sub-account derived from the user's identity and scoped to the Product's `.dot` domain. The Product never has to know the account address up front. Desktop resolves the right account and uses it for the submission.
- **Per-Product topic scope**: The Product SDK tags every submission with `blake2b(appName)` as its primary topic; subscribers from other Products on the same network see only their own traffic. The scope is set up at the Host API boundary so a misconfigured Product cannot accidentally publish into another Product's topic.
## What Desktop Does Not Do
A few responsibilities sit with the Product, not with Desktop:
- **Product topic settings**: The Host attaches the per-Product primary topic, but secondary `topic2`, channels (last-write-wins state), and per-statement TTL come from the Product's call.
- **Delivery semantics**: Statement Store delivery is best-effort gossip. There is no retry, no acknowledgement, and no ordering guarantee at the network layer. If your Product needs an acknowledgement, the recipient publishes one back. Reliability is composed at the application layer; Desktop does not add a queue or retry pipeline behind the scenes.
## Composition with the Bulletin Chain
The Statement Store is the right layer for ephemeral signaling. When content needs to outlive the statement TTL, the canonical pattern is to store it on the Bulletin Chain and publish the resulting CID as the statement payload. This composition powers the App's [Chat](/reference/apps/hosts/polkadot-app/chat/) feature and many other Product patterns:
- **Statement Store** carries the live signal (presence, "new message arrived", typing indicators).
- **Bulletin Chain** stores the durable content readers fetch later by hash.
Both layers are reached through Desktop's Host API and the same per-Product account context applies across them.
## Where to Go Next
- Guide **Exchange Ephemeral Messages**
---
The Product-side how-to: setting up the Statement Store client, subscribing, publishing typed statements, and using channels for last-write-wins state.
[:octicons-arrow-right-24: Get Started](/apps/build/pub-sub-off-chain-data/)
- Guide **Store Data on Chain**
---
The Bulletin Chain layer that composes with the Statement Store: write the durable content, publish the CID as a statement.
[:octicons-arrow-right-24: Get Started](/apps/build/store-data-on-chain/)
---
Page Title: Support
- Resolved Markdown: https://docs.polkadot.com/get-support.md
- Canonical (HTML): https://docs.polkadot.com/get-support/
- Summary: Start here to get developer support for Polkadot. Connect with the team, find help, and explore resources beyond the documentation.
- Word Count: 582; Token Estimate: 1318
- Last Updated: 2026-03-31T17:52:40+00:00
- Version Hash: sha256:55d620780013f68098103785501b4e460e996daf7be25e03e27e0cf2f8acc837
# Polkadot Developer Support
You're already in the docs — solid start. But sometimes you need more: answers, real examples, someone to talk to. This support hub is here to help you move forward — faster.
If something’s missing, unclear, or broken — **[tell us](https://github.com/polkadot-developers/polkadot-docs/issues/new?template=docs-issue.yml)**. Your feedback makes the whole ecosystem better for everyone.
## Support Channels
Use one of the channels below to get live technical support or ask questions.
- :simple-telegram:{ .sub } **Telegram: Polkadot Developer Support**
- **Who’s there:** DevRel team and active developer community.
- **Response time:** Within **2 business days (usually faster)**.
- **Topics:** Any developer-related question is welcome.
👉 [Join Telegram](https://t.me/substratedevs)
- :simple-discord:{ .sub } **Discord: Polkadot Official Server**
- **Smart contracts:** Ask in `#solidity-smart-contracts` and `#ink_smart-contracts`.
- **General developer support:** Ask in `#solidity-smart-contracts`.
- **Response time:** Within **1 business day (usually faster)**.
👉 [Join Discord](https://polkadot-discord.w3f.tools/)
- :simple-matrix:{ .sub } **Matrix: Polkadot Developer Support**
- **Who’s there:** Parity, W3F, DevRel, and community contributors.
- **Response time:** Within **1 business day (usually faster)**.
- **Topics:** Full-spectrum developer support.
- Bridged with Telegram (all messages synced).
👉 [Join Matrix](https://matrix.to/#/#substratedevs:matrix.org)
- :fontawesome-brands-stack-exchange:{ .sub } **Stack Exchange**
- Browse commonly asked technical questions.
- Ask your own and get detailed responses from experienced devs.
👉 [Visit Polkadot Stack Exchange](https://substrate.stackexchange.com/)
- :simple-reddit:{ .sub } **Reddit: r/Polkadot**
- General discussions and community perspectives.
- Developer questions are welcome — just tag them appropriately.
👉 [Visit r/Polkadot](https://www.reddit.com/r/Polkadot/)
- :simple-youtube:{ .sub } **YouTube: @PolkadotNetwork**
- Developer tutorials.
- Ecosystem interviews.
- Event recordings and walkthroughs.
👉 [Watch on YouTube](https://www.youtube.com/@PolkadotNetwork)
- :fontawesome-brands-x-twitter:{ .sub } **X (Twitter): Official Accounts**
- **[@PolkadotDevs](https://x.com/PolkadotDevs)**: Updates for developers.
- **[@Polkadot](https://x.com/Polkadot)**: Network-wide news.
- **[@Kusamanetwork](https://x.com/kusamanetwork)**: Kusama-specific updates.
- **[@Web3Foundation](https://x.com/web3foundation)**: Grants, research, and ecosystem programs.
- :fontawesome-brands-x-twitter:{ .sub } **X (Twitter): Community Accounts**
- **[@PolkadotDeploy](https://x.com/PolkadotDeploy)**: News from the deployment portal and tooling updates.
- :material-forum:{ .sub } **Polkadot Forum**
- Join community discussions around the direction of the ecosystem.
👉 [Visit the Polkadot Forum](https://forum.polkadot.network/)
- :material-vote:{ .sub } **Polkassembly: OpenGov**
- Explore and vote on governance proposals for Polkadot and Kusama.
- Help shape the future of the network.
👉 [Explore on Polkassembly](https://polkadot.polkassembly.io/)
- :material-vote:{ .sub } **Subsquare: OpenGov**
- Track, discuss, and vote on Polkadot OpenGov proposals.
- Stay informed on governance activity across the network.
👉 [Explore on Subsquare](https://polkadot.subsquare.io/)
- :fontawesome-solid-robot:{ .sub } **AI Resources**
Access documentation structured and optimized for use with large language models (LLMs) and AI tools. These resources help build AI assistants, power code search, or enable custom tooling trained on Polkadot’s documentation.
👉 [Access LLM Files](/ai-resources/)
---
Page Title: Technical Reference Overview
- Resolved Markdown: https://docs.polkadot.com/reference.md
- Canonical (HTML): https://docs.polkadot.com/reference/
- Summary: Learn about Polkadot's technical architecture, governance framework, parachain ecosystem, and the tools you need to build and interact with the network.
- Word Count: 888; Token Estimate: 1531
- Last Updated: 2026-06-16T14:17:44+00:00
- Version Hash: sha256:ac0e0c8b8514a78950c5df651820407b66da8c569086b8324e82c370604ba6a7
## Introduction
The Technical Reference section provides comprehensive documentation of Polkadot's architecture, core concepts, and development tooling. Whether you're exploring how Polkadot's relay chain coordinates parachains, understanding governance mechanisms, or building applications on the network, this reference covers the technical foundations you need.
Polkadot is a multi-chain network that enables diverse, interconnected blockchains to share security and communicate seamlessly. Understanding how these components interact from the Relay Chain that validates parachains to the Governance mechanisms that evolve the protocol is essential for developers, validators, and network participants.
This guide organizes technical documentation across five core areas: Polkadot Hub, Parachains, On-Chain Governance, Glossary, and Tools, each providing detailed information on different aspects of the Polkadot ecosystem.
## Polkadot Hub
[Polkadot Hub](/reference/polkadot-hub/) is the entry point to Polkadot for all users and application developers. It provides access to essential Web3 services including smart contracts, asset management, staking, governance, identity management, and cross-ecosystem interoperability—without requiring you to deploy or manage a parachain.
The Hub encompasses a set of core functionality that enables developers and users to build and interact with applications on Polkadot. Key capabilities include:
- **Smart contracts**: Deploy Ethereum-compatible smart contracts and build decentralized applications.
- **Asset management**: Create, manage, and transfer fungible tokens and NFTs across the ecosystem.
- **Staking**: Participate in network security and earn rewards by staking DOT.
- **Governance**: Vote on proposals and participate in Polkadot's decentralized decision-making through OpenGov.
- **Identity services**: Register and manage on-chain identities, enabling access to governance roles and network opportunities.
- **Cross-chain interoperability**: Leverage XCM messaging to interact securely with other chains in the Polkadot ecosystem.
- **Collectives and DAOs**: Participate in governance collectives and decentralized autonomous organizations.
## Parachains
[Parachains](/reference/parachains/) are specialized blockchains that connect to the Polkadot relay chain, inheriting its security while maintaining their own application-specific logic. The parachains documentation covers:
- **Accounts**: Deep dive into account types, storage, and management on parachains.
- **Blocks, transactions and fees**: Understand block production, transaction inclusion, and fee mechanisms.
- **Consensus**: Learn how parachain blocks are validated and finalized through the relay chain's consensus.
- **Chain data**: Explore data structures, storage layouts, and state management.
- **Cryptography**: Study cryptographic primitives used in Polkadot SDK-based chains.
- **Data encoding**: Understand how data is encoded and decoded for blockchain compatibility.
- **Networks**: Learn about networking protocols and peer-to-peer communication.
- **Interoperability**: Discover [Cross-Consensus Messaging (XCM)](/parachains/interoperability/get-started/), the standard for cross-chain communication.
- **Randomness**: Understand how randomness is generated and used in Polkadot chains.
- **Node and runtime**: Learn about parachain nodes, runtime environments, and the [Polkadot SDK](https://github.com/paritytech/polkadot-sdk).
## On-Chain Governance
[On-Chain governance](/reference/governance/) is the decentralized decision-making mechanism for the Polkadot network. It manages the evolution and modification of the network's runtime logic, enabling community oversight and approval for proposed changes. The governance documentation details:
- **OpenGov framework**: Understand Polkadot's next-generation governance system with enhanced delegation, flexible tracks, and simultaneous referendums.
- **Origins and tracks**: Learn how governance proposals are categorized, prioritized, and executed based on their privilege level and complexity.
- **Voting and delegation**: Explore conviction voting, vote delegation, and how token holders participate in governance.
- **Governance evolution**: See how Polkadot's governance has evolved from Governance V1 to the current OpenGov system.
## Glossary
The [Glossary](/reference/glossary/) provides quick-reference definitions for Polkadot-specific terminology. Essential terms include:
- Blockchain concepts (blocks, transactions, state)
- Consensus mechanisms (validators, collators, finality)
- Polkadot-specific terms (relay chain, parachain, XCM, FRAME)
- Network components (nodes, runtimes, storage)
- Governance terminology (origins, tracks, referendums)
## Tools
The [Tools](/reference/tools/zombienet/) section documents essential development and interaction tools for the Polkadot ecosystem:
- **Light clients**: Lightweight solutions for interacting with the network without running full nodes.
- **JavaScript/TypeScript tools**: Libraries like [Polkadot.js API](/reference/tools/polkadot-js-api/) and [PAPI](/reference/tools/papi/) for building applications.
- **Rust tools**: [Polkadart](/reference/tools/polkadart/) and other Rust-based libraries for SDK development.
- **Python tools**: [py-substrate-interface](/reference/tools/py-substrate-interface/) for Python developers.
- **Testing and development**: Tools like [Moonwall](/reference/tools/moonwall/), [Chopsticks](/reference/tools/chopsticks/), and [Omninode](/reference/tools/omninode/) for smart contract and parachain testing.
- **Indexing and monitoring**: [Sidecar](/reference/tools/sidecar/) for data indexing and [Dedot](/reference/tools/dedot/) for substrate interaction.
- **Cross-chain tools**: [ParaSpell](/reference/tools/paraspell/) for XCM integration and asset transfers.
## Where to Go Next
For detailed exploration of specific areas, proceed to any of the main sections:
- Learn **Polkadot Hub**
---
Understand the relay chain's role in coordinating parachains, providing shared security, and enabling governance.
[:octicons-arrow-right-24: Reference](/reference/polkadot-hub/)
- Learn **Parachains**
---
Deep dive into parachain architecture, consensus, data structures, and building application-specific blockchains.
[:octicons-arrow-right-24: Reference](/reference/parachains/)
- Learn **On-Chain Governance**
---
Explore Polkadot's decentralized governance framework and how to participate in network decision-making.
[:octicons-arrow-right-24: Reference](/reference/governance/)
- Guide **Glossary**
---
Quick reference for Polkadot-specific terminology and concepts used throughout the documentation.
[:octicons-arrow-right-24: Reference](/reference/glossary/)
- Guide **Tools**
---
Discover development tools, libraries, and frameworks for building and interacting with Polkadot.
[:octicons-arrow-right-24: Reference](/reference/tools/zombienet/)
---
Page Title: The .dot Name Mechanism
- Resolved Markdown: https://docs.polkadot.com/reference/apps/infrastructure/dotns/name-mechanism.md
- Canonical (HTML): https://docs.polkadot.com/reference/apps/infrastructure/dotns/name-mechanism/
- Summary: How a .dot name resolves to a Polkadot Product — namehash derivation, contenthash to CID mapping, and the IPFS gateway and Bulletin Chain delivery path.
- Word Count: 831; Token Estimate: 1209
- Last Updated: 2026-06-16T14:17:44+00:00
- Version Hash: sha256:1856f935ad027c8b5f1f3a9aedfa8a25121df5c3eb37bbc552cc48faebc9176c
# The `.dot` Name Mechanism
## Introduction
A `.dot` name is the front door a user enters to reach a Polkadot Product. Behind that front door, four layers cooperate to turn the name a user typed into the bytes a Host loads into its sandbox:
1. The dotNS registry on Asset Hub.
2. A `namehash` derivation that turns the string name into a deterministic key.
3. A `contenthash` record that points the `namehash` at a content reference.
4. A delivery layer (IPFS gateway, or Bulletin Chain peer-to-peer) that turns the content reference into bytes.
This page documents each of those layers so a Product developer knows what each one is doing and where to look when something doesn't resolve correctly.
## Layer 1: The Registry on Asset Hub
The registry of names — who owns `myproduct.dot`, when the registration was last updated, what record is currently attached — lives in contract state on Asset Hub, not on the People Chain or Bulletin Chain. Asset Hub is the natural home: it is Polkadot's system chain for asset and registry primitives, and dotNS is implemented as a set of contracts on it (see [Architecture](/reference/apps/infrastructure/dotns/architecture/)).
A registration creates a record; a transfer or update modifies it. A resolver reading the registry asks Asset Hub for the current state of a specific name and gets back the records associated with it, including the `contenthash` that points at the Product bundle.
## Layer 2: Namehash Derivation
`.dot` uses an ENS-compatible `namehash` scheme to derive a deterministic key from the dotted name. For example, the name `myproduct.dot` is hashed in a recursive way (hash of `dot`, then hash of `(parent_hash, label_hash)`, where `label_hash` is the keccak hash of the label `myproduct`). The result is a fixed-size hash that the registry uses internally as the lookup key.
This is the same scheme ENS uses for `.eth`, which is intentional — the derivation is well-understood, well-tooled, and lets dotNS interoperate with the existing `namehash` ecosystem.
## Layer 3: `contenthash` → CID
Each name's record carries a `contenthash` field that points at the Product bundle. The format follows the ENS `contenthash` codec, which can encode:
- **An IPFS CID (with the appropriate codec prefix)**: The canonical pointer for content-addressed bundles.
- **A Bulletin Chain CID**: Polkadot-native content references, used the same way.
The `contenthash` is what changes when a Product publishes a new version: the name stays the same, the `contenthash` updates to point at the new CID. Old `contenthash` references can be retained for rollback or audit, depending on how the operator manages the registration.
## Layer 4: Delivery (IPFS Gateway or Bulletin Peer-to-Peer)
Once a resolver has the CID, the bytes still need to actually be fetched and handed to the Host. Two delivery paths:
- **IPFS gateway**: The CID is a standard IPFS reference; any IPFS gateway can serve it. Hosts can use a gateway integration for the fetch.
- **Bulletin Chain peer-to-peer**: For Bulletin CIDs, the chain's collator network serves the bytes peer-to-peer without going through a centralized gateway. This is the Polkadot-native path.
Both paths produce the same bytes, because both are addressing the same content by the same hash. A Host can fall back from one to the other if one path fails, or prefer one for policy reasons (e.g. always Bulletin peer-to-peer when available, to avoid a third-party gateway).
## End-to-End Resolution
Stitching the four layers together, a typical resolution looks like this:
1. A user navigates to `myproduct.dot` in a Host (Polkadot Web at `dot.li`, or Polkadot Desktop's address bar).
2. The Host computes the `namehash` of `myproduct.dot`.
3. The Host reads the contract record for that `namehash` from Asset Hub and extracts the `contenthash`.
4. The Host decodes the `contenthash` into a CID.
5. The Host fetches the bytes for the CID via the configured delivery path.
6. The Host validates the bytes against the CID (content-addressed verification) and loads them into the sandbox.
A failure at any layer surfaces as a specific shield-state transition in the Host UI (see [Shield States](/reference/apps/hosts/polkadot-web/shield-states/)) — for example, a stale-cache CID that no longer matches the current `contenthash` will show as an out-of-sync state.
## Where to Go Next
- Learn **Architecture**
---
The contract architecture on Asset Hub that backs the registry layer above.
[:octicons-arrow-right-24: Reference](/reference/apps/infrastructure/dotns/architecture/)
- Learn **PopRules and Pricing**
---
Who can register what name, and at what cost, before the resolution flow above ever runs.
[:octicons-arrow-right-24: Reference](/reference/apps/infrastructure/dotns/poprules-pricing/)
- Guide **Register and Publish**
---
The Product-side how-to for creating a name record and attaching a `contenthash`.
[:octicons-arrow-right-24: Get Started](/apps/deploy-your-app/)
---
Page Title: Transactions
- Resolved Markdown: https://docs.polkadot.com/reference/parachains/blocks-transactions-fees/transactions.md
- Canonical (HTML): https://docs.polkadot.com/reference/parachains/blocks-transactions-fees/transactions/
- Summary: Learn how to construct, submit, and validate transactions in the Polkadot SDK, covering signed, unsigned, and inherent types of transactions.
- Word Count: 3300; Token Estimate: 4611
- Last Updated: 2026-01-14T11:42:16+00:00
- Version Hash: sha256:96d19c9c56bc35c73c5f003c55ffcff74bd39cd7d74cf17201abd20b15e2dd05
# Transactions
## Introduction
Transactions are essential components of blockchain networks, enabling state changes and the execution of key operations. In the Polkadot SDK, transactions, often called extrinsics, come in multiple forms, including signed, unsigned, and inherent transactions.
This guide walks you through the different transaction types and how they're formatted, validated, and processed within the Polkadot ecosystem. You'll also learn how to customize transaction formats and construct transactions for FRAME-based runtimes, ensuring a complete understanding of how transactions are built and executed in Polkadot SDK-based chains.
## What Is a Transaction?
In the Polkadot SDK, transactions represent operations that modify the chain's state, bundled into blocks for execution. The term extrinsic is often used to refer to any data that originates outside the runtime and is included in the chain. While other blockchain systems typically refer to these operations as "transactions," the Polkadot SDK adopts the broader term "extrinsic" to capture the wide variety of data types that can be added to a block.
There are three primary types of transactions (extrinsics) in the Polkadot SDK:
- **Signed transactions**: Signed by the submitting account, often carrying transaction fees.
- **Unsigned transactions**: Submitted without a signature, often requiring custom validation logic.
- **Inherent transactions**: Typically inserted directly into blocks by block authoring nodes, without gossiping between peers.
Each type serves a distinct purpose, and understanding when and how to use each is key to efficiently working with the Polkadot SDK.
### Signed Transactions
Signed transactions require an account's signature and typically involve submitting a request to execute a runtime call. The signature serves as a form of cryptographic proof that the sender has authorized the action, using their private key. These transactions often involve a transaction fee to cover the cost of execution and incentivize block producers.
Signed transactions are the most common type of transaction and are integral to user-driven actions, such as token transfers. For instance, when you transfer tokens from one account to another, the sending account must sign the transaction to authorize the operation.
For example, the [`pallet_balances::Call::transfer_allow_death`](https://paritytech.github.io/polkadot-sdk/master/pallet_balances/pallet/struct.Pallet.html#method.transfer_allow_death) extrinsic in the Balances pallet allows you to transfer tokens. Since your account initiates this transaction, your account key is used to sign it. You'll also be responsible for paying the associated transaction fee, with the option to include an additional tip to incentivize faster inclusion in the block.
### Unsigned Transactions
Unsigned transactions do not require a signature or account-specific data from the sender. Unlike signed transactions, they do not come with any form of economic deterrent, such as fees, which makes them susceptible to spam or replay attacks. Custom validation logic must be implemented to mitigate these risks and ensure these transactions are secure.
Unsigned transactions typically involve scenarios where including a fee or signature is unnecessary or counterproductive. However, due to the absence of fees, they require careful validation to protect the network. For example, [`pallet_im_online::Call::heartbeat`](https://paritytech.github.io/polkadot-sdk/master/pallet_im_online/pallet/struct.Pallet.html#method.heartbeat) extrinsic allows validators to send a heartbeat signal, indicating they are active. Since only validators can make this call, the logic embedded in the transaction ensures that the sender is a validator, making the need for a signature or fee redundant.
Unsigned transactions are more resource-intensive than signed ones because custom validation is required, but they play a crucial role in certain operational scenarios, especially when regular user accounts aren't involved.
### Inherent Transactions
Inherent transactions are a specialized type of unsigned transaction that is used primarily for block authoring. Unlike signed or other unsigned transactions, inherent transactions are added directly by block producers and are not broadcasted to the network or stored in the transaction queue. They don't require signatures or the usual validation steps and are generally used to insert system-critical data directly into blocks.
A key example of an inherent transaction is inserting a timestamp into each block. The [`pallet_timestamp::Call::now`](https://paritytech.github.io/polkadot-sdk/master/pallet_timestamp/pallet/struct.Pallet.html#method.now-1) extrinsic allows block authors to include the current time in the block they are producing. Since the block producer adds this information, there is no need for transaction validation, like signature verification. The validation in this case is done indirectly by the validators, who check whether the timestamp is within an acceptable range before finalizing the block.
Another example is the [`paras_inherent::Call::enter`](https://paritytech.github.io/polkadot-sdk/master/polkadot_runtime_parachains/paras_inherent/pallet/struct.Pallet.html#method.enter) extrinsic, which enables parachain collator nodes to send validation data to the relay chain. This inherent transaction ensures that the necessary parachain data is included in each block without the overhead of gossiped transactions.
Inherent transactions serve a critical role in block authoring by allowing important operational data to be added directly to the chain without needing the validation processes required for standard transactions.
## Transaction Formats
Understanding the structure of signed and unsigned transactions is crucial for developers building on Polkadot SDK-based chains. Whether you're optimizing transaction processing, customizing formats, or interacting with the transaction pool, knowing the format of extrinsics, Polkadot's term for transactions, is essential.
### Types of Transaction Formats
In Polkadot SDK-based chains, extrinsics can fall into three main categories:
- **Unchecked extrinsics**: Typically used for signed transactions that require validation. They contain a signature and additional data, such as a nonce and information for fee calculation. Unchecked extrinsics are named as such because they require validation checks before being accepted into the transaction pool.
- **Checked extrinsics**: Typically used for inherent extrinsics (unsigned transactions); these don't require signature verification. Instead, they carry information such as where the extrinsic originates and any additional data required for the block authoring process.
- **Opaque extrinsics**: Used when the format of an extrinsic is not yet fully committed or finalized. They are still decodable, but their structure can be flexible depending on the context.
### Signed Transaction Data Structure
A signed transaction typically includes the following components:
- **Signature**: Verifies the authenticity of the transaction sender.
- **Call**: The actual function or method call the transaction is requesting (for example, transferring funds).
- **Nonce**: Tracks the number of prior transactions sent from the account, helping to prevent replay attacks.
- **Tip**: An optional incentive to prioritize the transaction in block inclusion.
- **Additional data**: Includes details such as spec version, block hash, and genesis hash to ensure the transaction is valid within the correct runtime and chain context.
Here's a simplified breakdown of how signed transactions are typically constructed in a Polkadot SDK runtime:
``` code
+ +
```
Each part of the signed transaction has a purpose, ensuring the transaction's authenticity and context within the blockchain.
### Signed Extensions
Polkadot SDK also provides the concept of [signed extensions](https://paritytech.github.io/polkadot-sdk/master/polkadot_sdk_docs/reference_docs/signed_extensions/index.html), which allow developers to extend extrinsics with additional data or validation logic before they are included in a block. The [`SignedExtension`](https://paritytech.github.io/try-runtime-cli/sp_runtime/traits/trait.SignedExtension.html) set helps enforce custom rules or protections, such as ensuring the transaction's validity or calculating priority.
The transaction queue regularly calls signed extensions to verify a transaction's validity before placing it in the ready queue. This safeguard ensures transactions won't fail in a block. Signed extensions are commonly used to enforce validation logic and protect the transaction pool from spam and replay attacks.
In FRAME, a signed extension can hold any of the following types by default:
- **[`AccountId`](https://paritytech.github.io/polkadot-sdk/master/polkadot_sdk_frame/runtime/types_common/type.AccountId.html)**: To encode the sender's identity.
- **[`Call`](https://paritytech.github.io/polkadot-sdk/master/polkadot_sdk_frame/traits/trait.SignedExtension.html#associatedtype.Call)**: To encode the pallet call to be dispatched. This data is used to calculate transaction fees.
- **[`AdditionalSigned`](https://paritytech.github.io/polkadot-sdk/master/polkadot_sdk_frame/traits/trait.SignedExtension.html#associatedtype.AdditionalSigned)**: To handle any additional data to go into the signed payload allowing you to attach any custom logic prior to dispatching a transaction.
- **[`Pre`](https://paritytech.github.io/polkadot-sdk/master/polkadot_sdk_frame/traits/trait.SignedExtension.html#associatedtype.Pre)**: To encode the information that can be passed from before a call is dispatched to after it gets dispatched.
Signed extensions can enforce checks like:
- **[`CheckSpecVersion`](https://paritytech.github.io/polkadot-sdk/master/src/frame_system/extensions/check_spec_version.rs.html)**: Ensures the transaction is compatible with the runtime's current version.
- **[`CheckWeight`](https://paritytech.github.io/polkadot-sdk/master/frame_system/struct.CheckWeight.html)**: Calculates the weight (or computational cost) of the transaction, ensuring the block doesn't exceed the maximum allowed weight.
These extensions are critical in the transaction lifecycle, ensuring that only valid and prioritized transactions are processed.
## Transaction Construction
Building transactions in the Polkadot SDK involves constructing a payload that can be verified, signed, and submitted for inclusion in a block. Each runtime in the Polkadot SDK has its own rules for validating and executing transactions, but there are common patterns for constructing a signed transaction.
### Construct a Signed Transaction
A signed transaction in the Polkadot SDK includes various pieces of data to ensure security, prevent replay attacks, and prioritize processing. Here's an overview of how to construct one:
1. **Construct the unsigned payload**: Gather the necessary information for the call, including:
- **Pallet index**: Identifies the pallet where the runtime function resides.
- **Function index**: Specifies the particular function to call in the pallet.
- **Parameters**: Any additional arguments required by the function call.
2. **Create a signing payload**: Once the unsigned payload is ready, additional data must be included:
- **Transaction nonce**: Unique identifier to prevent replay attacks.
- **Era information**: Defines how long the transaction is valid before it's dropped from the pool.
- **Block hash**: Ensures the transaction doesn't execute on the wrong chain or fork.
3. **Sign the payload**: Using the sender's private key, sign the payload to ensure that the transaction can only be executed by the account holder.
4. **Serialize the signed payload**: Once signed, the transaction must be serialized into a binary format, ensuring the data is compact and easy to transmit over the network.
5. **Submit the serialized transaction**: Finally, submit the serialized transaction to the network, where it will enter the transaction pool and wait for processing by an authoring node.
The following is an example of how a signed transaction might look:
``` rust
node_runtime::UncheckedExtrinsic::new_signed(
function.clone(), // some call
sp_runtime::AccountId32::from(sender.public()).into(), // some sending account
node_runtime::Signature::Sr25519(signature.clone()), // the account's signature
extra.clone(), // the signed extensions
)
```
### Transaction Encoding
Before a transaction is sent to the network, it is serialized and encoded using a structured encoding process that ensures consistency and prevents tampering:
- **`[1]`**: Compact encoded length in bytes of the entire transaction.
- **`[2]`**: A u8 containing 1 byte to indicate whether the transaction is signed or unsigned (1 bit) and the encoded transaction version ID (7 bits).
- **`[3]`**: If signed, this field contains an account ID, an SR25519 signature, and some extra data.
- **`[4]`**: Encoded call data, including pallet and function indices and any required arguments.
This encoded format ensures consistency and efficiency in processing transactions across the network. By adhering to this format, applications can construct valid transactions and pass them to the network for execution.
To learn more about how compact encoding works using SCALE, see the [SCALE Codec](https://github.com/paritytech/parity-scale-codec) README on GitHub.
### Customize Transaction Construction
Although the basic steps for constructing transactions are consistent across Polkadot SDK-based chains, developers can customize transaction formats and validation rules. For example:
- **Custom pallets**: You can define new pallets with custom function calls, each with its own parameters and validation logic.
- **Signed extensions**: Developers can implement custom extensions that modify how transactions are prioritized, validated, or included in blocks.
By leveraging Polkadot SDK's modular design, developers can create highly specialized transaction logic tailored to their chain's needs.
## Lifecycle of a Transaction
In the Polkadot SDK, transactions are often referred to as extrinsics because the data in transactions originates outside of the runtime. These transactions contain data that initiates changes to the chain state. The most common type of extrinsic is a signed transaction, which is cryptographically verified and typically incurs a fee. This section focuses on how signed transactions are processed, validated, and ultimately included in a block.
### Define Transaction Properties
The Polkadot SDK runtime defines key transaction properties, such as:
- **Transaction validity**: Ensures the transaction meets all runtime requirements.
- **Signed or unsigned**: Identifies whether a transaction needs to be signed by an account.
- **State changes**: Determines how the transaction modifies the state of the chain.
Pallets, which compose the runtime's logic, define the specific transactions that your chain supports. When a user submits a transaction, such as a token transfer, it becomes a signed transaction, verified by the user's account signature. If the account has enough funds to cover fees, the transaction is executed, and the chain's state is updated accordingly.
### Process on a Block Authoring Node
In Polkadot SDK-based networks, some nodes are authorized to author blocks. These nodes validate and process transactions. When a transaction is sent to a node that can produce blocks, it undergoes a lifecycle that involves several stages, including validation and execution. Non-authoring nodes gossip the transaction across the network until an authoring node receives it. The following diagram illustrates the lifecycle of a transaction that's submitted to a network and processed by an authoring node.
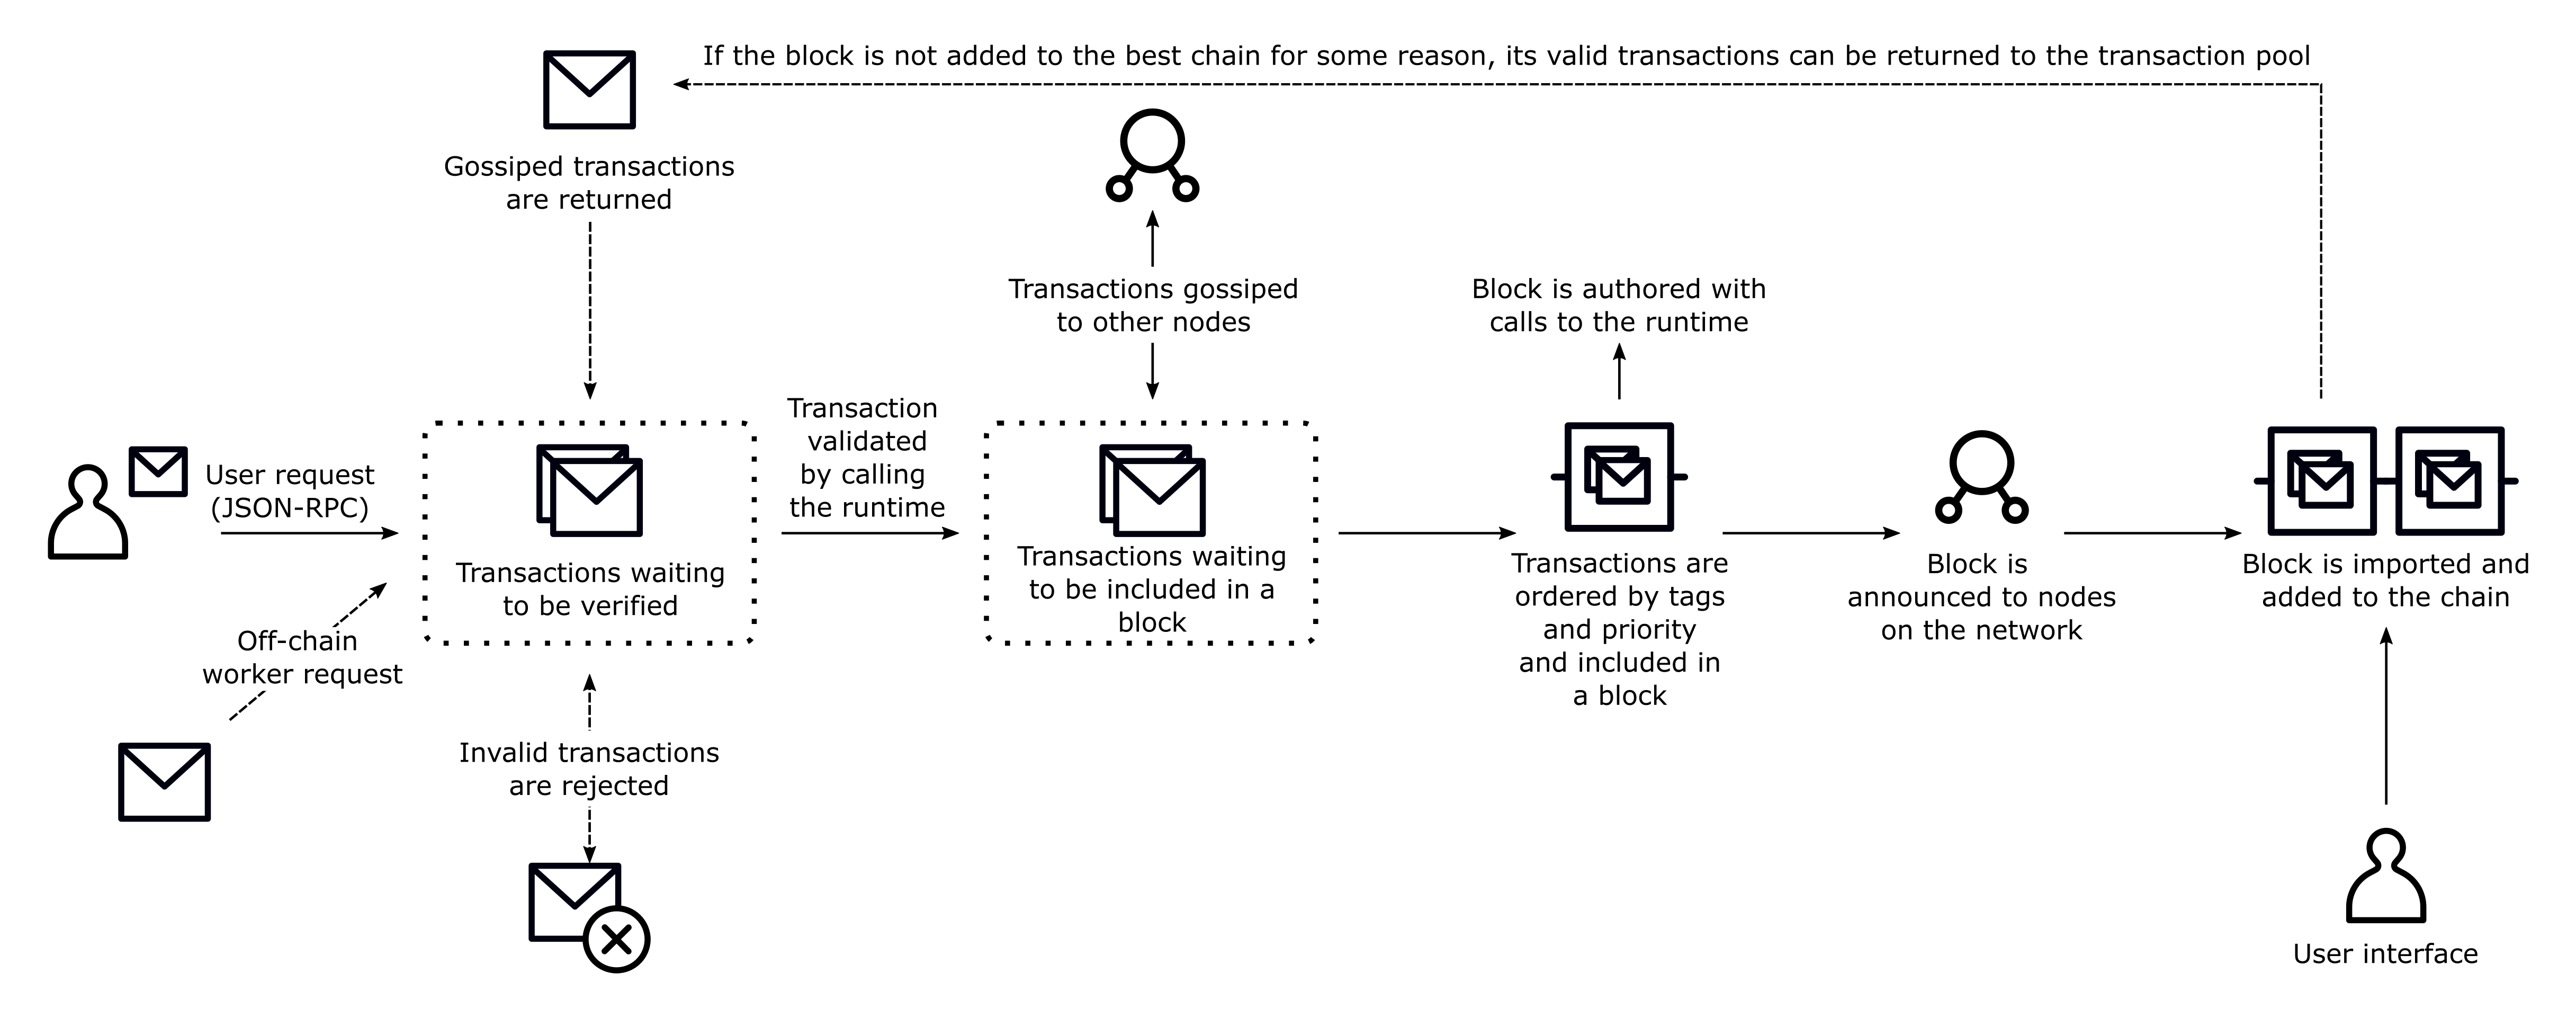
### Validate and Queue
Once a transaction reaches an authoring node, it undergoes an initial validation process to ensure it meets specific conditions defined in the runtime. This validation includes checks for:
- **Correct nonce**: Ensures the transaction is sequentially valid for the account.
- **Sufficient funds**: Confirms the account can cover any associated transaction fees.
- **Signature validity**: Verifies that the sender's signature matches the transaction data.
After these checks, valid transactions are placed in the transaction pool, where they are queued for inclusion in a block. The transaction pool regularly re-validates queued transactions to ensure they remain valid before being processed. To reach consensus, two-thirds of the nodes must agree on the order of the transactions executed and the resulting state change. Transactions are validated and queued on the local node in a transaction pool to prepare for consensus.
#### Transaction Pool
The transaction pool is responsible for managing valid transactions. It ensures that only transactions that pass initial validity checks are queued. Transactions that fail validation, expire, or become invalid for other reasons are removed from the pool.
The transaction pool organizes transactions into two queues:
- **Ready queue**: Transactions that are valid and ready to be included in a block.
- **Future queue**: Transactions that are not yet valid but could be in the future, such as transactions with a nonce too high for the current state.
Details on how the transaction pool validates transactions, including fee and signature handling, can be found in the [`validate_transaction`](https://paritytech.github.io/polkadot-sdk/master/sp_transaction_pool/runtime_api/trait.TaggedTransactionQueue.html#method.validate_transaction) method.
#### Invalid Transactions
If a transaction is invalid, for example, due to an invalid signature or insufficient funds, it is rejected and won't be added to the block. Invalid transactions might be rejected for reasons such as:
- The transaction has already been included in a block.
- The transaction's signature does not match the sender.
- The transaction is too large to fit in the current block.
### Transaction Ordering and Priority
When a node is selected as the next block author, it prioritizes transactions based on weight, length, and tip amount. The goal is to fill the block with high-priority transactions without exceeding its maximum size or computational limits. Transactions are ordered as follows:
- **Inherents first**: Inherent transactions, such as block timestamp updates, are always placed first.
- **Nonce-based ordering**: Transactions from the same account are ordered by their nonce.
- **Fee-based ordering**: Among transactions with the same nonce or priority level, those with higher fees are prioritized.
### Transaction Execution
Once a block author selects transactions from the pool, the transactions are executed in priority order. As each transaction is processed, the state changes are written directly to the chain's storage. It's important to note that these changes are not cached, meaning a failed transaction won't revert earlier state changes, which could leave the block in an inconsistent state.
Events are also written to storage. Runtime logic should not emit an event before performing the associated actions. If the associated transaction fails after the event was emitted, the event will not revert.
## Transaction Mortality
Transactions in the network can be configured as either mortal (with expiration) or immortal (without expiration). Every transaction payload contains a block checkpoint (reference block number and hash) and an era/validity period that determines how many blocks after the checkpoint the transaction remains valid.
When a transaction is submitted, the network validates it against these parameters. If the transaction is not included in a block within the specified validity window, it is automatically removed from the transaction queue.
- **Mortal transactions**: Have a finite lifespan and will expire after a specified number of blocks. For example, a transaction with a block checkpoint of 1000 and a validity period of 64 blocks will be valid from blocks 1000 to 1064.
- **Immortal transactions**: Never expire and remain valid indefinitely. To create an immortal transaction, set the block checkpoint to 0 (genesis block), use the genesis hash as a reference, and set the validity period to 0.
However, immortal transactions pose significant security risks through replay attacks. If an account is reaped (balance drops to zero, account removed) and later re-funded, malicious actors can replay old immortal transactions.
The blockchain maintains only a limited number of prior block hashes for reference validation, called `BlockHashCount`. If your validity period exceeds `BlockHashCount`, the effective validity period becomes the minimum of your specified period and the block hash count.
## Unique Identifiers for Extrinsics
Transaction hashes are **not unique identifiers** in Polkadot SDK-based chains.
Key differences from traditional blockchains:
- Transaction hashes serve only as fingerprints of transaction information.
- Multiple valid transactions can share the same hash.
- Hash uniqueness assumptions lead to serious issues.
For example, when an account is reaped (removed due to insufficient balance) and later recreated, it resets to nonce 0, allowing identical transactions to be valid at different points:
| Block | Extrinsic Index | Hash | Origin | Nonce | Call | Result |
|-------|----------------|------|-----------|-------|---------------------|-------------------------------|
| 100 | 0 | 0x01 | Account A | 0 | Transfer 5 DOT to B | Account A reaped |
| 150 | 5 | 0x02 | Account B | 4 | Transfer 7 DOT to A | Account A created (nonce = 0) |
| 200 | 2 | 0x01 | Account A | 0 | Transfer 5 DOT to B | Successful transaction |
Notice that blocks 100 and 200 contain transactions with identical hashes (0x01) but are completely different, valid operations occurring at different times.
Additional complexity comes from Polkadot SDK's origin abstraction. Origins can represent collectives, governance bodies, or other non-account entities that don't maintain nonces like regular accounts and might dispatch identical calls multiple times with the same hash values. Each execution occurs in different chain states with different results.
The correct way to uniquely identify an extrinsic on a Polkadot SDK-based chain is to use the block ID (height or hash) and the extrinsic index. Since the Polkadot SDK defines blocks as headers plus ordered arrays of extrinsics, the index position within a canonical block provides guaranteed uniqueness.
## Additional Resources
For a video overview of the lifecycle of transactions and the types of transactions that exist, see the [Transaction lifecycle](https://www.youtube.com/watch?v=3pfM0GOp02c) seminar from Parity Tech.
---
Page Title: Transactions and Fees on Asset Hub
- Resolved Markdown: https://docs.polkadot.com/smart-contracts/for-eth-devs/blocks-transactions-fees.md
- Canonical (HTML): https://docs.polkadot.com/smart-contracts/for-eth-devs/blocks-transactions-fees/
- Summary: Explore how Asset Hub smart contracts handle blocks, transactions, and fees with EVM compatibility, supporting various Ethereum transaction types.
- Word Count: 731; Token Estimate: 1091
- Last Updated: 2026-06-04T16:08:37+00:00
- Version Hash: sha256:ef45e08c061ad481f6cd10ffd6c86c9ae4019244ff5ef5ad3f2c35f5707d1f2b
# Blocks, Transactions, and Fees
## Introduction
Asset Hub smart contracts operate within the Polkadot ecosystem using the [`pallet_revive`](https://paritytech.github.io/polkadot-sdk/master/pallet_revive/) implementation, which provides EVM compatibility. While many aspects of blocks and transactions are inherited from the underlying parachain architecture, there are specific considerations and mechanisms unique to smart contract operations on Asset Hub.
## Smart Contract Blocks
Smart contract blocks in Asset Hub follow the same fundamental structure as parachain blocks, inheriting all standard parachain block components. The `pallet_revive` implementation maintains this consistency while adding necessary [EVM-specific features](https://paritytech.github.io/polkadot-sdk/master/pallet_revive/evm). For detailed implementation specifics, the [`Block`](https://paritytech.github.io/polkadot-sdk/master/pallet_revive/evm/struct.Block.html) struct in `pallet_revive` demonstrates how parachain and smart contract block implementations align.
## Smart Contract Transactions
Asset Hub implements a sophisticated transaction system that supports various transaction types and formats, encompassing both traditional parachain operations and EVM-specific interactions.
### EVM Transaction Types
The system provides a fundamental [`eth_transact`](https://paritytech.github.io/polkadot-sdk/master/pallet_revive/pallet/dispatchables/fn.eth_transact.html) interface for processing raw EVM transactions dispatched through [Ethereum JSON-RPC APIs](/smart-contracts/for-eth-devs/json-rpc-apis/). This interface acts as a wrapper for Ethereum transactions, requiring an encoded signed transaction payload, though it cannot be dispatched directly. Building upon this foundation, the system supports multiple transaction formats to accommodate different use cases and optimization needs:
- **[Legacy transactions](https://paritytech.github.io/polkadot-sdk/master/pallet_revive/evm/struct.TransactionLegacyUnsigned.html)**: The original Ethereum transaction format, providing basic transfer and contract interaction capabilities. These transactions use a simple pricing mechanism and are supported for backward compatibility.
- **[EIP-1559 transactions](https://paritytech.github.io/polkadot-sdk/master/pallet_revive/evm/struct.Transaction1559Unsigned.html)**: An improved transaction format that introduces a more predictable fee mechanism with base fee and priority fee components. This format helps optimize gas fee estimation and network congestion management.
- **[EIP-2930 transactions](https://paritytech.github.io/polkadot-sdk/master/pallet_revive/evm/struct.Transaction2930Unsigned.html)**: Introduces access lists to optimize gas costs for contract interactions by pre-declaring accessed addresses and storage slots.
- **[EIP-4844 transactions](https://paritytech.github.io/polkadot-sdk/master/pallet_revive/evm/struct.Transaction4844Unsigned.html)**: Implements blob-carrying transactions, designed to optimize Layer 2 scaling solutions by providing dedicated space for roll-up data.
Each transaction type can exist in both signed and unsigned states, with appropriate validation and processing mechanisms for each.
## Fees and Gas
Asset Hub implements a sophisticated resource management system that combines parachain transaction fees with EVM gas mechanics, providing both Ethereum compatibility and enhanced features.
### Gas Model Overview
Gas serves as the fundamental unit for measuring computational costs, with each network operation consuming a specified amount. This implementation maintains compatibility with Ethereum's approach while adding parachain-specific optimizations.
- **Dynamic gas scaling**: Asset Hub implements a dynamic pricing mechanism that reflects actual execution performance. This results in:
- More efficient pricing for computational instructions relative to I/O operations.
- Better correlation between gas costs and actual resource consumption.
- Need for developers to implement flexible gas calculation rather than hardcoding values.
- **Multi-dimensional resource metering**: Asset Hub extends beyond the traditional single-metric gas model to track three distinct resources.
- `ref_time` (computation time):
- Functions as traditional gas equivalent.
- Measures actual computational resource usage.
- Primary metric for basic operation costs.
- `proof_size` (verification overhead):
- Tracks state proof size required for validator verification.
- Helps manage consensus-related resource consumption.
- Important for cross-chain operations.
- `storage_deposit` (state management):
- Manages blockchain state growth.
- Implements a deposit-based system for long-term storage.
- Refundable when storage is freed.
These resources can be limited at both transaction and contract levels, similar to Ethereum's gas limits. For more information, check the [Gas Model](/smart-contracts/for-eth-devs/gas-model/) documentation.
### Fee Components
- Base fees:
- Storage deposit for contract deployment.
- Minimum transaction fee for network access.
- Network maintenance costs.
- Execution fees:
- Computed based on gas consumption.
- Converted to native currency using network-defined rates.
- Reflects actual computational resource usage.
- Storage fees:
- Deposit for long-term storage usage.
- Refundable when storage is freed.
- Helps prevent state bloat.
### Gas Calculation and Conversion
The system maintains precise conversion mechanisms between:
- Substrate weights and EVM gas units.
- Native currency and gas costs.
- Different resource metrics within the multi-dimensional model.
This ensures accurate fee calculation while maintaining compatibility with existing Ethereum tools and workflows.
---
Page Title: Transactions Weights and Fees
- Resolved Markdown: https://docs.polkadot.com/reference/parachains/blocks-transactions-fees/fees.md
- Canonical (HTML): https://docs.polkadot.com/reference/parachains/blocks-transactions-fees/fees/
- Summary: Overview of transaction weights and fees in Polkadot SDK chains, detailing how fees are calculated using a defined formula and runtime specifics.
- Word Count: 2826; Token Estimate: 4200
- Last Updated: 2026-05-27T20:25:14+00:00
- Version Hash: sha256:a9b6429d3b95d59c930a3ec6dd4aecea4f5c2a7bd6eb4cea480ce3a4e34785e7
# Transactions Weights and Fees
## Introductions
When transactions are executed, or data is stored on-chain, the activity changes the chain's state and consumes blockchain resources. Because the resources available to a blockchain are limited, managing how operations on-chain consume them is important. In addition to being limited in practical terms, such as storage capacity, blockchain resources represent a potential attack vector for malicious users. For example, a malicious user might attempt to overload the network with messages to stop the network from producing new blocks. To protect blockchain resources from being drained or overloaded, you need to manage how they are made available and how they are consumed. The resources to be aware of include:
- Memory usage
- Storage input and output
- Computation
- Transaction and block size
- State database size
The Polkadot SDK provides block authors with several ways to manage access to resources and to prevent individual components of the chain from consuming too much of any single resource. Two of the most important mechanisms available to block authors are weights and transaction fees.
Weights manage the time it takes to validate a block and characterize the time it takes to execute the calls in the block's body. By controlling the execution time a block can consume, weights set limits on storage input, output, and computation.
Some of the weight allowed for a block is consumed as part of the block's initialization and finalization. The weight might also be used to execute mandatory inherent extrinsic calls. To help ensure blocks don’t consume too much execution time and prevent malicious users from overloading the system with unnecessary calls, weights are combined with transaction fees.
[Transaction fees](/reference/parachains/blocks-transactions-fees/transactions/#transaction-fees) provide an economic incentive to limit execution time, computation, and the number of calls required to perform operations. Transaction fees are also used to make the blockchain economically sustainable because they are typically applied to transactions initiated by users and deducted before a transaction request is executed.
## How Fees are Calculated
The final fee for a transaction is calculated using the following parameters:
- **`base fee`**: This is the minimum amount a user pays for a transaction. It is declared a base weight in the runtime and converted to a fee using the [`WeightToFee`](https://docs.rs/pallet-transaction-payment/latest/pallet_transaction_payment/pallet/trait.Config.html#associatedtype.WeightToFee) conversion.
- **`weight fee`**: A fee proportional to the execution time (input and output and computation) that a transaction consumes.
- **`length fee`**: A fee proportional to the encoded length of the transaction.
- **`tip`**: An optional tip to increase the transaction’s priority, giving it a higher chance to be included in the transaction queue.
The base fee and proportional weight and length fees constitute the inclusion fee. The inclusion fee is the minimum fee that must be available for a transaction to be included in a block.
```text
inclusion fee = base fee + weight fee + length fee
```
Transaction fees are withdrawn before the transaction is executed. After the transaction is executed, the weight can be adjusted to reflect the resources used. If a transaction uses fewer resources than expected, the transaction fee is corrected, and the adjusted transaction fee is deposited.
## Using the Transaction Payment Pallet
The [Transaction Payment pallet](https://github.com/paritytech/polkadot-sdk/tree/polkadot-stable2603/substrate/frame/transaction-payment) provides the basic logic for calculating the inclusion fee. You can also use the Transaction Payment pallet to:
- Convert a weight value into a deductible fee based on a currency type using [`Config::WeightToFee`](https://docs.rs/pallet-transaction-payment/latest/pallet_transaction_payment/pallet/trait.Config.html#associatedtype.WeightToFee).
- Update the fee for the next block by defining a multiplier based on the chain’s final state at the end of the previous block using [`Config::FeeMultiplierUpdate`](https://docs.rs/pallet-transaction-payment/latest/pallet_transaction_payment/pallet/trait.Config.html#associatedtype.FeeMultiplierUpdate).
- Manage the withdrawal, refund, and deposit of transaction fees using [`Config::OnChargeTransaction`](https://docs.rs/pallet-transaction-payment/latest/pallet_transaction_payment/pallet/trait.Config.html#associatedtype.OnChargeTransaction).
You can learn more about these configuration traits in the [Transaction Payment documentation](https://paritytech.github.io/polkadot-sdk/master/pallet_transaction_payment/index.html).
### Understanding the Inclusion Fee
The formula for calculating the inclusion fee is as follows:
```text
inclusion_fee = base_fee + length_fee + [targeted_fee_adjustment * weight_fee]
```
And then, for calculating the final fee:
```text
final_fee = inclusion_fee + tip
```
In the first formula, the `targeted_fee_adjustment` is a multiplier that can tune the final fee based on the network’s congestion.
- The `base_fee` derived from the base weight covers inclusion overhead like signature verification.
- The `length_fee` is a per-byte fee that is multiplied by the length of the encoded extrinsic.
- The `weight_fee` fee is calculated using two parameters:
- The `ExtrinsicBaseWeight` that is declared in the runtime and applies to all extrinsics.
- The `#[pallet::weight]` annotation that accounts for an extrinsic's complexity.
To convert the weight to `Currency`, the runtime must define a `WeightToFee` struct that implements a conversion function, [`Convert`](https://docs.rs/pallet-transaction-payment/latest/pallet_transaction_payment/pallet/struct.Pallet.html#method.weight_to_fee).
Note that the extrinsic sender is charged the inclusion fee before the extrinsic is invoked. The fee is deducted from the sender's balance even if the transaction fails upon execution.
### Accounts with an Insufficient Balance
If an account does not have a sufficient balance to pay the inclusion fee and remain alive—that is, enough to pay the inclusion fee and maintain the minimum existential deposit—then you should ensure the transaction is canceled so that no fee is deducted and the transaction does not begin execution.
The Polkadot SDK doesn't enforce this rollback behavior. However, this scenario would be rare because the transaction queue and block-making logic perform checks to prevent it before adding an extrinsic to a block.
### Fee Multipliers
The inclusion fee formula always results in the same fee for the same input. However, weight can be dynamic and—based on how [`WeightToFee`](https://docs.rs/pallet-transaction-payment/latest/pallet_transaction_payment/pallet/trait.Config.html#associatedtype.WeightToFee) is defined—the final fee can include some degree of variability.
The Transaction Payment pallet provides the [`FeeMultiplierUpdate`](https://docs.rs/pallet-transaction-payment/latest/pallet_transaction_payment/pallet/trait.Config.html#associatedtype.FeeMultiplierUpdate) configurable parameter to account for this variability.
The Polkadot network inspires the default update function and implements a targeted adjustment in which a target saturation level of block weight is defined. If the previous block is more saturated, the fees increase slightly. Similarly, if the last block has fewer transactions than the target, fees are decreased by a small amount. For more information about fee multiplier adjustments, see the [Polkadot wiki](https://wiki.polkadot.com/learn/learn-transactions/#fee-multiplier).
## Transactions with Special Requirements
Inclusion fees must be computable before execution and can only represent fixed logic. Some transactions warrant limiting resources with other strategies. For example:
- Bonds are a type of fee that might be returned or slashed after some on-chain event. For example, you might want to require users to place a bond to participate in a vote. The bond might then be returned at the end of the referendum or slashed if the voter attempted malicious behavior.
- Deposits are fees that might be returned later. For example, you might require users to pay a deposit to execute an operation that uses storage. The user’s deposit could be returned if a subsequent operation frees up storage.
- Burn operations are used to pay for a transaction based on its internal logic. For example, a transaction might burn funds from the sender if the transaction creates new storage items to pay for the increased state size.
- Limits enable you to enforce constant or configurable limits on specific operations. For example, the default [Staking pallet](https://github.com/paritytech/polkadot-sdk/tree/polkadot-stable2603/substrate/frame/staking) only allows nominators to nominate 16 validators to limit the complexity of the validator election process.
It is important to note that if you query the chain for a transaction fee, it only returns the inclusion fee.
## Default Weight Annotations
All dispatchable functions in the Polkadot SDK must specify a weight. The way of doing that is using the annotation-based system that lets you combine fixed values for database read/write weight and/or fixed values based on benchmarks. The most basic example would look like this:
```rust
#[pallet::weight(100_000)]
fn my_dispatchable()
```
Note that the [`ExtrinsicBaseWeight`](https://crates.parity.io/frame_support/weights/constants/struct.ExtrinsicBaseWeight.html) is automatically added to the declared weight to account for the costs of simply including an empty extrinsic into a block.
### Weights and Database Read/Write Operations
To make weight annotations independent of the deployed database backend, they are defined as a constant and then used in the annotations when expressing database accesses performed by the dispatchable:
```rust
#[pallet::weight(T::DbWeight::get().reads_writes(1, 2) + 20_000)]
fn my_dispatchable()
```
This dispatchable allows one database to read and two to write, in addition to other things that add the additional 20,000. Database access is generally every time a value declared inside the [`#[pallet::storage]`](https://paritytech.github.io/polkadot-sdk/master/frame_support/pallet_macros/attr.storage.html) block is accessed. However, unique accesses are counted because after a value is accessed, it is cached, and reaccessing it does not result in a database operation. That is:
- Multiple reads of the exact value count as one read.
- Multiple writes of the exact value count as one write.
- Multiple reads of the same value, followed by a write to that value, count as one read and one write.
- A write followed by a read-only counts as one write.
### Dispatch Classes
Dispatches are broken into three classes:
- Normal
- Operational
- Mandatory
If a dispatch is not defined as `Operational` or `Mandatory` in the weight annotation, the dispatch is identified as `Normal` by default. You can specify that the dispatchable uses another class like this:
```rust
#[pallet::dispatch((DispatchClass::Operational))]
fn my_dispatchable()
```
This tuple notation also allows you to specify a final argument determining whether the user is charged based on the annotated weight. If you don't specify otherwise, `Pays::Yes` is assumed:
```rust
#[pallet::dispatch(DispatchClass::Normal, Pays::No)]
fn my_dispatchable()
```
#### Normal Dispatches
Dispatches in this class represent normal user-triggered transactions. These types of dispatches only consume a portion of a block's total weight limit. For information about the maximum portion of a block that can be consumed for normal dispatches, see [`AvailableBlockRatio`](https://paritytech.github.io/polkadot-sdk/master/frame_system/limits/struct.BlockLength.html). Normal dispatches are sent to the transaction pool.
#### Operational Dispatches
Unlike normal dispatches, which represent the usage of network capabilities, operational dispatches are those that provide network capabilities. Operational dispatches can consume the entire weight limit of a block. They are not bound by the [`AvailableBlockRatio`](https://paritytech.github.io/polkadot-sdk/master/frame_system/limits/struct.BlockLength.html). Dispatches in this class are given maximum priority and are exempt from paying the [`length_fee`](https://docs.rs/pallet-transaction-payment/latest/pallet_transaction_payment/).
#### Mandatory Dispatches
Mandatory dispatches are included in a block even if they cause the block to surpass its weight limit. You can only use the mandatory dispatch class for inherent transactions that the block author submits. This dispatch class is intended to represent functions in the block validation process. Because these dispatches are always included in a block regardless of the function weight, the validation process must prevent malicious nodes from abusing the function to craft valid but impossibly heavy blocks. You can typically accomplish this by ensuring that:
- The operation performed is always light.
- The operation can only be included in a block once.
To make it more difficult for malicious nodes to abuse mandatory dispatches, they cannot be included in blocks that return errors. This dispatch class serves the assumption that it is better to allow an overweight block to be created than not to allow any block to be created at all.
### Dynamic Weights
In addition to purely fixed weights and constants, the weight calculation can consider the input arguments of a dispatchable. The weight should be trivially computable from the input arguments with some basic arithmetic:
```rust
use frame_support:: {
dispatch:: {
DispatchClass::Normal,
Pays::Yes,
},
weights::Weight,
};
#[pallet::weight(FunctionOf(
|args: (&Vec,)| args.0.len().saturating_mul(10_000),
)
]
fn handle_users(origin, calls: Vec)
```
## Post Dispatch Weight Correction
Depending on the execution logic, a dispatchable function might consume less weight than was prescribed pre-dispatch. To correct weight, the function declares a different return type and returns its actual weight:
```rust
#[pallet::weight(10_000 + 500_000_000)]
fn expensive_or_cheap(input: u64) -> DispatchResultWithPostInfo {
let was_heavy = do_calculation(input);
if (was_heavy) else {
// Return the actual weight consumed.
Ok(Some(10_000).into())
}
}
```
## Custom Fees
You can also define custom fee systems through custom weight functions or inclusion fee functions.
### Custom Weights
Instead of using the default weight annotations, you can create a custom weight calculation type using the weights module. The custom weight calculation type must implement the following traits:
- [`WeighData`](https://crates.parity.io/frame_support/weights/trait.WeighData.html) to determine the weight of the dispatch.
- [`ClassifyDispatch`](https://crates.parity.io/frame_support/weights/trait.ClassifyDispatch.html) to determine the class of the dispatch.
- [`PaysFee`](https://crates.parity.io/frame_support/weights/trait.PaysFee.html) to determine whether the sender of the dispatch pays fees.
The Polkadot SDK then bundles the output information of the three traits into the [`DispatchInfo`](https://paritytech.github.io/polkadot-sdk/master/frame_support/dispatch/struct.DispatchInfo.html) struct and provides it by implementing the [`GetDispatchInfo`](https://docs.rs/frame-support/latest/frame_support/dispatch/trait.GetDispatchInfo.html) for all `Call` variants and opaque extrinsic types. This is used internally by the System and Executive modules.
`ClassifyDispatch`, `WeighData`, and `PaysFee` are generic over T, which gets resolved into the tuple of all dispatch arguments except for the origin. The following example illustrates a struct that calculates the weight as `m * len(args)`, where `m` is a given multiplier and args is the concatenated tuple of all dispatch arguments. In this example, the dispatch class is `Operational` if the transaction has more than 100 bytes of length in arguments and will pay fees if the encoded length exceeds 10 bytes.
```rust
struct LenWeight(u32);
impl WeighData for LenWeight {
fn weigh_data(&self, target: T) -> Weight {
let multiplier = self.0;
let encoded_len = target.encode().len() as u32;
multiplier * encoded_len
}
}
impl ClassifyDispatch for LenWeight {
fn classify_dispatch(&self, target: T) -> DispatchClass {
let encoded_len = target.encode().len() as u32;
if encoded_len > 100 {
DispatchClass::Operational
} else {
DispatchClass::Normal
}
}
}
impl PaysFee {
fn pays_fee(&self, target: T) -> Pays {
let encoded_len = target.encode().len() as u32;
if encoded_len > 10 {
Pays::Yes
} else {
Pays::No
}
}
}
```
A weight calculator function can also be coerced to the final type of the argument instead of defining it as a vague type that can be encoded. The code would roughly look like this:
```rust
struct CustomWeight;
impl WeighData<(&u32, &u64)> for CustomWeight {
fn weigh_data(&self, target: (&u32, &u64)) -> Weight {
...
}
}
// given a dispatch:
#[pallet::call]
impl, I: 'static> Pallet {
#[pallet::weight(CustomWeight)]
fn foo(a: u32, b: u64)
}
```
In this example, the `CustomWeight` can only be used in conjunction with a dispatch with a particular signature `(u32, u64)`, as opposed to `LenWeight`, which can be used with anything because there aren't any assumptions about ``.
#### Custom Inclusion Fee
The following example illustrates how to customize your inclusion fee. You must configure the appropriate associated types in the respective module.
```rust
// Assume this is the balance type
type Balance = u64;
// Assume we want all the weights to have a `100 + 2 * w` conversion to fees
struct CustomWeightToFee;
impl WeightToFee for CustomWeightToFee {
fn convert(w: Weight) -> Balance {
let a = Balance::from(100);
let b = Balance::from(2);
let w = Balance::from(w);
a + b * w
}
}
parameter_types! {
pub const ExtrinsicBaseWeight: Weight = 10_000_000;
}
impl frame_system::Config for Runtime {
type ExtrinsicBaseWeight = ExtrinsicBaseWeight;
}
parameter_types! {
pub const TransactionByteFee: Balance = 10;
}
impl transaction_payment::Config {
type TransactionByteFee = TransactionByteFee;
type WeightToFee = CustomWeightToFee;
type FeeMultiplierUpdate = TargetedFeeAdjustment;
}
struct TargetedFeeAdjustment(sp_std::marker::PhantomData);
impl> WeightToFee for TargetedFeeAdjustment {
fn convert(multiplier: Fixed128) -> Fixed128 {
// Don't change anything. Put any fee update info here.
multiplier
}
}
```
## Additional Resources
You now know the weight system, how it affects transaction fee computation, and how to specify weights for your dispatchable calls. The next step is determining the correct weight for your dispatchable operations. You can use Substrate benchmarking functions and frame-benchmarking calls to test your functions with different parameters and empirically determine the proper weight in their worst-case scenarios.
- [Benchmark](/parachains/customize-runtime/pallet-development/benchmark-pallet/)
- [`SignedExtension`](https://paritytech.github.io/polkadot-sdk/master/sp_runtime/traits/trait.SignedExtension.html)
- [Custom weights for the Example pallet](https://github.com/paritytech/polkadot-sdk/blob/polkadot-stable2603/substrate/frame/examples/basic/src/weights.rs)
- [Polkadot wiki](https://wiki.polkadot.com/learn/learn-transactions/#fee-multiplier)
---
Page Title: TrUAPI Calls Method Group
- Resolved Markdown: https://docs.polkadot.com/reference/apps/protocol/truapi/calls.md
- Canonical (HTML): https://docs.polkadot.com/reference/apps/protocol/truapi/calls/
- Summary: The lifecycle calls a Product uses to identify itself to its Host, the Host capability introduction, and the setup every TrUAPI group relies on.
- Word Count: 346; Token Estimate: 488
- Last Updated: 2026-06-16T14:17:44+00:00
- Version Hash: sha256:8e182299b6d99250add673ec4b388de746954c934be675a6b752083f0acfacd5
# TrUAPI Calls
## Introduction
The TrUAPI Calls method group is the lifecycle handshake between a Product and its Host. When a Product loads, it identifies itself to the Host; the Host responds with the TrUAPI surface the Product is allowed to use. Every other method group sits on top of this one — a Product cannot invoke any capability until the handshake completes.
For Product developers, this is mostly implicit. The [`@parity/product-sdk`](https://www.npmjs.com/package/@parity/product-sdk) core handles the handshake in `createApp()` and exposes the resulting `App` object that the rest of the SDK relies on. For Host developers, this is the entry point that every Host implementation has to honor.
!!! warning "Provisional"
The exact set of lifecycle calls in this group, their names, parameters, and the precise sequencing the Host enforces during Product load are still being finalized. The conceptual contract below is stable; per-call signatures will be added as the surface confirms.
## Conceptual Contract
Three things have to happen between a Product loading and that Product being able to use the rest of TrUAPI:
- **Product identifies itself**: The Product declares its identity, typically its `.dot` name, so the Host can scope sub-accounts, storage, and topic filters consistently.
- **Host advertises capabilities**: The Host responds with the TrUAPI version it implements and the set of method groups available. A Product can branch on the returned capabilities if it needs to support multiple Hosts with different capability sets.
- **Product completes setup-time configuration**: The Product configures session-level objects, such as the chain client, storage handle, and signer, against the Host context the lifecycle call returned.
After the lifecycle handshake completes, the Product is in steady state: every other call (signing, storage, chat, chain reads) goes through its own method group.
## Where to Go Next
- Learn **Permissions**
---
The next layer after the lifecycle handshake: what capabilities the Host will let the Product actually invoke, based on declared and granted permissions.
[:octicons-arrow-right-24: Reference](/reference/apps/protocol/truapi/permissions/)
---
Page Title: TrUAPI Packages
- Resolved Markdown: https://docs.polkadot.com/reference/apps/protocol/truapi/packages.md
- Canonical (HTML): https://docs.polkadot.com/reference/apps/protocol/truapi/packages/
- Summary: Which SDK package wraps which TrUAPI method group, and where the boundary between Product code and Host code lives in the package reference.
- Word Count: 571; Token Estimate: 1524
- Last Updated: 2026-06-16T14:17:44+00:00
- Version Hash: sha256:70fa5cec59e5f2b08249fda5ad3226e940fd459ba69ae43204ad97ab1075039a
# Packages
## Introduction
A Product developer rarely calls TrUAPI directly. The [`@parity/product-sdk`](https://www.npmjs.com/package/@parity/product-sdk) family of packages is the typed wrapper, and most Products will install one of them per capability they consume. This page maps which package wraps which TrUAPI method group, and which Product-side how-to guide demonstrates each.
!!! warning "Provisional"
Package names and version pins remain provisional while the SDK matures. This page documents known packages and boundaries; exact versions and future package splits are outside the current scope.
## Package Map
| TrUAPI Method Group | SDK Package | Product-Side How-To |
|:-------------------------------------------------------------------------:|:-------------------------------------------------------------------------------------------------------------------------------------------------------------------------------------:|:------------------------------------------------------------------------------:|
| [TrUAPI Calls](/reference/apps/protocol/truapi/calls/) | `@parity/product-sdk` (core) | N/A (lifecycle, implicit) |
| [Permissions](/reference/apps/protocol/truapi/permissions/) | `@parity/product-sdk` (core) | N/A |
| [Local Storage](/reference/apps/protocol/truapi/local-storage/) | [`@parity/product-sdk-local-storage`](https://www.npmjs.com/package/@parity/product-sdk-local-storage) | [Persist Data Locally](/apps/build/persist-data-locally/) |
| [Account Management](/reference/apps/protocol/truapi/account-management/) | [`@parity/product-sdk-signer`](https://www.npmjs.com/package/@parity/product-sdk-signer) / [`@parity/product-sdk-address`](https://www.npmjs.com/package/@parity/product-sdk-address) | [Sign and Submit Transactions](/apps/build/sign-and-submit/) |
| [Signing](/reference/apps/protocol/truapi/signing/) | `@parity/product-sdk-signer` / [`@parity/product-sdk-tx`](https://www.npmjs.com/package/@parity/product-sdk-tx) | [Sign and Submit Transactions](/apps/build/sign-and-submit/) |
| [Chat](/reference/apps/protocol/truapi/chat/) | `@parity/product-sdk` chat APIs | N/A |
| [Statement Store](/reference/apps/protocol/truapi/statement-store/) | [`@parity/product-sdk-statement-store`](https://www.npmjs.com/package/@parity/product-sdk-statement-store) | [Publish and Subscribe to Off-Chain Data](/apps/build/pub-sub-off-chain-data/) |
| [Preimage](/reference/apps/protocol/truapi/preimage/) | [`@parity/product-sdk-host`](https://www.npmjs.com/package/@parity/product-sdk-host) (Preimage manager) | (covered in Bulletin Chain how-to) |
| [Chain Interaction](/reference/apps/protocol/truapi/chain-interaction/) | [`@parity/product-sdk-chain-client`](https://www.npmjs.com/package/@parity/product-sdk-chain-client) and [`polkadot-api`](https://www.npmjs.com/package/polkadot-api) (PAPI) | [Read Chain State](/apps/build/read-chain-state/) |
| [Payment](/reference/apps/protocol/truapi/payment/) | `@parity/product-sdk-tx` and [`@parity/product-sdk-utils`](https://www.npmjs.com/package/@parity/product-sdk-utils) | N/A |
| [Entropy](/reference/apps/protocol/truapi/entropy/) | `@parity/product-sdk` (deterministic entropy derivation) | n/a (forthcoming) |
## The Boundary Between Product Code and Host Code
A useful way to read the package map is by where the package executes:
- **Pure Product packages**: Packages such as `@parity/product-sdk-local-storage`, `@parity/product-sdk-signer`, `@parity/product-sdk-chain-client`, and `@parity/product-sdk-tx` execute inside the Product sandbox. They are typed wrappers that build a TrUAPI call and dispatch it through the Host API. Your Product depends on them at compile time.
- **Product-SDK umbrella**: `@parity/product-sdk` ties them together at the top of a Product and wires up the App / chain / storage surfaces with consistent defaults.
- **Host implementations of TrUAPI**: Host implementations live in the Hosts themselves, not in any Product-side package. A Product does not depend on Host code at compile time; it depends on the Host honoring the TrUAPI contract at run time.
## Where to Go Next
- Learn **Versioning**
---
How package versions map to TrUAPI protocol versions.
[:octicons-arrow-right-24: Reference](/reference/apps/protocol/truapi/versioning/)
---
Page Title: TrUAPI Reference
- Resolved Markdown: https://docs.polkadot.com/reference/apps/protocol/truapi.md
- Canonical (HTML): https://docs.polkadot.com/reference/apps/protocol/truapi/
- Summary: TrUAPI is the protocol between Polkadot Hosts and the Products that run inside them, covering signing, chain interaction, storage, and messaging.
- Word Count: 1050; Token Estimate: 1865
- Last Updated: 2026-06-16T14:17:44+00:00
- Version Hash: sha256:c20b283564b4c165003ad80ae6e0f3e0df3f4fb25bd2b0b7bdd16d140627d68e
# TrUAPI
## Introduction
TrUAPI is the protocol every Polkadot Product uses to talk to the Host running it. It is the _only_ interface a Product has to the rest of the world. Every chain interaction, storage write, outbound request, signing operation, and Proof of Personhood proof crosses this boundary, and the Host on the other side enforces the sandbox.
In the Polkadot Triangle, three Hosts run Products. TrUAPI is the contract by which a Product talks to whichever Host is loading it. Most Product developers will never call TrUAPI directly. The [Product SDK](/reference/glossary/#polkadot-sdk) (the `@parity/product-sdk` family of packages) wraps it in typed methods. The methods you call still go through TrUAPI, and the Host validates and routes everything.
!!! note "TrUAPI and its packages"
TrUAPI is the name of the protocol specification maintained at [`paritytech/truapi`](https://github.com/paritytech/truapi). It ships as two layers of packages: [`@parity/truapi`](https://www.npmjs.com/package/@parity/truapi) is the low-level generated protocol client (the wire), and the [`@parity/product-sdk`](https://www.npmjs.com/package/@parity/product-sdk) family is the higher-level SDK most Products use. This reference uses "TrUAPI" for the protocol surface and names the `@parity/product-sdk-*` package in the [Packages](/reference/apps/protocol/truapi/packages/) table that wraps each group.
This reference documents the protocol surface in three layers:
1. **Conceptual model**: Why the Host-Product boundary exists, what derived sub-accounts mean, and how the sandbox enforces isolation. See [Sandbox and Sub-Accounts](/reference/apps/protocol/truapi/sandbox/).
2. **Operational properties**: The protocol's versioning model and the packages that implement it. See [Versioning](/reference/apps/protocol/truapi/versioning/) and [Packages](/reference/apps/protocol/truapi/packages/).
3. **Method groups**: Eleven groups covering the capabilities a Product reaches for. One page per group is linked in [The Eleven Method Groups](#the-eleven-method-groups). A few host-lifecycle methods sit outside these groups; see the note below.
!!! warning "Provisional"
The complete per-method reference for TrUAPI remains provisional. The method-group pages below cover what each group is for and the conceptual contract; the exhaustive per-method signatures, parameter shapes, and return types will be added as the surface stabilizes.
## Two Audiences
TrUAPI has two distinct readerships, and the per-method pages are written to serve both at once:
- **Product developers**: You build Products that call the TrUAPI surface. You need to know what each method does, what permissions gate it, what it returns, and how the Product SDK wraps it.
- **Host developers**: You build Hosts that implement the TrUAPI surface. You need to know what each method must guarantee, how to validate the Product's call, and how to enforce the sandbox at every entry point.
A Product developer can usually rely on the Product SDK (the [`@parity/product-sdk`](https://www.npmjs.com/package/@parity/product-sdk) family of packages) and never call TrUAPI directly. A Host developer is reading the same pages to know what the SDK calls underneath, and what their Host has to honor.
## The Eleven Method Groups
| Group | Covers |
|:-----------------------------------------------------------------------------------------:|:----------------------------------------------------------------------------------------------------:|
| [TrUAPI Calls](/reference/apps/protocol/truapi/calls/) | The lifecycle calls Products use to identify themselves and the Host uses to introduce capabilities. |
| [Permissions](/reference/apps/protocol/truapi/permissions/) | Declaring, querying, and gating on Product capabilities. |
| [Local Storage](/reference/apps/protocol/truapi/local-storage/) | The `KvStore` API for per-Product, per-device key-value persistence. |
| [Account Management](/reference/apps/protocol/truapi/account-management/) | Resolving per-Product sub-accounts and reading their state. |
| [Signing](/reference/apps/protocol/truapi/signing/) | The mediated signing flow for building transactions and dispatching them through the paired App. |
| [Chat](/reference/apps/protocol/truapi/chat/) | Room and bot registration, typed message publishing, custom message rendering. |
| [Statement Store](/reference/apps/protocol/truapi/statement-store/) | Publishing and subscribing to gossip-distributed signed statements on People Chain. |
| [Preimage](/reference/apps/protocol/truapi/preimage/) | Off-chain content addressed by hash for on-chain operations to dereference. |
| [Chain Interaction](/reference/apps/protocol/truapi/chain-interaction/) | Reading chain state and subscribing to changes through the Host. |
| [Payment](/reference/apps/protocol/truapi/payment/) | Payment-flow primitives (general `Balances` transfers and the Pocket flow). |
| [Entropy](/reference/apps/protocol/truapi/entropy/) | Deterministic per-Product entropy derived from the user's root key (key-derivation, not randomness). |
!!! note "Methods outside the eleven groups"
A small number of host-lifecycle methods in the TrUAPI v0.2 spec are not part of any of the eleven groups above — `host_navigate_to`, `host_push_notification`, and `host_feature_supported`. They are Host-environment hooks rather than Product capabilities, and are documented per-Host rather than in this protocol surface.
!!! warning "Cross-Host conformance is the target, not yet the guarantee"
TrUAPI is specified as a single canonical surface, and the intent is that a Product runs unchanged across every Host. Today that holds between Polkadot Web and Polkadot Desktop, which share the TypeScript host-container (SCALE, `host_*` calls). The mobile Polkadot App — the canonical signer for transactions — currently exposes a hand-written JSON bridge whose method names differ from the spec and, in places, between iOS and Android. Treat "the same surface on every Host" as the conformance goal the spec defines, not a settled property of every shipping Host. See the cross-host conformance tracking in the SDK team's work.
## High-Level Diagram
!!! warning "Provisional"
The canonical TrUAPI architecture diagram showing the Host, the Product, the SDK layers in between, and the eleven method groups as a single map — is still being finalized. It will be embedded here and referenced from the section overview once confirmed.
## Where to Go Next
- Learn **Sandbox and Sub-Accounts**
---
Why a Product gets a derived sub-account rather than the user's root identity, and why the Host API is the only egress.
[:octicons-arrow-right-24: Reference](/reference/apps/protocol/truapi/sandbox/)
- Learn **Versioning**
---
How TrUAPI versions evolve and what compatibility a Product can rely on across them.
[:octicons-arrow-right-24: Reference](/reference/apps/protocol/truapi/versioning/)
- Learn **Packages**
---
The package map: which SDK package wraps which TrUAPI method group, and where the boundary between Product code and Host code lives.
[:octicons-arrow-right-24: Reference](/reference/apps/protocol/truapi/packages/)
---
Page Title: TrUAPI Versioning
- Resolved Markdown: https://docs.polkadot.com/reference/apps/protocol/truapi/versioning.md
- Canonical (HTML): https://docs.polkadot.com/reference/apps/protocol/truapi/versioning/
- Summary: How TrUAPI versions evolve, what compatibility a Product can rely on across Host versions, and how to target a specific version range safely.
- Word Count: 543; Token Estimate: 716
- Last Updated: 2026-06-16T14:17:44+00:00
- Version Hash: sha256:e4a73d2978cc0492a33ee5497bbad3be5662a9b1333228c72c013823bb6ecd20
# Versioning
## Introduction
TrUAPI is versioned. A Host implements a specific version of the protocol; a Product is built against a specific version range; the SDK abstracts most version differences but cannot bridge across breaking changes. This page documents the versioning model so a Product developer knows what to declare and what to expect.
!!! warning "Provisional"
The detailed compatibility rules between TrUAPI versions, the canonical version number a Product manifest declares, and the deprecation policy for older versions are still being finalized. This page documents the conceptual model; the operational reference will be added once those details are confirmed.
## What a Version Number Identifies
A TrUAPI version identifies the set of method groups, their signatures, and their semantics as a single coherent surface. Two Hosts running the same version of TrUAPI must accept the same calls with the same parameters and return values with the same shape; a Product targeting that version can rely on consistent behavior across them.
A change between two versions can be:
- **Additive**: New methods or new optional parameters. A Product targeting the older version still works against a Host on the newer version.
- **Behavioral**: Same signature, different behavior. This is surfaced as a version bump with a documented behavior change; a Product targeting the older version may need to retest.
- **Breaking**: Removed or renamed methods, changed parameter shapes. A Product targeting an incompatible older version will not run on a Host that has dropped that version.
## What a Product Targets
A Product declares the TrUAPI version range it requires. The Host inspects the declaration on load and either runs the Product (compatibility OK) or refuses to load it (compatibility mismatch, with a user-visible explanation).
Most Products will target a single version line and let the SDK abstract the per-call wrapping. Reaching directly into TrUAPI in code that bypasses the SDK is the most common reason a Product breaks across a version change, because the SDK is the layer that smooths over compatible changes.
## How the SDK Maps to Versions
!!! warning "Roadmap"
The version-range model and SDK-to-protocol mapping described in this section are the intended design, not what ships today. The shipping protocol is a single version line (`v1`); manifest version-ranges and lockstep SDK versioning are not yet implemented. This section describes where versioning is headed.
The intent is for the [`@parity/product-sdk`](https://www.npmjs.com/package/@parity/product-sdk) family of packages to be versioned in lockstep with the TrUAPI versions they wrap, so that a given SDK version targets a specific TrUAPI version line and pinning your SDK pins your TrUAPI surface implicitly.
Under that model, when TrUAPI introduces a behavioral change the SDK would absorb it where it can; where it cannot (a removed method, an incompatible parameter), it would bump a major version, and a Product's upgrade path would be to update the SDK pin and re-test against the new TrUAPI surface.
For the package map, see [Packages](/reference/apps/protocol/truapi/packages/).
## Where to Go Next
- Learn **Packages**
---
Which SDK package wraps which TrUAPI method group, and how SDK versions map to TrUAPI versions.
[:octicons-arrow-right-24: Reference](/reference/apps/protocol/truapi/packages/)
---
Page Title: Visiting a Product on Polkadot Web
- Resolved Markdown: https://docs.polkadot.com/reference/apps/hosts/polkadot-web/visiting.md
- Canonical (HTML): https://docs.polkadot.com/reference/apps/hosts/polkadot-web/visiting/
- Summary: How Polkadot Web resolves a .dot name and loads the resulting Product inside a browser tab, including the visiting flow that differs from Desktop.
- Word Count: 428; Token Estimate: 592
- Last Updated: 2026-06-16T14:17:44+00:00
- Version Hash: sha256:910df157ce7e22b0f911f9dc0331253ee1a17cd24d7c5d6862ee3f1c34ac8f7a
# Visiting a Product
## Introduction
The defining flow of Polkadot Web is visiting a Polkadot Product by its `.dot` name from inside a regular browser tab. The mechanism is conceptually the same as Polkadot Desktop's address-bar resolution, but the delivery is different. There is no installed application, and the entry point is a URL.
This page is the reference for what happens between the user typing a `.dot` name and the Product running inside the Web Host.
## The Visiting Flow
From the user's perspective:
1. The user navigates to `https://.dot.li` (or otherwise enters a `.dot` name in the Web Host's UI).
2. Web resolves the `.dot` name through DotNS, retrieving the content reference (CID) for the published Product bundle.
3. Web fetches the bundle from the Bulletin Chain (or its delivery layer) by CID.
4. Web prepares the sandboxed container the Product will run inside and loads the bundle.
5. The Product is now running in the user's browser, with the Host API available for it to call.
If the user is not already signed in via their Polkadot App, the Host triggers the pairing handshake before any signed action becomes possible. Reading chain state, browsing the Product's UI, and interacting with anything that does not require signing all work before sign-in.
## How This Differs from Polkadot Desktop
The Product's experience is the same; the path to the Product is what differs:
- **No installer**: Desktop is a specialized browser the user installs; Web is a URL.
- **Browser-tab entry**: Web inherits the browser's history, back/forward, and tab model. A Product on Web behaves more like a navigated webpage than an opened application.
- **Updates on load**: Each visit fetches the published bundle. Web has no "update available" prompt. The user gets the version DotNS resolves to for that visit.
The trade-off is on the trust surface: Web depends on the user's browser as part of its runtime. The Host can verify the bundle it fetched matches the CID DotNS resolved to, but the user has to trust the browser to honor the sandbox. The [Shield States](/reference/apps/hosts/polkadot-web/shield-states/) reference documents how Web surfaces this trust posture in its UI.
## Where to Go Next
- Learn **Shield States**
---
How Polkadot Web surfaces the trust posture of the loaded Product, including what each shield state means and when it changes.
[:octicons-arrow-right-24: Reference](/reference/apps/hosts/polkadot-web/shield-states/)